Table of Contents
- 15.1 Introduction to InnoDB
- 15.2 InnoDB and the ACID Model
- 15.3 InnoDB Multi-Versioning
- 15.4 InnoDB Architecture
- 15.5 InnoDB In-Memory Structures
- 15.6 InnoDB On-Disk Structures
- 15.7 InnoDB Locking and Transaction Model
- 15.8 InnoDB Configuration
- 15.8.1 InnoDB Startup Configuration
- 15.8.2 Configuring InnoDB for Read-Only Operation
- 15.8.3 InnoDB Buffer Pool Configuration
- 15.8.4 Configuring Thread Concurrency for InnoDB
- 15.8.5 Configuring the Number of Background InnoDB I/O Threads
- 15.8.6 Using Asynchronous I/O on Linux
- 15.8.7 Configuring InnoDB I/O Capacity
- 15.8.8 Configuring Spin Lock Polling
- 15.8.9 Purge Configuration
- 15.8.10 Configuring Optimizer Statistics for InnoDB
- 15.8.11 Configuring the Merge Threshold for Index Pages
- 15.8.12 Enabling Automatic Configuration for a Dedicated MySQL Server
- 15.9 InnoDB Table and Page Compression
- 15.10 InnoDB Row Formats
- 15.11 InnoDB Disk I/O and File Space Management
- 15.12 InnoDB and Online DDL
- 15.13 InnoDB Data-at-Rest Encryption
- 15.14 InnoDB Startup Options and System Variables
- 15.15 InnoDB INFORMATION_SCHEMA Tables
- 15.15.1 InnoDB INFORMATION_SCHEMA Tables about Compression
- 15.15.2 InnoDB INFORMATION_SCHEMA Transaction and Locking Information
- 15.15.3 InnoDB INFORMATION_SCHEMA Schema Object Tables
- 15.15.4 InnoDB INFORMATION_SCHEMA FULLTEXT Index Tables
- 15.15.5 InnoDB INFORMATION_SCHEMA Buffer Pool Tables
- 15.15.6 InnoDB INFORMATION_SCHEMA Metrics Table
- 15.15.7 InnoDB INFORMATION_SCHEMA Temporary Table Info Table
- 15.15.8 Retrieving InnoDB Tablespace Metadata from INFORMATION_SCHEMA.FILES
- 15.16 InnoDB Integration with MySQL Performance Schema
- 15.17 InnoDB Monitors
- 15.18 InnoDB Backup and Recovery
- 15.19 InnoDB and MySQL Replication
- 15.20 InnoDB memcached Plugin
- 15.20.1 Benefits of the InnoDB memcached Plugin
- 15.20.2 InnoDB memcached Architecture
- 15.20.3 Setting Up the InnoDB memcached Plugin
- 15.20.4 InnoDB memcached Multiple get and Range Query Support
- 15.20.5 Security Considerations for the InnoDB memcached Plugin
- 15.20.6 Writing Applications for the InnoDB memcached Plugin
- 15.20.7 The InnoDB memcached Plugin and Replication
- 15.20.8 InnoDB memcached Plugin Internals
- 15.20.9 Troubleshooting the InnoDB memcached Plugin
- 15.21 InnoDB Troubleshooting
- 15.22 InnoDB Limits
- 15.23 InnoDB Restrictions and Limitations
InnoDB is a general-purpose storage engine that
balances high reliability and high performance. In MySQL
8.0, InnoDB is the default MySQL
storage engine. Unless you have configured a different default
storage engine, issuing a CREATE
TABLE statement without an ENGINE=
clause creates an InnoDB table.
Key Advantages of InnoDB
Its DML operations follow the ACID model, with transactions featuring commit, rollback, and crash-recovery capabilities to protect user data. See Section 15.2, “InnoDB and the ACID Model” for more information.
Row-level locking and Oracle-style consistent reads increase multi-user concurrency and performance. See Section 15.7, “InnoDB Locking and Transaction Model” for more information.
InnoDBtables arrange your data on disk to optimize queries based on primary keys. EachInnoDBtable has a primary key index called the clustered index that organizes the data to minimize I/O for primary key lookups. See Section 15.6.2.1, “Clustered and Secondary Indexes” for more information.To maintain data integrity,
InnoDBsupportsFOREIGN KEYconstraints. With foreign keys, inserts, updates, and deletes are checked to ensure they do not result in inconsistencies across different tables. See Section 13.1.20.5, “FOREIGN KEY Constraints” for more information.
Table 15.1 InnoDB Storage Engine Features
| Feature | Support |
|---|---|
| B-tree indexes | Yes |
| Backup/point-in-time recovery (Implemented in the server, rather than in the storage engine.) | Yes |
| Cluster database support | No |
| Clustered indexes | Yes |
| Compressed data | Yes |
| Data caches | Yes |
| Encrypted data | Yes (Implemented in the server via encryption functions; In MySQL 5.7 and later, data-at-rest tablespace encryption is supported.) |
| Foreign key support | Yes |
| Full-text search indexes | Yes (InnoDB support for FULLTEXT indexes is available in MySQL 5.6 and later.) |
| Geospatial data type support | Yes |
| Geospatial indexing support | Yes (InnoDB support for geospatial indexing is available in MySQL 5.7 and later.) |
| Hash indexes | No (InnoDB utilizes hash indexes internally for its Adaptive Hash Index feature.) |
| Index caches | Yes |
| Locking granularity | Row |
| MVCC | Yes |
| Replication support (Implemented in the server, rather than in the storage engine.) | Yes |
| Storage limits | 64TB |
| T-tree indexes | No |
| Transactions | Yes |
| Update statistics for data dictionary | Yes |
To compare the features of InnoDB with other
storage engines provided with MySQL, see the Storage
Engine Features table in
Chapter 16, Alternative Storage Engines.
InnoDB Enhancements and New Features
For information about InnoDB enhancements and new
features, refer to:
The
InnoDBenhancements list in Section 1.3, “What Is New in MySQL 8.0”.The Release Notes.
Additional InnoDB Information and Resources
For
InnoDB-related terms and definitions, see the MySQL Glossary.For a forum dedicated to the
InnoDBstorage engine, see MySQL Forums::InnoDB.InnoDBis published under the same GNU GPL License Version 2 (of June 1991) as MySQL. For more information on MySQL licensing, see http://www.mysql.com/company/legal/licensing/.
You may find InnoDB tables beneficial for the
following reasons:
If your server unexpectedly exits because of a hardware or software issue, regardless of what was happening in the database at the time, you don't need to do anything special after restarting the database.
InnoDBcrash recovery automatically finalizes any changes that were committed before the time of the crash, and undoes any changes that were in process but not committed. Just restart and continue where you left off.The
InnoDBstorage engine maintains its own buffer pool that caches table and index data in main memory as data is accessed. Frequently used data is processed directly from memory. This cache applies to many types of information and speeds up processing. On dedicated database servers, up to 80% of physical memory is often assigned to the buffer pool.If you split up related data into different tables, you can set up foreign keys that enforce referential integrity. Update or delete data, and the related data in other tables is updated or deleted automatically. Try to insert data into a secondary table without corresponding data in the primary table, and the bad data gets kicked out automatically.
If data becomes corrupted on disk or in memory, a checksum mechanism alerts you to the bogus data before you use it.
When you design your database with appropriate primary key columns for each table, operations involving those columns are automatically optimized. It is very fast to reference the primary key columns in
WHEREclauses,ORDER BYclauses,GROUP BYclauses, and join operations.Inserts, updates, and deletes are optimized by an automatic mechanism called change buffering.
InnoDBnot only allows concurrent read and write access to the same table, it caches changed data to streamline disk I/O.Performance benefits are not limited to giant tables with long-running queries. When the same rows are accessed over and over from a table, a feature called the Adaptive Hash Index takes over to make these lookups even faster, as if they came out of a hash table.
You can compress tables and associated indexes.
You can create and drop indexes with much less impact on performance and availability.
Truncating a file-per-table tablespace is very fast, and can free up disk space for the operating system to reuse, rather than freeing up space within the system tablespace that only
InnoDBcan reuse.The storage layout for table data is more efficient for
BLOBand long text fields, with the DYNAMIC row format.You can monitor the internal workings of the storage engine by querying INFORMATION_SCHEMA tables.
You can monitor the performance details of the storage engine by querying Performance Schema tables.
You can freely mix
InnoDBtables with tables from other MySQL storage engines, even within the same statement. For example, you can use a join operation to combine data fromInnoDBandMEMORYtables in a single query.InnoDBhas been designed for CPU efficiency and maximum performance when processing large data volumes.InnoDBtables can handle large quantities of data, even on operating systems where file size is limited to 2GB.
For InnoDB-specific tuning techniques you can
apply in your application code, see
Section 8.5, “Optimizing for InnoDB Tables”.
This section describes best practices when using
InnoDB tables.
Specifying a primary key for every table using the most frequently queried column or columns, or an auto-increment value if there is no obvious primary key.
Using joins wherever data is pulled from multiple tables based on identical ID values from those tables. For fast join performance, define foreign keys on the join columns, and declare those columns with the same data type in each table. Adding foreign keys ensures that referenced columns are indexed, which can improve performance. Foreign keys also propagate deletes or updates to all affected tables, and prevent insertion of data in a child table if the corresponding IDs are not present in the parent table.
Turning off autocommit. Committing hundreds of times a second puts a cap on performance (limited by the write speed of your storage device).
Grouping sets of related DML operations into transactions, by bracketing them with
START TRANSACTIONandCOMMITstatements. While you don't want to commit too often, you also don't want to issue huge batches ofINSERT,UPDATE, orDELETEstatements that run for hours without committing.Not using
LOCK TABLESstatements.InnoDBcan handle multiple sessions all reading and writing to the same table at once, without sacrificing reliability or high performance. To get exclusive write access to a set of rows, use theSELECT ... FOR UPDATEsyntax to lock just the rows you intend to update.Enabling the
innodb_file_per_tableoption or using general tablespaces to put the data and indexes for tables into separate files, instead of the system tablespace.The
innodb_file_per_tableoption is enabled by default.Evaluating whether your data and access patterns benefit from the
InnoDBtable or page compression features. You can compressInnoDBtables without sacrificing read/write capability.Running your server with the option
--sql_mode=NO_ENGINE_SUBSTITUTIONto prevent tables being created with a different storage engine if there is an issue with the engine specified in theENGINE=clause ofCREATE TABLE.
Issue the SHOW ENGINES statement to
view the available MySQL storage engines. Look for
DEFAULT in the InnoDB line.
mysql> SHOW ENGINES;
Alternatively, query the
INFORMATION_SCHEMA.ENGINES table.
mysql> SELECT * FROM INFORMATION_SCHEMA.ENGINES;
If InnoDB is not your default storage engine,
you can determine if your database server or applications work
correctly with InnoDB by restarting the server
with
--default-storage-engine=InnoDB
defined on the command line or with
default-storage-engine=innodb
defined in the [mysqld] section of your MySQL
server option file.
Since changing the default storage engine only affects new tables
as they are created, run all your application installation and
setup steps to confirm that everything installs properly. Then
exercise all the application features to make sure all the data
loading, editing, and querying features work. If a table relies on
a feature that is specific to another storage engine, an error is
raised; add the
ENGINE=
clause to the other_engine_nameCREATE TABLE
statement to avoid the error.
If you did not make a deliberate decision about the storage
engine, and you want to preview how certain tables work when
created using InnoDB, issue the command
ALTER TABLE
table_name ENGINE=InnoDB; for each table. Or, to run
test queries and other statements without disturbing the original
table, make a copy:
CREATE TABLE InnoDB_Table (...) ENGINE=InnoDB AS SELECT * FROM other_engine_table;
To assess performance with a full application under a realistic workload, install the latest MySQL server and run benchmarks.
Test the full application lifecycle, from installation, through heavy usage, and server restart. Kill the server process while the database is busy to simulate a power failure, and verify that the data is recovered successfully when you restart the server.
Test any replication configurations, especially if you use different MySQL versions and options on the source server and replicas.
The ACID model is a set of database
design principles that emphasize aspects of reliability that are
important for business data and mission-critical applications. MySQL
includes components such as the InnoDB storage
engine that adhere closely to the ACID model, so that data is not
corrupted and results are not distorted by exceptional conditions
such as software crashes and hardware malfunctions. When you rely on
ACID-compliant features, you do not need to reinvent the wheel of
consistency checking and crash recovery mechanisms. In cases where
you have additional software safeguards, ultra-reliable hardware, or
an application that can tolerate a small amount of data loss or
inconsistency, you can adjust MySQL settings to trade some of the
ACID reliability for greater performance or throughput.
The following sections discuss how MySQL features, in particular the
InnoDB storage engine, interact with the
categories of the ACID model:
A: atomicity.
C: consistency.
I:: isolation.
D: durability.
Atomicity
The atomicity aspect of the ACID
model mainly involves InnoDB
transactions. Related MySQL
features include:
Consistency
The consistency aspect of the ACID
model mainly involves internal InnoDB processing
to protect data from crashes. Related MySQL features include:
InnoDBdoublewrite buffer.InnoDBcrash recovery.
Isolation
The isolation aspect of the ACID
model mainly involves InnoDB
transactions, in particular
the isolation level that
applies to each transaction. Related MySQL features include:
Autocommit setting.
SET ISOLATION LEVELstatement.The low-level details of
InnoDBlocking. During performance tuning, you see these details throughINFORMATION_SCHEMAtables.
Durability
The durability aspect of the ACID model involves MySQL software features interacting with your particular hardware configuration. Because of the many possibilities depending on the capabilities of your CPU, network, and storage devices, this aspect is the most complicated to provide concrete guidelines for. (And those guidelines might take the form of buy “new hardware”.) Related MySQL features include:
InnoDBdoublewrite buffer, turned on and off by theinnodb_doublewriteconfiguration option.Configuration option
innodb_flush_log_at_trx_commit.Configuration option
sync_binlog.Configuration option
innodb_file_per_table.Write buffer in a storage device, such as a disk drive, SSD, or RAID array.
Battery-backed cache in a storage device.
The operating system used to run MySQL, in particular its support for the
fsync()system call.Uninterruptible power supply (UPS) protecting the electrical power to all computer servers and storage devices that run MySQL servers and store MySQL data.
Your backup strategy, such as frequency and types of backups, and backup retention periods.
For distributed or hosted data applications, the particular characteristics of the data centers where the hardware for the MySQL servers is located, and network connections between the data centers.
InnoDB is a
multi-versioned storage engine: it
keeps information about old versions of changed rows, to support
transactional features such as concurrency and
rollback. This information is
stored in the tablespace in a data structure called a
rollback segment (after
an analogous data structure in Oracle). InnoDB
uses the information in the rollback segment to perform the undo
operations needed in a transaction rollback. It also uses the
information to build earlier versions of a row for a
consistent read.
Internally, InnoDB adds three fields to each row
stored in the database. A 6-byte DB_TRX_ID field
indicates the transaction identifier for the last transaction that
inserted or updated the row. Also, a deletion is treated internally
as an update where a special bit in the row is set to mark it as
deleted. Each row also contains a 7-byte
DB_ROLL_PTR field called the roll pointer. The
roll pointer points to an undo log record written to the rollback
segment. If the row was updated, the undo log record contains the
information necessary to rebuild the content of the row before it
was updated. A 6-byte DB_ROW_ID field contains a
row ID that increases monotonically as new rows are inserted. If
InnoDB generates a clustered index automatically,
the index contains row ID values. Otherwise, the
DB_ROW_ID column does not appear in any index.
Undo logs in the rollback segment are divided into insert and update
undo logs. Insert undo logs are needed only in transaction rollback
and can be discarded as soon as the transaction commits. Update undo
logs are used also in consistent reads, but they can be discarded
only after there is no transaction present for which
InnoDB has assigned a snapshot that in a
consistent read could need the information in the update undo log to
build an earlier version of a database row.
Commit your transactions regularly, including those transactions
that issue only consistent reads. Otherwise,
InnoDB cannot discard data from the update undo
logs, and the rollback segment may grow too big, filling up your
tablespace.
The physical size of an undo log record in the rollback segment is typically smaller than the corresponding inserted or updated row. You can use this information to calculate the space needed for your rollback segment.
In the InnoDB multi-versioning scheme, a row is
not physically removed from the database immediately when you delete
it with an SQL statement. InnoDB only physically
removes the corresponding row and its index records when it discards
the update undo log record written for the deletion. This removal
operation is called a purge, and
it is quite fast, usually taking the same order of time as the SQL
statement that did the deletion.
If you insert and delete rows in smallish batches at about the same
rate in the table, the purge thread can start to lag behind and the
table can grow bigger and bigger because of all the
“dead” rows, making everything disk-bound and very
slow. In such a case, throttle new row operations, and allocate more
resources to the purge thread by tuning the
innodb_max_purge_lag system
variable. See Section 15.14, “InnoDB Startup Options and System Variables” for more
information.
InnoDB multiversion concurrency control (MVCC)
treats secondary indexes differently than clustered indexes.
Records in a clustered index are updated in-place, and their
hidden system columns point undo log entries from which earlier
versions of records can be reconstructed. Unlike clustered index
records, secondary index records do not contain hidden system
columns nor are they updated in-place.
When a secondary index column is updated, old secondary index
records are delete-marked, new records are inserted, and
delete-marked records are eventually purged. When a secondary
index record is delete-marked or the secondary index page is
updated by a newer transaction, InnoDB looks up
the database record in the clustered index. In the clustered
index, the record's DB_TRX_ID is checked, and
the correct version of the record is retrieved from the undo log
if the record was modified after the reading transaction was
initiated.
If a secondary index record is marked for deletion or the
secondary index page is updated by a newer transaction, the
covering index
technique is not used. Instead of returning values from the index
structure, InnoDB looks up the record in the
clustered index.
However, if the
index
condition pushdown (ICP) optimization is enabled, and parts
of the WHERE condition can be evaluated using
only fields from the index, the MySQL server still pushes this
part of the WHERE condition down to the storage
engine where it is evaluated using the index. If no matching
records are found, the clustered index lookup is avoided. If
matching records are found, even among delete-marked records,
InnoDB looks up the record in the clustered
index.
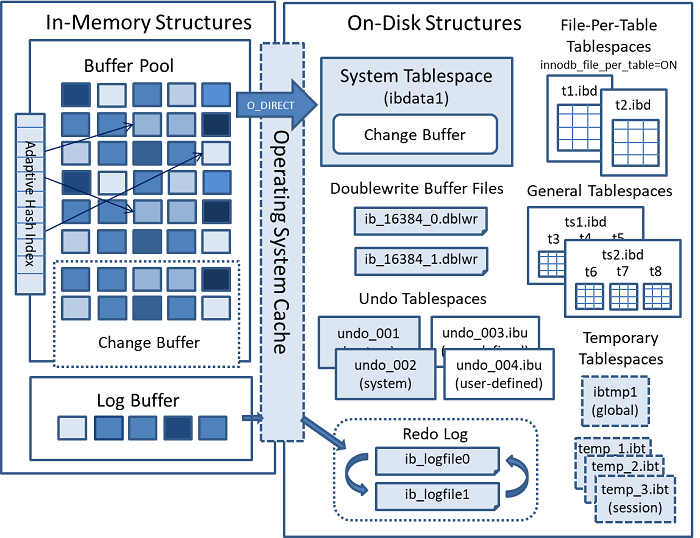
The following diagram shows in-memory and on-disk structures that
comprise the InnoDB storage engine
architecture. For information about each structure, see
Section 15.5, “InnoDB In-Memory Structures”, and
Section 15.6, “InnoDB On-Disk Structures”.
This section describes InnoDB in-memory
structures and related topics.
The buffer pool is an area in main memory where
InnoDB caches table and index data as it is
accessed. The buffer pool permits frequently used data to be
processed directly from memory, which speeds up processing. On
dedicated servers, up to 80% of physical memory is often assigned to
the buffer pool.
For efficiency of high-volume read operations, the buffer pool is divided into pages that can potentially hold multiple rows. For efficiency of cache management, the buffer pool is implemented as a linked list of pages; data that is rarely used is aged out of the cache using a variation of the LRU algorithm.
Knowing how to take advantage of the buffer pool to keep frequently accessed data in memory is an important aspect of MySQL tuning.
The buffer pool is managed as a list using a variation of the least recently used (LRU) algorithm. When room is needed to add a new page to the buffer pool, the least recently used page is evicted and a new page is added to the middle of the list. This midpoint insertion strategy treats the list as two sublists:
At the head, a sublist of new (“young”) pages that were accessed recently
At the tail, a sublist of old pages that were accessed less recently
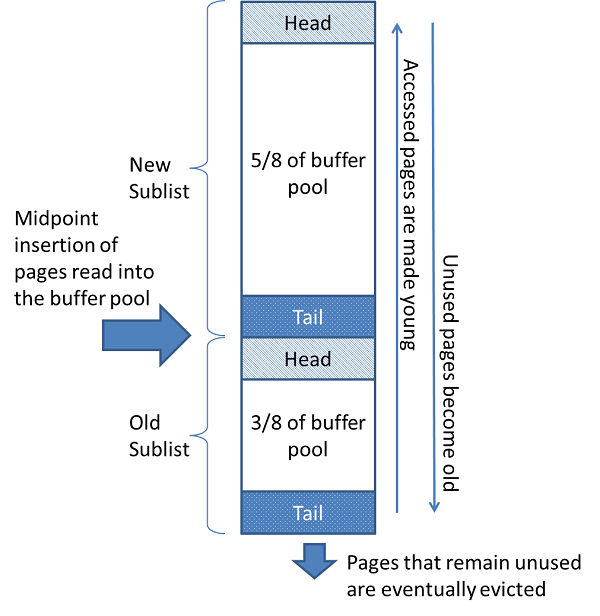
The algorithm keeps frequently used pages in the new sublist. The old sublist contains less frequently used pages; these pages are candidates for eviction.
By default, the algorithm operates as follows:
3/8 of the buffer pool is devoted to the old sublist.
The midpoint of the list is the boundary where the tail of the new sublist meets the head of the old sublist.
When
InnoDBreads a page into the buffer pool, it initially inserts it at the midpoint (the head of the old sublist). A page can be read because it is required for a user-initiated operation such as an SQL query, or as part of a read-ahead operation performed automatically byInnoDB.Accessing a page in the old sublist makes it “young”, moving it to the head of the new sublist. If the page was read because it was required by a user-initiated operation, the first access occurs immediately and the page is made young. If the page was read due to a read-ahead operation, the first access does not occur immediately and might not occur at all before the page is evicted.
As the database operates, pages in the buffer pool that are not accessed “age” by moving toward the tail of the list. Pages in both the new and old sublists age as other pages are made new. Pages in the old sublist also age as pages are inserted at the midpoint. Eventually, a page that remains unused reaches the tail of the old sublist and is evicted.
By default, pages read by queries are immediately moved into the
new sublist, meaning they stay in the buffer pool longer. A table
scan, performed for a mysqldump operation or a
SELECT statement with no
WHERE clause, for example, can bring a large
amount of data into the buffer pool and evict an equivalent amount
of older data, even if the new data is never used again.
Similarly, pages that are loaded by the read-ahead background
thread and accessed only once are moved to the head of the new
list. These situations can push frequently used pages to the old
sublist where they become subject to eviction. For information
about optimizing this behavior, see
Section 15.8.3.3, “Making the Buffer Pool Scan Resistant”, and
Section 15.8.3.4, “Configuring InnoDB Buffer Pool Prefetching (Read-Ahead)”.
InnoDB Standard Monitor output contains several
fields in the BUFFER POOL AND MEMORY section
regarding operation of the buffer pool LRU algorithm. For details,
see Monitoring the Buffer Pool Using the InnoDB Standard Monitor.
You can configure the various aspects of the buffer pool to improve performance.
Ideally, you set the size of the buffer pool to as large a value as practical, leaving enough memory for other processes on the server to run without excessive paging. The larger the buffer pool, the more
InnoDBacts like an in-memory database, reading data from disk once and then accessing the data from memory during subsequent reads. See Section 15.8.3.1, “Configuring InnoDB Buffer Pool Size”.On 64-bit systems with sufficient memory, you can split the buffer pool into multiple parts to minimize contention for memory structures among concurrent operations. For details, see Section 15.8.3.2, “Configuring Multiple Buffer Pool Instances”.
You can keep frequently accessed data in memory regardless of sudden spikes of activity from operations that would bring large amounts of infrequently accessed data into the buffer pool. For details, see Section 15.8.3.3, “Making the Buffer Pool Scan Resistant”.
You can control how and when to perform read-ahead requests to prefetch pages into the buffer pool asynchronously in anticipation of impending need for them. For details, see Section 15.8.3.4, “Configuring InnoDB Buffer Pool Prefetching (Read-Ahead)”.
You can control when background flushing occurs and whether or not the rate of flushing is dynamically adjusted based on workload. For details, see Section 15.8.3.5, “Configuring Buffer Pool Flushing”.
You can configure how
InnoDBpreserves the current buffer pool state to avoid a lengthy warmup period after a server restart. For details, see Section 15.8.3.6, “Saving and Restoring the Buffer Pool State”.
InnoDB Standard Monitor output, which can be
accessed using
SHOW
ENGINE INNODB STATUS, provides metrics regarding
operation of the buffer pool. Buffer pool metrics are located in
the BUFFER POOL AND MEMORY section of
InnoDB Standard Monitor output and appear
similar to the following:
---------------------- BUFFER POOL AND MEMORY ---------------------- Total large memory allocated 2198863872 Dictionary memory allocated 776332 Buffer pool size 131072 Free buffers 124908 Database pages 5720 Old database pages 2071 Modified db pages 910 Pending reads 0 Pending writes: LRU 0, flush list 0, single page 0 Pages made young 4, not young 0 0.10 youngs/s, 0.00 non-youngs/s Pages read 197, created 5523, written 5060 0.00 reads/s, 190.89 creates/s, 244.94 writes/s Buffer pool hit rate 1000 / 1000, young-making rate 0 / 1000 not 0 / 1000 Pages read ahead 0.00/s, evicted without access 0.00/s, Random read ahead 0.00/s LRU len: 5720, unzip_LRU len: 0 I/O sum[0]:cur[0], unzip sum[0]:cur[0]
The following table describes buffer pool metrics reported by the
InnoDB Standard Monitor.
Per second averages provided in InnoDB
Standard Monitor output are based on the elapsed time since
InnoDB Standard Monitor output was last
printed.
Table 15.2 InnoDB Buffer Pool Metrics
| Name | Description |
|---|---|
| Total memory allocated | The total memory allocated for the buffer pool in bytes. |
| Dictionary memory allocated | The total memory allocated for the InnoDB data
dictionary in bytes. |
| Buffer pool size | The total size in pages allocated to the buffer pool. |
| Free buffers | The total size in pages of the buffer pool free list. |
| Database pages | The total size in pages of the buffer pool LRU list. |
| Old database pages | The total size in pages of the buffer pool old LRU sublist. |
| Modified db pages | The current number of pages modified in the buffer pool. |
| Pending reads | The number of buffer pool pages waiting to be read into the buffer pool. |
| Pending writes LRU | The number of old dirty pages within the buffer pool to be written from the bottom of the LRU list. |
| Pending writes flush list | The number of buffer pool pages to be flushed during checkpointing. |
| Pending writes single page | The number of pending independent page writes within the buffer pool. |
| Pages made young | The total number of pages made young in the buffer pool LRU list (moved to the head of sublist of “new” pages). |
| Pages made not young | The total number of pages not made young in the buffer pool LRU list (pages that have remained in the “old” sublist without being made young). |
| youngs/s | The per second average of accesses to old pages in the buffer pool LRU list that have resulted in making pages young. See the notes that follow this table for more information. |
| non-youngs/s | The per second average of accesses to old pages in the buffer pool LRU list that have resulted in not making pages young. See the notes that follow this table for more information. |
| Pages read | The total number of pages read from the buffer pool. |
| Pages created | The total number of pages created within the buffer pool. |
| Pages written | The total number of pages written from the buffer pool. |
| reads/s | The per second average number of buffer pool page reads per second. |
| creates/s | The per second average number of buffer pool pages created per second. |
| writes/s | The per second average number of buffer pool page writes per second. |
| Buffer pool hit rate | The buffer pool page hit rate for pages read from the buffer pool memory vs from disk storage. |
| young-making rate | The average hit rate at which page accesses have resulted in making pages young. See the notes that follow this table for more information. |
| not (young-making rate) | The average hit rate at which page accesses have not resulted in making pages young. See the notes that follow this table for more information. |
| Pages read ahead | The per second average of read ahead operations. |
| Pages evicted without access | The per second average of the pages evicted without being accessed from the buffer pool. |
| Random read ahead | The per second average of random read ahead operations. |
| LRU len | The total size in pages of the buffer pool LRU list. |
| unzip_LRU len | The total size in pages of the buffer pool unzip_LRU list. |
| I/O sum | The total number of buffer pool LRU list pages accessed, for the last 50 seconds. |
| I/O cur | The total number of buffer pool LRU list pages accessed. |
| I/O unzip sum | The total number of buffer pool unzip_LRU list pages accessed. |
| I/O unzip cur | The total number of buffer pool unzip_LRU list pages accessed. |
Notes:
The
youngs/smetric is applicable only to old pages. It is based on the number of accesses to pages and not the number of pages. There can be multiple accesses to a given page, all of which are counted. If you see very lowyoungs/svalues when there are no large scans occurring, you might need to reduce the delay time or increase the percentage of the buffer pool used for the old sublist. Increasing the percentage makes the old sublist larger, so pages in that sublist take longer to move to the tail, which increases the likelihood that those pages are accessed again and made young.The
non-youngs/smetric is applicable only to old pages. It is based on the number of accesses to pages and not the number of pages. There can be multiple accesses to a given page, all of which are counted. If you do not see a highernon-youngs/svalue when performing large table scans (and a higheryoungs/svalue), increase the delay value.The
young-makingrate accounts for accesses to all buffer pool pages, not just accesses to pages in the old sublist. Theyoung-makingrate andnotrate do not normally add up to the overall buffer pool hit rate. Page hits in the old sublist cause pages to move to the new sublist, but page hits in the new sublist cause pages to move to the head of the list only if they are a certain distance from the head.not (young-making rate)is the average hit rate at which page accesses have not resulted in making pages young due to the delay defined byinnodb_old_blocks_timenot being met, or due to page hits in the new sublist that did not result in pages being moved to the head. This rate accounts for accesses to all buffer pool pages, not just accesses to pages in the old sublist.
Buffer pool server status
variables and the
INNODB_BUFFER_POOL_STATS table
provide many of the same buffer pool metrics found in
InnoDB Standard Monitor output. For more
information, see
Example 15.10, “Querying the INNODB_BUFFER_POOL_STATS Table”.
The change buffer is a special data structure that caches changes to
secondary index pages
when those pages are not in the
buffer pool. The buffered
changes, which may result from
INSERT,
UPDATE, or
DELETE operations (DML), are merged
later when the pages are loaded into the buffer pool by other read
operations.
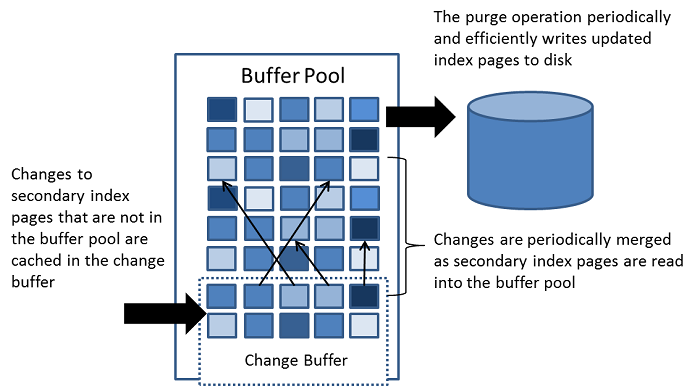
Unlike clustered indexes, secondary indexes are usually nonunique, and inserts into secondary indexes happen in a relatively random order. Similarly, deletes and updates may affect secondary index pages that are not adjacently located in an index tree. Merging cached changes at a later time, when affected pages are read into the buffer pool by other operations, avoids substantial random access I/O that would be required to read secondary index pages into the buffer pool from disk.
Periodically, the purge operation that runs when the system is mostly idle, or during a slow shutdown, writes the updated index pages to disk. The purge operation can write disk blocks for a series of index values more efficiently than if each value were written to disk immediately.
Change buffer merging may take several hours when there are many affected rows and numerous secondary indexes to update. During this time, disk I/O is increased, which can cause a significant slowdown for disk-bound queries. Change buffer merging may also continue to occur after a transaction is committed, and even after a server shutdown and restart (see Section 15.21.2, “Forcing InnoDB Recovery” for more information).
In memory, the change buffer occupies part of the buffer pool. On disk, the change buffer is part of the system tablespace, where index changes are buffered when the database server is shut down.
The type of data cached in the change buffer is governed by the
innodb_change_buffering variable.
For more information, see
Configuring Change Buffering. You can also
configure the maximum change buffer size. For more information, see
Configuring the Change Buffer Maximum Size.
Change buffering is not supported for a secondary index if the index contains a descending index column or if the primary key includes a descending index column.
For answers to frequently asked questions about the change buffer, see Section A.16, “MySQL 8.0 FAQ: InnoDB Change Buffer”.
When INSERT,
UPDATE, and
DELETE operations are performed on
a table, the values of indexed columns (particularly the values of
secondary keys) are often in an unsorted order, requiring
substantial I/O to bring secondary indexes up to date. The
change buffer caches
changes to secondary index entries when the relevant
page is not in the
buffer pool, thus avoiding
expensive I/O operations by not immediately reading in the page
from disk. The buffered changes are merged when the page is loaded
into the buffer pool, and the updated page is later flushed to
disk. The InnoDB main thread merges buffered
changes when the server is nearly idle, and during a
slow shutdown.
Because it can result in fewer disk reads and writes, the change buffer feature is most valuable for workloads that are I/O-bound, for example applications with a high volume of DML operations such as bulk inserts.
However, the change buffer occupies a part of the buffer pool, reducing the memory available to cache data pages. If the working set almost fits in the buffer pool, or if your tables have relatively few secondary indexes, it may be useful to disable change buffering. If the working data set fits entirely within the buffer pool, change buffering does not impose extra overhead, because it only applies to pages that are not in the buffer pool.
You can control the extent to which InnoDB
performs change buffering using the
innodb_change_buffering
configuration parameter. You can enable or disable buffering for
inserts, delete operations (when index records are initially
marked for deletion) and purge operations (when index records are
physically deleted). An update operation is a combination of an
insert and a delete. The default
innodb_change_buffering value is
all.
Permitted innodb_change_buffering
values include:
allThe default value: buffer inserts, delete-marking operations, and purges.
noneDo not buffer any operations.
insertsBuffer insert operations.
deletesBuffer delete-marking operations.
changesBuffer both inserts and delete-marking operations.
purgesBuffer the physical deletion operations that happen in the background.
You can set the
innodb_change_buffering parameter
in the MySQL option file (my.cnf or
my.ini) or change it dynamically with the
SET GLOBAL
statement, which requires privileges sufficient to set global
system variables. See
Section 5.1.9.1, “System Variable Privileges”. Changing the setting
affects the buffering of new operations; the merging of existing
buffered entries is not affected.
The innodb_change_buffer_max_size
variable permits configuring the maximum size of the change buffer
as a percentage of the total size of the buffer pool. By default,
innodb_change_buffer_max_size is
set to 25. The maximum setting is 50.
Consider increasing
innodb_change_buffer_max_size on
a MySQL server with heavy insert, update, and delete activity,
where change buffer merging does not keep pace with new change
buffer entries, causing the change buffer to reach its maximum
size limit.
Consider decreasing
innodb_change_buffer_max_size on
a MySQL server with static data used for reporting, or if the
change buffer consumes too much of the memory space shared with
the buffer pool, causing pages to age out of the buffer pool
sooner than desired.
Test different settings with a representative workload to
determine an optimal configuration. The
innodb_change_buffer_max_size
setting is dynamic, which permits modifying the setting without
restarting the server.
The following options are available for change buffer monitoring:
InnoDBStandard Monitor output includes change buffer status information. To view monitor data, issue theSHOW ENGINE INNODB STATUSstatement.mysql>
SHOW ENGINE INNODB STATUS\GChange buffer status information is located under the
INSERT BUFFER AND ADAPTIVE HASH INDEXheading and appears similar to the following:------------------------------------- INSERT BUFFER AND ADAPTIVE HASH INDEX ------------------------------------- Ibuf: size 1, free list len 0, seg size 2, 0 merges merged operations: insert 0, delete mark 0, delete 0 discarded operations: insert 0, delete mark 0, delete 0 Hash table size 4425293, used cells 32, node heap has 1 buffer(s) 13577.57 hash searches/s, 202.47 non-hash searches/s
For more information, see Section 15.17.3, “InnoDB Standard Monitor and Lock Monitor Output”.
The
INFORMATION_SCHEMA.INNODB_METRICStable provides most of the data points found inInnoDBStandard Monitor output, plus other data points. To view change buffer metrics and a description of each, issue the following query:mysql>
SELECT NAME, COMMENT FROM INFORMATION_SCHEMA.INNODB_METRICS WHERE NAME LIKE '%ibuf%'\GFor
INNODB_METRICStable usage information, see Section 15.15.6, “InnoDB INFORMATION_SCHEMA Metrics Table”.The
INFORMATION_SCHEMA.INNODB_BUFFER_PAGEtable provides metadata about each page in the buffer pool, including change buffer index and change buffer bitmap pages. Change buffer pages are identified byPAGE_TYPE.IBUF_INDEXis the page type for change buffer index pages, andIBUF_BITMAPis the page type for change buffer bitmap pages.WarningQuerying the
INNODB_BUFFER_PAGEtable can introduce significant performance overhead. To avoid impacting performance, reproduce the issue you want to investigate on a test instance and run your queries on the test instance.For example, you can query the
INNODB_BUFFER_PAGEtable to determine the approximate number ofIBUF_INDEXandIBUF_BITMAPpages as a percentage of total buffer pool pages.mysql>
SELECT (SELECT COUNT(*) FROM INFORMATION_SCHEMA.INNODB_BUFFER_PAGEWHERE PAGE_TYPE LIKE 'IBUF%') AS change_buffer_pages,(SELECT COUNT(*) FROM INFORMATION_SCHEMA.INNODB_BUFFER_PAGE) AS total_pages,(SELECT ((change_buffer_pages/total_pages)*100))AS change_buffer_page_percentage;+---------------------+-------------+-------------------------------+ | change_buffer_pages | total_pages | change_buffer_page_percentage | +---------------------+-------------+-------------------------------+ | 25 | 8192 | 0.3052 | +---------------------+-------------+-------------------------------+For information about other data provided by the
INNODB_BUFFER_PAGEtable, see Section 26.51.1, “The INFORMATION_SCHEMA INNODB_BUFFER_PAGE Table”. For related usage information, see Section 15.15.5, “InnoDB INFORMATION_SCHEMA Buffer Pool Tables”.Performance Schema provides change buffer mutex wait instrumentation for advanced performance monitoring. To view change buffer instrumentation, issue the following query:
mysql>
SELECT * FROM performance_schema.setup_instrumentsWHERE NAME LIKE '%wait/synch/mutex/innodb/ibuf%';+-------------------------------------------------------+---------+-------+ | NAME | ENABLED | TIMED | +-------------------------------------------------------+---------+-------+ | wait/synch/mutex/innodb/ibuf_bitmap_mutex | YES | YES | | wait/synch/mutex/innodb/ibuf_mutex | YES | YES | | wait/synch/mutex/innodb/ibuf_pessimistic_insert_mutex | YES | YES | +-------------------------------------------------------+---------+-------+For information about monitoring
InnoDBmutex waits, see Section 15.16.2, “Monitoring InnoDB Mutex Waits Using Performance Schema”.
The adaptive hash index feature enables InnoDB
to perform more like an in-memory database on systems with
appropriate combinations of workload and sufficient memory for the
buffer pool without sacrificing transactional features or
reliability. The adaptive hash index feature is enabled by the
innodb_adaptive_hash_index
variable, or turned off at server startup by
--skip-innodb-adaptive-hash-index.
Based on the observed pattern of searches, a hash index is built using a prefix of the index key. The prefix can be any length, and it may be that only some values in the B-tree appear in the hash index. Hash indexes are built on demand for the pages of the index that are accessed often.
If a table fits almost entirely in main memory, a hash index can
speed up queries by enabling direct lookup of any element, turning
the index value into a sort of pointer. InnoDB
has a mechanism that monitors index searches. If
InnoDB notices that queries could benefit from
building a hash index, it does so automatically.
With some workloads, the speedup from hash index lookups greatly
outweighs the extra work to monitor index lookups and maintain the
hash index structure. Access to the adaptive hash index can
sometimes become a source of contention under heavy workloads,
such as multiple concurrent joins. Queries with
LIKE operators and %
wildcards also tend not to benefit. For workloads that do not
benefit from the adaptive hash index feature, turning it off
reduces unnecessary performance overhead. Because it is difficult
to predict in advance whether the adaptive hash index feature is
appropriate for a particular system and workload, consider running
benchmarks with it enabled and disabled. Architectural changes in
MySQL 5.6 make it more suitable to disable the adaptive hash index
feature than in earlier releases.
The adaptive hash index feature is partitioned. Each index is
bound to a specific partition, and each partition is protected by
a separate latch. Partitioning is controlled by the
innodb_adaptive_hash_index_parts
variable. The
innodb_adaptive_hash_index_parts
variable is set to 8 by default. The maximum setting is 512.
You can monitor adaptive hash index use and contention in the
SEMAPHORES section of
SHOW ENGINE INNODB
STATUS output. If there are numerous threads waiting on
RW-latches created in btr0sea.c, consider
increasing the number of adaptive hash index partitions or
disabling the adaptive hash index feature.
For information about the performance characteristics of hash indexes, see Section 8.3.9, “Comparison of B-Tree and Hash Indexes”.
The log buffer is the memory area that holds data to be written to
the log files on disk. Log buffer size is defined by the
innodb_log_buffer_size variable.
The default size is 16MB. The contents of the log buffer are
periodically flushed to disk. A large log buffer enables large
transactions to run without the need to write redo log data to
disk before the transactions commit. Thus, if you have
transactions that update, insert, or delete many rows, increasing
the size of the log buffer saves disk I/O.
The
innodb_flush_log_at_trx_commit
variable controls how the contents of the log buffer are written
and flushed to disk. The
innodb_flush_log_at_timeout
variable controls log flushing frequency.
For related information, see Memory Configuration, and Section 8.5.4, “Optimizing InnoDB Redo Logging”.
This section describes InnoDB on-disk structures
and related topics.
This section covers topics related to InnoDB
tables.
To create an InnoDB table, use the
CREATE TABLE statement.
CREATE TABLE t1 (a INT, b CHAR (20), PRIMARY KEY (a)) ENGINE=InnoDB;
You do not need to specify the ENGINE=InnoDB
clause if InnoDB is defined as the default
storage engine, which it is by default. To check the default
storage engine, issue the following statement:
mysql> SELECT @@default_storage_engine;
+--------------------------+
| @@default_storage_engine |
+--------------------------+
| InnoDB |
+--------------------------+
You might still use ENGINE=InnoDB clause if you
plan to use mysqldump or replication to replay
the CREATE TABLE statement on a
server where the default storage engine is not
InnoDB.
An InnoDB table and its indexes can be created
in the system
tablespace, in a
file-per-table
tablespace, or in a
general tablespace.
When innodb_file_per_table is
enabled, which is the default, an InnoDB table
is implicitly created in an individual file-per-table tablespace.
Conversely, when
innodb_file_per_table is
disabled, an InnoDB table is implicitly created
in the InnoDB system tablespace. To create a
table in a general tablespace, use
CREATE TABLE ...
TABLESPACE syntax. For more information, see
Section 15.6.3.3, “General Tablespaces”.
When you create a table in a file-per-table tablespace, MySQL
creates an .ibd tablespace
file in a database directory under the MySQL data directory, by
default. A table created in the InnoDB system
tablespace is created in an existing
ibdata file, which resides in
the MySQL data directory. A table created in a general tablespace
is created in an existing general tablespace
.ibd file. General tablespace
files can be created inside or outside of the MySQL data
directory. For more information, see
Section 15.6.3.3, “General Tablespaces”.
Internally, InnoDB adds an entry for each table
to the data dictionary. The entry includes the database name. For
example, if table t1 is created in the
test database, the data dictionary entry for
the database name is 'test/t1'. This means you
can create a table of the same name (t1) in a
different database, and the table names do not collide inside
InnoDB.
The default row format for InnoDB tables is
defined by the
innodb_default_row_format
configuration option, which has a default value of
DYNAMIC.
Dynamic
and
Compressed
row format allow you to take advantage of
InnoDB features such as table compression and
efficient off-page storage of long column values. To use these
row formats,
innodb_file_per_table must be
enabled (the default).
SET GLOBAL innodb_file_per_table=1; CREATE TABLE t3 (a INT, b CHAR (20), PRIMARY KEY (a)) ROW_FORMAT=DYNAMIC; CREATE TABLE t4 (a INT, b CHAR (20), PRIMARY KEY (a)) ROW_FORMAT=COMPRESSED;
Alternatively, you can use
CREATE TABLE ...
TABLESPACE syntax to create an
InnoDB table in a general tablespace. General
tablespaces support all row formats. For more information, see
Section 15.6.3.3, “General Tablespaces”.
CREATE TABLE t1 (c1 INT PRIMARY KEY) TABLESPACE ts1 ROW_FORMAT=DYNAMIC;
CREATE TABLE ...
TABLESPACE syntax can also be used to create
InnoDB tables with a
Dynamic row format in the system tablespace,
alongside tables with a Compact or
Redundant row format.
CREATE TABLE t1 (c1 INT PRIMARY KEY) TABLESPACE = innodb_system ROW_FORMAT=DYNAMIC;
For more information about InnoDB row
formats, see Section 15.10, “InnoDB Row Formats”. For how to
determine the row format of an InnoDB table
and the physical characteristics of InnoDB
row formats, see Section 15.10, “InnoDB Row Formats”.
Always define a primary
key for an InnoDB table, specifying
the column or columns that:
Are referenced by the most important queries.
Are never left blank.
Never have duplicate values.
Rarely if ever change value once inserted.
For example, in a table containing information about people, you
would not create a primary key on (firstname,
lastname) because more than one person can have the
same name, some people have blank last names, and sometimes
people change their names. With so many constraints, often there
is not an obvious set of columns to use as a primary key, so you
create a new column with a numeric ID to serve as all or part of
the primary key. You can declare an
auto-increment column
so that ascending values are filled in automatically as rows are
inserted:
# The value of ID can act like a pointer between related items in different tables. CREATE TABLE t5 (id INT AUTO_INCREMENT, b CHAR (20), PRIMARY KEY (id)); # The primary key can consist of more than one column. Any autoinc column must come first. CREATE TABLE t6 (id INT AUTO_INCREMENT, a INT, b CHAR (20), PRIMARY KEY (id,a));
Although the table works correctly without defining a primary
key, the primary key is involved with many aspects of
performance and is a crucial design aspect for any large or
frequently used table. It is recommended that you always specify
a primary key in the CREATE TABLE
statement. If you create the table, load data, and then run
ALTER TABLE to add a primary key
later, that operation is much slower than defining the primary
key when creating the table.
To view the properties of an InnoDB table,
issue a SHOW TABLE STATUS
statement:
mysql> SHOW TABLE STATUS FROM test LIKE 't%' \G;
*************************** 1. row ***************************
Name: t1
Engine: InnoDB
Version: 10
Row_format: Compact
Rows: 0
Avg_row_length: 0
Data_length: 16384
Max_data_length: 0
Index_length: 0
Data_free: 0
Auto_increment: NULL
Create_time: 2015-03-16 15:13:31
Update_time: NULL
Check_time: NULL
Collation: utf8mb4_0900_ai_ci
Checksum: NULL
Create_options:
Comment:
For information about SHOW TABLE
STATUS output, see
Section 13.7.7.38, “SHOW TABLE STATUS Statement”.
InnoDB table properties may also be queried
using the InnoDB Information Schema system
tables:
mysql> SELECT * FROM INFORMATION_SCHEMA.INNODB_TABLES WHERE NAME='test/t1' \G
*************************** 1. row ***************************
TABLE_ID: 45
NAME: test/t1
FLAG: 1
N_COLS: 5
SPACE: 35
ROW_FORMAT: Compact
ZIP_PAGE_SIZE: 0
SPACE_TYPE: Single
For more information, see Section 15.15.3, “InnoDB INFORMATION_SCHEMA Schema Object Tables”.
There are different reasons for creating InnoDB
tables externally; that is, creating tables outside of the data
directory. Those reasons might include space management, I/O
optimization, or placing tables on a storage device with
particular performance or capacity characteristics, for example.
InnoDB supports the following methods for
creating tables externally:
You can create an InnoDB table in an external
directory by specifying a DATA DIRECTORY
clause in the CREATE TABLE statement.
CREATE TABLE t1 (c1 INT PRIMARY KEY) DATA DIRECTORY = '/external/directory';
The DATA DIRECTORY clause is supported for
tables created in file-per-table tablespaces. Tables are
implicitly created in file-per-table tablespaces when the
innodb_file_per_table variable
is enabled, which it is by default.
mysql> SELECT @@innodb_file_per_table;
+-------------------------+
| @@innodb_file_per_table |
+-------------------------+
| 1 |
+-------------------------+
For more information about file-per-table tablespaces, see Section 15.6.3.2, “File-Per-Table Tablespaces”.
When you specify a DATA DIRECTORY clause in a
CREATE TABLE statement, the table's data file
(table_name.ibd
As of MySQL 8.0.21, tables and table partitions created outside
of the data directory using the DATA
DIRECTORY clause are restricted to directories known
to InnoDB. This requirement permits database
administrators to control where tablespace data files are
created and ensures that data files can be found during recovery
(see Tablespace Discovery During Crash Recovery).
Known directories are those defined by the
datadir,
innodb_data_home_dir, and
innodb_directories variables.
You can use the following statement to check those settings:
mysql> SELECT @@datadir,@@innodb_data_home_dir,@@innodb_directories;
If the directory you want to use is unknown, add it to the
innodb_directories setting
before you create the table. The
innodb_directories variable is
read-only. Configuring it requires restarting the server. For
general information about setting system variables, see
Section 5.1.9, “Using System Variables”.
The following example demonstrates creating a table in an
external directory using the DATA DIRECTORY
clause. It is assumed that the
innodb_file_per_table variable
is enabled and that the directory is known to
InnoDB.
mysql>USE test;Database changed mysql>CREATE TABLE t1 (c1 INT PRIMARY KEY) DATA DIRECTORY = '# MySQL creates the table's data file in a schema directory # under the external directory shell>/external/directory';cd /external/directory/testshell>lst1.ibd
Usage Notes:
MySQL initially holds the tablespace data file open, preventing you from dismounting the device, but might eventually close the file if the server is busy. Be careful not to accidentally dismount an external device while MySQL is running, or start MySQL while the device is disconnected. Attempting to access a table when the associated data file is missing causes a serious error that requires a server restart.
A server restart might fail if the data file is not found at the expected path. In this case, you can restore the tablespace data file from a backup or drop the table to remove the information about it from the data dictionary.
Before placing a table on an NFS-mounted volume, review potential issues outlined in Using NFS with MySQL.
If using an LVM snapshot, file copy, or other file-based mechanism to back up the table's data file, always use the
FLUSH TABLES ... FOR EXPORTstatement first to ensure that all changes buffered in memory are flushed to disk before the backup occurs.Using the
DATA DIRECTORYclause to create a table in an external directory is an alternative to using symbolic links, whichInnoDBdoes not support.The
DATA DIRECTORYclause is not supported in a replication environment where the source and replica reside on the same host. TheDATA DIRECTORYclause requires a full directory path. Replicating the path in this case would cause the source and replica to create the table in same location.As of MySQL 8.0.21, tables created in file-per-table tablespaces can no longer be created in the undo tablespace directory (
innodb_undo_directory) unless that directly is known toInnoDB. Known directories are those defined by thedatadir,innodb_data_home_dir, andinnodb_directoriesvariables.
CREATE TABLE ...
TABLESPACE syntax can be used in combination with the
DATA DIRECTORY clause to create a table in an
external directory. To do so, specify
innodb_file_per_table as the tablespace name.
mysql>CREATE TABLE t2 (c1 INT PRIMARY KEY) TABLESPACE = innodb_file_per_tableDATA DIRECTORY = '/external/directory';
This method is supported only for tables created in
file-per-table tablespaces, but does not require the
innodb_file_per_table variable
to be enabled. In all other respects, this method is equivalent
to the CREATE TABLE ... DATA DIRECTORY method
described above. The same usage notes apply.
You can create a table in a general tablespace that resides in an external directory.
For information about creating a general tablespace in an external directory, see Creating a General Tablespace.
For information about creating a table in a general tablespace, see Adding Tables to a General Tablespace.
This section describes how to import tables using the Transportable Tablespaces feature, which permits importing tables, partitioned tables, or individual table partitions that reside in file-per-table tablespaces. There are many reasons why you might want to import tables:
To run reports on a non-production MySQL server instance to avoid placing extra load on a production server.
To copy data to a new replica server.
To restore a table from a backed-up tablespace file.
As a faster way of moving data than importing a dump file, which requires reinserting data and rebuilding indexes.
To move a data to a server with storage media that is better suited to your storage requirements. For example, you might move busy tables to an SSD device, or move large tables to a high-capacity HDD device.
The Transportable Tablespaces feature is described under the following topics in this section:
The
innodb_file_per_tablevariable must be enabled, which it is by default.The page size of the tablespace must match the page size of the destination MySQL server instance.
InnoDBpage size is defined by theinnodb_page_sizevariable, which is configured when initializing a MySQL server instance.If the table is in a foreign key relationship,
foreign_key_checksmust be disabled before executingDISCARD TABLESPACE. Also, you should export all foreign key related tables at the same logical point in time, asALTER TABLE ... IMPORT TABLESPACEdoes not enforce foreign key constraints on imported data. To do so, stop updating the related tables, commit all transactions, acquire shared locks on the tables, and perform the export operations.When importing a table from another MySQL server instance, both MySQL server instances must have General Availability (GA) status and must be the same version. Otherwise, the table must be created on the same MySQL server instance into which it is being imported.
If the table was created in an external directory by specifying the
DATA DIRECTORYclause in theCREATE TABLEstatement, the table that you replace on the destination instance must be defined with the sameDATA DIRECTORYclause. A schema mismatch error is reported if the clauses do not match. To determine if the source table was defined with aDATA DIRECTORYclause, useSHOW CREATE TABLEto view the table definition. For information about using theDATA DIRECTORYclause, see Section 15.6.1.2, “Creating Tables Externally”.If a
ROW_FORMAToption is not defined explicitly in the table definition orROW_FORMAT=DEFAULTis used, theinnodb_default_row_formatsetting must be the same on the source and destination instances. Otherwise, a schema mismatch error is reported when you attempt the import operation. UseSHOW CREATE TABLEto check the table definition. UseSHOW VARIABLESto check theinnodb_default_row_formatsetting. For related information, see Defining the Row Format of a Table.
This example demonstrates how to import a regular non-partitioned table that resides in a file-per-table tablespace.
On the destination instance, create a table with the same definition as the table you intend to import. (You can obtain the table definition using
SHOW CREATE TABLEsyntax.) If the table definition does not match, a schema mismatch error is reported when you attempt the import operation.mysql> USE test; mysql> CREATE TABLE t1 (c1 INT) ENGINE=INNODB;
On the destination instance, discard the tablespace of the table that you just created. (Before importing, you must discard the tablespace of the receiving table.)
mysql> ALTER TABLE t1 DISCARD TABLESPACE;
On the source instance, run
FLUSH TABLES ... FOR EXPORTto quiesce the table you intend to import. When a table is quiesced, only read-only transactions are permitted on the table.mysql> USE test; mysql> FLUSH TABLES t1 FOR EXPORT;
FLUSH TABLES ... FOR EXPORTensures that changes to the named table have been flushed to disk so that a binary table copy can be made while the server is running. WhenFLUSH TABLES ... FOR EXPORTis run,InnoDBgenerates a.cfgmetadata file in the schema directory of the table. The.cfgfile contains metadata that is used for schema verification during the import operation.Copy the
.ibdfile and.cfgmetadata file from the source instance to the destination instance. For example:shell> scp
/path/to/datadir/test/t1.{ibd,cfg} destination-server:/path/to/datadir/testThe
.ibdfile and.cfgfile must be copied before releasing the shared locks, as described in the next step.NoteIf you are importing a table from an encrypted tablespace,
InnoDBgenerates a.cfpfile in addition to a.cfgmetadata file. The.cfpfile must be copied to the destination instance together with the.cfgfile. The.cfpfile contains a transfer key and an encrypted tablespace key. On import,InnoDBuses the transfer key to decrypt the tablespace key. For related information, see Section 15.13, “InnoDB Data-at-Rest Encryption”.On the source instance, use
UNLOCK TABLESto release the locks acquired by theFLUSH TABLES ... FOR EXPORTstatement:mysql> USE test; mysql> UNLOCK TABLES;
On the destination instance, import the tablespace:
mysql> USE test; mysql> ALTER TABLE t1 IMPORT TABLESPACE;
This example demonstrates how to import a partitioned table, where each table partition resides in a file-per-table tablespace.
On the destination instance, create a partitioned table with the same definition as the partitioned table that you want to import. (You can obtain the table definition using
SHOW CREATE TABLEsyntax.) If the table definition does not match, a schema mismatch error is reported when you attempt the import operation.mysql>
USE test;mysql>CREATE TABLE t1 (i int) ENGINE = InnoDB PARTITION BY KEY (i) PARTITIONS 3;In the
/directory, there is a tablespacedatadir/test.ibdfile for each of the three partitions.mysql>
\! lst1.frm t1#p#p0.ibd t1#p#p1.ibd t1#p#p2.ibd/path/to/datadir/test/On the destination instance, discard the tablespace for the partitioned table. (Before the import operation, you must discard the tablespace of the receiving table.)
mysql>
ALTER TABLE t1 DISCARD TABLESPACE;The three tablespace
.ibdfiles of the partitioned table are discarded from the/directory, leaving the following files:datadir/testmysql>
\! lst1.frm/path/to/datadir/test/On the source instance, run
FLUSH TABLES ... FOR EXPORTto quiesce the partitioned table that you intend to import. When a table is quiesced, only read-only transactions are permitted on the table.mysql>
USE test;mysql>FLUSH TABLES t1 FOR EXPORT;FLUSH TABLES ... FOR EXPORTensures that changes to the named table are flushed to disk so that binary table copy can be made while the server is running. WhenFLUSH TABLES ... FOR EXPORTis run,InnoDBgenerates.cfgmetadata files in the schema directory of the table for each of the table's tablespace files.mysql>
\! lst1#p#p0.ibd t1#p#p1.ibd t1#p#p2.ibd t1.frm t1#p#p0.cfg t1#p#p1.cfg t1#p#p2.cfg/path/to/datadir/test/The
.cfgfiles contain metadata that is used for schema verification when importing the tablespace.FLUSH TABLES ... FOR EXPORTcan only be run on the table, not on individual table partitions.Copy the
.ibdand.cfgfiles from the source instance schema directory to the destination instance schema directory. For example:shell>scp
/path/to/datadir/test/t1*.{ibd,cfg} destination-server:/path/to/datadir/testThe
.ibdand.cfgfiles must be copied before releasing the shared locks, as described in the next step.NoteIf you are importing a table from an encrypted tablespace,
InnoDBgenerates a.cfpfiles in addition to a.cfgmetadata files. The.cfpfiles must be copied to the destination instance together with the.cfgfiles. The.cfpfiles contain a transfer key and an encrypted tablespace key. On import,InnoDBuses the transfer key to decrypt the tablespace key. For related information, see Section 15.13, “InnoDB Data-at-Rest Encryption”.On the source instance, use
UNLOCK TABLESto release the locks acquired byFLUSH TABLES ... FOR EXPORT:mysql>
USE test;mysql>UNLOCK TABLES;On the destination instance, import the tablespace of the partitioned table:
mysql>
USE test;mysql>ALTER TABLE t1 IMPORT TABLESPACE;
This example demonstrates how to import individual table partitions, where each partition resides in a file-per-table tablespace file.
In the following example, two partitions (p2
and p3) of a four-partition table are
imported.
On the destination instance, create a partitioned table with the same definition as the partitioned table that you want to import partitions from. (You can obtain the table definition using
SHOW CREATE TABLEsyntax.) If the table definition does not match, a schema mismatch error is reported when you attempt the import operation.mysql>
USE test;mysql>CREATE TABLE t1 (i int) ENGINE = InnoDB PARTITION BY KEY (i) PARTITIONS 4;In the
/directory, there is a tablespacedatadir/test.ibdfile for each of the four partitions.mysql>
\! lst1.frm t1#p#p0.ibd t1#p#p1.ibd t1#p#p2.ibd t1#p#p3.ibd/path/to/datadir/test/On the destination instance, discard the partitions that you intend to import from the source instance. (Before importing partitions, you must discard the corresponding partitions from the receiving partitioned table.)
mysql>
ALTER TABLE t1 DISCARD PARTITION p2, p3 TABLESPACE;The tablespace
.ibdfiles for the two discarded partitions are removed from the/directory on the destination instance, leaving the following files:datadir/testmysql>
\! lst1.frm t1#p#p0.ibd t1#p#p1.ibd/path/to/datadir/test/NoteWhen
ALTER TABLE ... DISCARD PARTITION ... TABLESPACEis run on subpartitioned tables, both partition and subpartition table names are permitted. When a partition name is specified, subpartitions of that partition are included in the operation.On the source instance, run
FLUSH TABLES ... FOR EXPORTto quiesce the partitioned table. When a table is quiesced, only read-only transactions are permitted on the table.mysql>
USE test;mysql>FLUSH TABLES t1 FOR EXPORT;FLUSH TABLES ... FOR EXPORTensures that changes to the named table are flushed to disk so that binary table copy can be made while the instance is running. WhenFLUSH TABLES ... FOR EXPORTis run,InnoDBgenerates a.cfgmetadata file for each of the table's tablespace files in the schema directory of the table.mysql>
\! lst1#p#p0.ibd t1#p#p1.ibd t1#p#p2.ibd t1#p#p3.ibd t1.frm t1#p#p0.cfg t1#p#p1.cfg t1#p#p2.cfg t1#p#p3.cfg/path/to/datadir/test/The
.cfgfiles contain metadata that used for schema verification during the import operation.FLUSH TABLES ... FOR EXPORTcan only be run on the table, not on individual table partitions.Copy the
.ibdand.cfgfiles for partitionp2and partitionp3from the source instance schema directory to the destination instance schema directory.shell>
scp t1#p#p2.ibd t1#p#p2.cfg t1#p#p3.ibd t1#p#p3.cfg destination-server:/path/to/datadir/testThe
.ibdand.cfgfiles must be copied before releasing the shared locks, as described in the next step.NoteIf you are importing partitions from an encrypted tablespace,
InnoDBgenerates a.cfpfiles in addition to a.cfgmetadata files. The.cfpfiles must be copied to the destination instance together with the.cfgfiles. The.cfpfiles contain a transfer key and an encrypted tablespace key. On import,InnoDBuses the transfer key to decrypt the tablespace key. For related information, see Section 15.13, “InnoDB Data-at-Rest Encryption”.On the source instance, use
UNLOCK TABLESto release the locks acquired byFLUSH TABLES ... FOR EXPORT:mysql>
USE test;mysql>UNLOCK TABLES;On the destination instance, import table partitions
p2andp3:mysql>
USE test;mysql>ALTER TABLE t1 IMPORT PARTITION p2, p3 TABLESPACE;NoteWhen
ALTER TABLE ... IMPORT PARTITION ... TABLESPACEis run on subpartitioned tables, both partition and subpartition table names are permitted. When a partition name is specified, subpartitions of that partition are included in the operation.
The Transportable Tablespaces feature is only supported for tables that reside in file-per-table tablespaces. It is not supported for the tables that reside in the system tablespace or general tablespaces. Tables in shared tablespaces cannot be quiesced.
FLUSH TABLES ... FOR EXPORTis not supported on tables with aFULLTEXTindex, as full-text search auxiliary tables cannot be flushed. After importing a table with aFULLTEXTindex, runOPTIMIZE TABLEto rebuild theFULLTEXTindexes. Alternatively, dropFULLTEXTindexes before the export operation and recreate the indexes after importing the table on the destination instance.Due to a
.cfgmetadata file limitation, schema mismatches are not reported for partition type or partition definition differences when importing a partitioned table. Column differences are reported.Prior to MySQL 8.0.19, index key part sort order information is not stored to the
.cfgmetadata file used during a tablespace import operation. The index key part sort order is therefore assumed to be ascending, which is the default. As a result, records could be sorted in an unintended order if one table involved in the import operation is defined with a DESC index key part sort order and the other table is not. The workaround is to drop and recreate affected indexes. For information about index key part sort order, see Section 13.1.15, “CREATE INDEX Statement”.The
.cfgfile format was updated in MySQL 8.0.19 to include index key part sort order information. The issue described above does not affect import operations between MySQL 8.0.19 server instances or higher.
ALTER TABLE ... IMPORT TABLESPACEdoes not require a.cfgmetadata file to import a table. However, metadata checks are not performed when importing without a.cfgfile, and a warning similar to the following is issued:Message: InnoDB: IO Read error: (2, No such file or directory) Error opening '.\ test\t.cfg', will attempt to import without schema verification 1 row in set (0.00 sec)
Importing a table without a
.cfgmetadata file should only be considered if no schema mismatches are expected. The ability to import without a.cfgfile could be useful in crash recovery scenarios where metadata is not accessible.On Windows,
InnoDBstores database, tablespace, and table names internally in lowercase. To avoid import problems on case-sensitive operating systems such as Linux and Unix, create all databases, tablespaces, and tables using lowercase names. A convenient way to ensure that names are created in lowercase is to setlower_case_table_namesto 1 before initializing the server. (It is prohibited to start the server with alower_case_table_namessetting that is different from the setting used when the server was initialized.)[mysqld] lower_case_table_names=1
When running
ALTER TABLE ... DISCARD PARTITION ... TABLESPACEandALTER TABLE ... IMPORT PARTITION ... TABLESPACEon subpartitioned tables, both partition and subpartition table names are permitted. When a partition name is specified, subpartitions of that partition are included in the operation.
The following information describes internals and messages written to the error log during a table import procedure.
When ALTER TABLE
... DISCARD TABLESPACE is run on the destination
instance:
The table is locked in X mode.
The tablespace is detached from the table.
When
FLUSH
TABLES ... FOR EXPORT is run on the source instance:
The table being flushed for export is locked in shared mode.
The purge coordinator thread is stopped.
Dirty pages are synchronized to disk.
Table metadata is written to the binary
.cfgfile.
Expected error log messages for this operation:
[Note] InnoDB: Sync to disk of '"test"."t1"' started. [Note] InnoDB: Stopping purge [Note] InnoDB: Writing table metadata to './test/t1.cfg' [Note] InnoDB: Table '"test"."t1"' flushed to disk
When UNLOCK
TABLES is run on the source instance:
The binary
.cfgfile is deleted.The shared lock on the table or tables being imported is released and the purge coordinator thread is restarted.
Expected error log messages for this operation:
[Note] InnoDB: Deleting the meta-data file './test/t1.cfg' [Note] InnoDB: Resuming purge
When ALTER TABLE
... IMPORT TABLESPACE is run on the destination
instance, the import algorithm performs the following operations
for each tablespace being imported:
Each tablespace page is checked for corruption.
The space ID and log sequence numbers (LSNs) on each page are updated.
Flags are validated and LSN updated for the header page.
Btree pages are updated.
The page state is set to dirty so that it is written to disk.
Expected error log messages for this operation:
[Note] InnoDB: Importing tablespace for table 'test/t1' that was exported
from host 'host_name'
[Note] InnoDB: Phase I - Update all pages
[Note] InnoDB: Sync to disk
[Note] InnoDB: Sync to disk - done!
[Note] InnoDB: Phase III - Flush changes to disk
[Note] InnoDB: Phase IV - Flush complete
You may also receive a warning that a tablespace is discarded
(if you discarded the tablespace for the destination table)
and a message stating that statistics could not be calculated
due to a missing .ibd file:
[Warning] InnoDB: Table "test"."t1" tablespace is set as discarded. 7f34d9a37700 InnoDB: cannot calculate statistics for table "test"."t1" because the .ibd file is missing. For help, please refer to http://dev.mysql.com/doc/refman/8.0/en/innodb-troubleshooting.html
This section describes techniques for moving or copying some or all
InnoDB tables to a different server or instance.
For example, you might move an entire MySQL instance to a larger,
faster server; you might clone an entire MySQL instance to a new
replica server; you might copy individual tables to another instance
to develop and test an application, or to a data warehouse server to
produce reports.
On Windows, InnoDB always stores database and
table names internally in lowercase. To move databases in a binary
format from Unix to Windows or from Windows to Unix, create all
databases and tables using lowercase names. A convenient way to
accomplish this is to add the following line to the
[mysqld] section of your
my.cnf or my.ini file
before creating any databases or tables:
[mysqld] lower_case_table_names=1
It is prohibited to start the server with a
lower_case_table_names setting
that is different from the setting used when the server was
initialized.
Techniques for moving or copying InnoDB tables
include:
Importing Tables
A table that resides in a file-per-table tablespace can be imported from another MySQL server instance or from a backup using the Transportable Tablespace feature. See Section 15.6.1.3, “Importing InnoDB Tables”.
MySQL Enterprise Backup
The MySQL Enterprise Backup product lets you back up a running MySQL database with minimal disruption to operations while producing a consistent snapshot of the database. When MySQL Enterprise Backup is copying tables, reads and writes can continue. In addition, MySQL Enterprise Backup can create compressed backup files, and back up subsets of tables. In conjunction with the MySQL binary log, you can perform point-in-time recovery. MySQL Enterprise Backup is included as part of the MySQL Enterprise subscription.
For more details about MySQL Enterprise Backup, see Section 30.2, “MySQL Enterprise Backup Overview”.
Copying Data Files (Cold Backup Method)
You can move an InnoDB database simply by copying
all the relevant files listed under "Cold Backups" in
Section 15.18.1, “InnoDB Backup”.
InnoDB data and log files are binary-compatible
on all platforms having the same floating-point number format. If
the floating-point formats differ but you have not used
FLOAT or
DOUBLE data types in your tables,
then the procedure is the same: simply copy the relevant files.
When you move or copy file-per-table .ibd
files, the database directory name must be the same on the source
and destination systems. The table definition stored in the
InnoDB shared tablespace includes the database
name. The transaction IDs and log sequence numbers stored in the
tablespace files also differ between databases.
To move an .ibd file and the associated table
from one database to another, use a RENAME
TABLE statement:
RENAME TABLEdb1.tbl_nameTOdb2.tbl_name;
If you have a “clean” backup of an
.ibd file, you can restore it to the MySQL
installation from which it originated as follows:
The table must not have been dropped or truncated since you copied the
.ibdfile, because doing so changes the table ID stored inside the tablespace.Issue this
ALTER TABLEstatement to delete the current.ibdfile:ALTER TABLE
tbl_nameDISCARD TABLESPACE;Copy the backup
.ibdfile to the proper database directory.Issue this
ALTER TABLEstatement to tellInnoDBto use the new.ibdfile for the table:ALTER TABLE
tbl_nameIMPORT TABLESPACE;NoteThe
ALTER TABLE ... IMPORT TABLESPACEfeature does not enforce foreign key constraints on imported data.
In this context, a “clean” .ibd
file backup is one for which the following requirements are
satisfied:
There are no uncommitted modifications by transactions in the
.ibdfile.There are no unmerged insert buffer entries in the
.ibdfile.Purge has removed all delete-marked index records from the
.ibdfile.mysqld has flushed all modified pages of the
.ibdfile from the buffer pool to the file.
You can make a clean backup .ibd file using the
following method:
Stop all activity from the mysqld server and commit all transactions.
Wait until
SHOW ENGINE INNODB STATUSshows that there are no active transactions in the database, and the main thread status ofInnoDBisWaiting for server activity. Then you can make a copy of the.ibdfile.
Another method for making a clean copy of an
.ibd file is to use the MySQL Enterprise Backup
product:
Use MySQL Enterprise Backup to back up the
InnoDBinstallation.Start a second mysqld server on the backup and let it clean up the
.ibdfiles in the backup.
Restoring from a Logical Backup
You can use a utility such as mysqldump to perform a logical backup, which produces a set of SQL statements that can be executed to reproduce the original database object definitions and table data for transfer to another SQL server. Using this method, it does not matter whether the formats differ or if your tables contain floating-point data.
To improve the performance of this method, disable
autocommit when importing data.
Perform a commit only after importing an entire table or segment of
a table.
If you have MyISAM tables that you want
to convert to InnoDB for better
reliability and scalability, review the following guidelines and
tips before converting.
Partitioned MyISAM tables created in previous
versions of MySQL are not compatible with MySQL 8.0.
Such tables must be prepared prior to upgrade, either by removing
the partitioning, or by converting them to
InnoDB. See
Section 24.6.2, “Partitioning Limitations Relating to Storage Engines”, for
more information.
As you transition away from MyISAM tables,
lower the value of the
key_buffer_size configuration
option to free memory no longer needed for caching results.
Increase the value of the
innodb_buffer_pool_size
configuration option, which performs a similar role of allocating
cache memory for InnoDB tables. The
InnoDB buffer
pool caches both table data and index data, speeding up
lookups for queries and keeping query results in memory for reuse.
For guidance regarding buffer pool size configuration, see
Section 8.12.3.1, “How MySQL Uses Memory”.
Because MyISAM tables do not support
transactions, you might
not have paid much attention to the
autocommit configuration option
and the COMMIT and
ROLLBACK
statements. These keywords are important to allow multiple
sessions to read and write InnoDB tables
concurrently, providing substantial scalability benefits in
write-heavy workloads.
While a transaction is open, the system keeps a snapshot of the data as seen at the beginning of the transaction, which can cause substantial overhead if the system inserts, updates, and deletes millions of rows while a stray transaction keeps running. Thus, take care to avoid transactions that run for too long:
If you are using a mysql session for interactive experiments, always
COMMIT(to finalize the changes) orROLLBACK(to undo the changes) when finished. Close down interactive sessions rather than leave them open for long periods, to avoid keeping transactions open for long periods by accident.Make sure that any error handlers in your application also
ROLLBACKincomplete changes orCOMMITcompleted changes.ROLLBACKis a relatively expensive operation, becauseINSERT,UPDATE, andDELETEoperations are written toInnoDBtables prior to theCOMMIT, with the expectation that most changes are committed successfully and rollbacks are rare. When experimenting with large volumes of data, avoid making changes to large numbers of rows and then rolling back those changes.When loading large volumes of data with a sequence of
INSERTstatements, periodicallyCOMMITthe results to avoid having transactions that last for hours. In typical load operations for data warehousing, if something goes wrong, you truncate the table (usingTRUNCATE TABLE) and start over from the beginning rather than doing aROLLBACK.
The preceding tips save memory and disk space that can be wasted
during too-long transactions. When transactions are shorter than
they should be, the problem is excessive I/O. With each
COMMIT, MySQL makes sure each
change is safely recorded to disk, which involves some I/O.
For most operations on
InnoDBtables, you should use the settingautocommit=0. From an efficiency perspective, this avoids unnecessary I/O when you issue large numbers of consecutiveINSERT,UPDATE, orDELETEstatements. From a safety perspective, this allows you to issue aROLLBACKstatement to recover lost or garbled data if you make a mistake on the mysql command line, or in an exception handler in your application.The time when
autocommit=1is suitable forInnoDBtables is when running a sequence of queries for generating reports or analyzing statistics. In this situation, there is no I/O penalty related toCOMMITorROLLBACK, andInnoDBcan automatically optimize the read-only workload.If you make a series of related changes, finalize all the changes at once with a single
COMMITat the end. For example, if you insert related pieces of information into several tables, do a singleCOMMITafter making all the changes. Or if you run many consecutiveINSERTstatements, do a singleCOMMITafter all the data is loaded; if you are doing millions ofINSERTstatements, perhaps split up the huge transaction by issuing aCOMMITevery ten thousand or hundred thousand records, so the transaction does not grow too large.Remember that even a
SELECTstatement opens a transaction, so after running some report or debugging queries in an interactive mysql session, either issue aCOMMITor close the mysql session.
You might see warning messages referring to
“deadlocks” in the MySQL error log, or the output of
SHOW ENGINE INNODB
STATUS. Despite the scary-sounding name, a
deadlock is not a serious
issue for InnoDB tables, and often does not
require any corrective action. When two transactions start
modifying multiple tables, accessing the tables in a different
order, they can reach a state where each transaction is waiting
for the other and neither can proceed. When
deadlock detection
is enabled (the default), MySQL immediately detects this condition
and cancels (rolls back) the
“smaller” transaction, allowing the other to proceed.
If deadlock detection is disabled using the
innodb_deadlock_detect
configuration option, InnoDB relies on the
innodb_lock_wait_timeout setting
to roll back transactions in case of a deadlock.
Either way, your applications need error-handling logic to restart a transaction that is forcibly cancelled due to a deadlock. When you re-issue the same SQL statements as before, the original timing issue no longer applies. Either the other transaction has already finished and yours can proceed, or the other transaction is still in progress and your transaction waits until it finishes.
If deadlock warnings occur constantly, you might review the
application code to reorder the SQL operations in a consistent
way, or to shorten the transactions. You can test with the
innodb_print_all_deadlocks option
enabled to see all deadlock warnings in the MySQL error log,
rather than only the last warning in the
SHOW ENGINE INNODB
STATUS output.
For more information, see Section 15.7.5, “Deadlocks in InnoDB”.
To get the best performance from InnoDB tables,
you can adjust a number of parameters related to storage layout.
When you convert MyISAM tables that are large,
frequently accessed, and hold vital data, investigate and consider
the innodb_file_per_table and
innodb_page_size configuration
options, and the
ROW_FORMAT
and KEY_BLOCK_SIZE clauses of the
CREATE TABLE statement.
During your initial experiments, the most important setting is
innodb_file_per_table. When this
setting is enabled, which is the default, new
InnoDB tables are implicitly created in
file-per-table
tablespaces. In contrast with the InnoDB system
tablespace, file-per-table tablespaces allow disk space to be
reclaimed by the operating system when a table is truncated or
dropped. File-per-table tablespaces also support
DYNAMIC and
COMPRESSED row
formats and associated features such as table compression,
efficient off-page storage for long variable-length columns, and
large index prefixes. For more information, see
Section 15.6.3.2, “File-Per-Table Tablespaces”.
You can also store InnoDB tables in a shared
general tablespace, which support multiple tables and all row
formats. For more information, see
Section 15.6.3.3, “General Tablespaces”.
To convert a non-InnoDB table to use
InnoDB use ALTER
TABLE:
ALTER TABLE table_name ENGINE=InnoDB;
You might make an InnoDB table that is a clone
of a MyISAM table, rather than using ALTER
TABLE to perform conversion, to test the old and new
table side-by-side before switching.
Create an empty InnoDB table with identical
column and index definitions. Use SHOW CREATE TABLE
to see the full
table_name\GCREATE TABLE statement to use.
Change the ENGINE clause to
ENGINE=INNODB.
To transfer a large volume of data into an empty
InnoDB table created as shown in the previous
section, insert the rows with INSERT INTO
.
innodb_table SELECT * FROM
myisam_table ORDER BY
primary_key_columns
You can also create the indexes for the InnoDB
table after inserting the data. Historically, creating new
secondary indexes was a slow operation for InnoDB, but now you can
create the indexes after the data is loaded with relatively little
overhead from the index creation step.
If you have UNIQUE constraints on secondary
keys, you can speed up a table import by turning off the
uniqueness checks temporarily during the import operation:
SET unique_checks=0;
... import operation ...
SET unique_checks=1;
For big tables, this saves disk I/O because
InnoDB can use its
change buffer to write
secondary index records as a batch. Be certain that the data
contains no duplicate keys.
unique_checks permits but does
not require storage engines to ignore duplicate keys.
For better control over the insertion process, you can insert big tables in pieces:
INSERT INTO newtable SELECT * FROM oldtable WHERE yourkey >somethingAND yourkey <=somethingelse;
After all records are inserted, you can rename the tables.
During the conversion of big tables, increase the size of the
InnoDB buffer pool to reduce disk I/O, to a
maximum of 80% of physical memory. You can also increase the size
of InnoDB log files.
If you intend to make several temporary copies of your data in
InnoDB tables during the conversion process, it
is recommended that you create the tables in file-per-table
tablespaces so that you can reclaim the disk space when you drop
the tables. When the
innodb_file_per_table
configuration option is enabled (the default), newly created
InnoDB tables are implicitly created in
file-per-table tablespaces.
Whether you convert the MyISAM table directly
or create a cloned InnoDB table, make sure that
you have sufficient disk space to hold both the old and new tables
during the process.
InnoDB tables require
more disk space than MyISAM tables.
If an ALTER TABLE operation runs
out of space, it starts a rollback, and that can take hours if it
is disk-bound. For inserts, InnoDB uses the
insert buffer to merge secondary index records to indexes in
batches. That saves a lot of disk I/O. For rollback, no such
mechanism is used, and the rollback can take 30 times longer than
the insertion.
In the case of a runaway rollback, if you do not have valuable data in your database, it may be advisable to kill the database process rather than wait for millions of disk I/O operations to complete. For the complete procedure, see Section 15.21.2, “Forcing InnoDB Recovery”.
The PRIMARY KEY clause is a critical factor
affecting the performance of MySQL queries and the space usage for
tables and indexes. The primary key uniquely identifies a row in a
table. Every row in the table must have a primary key value, and
no two rows can have the same primary key value.
These are guidelines for the primary key, followed by more detailed explanations.
Declare a
PRIMARY KEYfor each table. Typically, it is the most important column that you refer to inWHEREclauses when looking up a single row.Declare the
PRIMARY KEYclause in the originalCREATE TABLEstatement, rather than adding it later through anALTER TABLEstatement.Choose the column and its data type carefully. Prefer numeric columns over character or string ones.
Consider using an auto-increment column if there is not another stable, unique, non-null, numeric column to use.
An auto-increment column is also a good choice if there is any doubt whether the value of the primary key column could ever change. Changing the value of a primary key column is an expensive operation, possibly involving rearranging data within the table and within each secondary index.
Consider adding a primary key to any table that does not already have one. Use the smallest practical numeric type based on the maximum projected size of the table. This can make each row slightly more compact, which can yield substantial space savings for large tables. The space savings are multiplied if the table has any secondary indexes, because the primary key value is repeated in each secondary index entry. In addition to reducing data size on disk, a small primary key also lets more data fit into the buffer pool, speeding up all kinds of operations and improving concurrency.
If the table already has a primary key on some longer column, such
as a VARCHAR, consider adding a new unsigned
AUTO_INCREMENT column and switching the primary
key to that, even if that column is not referenced in queries.
This design change can produce substantial space savings in the
secondary indexes. You can designate the former primary key
columns as UNIQUE NOT NULL to enforce the same
constraints as the PRIMARY KEY clause, that is,
to prevent duplicate or null values across all those columns.
If you spread related information across multiple tables, typically each table uses the same column for its primary key. For example, a personnel database might have several tables, each with a primary key of employee number. A sales database might have some tables with a primary key of customer number, and other tables with a primary key of order number. Because lookups using the primary key are very fast, you can construct efficient join queries for such tables.
If you leave the PRIMARY KEY clause out
entirely, MySQL creates an invisible one for you. It is a 6-byte
value that might be longer than you need, thus wasting space.
Because it is hidden, you cannot refer to it in queries.
The reliability and scalability features of
InnoDB require more disk storage than
equivalent MyISAM tables. You might change the
column and index definitions slightly, for better space
utilization, reduced I/O and memory consumption when processing
result sets, and better query optimization plans making efficient
use of index lookups.
If you do set up a numeric ID column for the primary key, use that
value to cross-reference with related values in any other tables,
particularly for join queries.
For example, rather than accepting a country name as input and
doing queries searching for the same name, do one lookup to
determine the country ID, then do other queries (or a single join
query) to look up relevant information across several tables.
Rather than storing a customer or catalog item number as a string
of digits, potentially using up several bytes, convert it to a
numeric ID for storing and querying. A 4-byte unsigned
INT column can index over 4 billion
items (with the US meaning of billion: 1000 million). For the
ranges of the different integer types, see
Section 11.1.2, “Integer Types (Exact Value) - INTEGER, INT, SMALLINT, TINYINT,
MEDIUMINT, BIGINT”.
InnoDB files require more care and planning
than MyISAM files do.
You must not delete the ibdata files that represent the
InnoDBsystem tablespace.Methods of moving or copying
InnoDBtables to a different server are described in Section 15.6.1.4, “Moving or Copying InnoDB Tables”.
InnoDB provides a configurable locking
mechanism that can significantly improve scalability and
performance of SQL statements that add rows to tables with
AUTO_INCREMENT columns. To use the
AUTO_INCREMENT mechanism with an
InnoDB table, an
AUTO_INCREMENT column must be defined as part
of an index such that it is possible to perform the equivalent of
an indexed SELECT
MAX( lookup on the
table to obtain the maximum column value. Typically, this is
achieved by making the column the first column of some table
index.
ai_col)
This section describes the behavior of
AUTO_INCREMENT lock modes, usage implications
for different AUTO_INCREMENT lock mode
settings, and how InnoDB initializes the
AUTO_INCREMENT counter.
This section describes the behavior of
AUTO_INCREMENT lock modes used to generate
auto-increment values, and how each lock mode affects
replication. Auto-increment lock modes are configured at startup
using the
innodb_autoinc_lock_mode
configuration parameter.
The following terms are used in describing
innodb_autoinc_lock_mode
settings:
“
INSERT-like” statementsAll statements that generate new rows in a table, including
INSERT,INSERT ... SELECT,REPLACE,REPLACE ... SELECT, andLOAD DATA. Includes “simple-inserts”, “bulk-inserts”, and “mixed-mode” inserts.“Simple inserts”
Statements for which the number of rows to be inserted can be determined in advance (when the statement is initially processed). This includes single-row and multiple-row
INSERTandREPLACEstatements that do not have a nested subquery, but notINSERT ... ON DUPLICATE KEY UPDATE.“Bulk inserts”
Statements for which the number of rows to be inserted (and the number of required auto-increment values) is not known in advance. This includes
INSERT ... SELECT,REPLACE ... SELECT, andLOAD DATAstatements, but not plainINSERT.InnoDBassigns new values for theAUTO_INCREMENTcolumn one at a time as each row is processed.“Mixed-mode inserts”
These are “simple insert” statements that specify the auto-increment value for some (but not all) of the new rows. An example follows, where
c1is anAUTO_INCREMENTcolumn of tablet1:INSERT INTO t1 (c1,c2) VALUES (1,'a'), (NULL,'b'), (5,'c'), (NULL,'d');
Another type of “mixed-mode insert” is
INSERT ... ON DUPLICATE KEY UPDATE, which in the worst case is in effect anINSERTfollowed by aUPDATE, where the allocated value for theAUTO_INCREMENTcolumn may or may not be used during the update phase.
There are three possible settings for the
innodb_autoinc_lock_mode
configuration parameter. The settings are 0, 1, or 2, for
“traditional”, “consecutive”, or
“interleaved” lock mode, respectively. As of MySQL
8.0, interleaved lock mode
(innodb_autoinc_lock_mode=2) is
the default setting. Prior to MySQL 8.0, consecutive lock mode
is the default
(innodb_autoinc_lock_mode=1).
The default setting of interleaved lock mode in MySQL 8.0 reflects the change from statement-based replication to row based replication as the default replication type. Statement-based replication requires the consecutive auto-increment lock mode to ensure that auto-increment values are assigned in a predictable and repeatable order for a given sequence of SQL statements, whereas row-based replication is not sensitive to the execution order of SQL statements.
innodb_autoinc_lock_mode = 0(“traditional” lock mode)The traditional lock mode provides the same behavior that existed before the
innodb_autoinc_lock_modeconfiguration parameter was introduced in MySQL 5.1. The traditional lock mode option is provided for backward compatibility, performance testing, and working around issues with “mixed-mode inserts”, due to possible differences in semantics.In this lock mode, all “INSERT-like” statements obtain a special table-level
AUTO-INClock for inserts into tables withAUTO_INCREMENTcolumns. This lock is normally held to the end of the statement (not to the end of the transaction) to ensure that auto-increment values are assigned in a predictable and repeatable order for a given sequence ofINSERTstatements, and to ensure that auto-increment values assigned by any given statement are consecutive.In the case of statement-based replication, this means that when an SQL statement is replicated on a replica server, the same values are used for the auto-increment column as on the source server. The result of execution of multiple
INSERTstatements is deterministic, and the replica reproduces the same data as on the source. If auto-increment values generated by multipleINSERTstatements were interleaved, the result of two concurrentINSERTstatements would be nondeterministic, and could not reliably be propagated to a replica server using statement-based replication.To make this clear, consider an example that uses this table:
CREATE TABLE t1 ( c1 INT(11) NOT NULL AUTO_INCREMENT, c2 VARCHAR(10) DEFAULT NULL, PRIMARY KEY (c1) ) ENGINE=InnoDB;
Suppose that there are two transactions running, each inserting rows into a table with an
AUTO_INCREMENTcolumn. One transaction is using anINSERT ... SELECTstatement that inserts 1000 rows, and another is using a simpleINSERTstatement that inserts one row:Tx1: INSERT INTO t1 (c2) SELECT 1000 rows from another table ... Tx2: INSERT INTO t1 (c2) VALUES ('xxx');InnoDBcannot tell in advance how many rows are retrieved from theSELECTin theINSERTstatement in Tx1, and it assigns the auto-increment values one at a time as the statement proceeds. With a table-level lock, held to the end of the statement, only oneINSERTstatement referring to tablet1can execute at a time, and the generation of auto-increment numbers by different statements is not interleaved. The auto-increment value generated by the Tx1INSERT ... SELECTstatement are consecutive, and the (single) auto-increment value used by theINSERTstatement in Tx2 are either smaller or larger than all those used for Tx1, depending on which statement executes first.As long as the SQL statements execute in the same order when replayed from the binary log (when using statement-based replication, or in recovery scenarios), the results are the same as they were when Tx1 and Tx2 first ran. Thus, table-level locks held until the end of a statement make
INSERTstatements using auto-increment safe for use with statement-based replication. However, those table-level locks limit concurrency and scalability when multiple transactions are executing insert statements at the same time.In the preceding example, if there were no table-level lock, the value of the auto-increment column used for the
INSERTin Tx2 depends on precisely when the statement executes. If theINSERTof Tx2 executes while theINSERTof Tx1 is running (rather than before it starts or after it completes), the specific auto-increment values assigned by the twoINSERTstatements are nondeterministic, and may vary from run to run.Under the consecutive lock mode,
InnoDBcan avoid using table-levelAUTO-INClocks for “simple insert” statements where the number of rows is known in advance, and still preserve deterministic execution and safety for statement-based replication.If you are not using the binary log to replay SQL statements as part of recovery or replication, the interleaved lock mode can be used to eliminate all use of table-level
AUTO-INClocks for even greater concurrency and performance, at the cost of permitting gaps in auto-increment numbers assigned by a statement and potentially having the numbers assigned by concurrently executing statements interleaved.innodb_autoinc_lock_mode = 1(“consecutive” lock mode)In this mode, “bulk inserts” use the special
AUTO-INCtable-level lock and hold it until the end of the statement. This applies to allINSERT ... SELECT,REPLACE ... SELECT, andLOAD DATAstatements. Only one statement holding theAUTO-INClock can execute at a time. If the source table of the bulk insert operation is different from the target table, theAUTO-INClock on the target table is taken after a shared lock is taken on the first row selected from the source table. If the source and target of the bulk insert operation are the same table, theAUTO-INClock is taken after shared locks are taken on all selected rows.“Simple inserts” (for which the number of rows to be inserted is known in advance) avoid table-level
AUTO-INClocks by obtaining the required number of auto-increment values under the control of a mutex (a light-weight lock) that is only held for the duration of the allocation process, not until the statement completes. No table-levelAUTO-INClock is used unless anAUTO-INClock is held by another transaction. If another transaction holds anAUTO-INClock, a “simple insert” waits for theAUTO-INClock, as if it were a “bulk insert”.This lock mode ensures that, in the presence of
INSERTstatements where the number of rows is not known in advance (and where auto-increment numbers are assigned as the statement progresses), all auto-increment values assigned by any “INSERT-like” statement are consecutive, and operations are safe for statement-based replication.Simply put, this lock mode significantly improves scalability while being safe for use with statement-based replication. Further, as with “traditional” lock mode, auto-increment numbers assigned by any given statement are consecutive. There is no change in semantics compared to “traditional” mode for any statement that uses auto-increment, with one important exception.
The exception is for “mixed-mode inserts”, where the user provides explicit values for an
AUTO_INCREMENTcolumn for some, but not all, rows in a multiple-row “simple insert”. For such inserts,InnoDBallocates more auto-increment values than the number of rows to be inserted. However, all values automatically assigned are consecutively generated (and thus higher than) the auto-increment value generated by the most recently executed previous statement. “Excess” numbers are lost.innodb_autoinc_lock_mode = 2(“interleaved” lock mode)In this lock mode, no “
INSERT-like” statements use the table-levelAUTO-INClock, and multiple statements can execute at the same time. This is the fastest and most scalable lock mode, but it is not safe when using statement-based replication or recovery scenarios when SQL statements are replayed from the binary log.In this lock mode, auto-increment values are guaranteed to be unique and monotonically increasing across all concurrently executing “
INSERT-like” statements. However, because multiple statements can be generating numbers at the same time (that is, allocation of numbers is interleaved across statements), the values generated for the rows inserted by any given statement may not be consecutive.If the only statements executing are “simple inserts” where the number of rows to be inserted is known ahead of time, there are no gaps in the numbers generated for a single statement, except for “mixed-mode inserts”. However, when “bulk inserts” are executed, there may be gaps in the auto-increment values assigned by any given statement.
Using auto-increment with replication
If you are using statement-based replication, set
innodb_autoinc_lock_modeto 0 or 1 and use the same value on the source and its replicas. Auto-increment values are not ensured to be the same on the replicas as on the source if you useinnodb_autoinc_lock_mode= 2 (“interleaved”) or configurations where the source and replicas do not use the same lock mode.If you are using row-based or mixed-format replication, all of the auto-increment lock modes are safe, since row-based replication is not sensitive to the order of execution of the SQL statements (and the mixed format uses row-based replication for any statements that are unsafe for statement-based replication).
“Lost” auto-increment values and sequence gaps
In all lock modes (0, 1, and 2), if a transaction that generated auto-increment values rolls back, those auto-increment values are “lost”. Once a value is generated for an auto-increment column, it cannot be rolled back, whether or not the “
INSERT-like” statement is completed, and whether or not the containing transaction is rolled back. Such lost values are not reused. Thus, there may be gaps in the values stored in anAUTO_INCREMENTcolumn of a table.Specifying NULL or 0 for the
AUTO_INCREMENTcolumnIn all lock modes (0, 1, and 2), if a user specifies NULL or 0 for the
AUTO_INCREMENTcolumn in anINSERT,InnoDBtreats the row as if the value was not specified and generates a new value for it.Assigning a negative value to the
AUTO_INCREMENTcolumnIn all lock modes (0, 1, and 2), the behavior of the auto-increment mechanism is not defined if you assign a negative value to the
AUTO_INCREMENTcolumn.If the
AUTO_INCREMENTvalue becomes larger than the maximum integer for the specified integer typeIn all lock modes (0, 1, and 2), the behavior of the auto-increment mechanism is not defined if the value becomes larger than the maximum integer that can be stored in the specified integer type.
Gaps in auto-increment values for “bulk inserts”
With
innodb_autoinc_lock_modeset to 0 (“traditional”) or 1 (“consecutive”), the auto-increment values generated by any given statement are consecutive, without gaps, because the table-levelAUTO-INClock is held until the end of the statement, and only one such statement can execute at a time.With
innodb_autoinc_lock_modeset to 2 (“interleaved”), there may be gaps in the auto-increment values generated by “bulk inserts,” but only if there are concurrently executing “INSERT-like” statements.For lock modes 1 or 2, gaps may occur between successive statements because for bulk inserts the exact number of auto-increment values required by each statement may not be known and overestimation is possible.
Auto-increment values assigned by “mixed-mode inserts”
Consider a “mixed-mode insert,” where a “simple insert” specifies the auto-increment value for some (but not all) resulting rows. Such a statement behaves differently in lock modes 0, 1, and 2. For example, assume
c1is anAUTO_INCREMENTcolumn of tablet1, and that the most recent automatically generated sequence number is 100.mysql>
CREATE TABLE t1 (->c1 INT UNSIGNED NOT NULL AUTO_INCREMENT PRIMARY KEY,->c2 CHAR(1)->) ENGINE = INNODB;Now, consider the following “mixed-mode insert” statement:
mysql>
INSERT INTO t1 (c1,c2) VALUES (1,'a'), (NULL,'b'), (5,'c'), (NULL,'d');With
innodb_autoinc_lock_modeset to 0 (“traditional”), the four new rows are:mysql>
SELECT c1, c2 FROM t1 ORDER BY c2;+-----+------+ | c1 | c2 | +-----+------+ | 1 | a | | 101 | b | | 5 | c | | 102 | d | +-----+------+The next available auto-increment value is 103 because the auto-increment values are allocated one at a time, not all at once at the beginning of statement execution. This result is true whether or not there are concurrently executing “
INSERT-like” statements (of any type).With
innodb_autoinc_lock_modeset to 1 (“consecutive”), the four new rows are also:mysql>
SELECT c1, c2 FROM t1 ORDER BY c2;+-----+------+ | c1 | c2 | +-----+------+ | 1 | a | | 101 | b | | 5 | c | | 102 | d | +-----+------+However, in this case, the next available auto-increment value is 105, not 103 because four auto-increment values are allocated at the time the statement is processed, but only two are used. This result is true whether or not there are concurrently executing “
INSERT-like” statements (of any type).With
innodb_autoinc_lock_modeset to mode 2 (“interleaved”), the four new rows are:mysql>
SELECT c1, c2 FROM t1 ORDER BY c2;+-----+------+ | c1 | c2 | +-----+------+ | 1 | a | |x| b | | 5 | c | |y| d | +-----+------+The values of
xandyare unique and larger than any previously generated rows. However, the specific values ofxandydepend on the number of auto-increment values generated by concurrently executing statements.Finally, consider the following statement, issued when the most-recently generated sequence number is 100:
mysql>
INSERT INTO t1 (c1,c2) VALUES (1,'a'), (NULL,'b'), (101,'c'), (NULL,'d');With any
innodb_autoinc_lock_modesetting, this statement generates a duplicate-key error 23000 (Can't write; duplicate key in table) because 101 is allocated for the row(NULL, 'b')and insertion of the row(101, 'c')fails.Modifying
AUTO_INCREMENTcolumn values in the middle of a sequence ofINSERTstatementsIn MySQL 5.7 and earlier, modifying an
AUTO_INCREMENTcolumn value in the middle of a sequence ofINSERTstatements could lead to “Duplicate entry” errors. For example, if you performed anUPDATEoperation that changed anAUTO_INCREMENTcolumn value to a value larger than the current maximum auto-increment value, subsequentINSERToperations that did not specify an unused auto-increment value could encounter “Duplicate entry” errors. In MySQL 8.0 and later, if you modify anAUTO_INCREMENTcolumn value to a value larger than the current maximum auto-increment value, the new value is persisted, and subsequentINSERToperations allocate auto-increment values starting from the new, larger value. This behavior is demonstrated in the following example.mysql>
CREATE TABLE t1 (->c1 INT NOT NULL AUTO_INCREMENT,->PRIMARY KEY (c1)->) ENGINE = InnoDB;mysql>INSERT INTO t1 VALUES(0), (0), (3);mysql>SELECT c1 FROM t1;+----+ | c1 | +----+ | 1 | | 2 | | 3 | +----+ mysql>UPDATE t1 SET c1 = 4 WHERE c1 = 1;mysql>SELECT c1 FROM t1;+----+ | c1 | +----+ | 2 | | 3 | | 4 | +----+ mysql>INSERT INTO t1 VALUES(0);mysql>SELECT c1 FROM t1;+----+ | c1 | +----+ | 2 | | 3 | | 4 | | 5 | +----+
This section describes how InnoDB initializes
AUTO_INCREMENT counters.
If you specify an AUTO_INCREMENT column for
an InnoDB table, the in-memory table object
contains a special counter called the auto-increment counter
that is used when assigning new values for the column.
In MySQL 5.7 and earlier, the auto-increment counter is stored
only in main memory, not on disk. To initialize an
auto-increment counter after a server restart,
InnoDB would execute the equivalent of the
following statement on the first insert into a table containing
an AUTO_INCREMENT column.
SELECT MAX(ai_col) FROM table_name FOR UPDATE;
In MySQL 8.0, this behavior is changed. The current maximum auto-increment counter value is written to the redo log each time it changes and is saved to an engine-private system table on each checkpoint. These changes make the current maximum auto-increment counter value persistent across server restarts.
On a server restart following a normal shutdown,
InnoDB initializes the in-memory
auto-increment counter using the current maximum auto-increment
value stored in the data dictionary system table.
On a server restart during crash recovery,
InnoDB initializes the in-memory
auto-increment counter using the current maximum auto-increment
value stored in the data dictionary system table and scans the
redo log for auto-increment counter values written since the
last checkpoint. If a redo-logged value is greater than the
in-memory counter value, the redo-logged value is applied.
However, in the case of an unexpected server exit, reuse of a
previously allocated auto-increment value cannot be guaranteed.
Each time the current maximum auto-increment value is changed
due to an INSERT or
UPDATE operation, the new value
is written to the redo log, but if the unexpected exit occurs
before the redo log is flushed to disk, the previously allocated
value could be reused when the auto-increment counter is
initialized after the server is restarted.
The only circumstance in which InnoDB uses
the equivalent of a SELECT MAX(ai_col) FROM
statement to initialize an auto-increment counter is when
importing a table
without a table_name FOR UPDATE.cfg metadata file. Otherwise,
the current maximum auto-increment counter value is read from
the .cfg metadata file if present. Aside
from counter value initialization, the equivalent of a
SELECT MAX(ai_col) FROM
statement is
used to determine the current maximum auto-increment counter
value of the table when attempting to set the counter value to
one that is smaller than or equal to the persisted counter value
using an table_nameALTER TABLE ... AUTO_INCREMENT =
statement. For
example, you might try to set the counter value to a lesser
value after deleting some records. In this case, the table must
be searched to ensure that the new counter value is not less
than or equal to the actual current maximum counter value.
N FOR UPDATE
In MySQL 5.7 and earlier, a server restart cancels the effect of
the AUTO_INCREMENT = N table option, which
may be used in a CREATE TABLE or
ALTER TABLE statement to set an initial
counter value or alter the existing counter value, respectively.
In MySQL 8.0, a server restart does not cancel the effect of the
AUTO_INCREMENT = N table option. If you
initialize the auto-increment counter to a specific value, or if
you alter the auto-increment counter value to a larger value,
the new value is persisted across server restarts.
ALTER TABLE ...
AUTO_INCREMENT = N can only change the
auto-increment counter value to a value larger than the
current maximum.
In MySQL 5.7 and earlier, a server restart immediately following
a ROLLBACK
operation could result in the reuse of auto-increment values
that were previously allocated to the rolled-back transaction,
effectively rolling back the current maximum auto-increment
value. In MySQL 8.0, the current maximum auto-increment value is
persisted, preventing the reuse of previously allocated values.
If a SHOW TABLE STATUS statement
examines a table before the auto-increment counter is
initialized, InnoDB opens the table and
initializes the counter value using the current maximum
auto-increment value that is stored in the data dictionary
system table. The value is stored in memory for use by later
inserts or updates. Initialization of the counter value uses a
normal exclusive-locking read on the table which lasts to the
end of the transaction. InnoDB follows the
same procedure when initializing the auto-increment counter for
a newly created table that has a user-specified auto-increment
value that is greater than 0.
After the auto-increment counter is initialized, if you do not
explicitly specify an auto-increment value when inserting a row,
InnoDB implicitly increments the counter and
assigns the new value to the column. If you insert a row that
explicitly specifies an auto-increment column value, and the
value is greater than the current maximum counter value, the
counter is set to the specified value.
InnoDB uses the in-memory auto-increment
counter as long as the server runs. When the server is stopped
and restarted, InnoDB reinitializes the
auto-increment counter, as described earlier.
The auto_increment_offset
configuration option determines the starting point for the
AUTO_INCREMENT column value. The default
setting is 1.
The auto_increment_increment
configuration option controls the interval between successive
column values. The default setting is 1.
This section covers topics related to InnoDB
indexes.
Every InnoDB table has a special index called
the clustered index
where the data for the rows is stored. Typically, the clustered
index is synonymous with the
primary key. To get the
best performance from queries, inserts, and other database
operations, you must understand how InnoDB uses
the clustered index to optimize the most common lookup and DML
operations for each table.
When you define a
PRIMARY KEYon your table,InnoDBuses it as the clustered index. Define a primary key for each table that you create. If there is no logical unique and non-null column or set of columns, add a new auto-increment column, whose values are filled in automatically.If you do not define a
PRIMARY KEYfor your table, MySQL locates the firstUNIQUEindex where all the key columns areNOT NULLandInnoDBuses it as the clustered index.If the table has no
PRIMARY KEYor suitableUNIQUEindex,InnoDBinternally generates a hidden clustered index namedGEN_CLUST_INDEXon a synthetic column containing row ID values. The rows are ordered by the ID thatInnoDBassigns to the rows in such a table. The row ID is a 6-byte field that increases monotonically as new rows are inserted. Thus, the rows ordered by the row ID are physically in insertion order.
Accessing a row through the clustered index is fast because the index search leads directly to the page with all the row data. If a table is large, the clustered index architecture often saves a disk I/O operation when compared to storage organizations that store row data using a different page from the index record.
All indexes other than the clustered index are known as
secondary indexes.
In InnoDB, each record in a secondary index
contains the primary key columns for the row, as well as the
columns specified for the secondary index.
InnoDB uses this primary key value to search
for the row in the clustered index.
If the primary key is long, the secondary indexes use more space, so it is advantageous to have a short primary key.
For guidelines to take advantage of InnoDB
clustered and secondary indexes, see
Section 8.3, “Optimization and Indexes”.
With the exception of spatial indexes, InnoDB
indexes are B-tree data
structures. Spatial indexes use
R-trees, which are specialized
data structures for indexing multi-dimensional data. Index records
are stored in the leaf pages of their B-tree or R-tree data
structure. The default size of an index page is 16KB.
When new records are inserted into an InnoDB
clustered index,
InnoDB tries to leave 1/16 of the page free for
future insertions and updates of the index records. If index
records are inserted in a sequential order (ascending or
descending), the resulting index pages are about 15/16 full. If
records are inserted in a random order, the pages are from 1/2 to
15/16 full.
InnoDB performs a bulk load when creating or
rebuilding B-tree indexes. This method of index creation is known
as a sorted index build. The
innodb_fill_factor configuration
option defines the percentage of space on each B-tree page that is
filled during a sorted index build, with the remaining space
reserved for future index growth. Sorted index builds are not
supported for spatial indexes. For more information, see
Section 15.6.2.3, “Sorted Index Builds”. An
innodb_fill_factor setting of 100
leaves 1/16 of the space in clustered index pages free for future
index growth.
If the fill factor of an InnoDB index page
drops below the MERGE_THRESHOLD, which is 50%
by default if not specified, InnoDB tries to
contract the index tree to free the page. The
MERGE_THRESHOLD setting applies to both B-tree
and R-tree indexes. For more information, see
Section 15.8.11, “Configuring the Merge Threshold for Index Pages”.
You can define the page size
for all InnoDB tablespaces in a MySQL instance
by setting the innodb_page_size
configuration option prior to initializing the MySQL instance.
Once the page size for an instance is defined, you cannot change
it without reinitializing the instance. Supported sizes are 64KB,
32KB, 16KB (default), 8KB, and 4KB.
A MySQL instance using a particular InnoDB page
size cannot use data files or log files from an instance that uses
a different page size.
InnoDB performs a bulk load instead of
inserting one index record at a time when creating or rebuilding
indexes. This method of index creation is also known as a sorted
index build. Sorted index builds are not supported for spatial
indexes.
There are three phases to an index build. In the first phase, the clustered index is scanned, and index entries are generated and added to the sort buffer. When the sort buffer becomes full, entries are sorted and written out to a temporary intermediate file. This process is also known as a “run”. In the second phase, with one or more runs written to the temporary intermediate file, a merge sort is performed on all entries in the file. In the third and final phase, the sorted entries are inserted into the B-tree.
Prior to the introduction of sorted index builds, index entries were inserted into the B-tree one record at a time using insert APIs. This method involved opening a B-tree cursor to find the insert position and then inserting entries into a B-tree page using an optimistic insert. If an insert failed due to a page being full, a pessimistic insert would be performed, which involves opening a B-tree cursor and splitting and merging B-tree nodes as necessary to find space for the entry. The drawbacks of this “top-down” method of building an index are the cost of searching for an insert position and the constant splitting and merging of B-tree nodes.
Sorted index builds use a “bottom-up” approach to building an index. With this approach, a reference to the right-most leaf page is held at all levels of the B-tree. The right-most leaf page at the necessary B-tree depth is allocated and entries are inserted according to their sorted order. Once a leaf page is full, a node pointer is appended to the parent page and a sibling leaf page is allocated for the next insert. This process continues until all entries are inserted, which may result in inserts up to the root level. When a sibling page is allocated, the reference to the previously pinned leaf page is released, and the newly allocated leaf page becomes the right-most leaf page and new default insert location.
Reserving B-tree Page Space for Future Index Growth
To set aside space for future index growth, you can use the
innodb_fill_factor configuration
option to reserve a percentage of B-tree page space. For example,
setting innodb_fill_factor to 80
reserves 20 percent of the space in B-tree pages during a sorted
index build. This setting applies to both B-tree leaf and non-leaf
pages. It does not apply to external pages used for
TEXT or
BLOB entries. The amount of space
that is reserved may not be exactly as configured, as the
innodb_fill_factor value is
interpreted as a hint rather than a hard limit.
Sorted Index Builds and Full-Text Index Support
Sorted index builds are supported for fulltext indexes. Previously, SQL was used to insert entries into a fulltext index.
Sorted Index Builds and Compressed Tables
For compressed tables, the previous index creation method appended entries to both compressed and uncompressed pages. When the modification log (representing free space on the compressed page) became full, the compressed page would be recompressed. If compression failed due to a lack of space, the page would be split. With sorted index builds, entries are only appended to uncompressed pages. When an uncompressed page becomes full, it is compressed. Adaptive padding is used to ensure that compression succeeds in most cases, but if compression fails, the page is split and compression is attempted again. This process continues until compression is successful. For more information about compression of B-Tree pages, see Section 15.9.1.5, “How Compression Works for InnoDB Tables”.
Sorted Index Builds and Redo Logging
Redo logging is disabled during a sorted index build. Instead, there is a checkpoint to ensure that the index build can withstand an unexpected exit or failure. The checkpoint forces a write of all dirty pages to disk. During a sorted index build, the page cleaner thread is signaled periodically to flush dirty pages to ensure that the checkpoint operation can be processed quickly. Normally, the page cleaner thread flushes dirty pages when the number of clean pages falls below a set threshold. For sorted index builds, dirty pages are flushed promptly to reduce checkpoint overhead and to parallelize I/O and CPU activity.
Sorted Index Builds and Optimizer Statistics
Sorted index builds may result in optimizer statistics that differ from those generated by the previous method of index creation. The difference in statistics, which is not expected to affect workload performance, is due to the different algorithm used to populate the index.
FULLTEXT indexes are created on text-based
columns (CHAR,
VARCHAR, or
TEXT columns) to help speed up
queries and DML operations on data contained within those columns,
omitting any words that are defined as stopwords.
A FULLTEXT index is defined as part of a
CREATE TABLE statement or added to
an existing table using ALTER TABLE
or CREATE INDEX.
Full-text search is performed using MATCH()
... AGAINST syntax. For usage information, see
Section 12.10, “Full-Text Search Functions”.
InnoDB FULLTEXT indexes are
described under the following topics in this section:
InnoDB FULLTEXT indexes
have an inverted index design. Inverted indexes store a list of
words, and for each word, a list of documents that the word
appears in. To support proximity search, position information
for each word is also stored, as a byte offset.
When creating an InnoDB
FULLTEXT index, a set of index tables is
created, as shown in the following example:
mysql>CREATE TABLE opening_lines (id INT UNSIGNED AUTO_INCREMENT NOT NULL PRIMARY KEY,opening_line TEXT(500),author VARCHAR(200),title VARCHAR(200),FULLTEXT idx (opening_line)) ENGINE=InnoDB;mysql>SELECT table_id, name, space from INFORMATION_SCHEMA.INNODB_TABLESWHERE name LIKE 'test/%';+----------+----------------------------------------------------+-------+ | table_id | name | space | +----------+----------------------------------------------------+-------+ | 333 | test/fts_0000000000000147_00000000000001c9_index_1 | 289 | | 334 | test/fts_0000000000000147_00000000000001c9_index_2 | 290 | | 335 | test/fts_0000000000000147_00000000000001c9_index_3 | 291 | | 336 | test/fts_0000000000000147_00000000000001c9_index_4 | 292 | | 337 | test/fts_0000000000000147_00000000000001c9_index_5 | 293 | | 338 | test/fts_0000000000000147_00000000000001c9_index_6 | 294 | | 330 | test/fts_0000000000000147_being_deleted | 286 | | 331 | test/fts_0000000000000147_being_deleted_cache | 287 | | 332 | test/fts_0000000000000147_config | 288 | | 328 | test/fts_0000000000000147_deleted | 284 | | 329 | test/fts_0000000000000147_deleted_cache | 285 | | 327 | test/opening_lines | 283 | +----------+----------------------------------------------------+-------+
The first six tables represent the inverted index and are
referred to as auxiliary index tables. When incoming documents
are tokenized, the individual words (also referred to as
“tokens”) are inserted into the index tables along
with position information and the associated Document ID
(DOC_ID). The words are fully sorted and
partitioned among the six index tables based on the character
set sort weight of the word's first character.
The inverted index is partitioned into six auxiliary index
tables to support parallel index creation. By default, two
threads tokenize, sort, and insert words and associated data
into the index tables. The number of threads is configurable
using the
innodb_ft_sort_pll_degree
option. Consider increasing the number of threads when creating
FULLTEXT indexes on large tables.
Auxiliary index table names are prefixed with
fts_ and postfixed with
index_*. Each index table is associated with
the indexed table by a hex value in the index table name that
matches the table_id of the indexed table.
For example, the table_id of the
test/opening_lines table is
327, for which the hex value is 0x147. As
shown in the preceding example, the “147” hex value
appears in the names of index tables that are associated with
the test/opening_lines table.
A hex value representing the index_id of the
FULLTEXT index also appears in auxiliary
index table names. For example, in the auxiliary table name
test/fts_0000000000000147_00000000000001c9_index_1,
the hex value 1c9 has a decimal value of 457.
The index defined on the opening_lines table
(idx) can be identified by querying the
INFORMATION_SCHEMA.INNODB_INDEXES
table for this value (457).
mysql>SELECT index_id, name, table_id, space from INFORMATION_SCHEMA.INNODB_INDEXESWHERE index_id=457;+----------+------+----------+-------+ | index_id | name | table_id | space | +----------+------+----------+-------+ | 457 | idx | 327 | 283 | +----------+------+----------+-------+
Index tables are stored in their own tablespace if the primary table is created in a file-per-table tablespace.
The other index tables shown in the preceding example are
referred to as common index tables and are used for deletion
handling and storing the internal state of
FULLTEXT indexes. Unlike the inverted index
tables, which are created for each full-text index, this set of
tables is common to all full-text indexes created on a
particular table.
Common auxiliary tables are retained even if full-text indexes
are dropped. When a full-text index is dropped, the
FTS_DOC_ID column that was created for the
index is retained, as removing the FTS_DOC_ID
column would require rebuilding the table. Common axillary
tables are required to manage the FTS_DOC_ID
column.
fts_*_deletedandfts_*_deleted_cacheContain the document IDs (DOC_ID) for documents that are deleted but whose data is not yet removed from the full-text index. The
fts_*_deleted_cacheis the in-memory version of thefts_*_deletedtable.fts_*_being_deletedandfts_*_being_deleted_cacheContain the document IDs (DOC_ID) for documents that are deleted and whose data is currently in the process of being removed from the full-text index. The
fts_*_being_deleted_cachetable is the in-memory version of thefts_*_being_deletedtable.fts_*_configStores information about the internal state of the
FULLTEXTindex. Most importantly, it stores theFTS_SYNCED_DOC_ID, which identifies documents that have been parsed and flushed to disk. In case of crash recovery,FTS_SYNCED_DOC_IDvalues are used to identify documents that have not been flushed to disk so that the documents can be re-parsed and added back to theFULLTEXTindex cache. To view the data in this table, query theINFORMATION_SCHEMA.INNODB_FT_CONFIGtable.
When a document is inserted, it is tokenized, and the individual
words and associated data are inserted into the
FULLTEXT index. This process, even for small
documents, could result in numerous small insertions into the
auxiliary index tables, making concurrent access to these tables
a point of contention. To avoid this problem,
InnoDB uses a FULLTEXT
index cache to temporarily cache index table insertions for
recently inserted rows. This in-memory cache structure holds
insertions until the cache is full and then batch flushes them
to disk (to the auxiliary index tables). You can query the
INFORMATION_SCHEMA.INNODB_FT_INDEX_CACHE
table to view tokenized data for recently inserted rows.
The caching and batch flushing behavior avoids frequent updates to auxiliary index tables, which could result in concurrent access issues during busy insert and update times. The batching technique also avoids multiple insertions for the same word, and minimizes duplicate entries. Instead of flushing each word individually, insertions for the same word are merged and flushed to disk as a single entry, improving insertion efficiency while keeping auxiliary index tables as small as possible.
The innodb_ft_cache_size
variable is used to configure the full-text index cache size (on
a per-table basis), which affects how often the full-text index
cache is flushed. You can also define a global full-text index
cache size limit for all tables in a given instance using the
innodb_ft_total_cache_size
option.
The full-text index cache stores the same information as auxiliary index tables. However, the full-text index cache only caches tokenized data for recently inserted rows. The data that is already flushed to disk (to the full-text auxiliary tables) is not brought back into the full-text index cache when queried. The data in auxiliary index tables is queried directly, and results from the auxiliary index tables are merged with results from the full-text index cache before being returned.
InnoDB uses a unique document identifier
referred to as a Document ID (DOC_ID) to map
words in the full-text index to document records where the word
appears. The mapping requires an FTS_DOC_ID
column on the indexed table. If an FTS_DOC_ID
column is not defined, InnoDB automatically
adds a hidden FTS_DOC_ID column when the
full-text index is created. The following example demonstrates
this behavior.
The following table definition does not include an
FTS_DOC_ID column:
mysql>CREATE TABLE opening_lines (id INT UNSIGNED AUTO_INCREMENT NOT NULL PRIMARY KEY,opening_line TEXT(500),author VARCHAR(200),title VARCHAR(200)) ENGINE=InnoDB;
When you create a full-text index on the table using
CREATE FULLTEXT INDEX syntax, a warning is
returned which reports that InnoDB is
rebuilding the table to add the FTS_DOC_ID
column.
mysql>CREATE FULLTEXT INDEX idx ON opening_lines(opening_line);Query OK, 0 rows affected, 1 warning (0.19 sec) Records: 0 Duplicates: 0 Warnings: 1 mysql>SHOW WARNINGS;+---------+------+--------------------------------------------------+ | Level | Code | Message | +---------+------+--------------------------------------------------+ | Warning | 124 | InnoDB rebuilding table to add column FTS_DOC_ID | +---------+------+--------------------------------------------------+
The same warning is returned when using
ALTER TABLE to add a full-text
index to a table that does not have an
FTS_DOC_ID column. If you create a full-text
index at CREATE TABLE time and do
not specify an FTS_DOC_ID column,
InnoDB adds a hidden
FTS_DOC_ID column, without warning.
Defining an FTS_DOC_ID column at
CREATE TABLE time is less
expensive than creating a full-text index on a table that is
already loaded with data. If an FTS_DOC_ID
column is defined on a table prior to loading data, the table
and its indexes do not have to be rebuilt to add the new column.
If you are not concerned with CREATE FULLTEXT
INDEX performance, leave out the
FTS_DOC_ID column to have
InnoDB create it for you.
InnoDB creates a hidden
FTS_DOC_ID column along with a unique index
(FTS_DOC_ID_INDEX) on the
FTS_DOC_ID column. If you want to create your
own FTS_DOC_ID column, the column must be
defined as BIGINT UNSIGNED NOT NULL and named
FTS_DOC_ID (all uppercase), as in the
following example:
The FTS_DOC_ID column does not need to be
defined as an AUTO_INCREMENT column, but
AUTO_INCREMENT could make loading data
easier.
mysql>CREATE TABLE opening_lines (FTS_DOC_ID BIGINT UNSIGNED AUTO_INCREMENT NOT NULL PRIMARY KEY,opening_line TEXT(500),author VARCHAR(200),title VARCHAR(200)) ENGINE=InnoDB;
If you choose to define the FTS_DOC_ID column
yourself, you are responsible for managing the column to avoid
empty or duplicate values. FTS_DOC_ID values
cannot be reused, which means FTS_DOC_ID
values must be ever increasing.
Optionally, you can create the required unique
FTS_DOC_ID_INDEX (all uppercase) on the
FTS_DOC_ID column.
mysql> CREATE UNIQUE INDEX FTS_DOC_ID_INDEX on opening_lines(FTS_DOC_ID);
If you do not create the FTS_DOC_ID_INDEX,
InnoDB creates it automatically.
FTS_DOC_ID_INDEX cannot be defined as a
descending index because the InnoDB SQL
parser does not use descending indexes.
The permitted gap between the largest used
FTS_DOC_ID value and new
FTS_DOC_ID value is 65535.
To avoid rebuilding the table, the FTS_DOC_ID
column is retained when dropping a full-text index.
Deleting a record that has a full-text index column could result
in numerous small deletions in the auxiliary index tables,
making concurrent access to these tables a point of contention.
To avoid this problem, the Document ID
(DOC_ID) of a deleted document is logged in a
special FTS_*_DELETED table whenever a record
is deleted from an indexed table, and the indexed record remains
in the full-text index. Before returning query results,
information in the FTS_*_DELETED table is
used to filter out deleted Document IDs. The benefit of this
design is that deletions are fast and inexpensive. The drawback
is that the size of the index is not immediately reduced after
deleting records. To remove full-text index entries for deleted
records, run OPTIMIZE TABLE on the indexed
table with
innodb_optimize_fulltext_only=ON
to rebuild the full-text index. For more information, see
Optimizing InnoDB Full-Text Indexes.
InnoDB FULLTEXT indexes
have special transaction handling characteristics due its
caching and batch processing behavior. Specifically, updates and
insertions on a FULLTEXT index are processed
at transaction commit time, which means that a
FULLTEXT search can only see committed data.
The following example demonstrates this behavior. The
FULLTEXT search only returns a result after
the inserted lines are committed.
mysql>CREATE TABLE opening_lines (id INT UNSIGNED AUTO_INCREMENT NOT NULL PRIMARY KEY,opening_line TEXT(500),author VARCHAR(200),title VARCHAR(200),FULLTEXT idx (opening_line)) ENGINE=InnoDB;mysql>BEGIN;mysql>INSERT INTO opening_lines(opening_line,author,title) VALUES('Call me Ishmael.','Herman Melville','Moby-Dick'),('A screaming comes across the sky.','Thomas Pynchon','Gravity\'s Rainbow'),('I am an invisible man.','Ralph Ellison','Invisible Man'),('Where now? Who now? When now?','Samuel Beckett','The Unnamable'),('It was love at first sight.','Joseph Heller','Catch-22'),('All this happened, more or less.','Kurt Vonnegut','Slaughterhouse-Five'),('Mrs. Dalloway said she would buy the flowers herself.','Virginia Woolf','Mrs. Dalloway'),('It was a pleasure to burn.','Ray Bradbury','Fahrenheit 451');mysql>SELECT COUNT(*) FROM opening_lines WHERE MATCH(opening_line) AGAINST('Ishmael');+----------+ | COUNT(*) | +----------+ | 0 | +----------+ mysql>COMMIT;mysql>SELECT COUNT(*) FROM opening_lines WHERE MATCH(opening_line) AGAINST('Ishmael');+----------+ | COUNT(*) | +----------+ | 1 | +----------+
You can monitor and examine the special text-processing aspects
of InnoDB FULLTEXT indexes
by querying the following INFORMATION_SCHEMA
tables:
You can also view basic information for
FULLTEXT indexes and tables by querying
INNODB_INDEXES and
INNODB_TABLES.
For more information, see Section 15.15.4, “InnoDB INFORMATION_SCHEMA FULLTEXT Index Tables”.
- 15.6.3.1 The System Tablespace
- 15.6.3.2 File-Per-Table Tablespaces
- 15.6.3.3 General Tablespaces
- 15.6.3.4 Undo Tablespaces
- 15.6.3.5 Temporary Tablespaces
- 15.6.3.6 Moving Tablespace Files While the Server is Offline
- 15.6.3.7 Disabling Tablespace Path Validation
- 15.6.3.8 Optimizing Tablespace Space Allocation on Linux
- 15.6.3.9 Tablespace AUTOEXTEND_SIZE Configuration
This section covers topics related to InnoDB
tablespaces.
The system tablespace is the storage area for the change buffer.
It may also contain table and index data if tables are created in
the system tablespace rather than file-per-table or general
tablespaces. In previous MySQL versions, the system tablespace
contained the InnoDB data dictionary. In MySQL
8.0, InnoDB stores metadata in the
MySQL data dictionary. See Chapter 14, MySQL Data Dictionary. In
previous MySQL releases, the system tablespace also contained the
doublewrite buffer storage area. This storage area resides in
separate doublewrite files as of MySQL 8.0.20. See
Section 15.6.4, “Doublewrite Buffer”.
The system tablespace can have one or more data files. By default,
a single system tablespace data file, named
ibdata1, is created in the data directory.
The size and number of system tablespace data files is defined by
the innodb_data_file_path startup
option. For configuration information, see
System Tablespace Data File Configuration.
Additional information about the system tablespace is provided under the following topics in the section:
This section describes how to increase or decrease the size of the system tablespace.
Increasing the Size of the System Tablespace
The easiest way to increase the size of the system tablespace is
to configure it to be auto-extending. To do so, specify the
autoextend attribute for the last data file
in the innodb_data_file_path
setting, and restart the server. For example:
innodb_data_file_path=ibdata1:10M:autoextend
When the autoextend attribute is specified,
the data file automatically increases in size by 8MB increments
as space is required. The
innodb_autoextend_increment
variable controls the increment size.
You can also increase system tablespace size by adding another data file. To do so:
Stop the MySQL server.
If the last data file in the
innodb_data_file_pathsetting is defined with theautoextendattribute, remove it, and modify the size attribute to reflect the current data file size. To determine the appropriate data file size to specify, check your file system for the file size, and round that value down to the closest MB value, where a MB is equal to 1024 x 1024.Append a new data file to the
innodb_data_file_pathsetting, optionally specifying theautoextendattribute. Theautoextendattribute can be specified only for the last data file in theinnodb_data_file_pathsetting.Start the MySQL server.
For example, this tablespace has one auto-extending data file:
innodb_data_home_dir = innodb_data_file_path = /ibdata/ibdata1:10M:autoextend
Suppose that the data file has grown to 988MB over time. This is
the innodb_data_file_path
setting after modifying the size attribute to reflect the
current data file size, and after specifying a new 50MB
auto-extending data file:
innodb_data_home_dir = innodb_data_file_path = /ibdata/ibdata1:988M;/disk2/ibdata2:50M:autoextend
When adding a new data file, do not specify an existing file
name. InnoDB creates and initializes the new
data file when you start the server.
You cannot increase the size of an existing system tablespace
data file by changing its size attribute. For example,
changing the
innodb_data_file_path setting
from ibdata1:10M:autoextend to
ibdata1:12M:autoextend produces the
following error when starting the server:
[ERROR] [MY-012263] [InnoDB] The Auto-extending innodb_system data file './ibdata1' is of a different size 640 pages (rounded down to MB) than specified in the .cnf file: initial 768 pages, max 0 (relevant if non-zero) pages!
The error indicates that the existing data file size
(expressed in InnoDB pages) is different
from the size specified in the configuration file. If you
encounter this error, restore the previous
innodb_data_file_path
setting, and refer to the system tablespace resizing
instructions.
InnoDB page size is defined by the
innodb_page_size variable.
The default is 16384 bytes.
Decreasing the Size of the InnoDB System Tablespace
Decreasing the size of an existing system tablespace is not supported. The only option to achieve a smaller system tablespace is to restore your data from a backup to a new MySQL instance created with the desired system tablespace configuration.
For information about creating backups, see Section 15.18.1, “InnoDB Backup”.
For information about configuring data files for a new system tablespace. See System Tablespace Data File Configuration.
To avoid large system tablespaces, consider using file-per-table
tablespaces for your data. File-per-table tablespaces are the
default tablespace type and are used implicitly when creating an
InnoDB table. Unlike the system tablespace,
disk space is returned to the operating system after truncating
or dropping a table created in a file-per-table tablespace. For
more information, see
Section 15.6.3.2, “File-Per-Table Tablespaces”.
You can use raw disk partitions as data files in the
InnoDB
system tablespace.
This technique enables nonbuffered I/O on Windows and on some
Linux and Unix systems without file system overhead. Perform
tests with and without raw partitions to verify whether this
change actually improves performance on your system.
When you use a raw disk partition, ensure that the user ID that
runs the MySQL server has read and write privileges for that
partition. For example, if you run the server as the
mysql user, the partition must be readable
and writeable by mysql. If you run the server
with the --memlock option, the
server must be run as root, so the partition
must be readable and writeable by root.
The procedures described below involve option file modification. For additional information, see Section 4.2.2.2, “Using Option Files”.
Allocating a Raw Disk Partition on Linux and Unix Systems
When you create a new data file, specify the keyword
newrawimmediately after the data file size for theinnodb_data_file_pathoption. The partition must be at least as large as the size that you specify. Note that 1MB inInnoDBis 1024 × 1024 bytes, whereas 1MB in disk specifications usually means 1,000,000 bytes.[mysqld] innodb_data_home_dir= innodb_data_file_path=/dev/hdd1:3Gnewraw;/dev/hdd2:2Gnewraw
Restart the server.
InnoDBnotices thenewrawkeyword and initializes the new partition. However, do not create or change anyInnoDBtables yet. Otherwise, when you next restart the server,InnoDBreinitializes the partition and your changes are lost. (As a safety measureInnoDBprevents users from modifying data when any partition withnewrawis specified.)After
InnoDBhas initialized the new partition, stop the server, changenewrawin the data file specification toraw:[mysqld] innodb_data_home_dir= innodb_data_file_path=/dev/hdd1:3Graw;/dev/hdd2:2Graw
Restart the server.
InnoDBnow permits changes to be made.
Allocating a Raw Disk Partition on Windows
On Windows systems, the same steps and accompanying guidelines
described for Linux and Unix systems apply except that the
innodb_data_file_path setting
differs slightly on Windows.
When you create a new data file, specify the keyword
newrawimmediately after the data file size for theinnodb_data_file_pathoption:[mysqld] innodb_data_home_dir= innodb_data_file_path=//./D::10Gnewraw
The
//./corresponds to the Windows syntax of\\.\for accessing physical drives. In the example above,D:is the drive letter of the partition.Restart the server.
InnoDBnotices thenewrawkeyword and initializes the new partition.After
InnoDBhas initialized the new partition, stop the server, changenewrawin the data file specification toraw:[mysqld] innodb_data_home_dir= innodb_data_file_path=//./D::10Graw
Restart the server.
InnoDBnow permits changes to be made.
A file-per-table tablespace contains data and indexes for a single
InnoDB table, and is stored on the file system
in its own data file.
File-per-table tablespace characteristics are described under the following topics in this section:
InnoDB creates tables in file-per-table
tablespaces by default. This behavior is controlled by the
innodb_file_per_table variable.
Disabling innodb_file_per_table
causes InnoDB to create tables in the system
tablespace.
An innodb_file_per_table
setting can be specified in an option file or configured at
runtime using a
SET
GLOBAL statement. Changing the setting at runtime
requires privileges sufficient to set global system variables.
See Section 5.1.9.1, “System Variable Privileges”.
Option file:
[mysqld] innodb_file_per_table=ON
Using SET
GLOBAL at runtime:
mysql> SET GLOBAL innodb_file_per_table=ON;
A file-per-table tablespace is created in an
.idb data file in a schema directory under
the MySQL data directory. The .ibd file is
named for the table
(table_name.ibdtest.t1
is created in the test directory under the
MySQL data directory:
mysql> USE test; mysql> CREATE TABLE t1 ( id INT PRIMARY KEY AUTO_INCREMENT, name VARCHAR(100) ) ENGINE = InnoDB; shell> cd /path/to/mysql/data/test shell> ls t1.ibd
You can use the DATA DIRECTORY clause of the
CREATE TABLE statement to
implicitly create a file-per-table tablespace data file outside
of the data directory. For more information, see
Section 15.6.1.2, “Creating Tables Externally”.
File-per-table tablespaces have the following advantages over shared tablespaces such as the system tablespace or general tablespaces.
Disk space is returned to the operating system after truncating or dropping a table created in a file-per-table tablespace. Truncating or dropping a table stored in a shared tablespace creates free space within the shared tablespace data file, which can only be used for
InnoDBdata. In other words, a shared tablespace data file does not shrink in size after a table is truncated or dropped.A table-copying
ALTER TABLEoperation on a table that resides in a shared tablespace can increase the amount of disk space occupied by the tablespace. Such operations may require as much additional space as the data in the table plus indexes. This space is not released back to the operating system as it is for file-per-table tablespaces.TRUNCATE TABLEperformance is better when executed on tables that reside in file-per-table tablespaces.File-per-table tablespace data files can be created on separate storage devices for I/O optimization, space management, or backup purposes. See Section 15.6.1.2, “Creating Tables Externally”.
You can import a table that resides in file-per-table tablespace from another MySQL instance. See Section 15.6.1.3, “Importing InnoDB Tables”.
Tables created in file-per-table tablespaces support features associated with
DYNAMICandCOMPRESSEDrow formats, which are not supported by the system tablespace. See Section 15.10, “InnoDB Row Formats”.Tables stored in individual tablespace data files can save time and improve chances for a successful recovery when data corruption occurs, when backups or binary logs are unavailable, or when the MySQL server instance cannot be restarted.
You can backup or restore tables created in file-per-table tablespaces quickly using MySQL Enterprise Backup, without interrupting the use of other
InnoDBtables. This is beneficial for tables on varying backup schedules or that require backup less frequently. See Making a Partial Backup for details.File-per-table tablespaces permit monitoring table size on the file system by monitoring the size of the tablespace data file.
Common Linux file systems do not permit concurrent writes to a single file such as a shared tablespace data file when
innodb_flush_methodis set toO_DIRECT. As a result, there are possible performance improvements when using file-per-table tablespaces in conjunction with this setting.Tables in a shared tablespace are limited in size by the 64TB tablespace size limit. By comparison, each file-per-table tablespace has a 64TB size limit, which provides plenty of room for individual tables to grow in size.
File-per-table tablespaces have the following disadvantages compared to shared tablespaces such as the system tablespace or general tablespaces.
With file-per-table tablespaces, each table may have unused space that can only be utilized by rows of the same table, which can lead to wasted space if not properly managed.
fsyncoperations are performed on multiple file-per-table data files instead of a single shared tablespace data file. Becausefsyncoperations are per file, write operations for multiple tables cannot be combined, which can result in a higher total number offsyncoperations.mysqld must keep an open file handle for each file-per-table tablespace, which may impact performance if you have numerous tables in file-per-table tablespaces.
More file descriptors are required when each table has its own data file.
There is potential for more fragmentation, which can impede
DROP TABLEand table scan performance. However, if fragmentation is managed, file-per-table tablespaces can improve performance for these operations.The buffer pool is scanned when dropping a table that resides in a file-per-table tablespace, which can take several seconds for large buffer pools. The scan is performed with a broad internal lock, which may delay other operations.
The
innodb_autoextend_incrementvariable, which defines the increment size for extending the size of an auto-extending shared tablespace file when it becomes full, does not apply to file-per-table tablespace files, which are auto-extending regardless of theinnodb_autoextend_incrementsetting. Initial file-per-table tablespace extensions are by small amounts, after which extensions occur in increments of 4MB.
A general tablespace is a shared InnoDB
tablespace that is created using CREATE
TABLESPACE syntax. General tablespace capabilities and
features are described under the following topics in this section:
The general tablespace feature provides the following capabilities:
Similar to the system tablespace, general tablespaces are shared tablespaces that can store data for multiple tables.
General tablespaces have a potential memory advantage over file-per-table tablespaces. The server keeps tablespace metadata in memory for the lifetime of a tablespace. Multiple tables in fewer general tablespaces consume less memory for tablespace metadata than the same number of tables in separate file-per-table tablespaces.
General tablespace data files may be placed in a directory relative to or independent of the MySQL data directory, which provides you with many of the data file and storage management capabilities of file-per-table tablespaces. As with file-per-table tablespaces, the ability to place data files outside of the MySQL data directory allows you to manage performance of critical tables separately, setup RAID or DRBD for specific tables, or bind tables to particular disks, for example.
General tablespaces support all table row formats and associated features.
The
TABLESPACEoption can be used withCREATE TABLEto create tables in a general tablespaces, file-per-table tablespace, or in the system tablespace.The
TABLESPACEoption can be used withALTER TABLEto move tables between general tablespaces, file-per-table tablespaces, and the system tablespace. Previously, it was not possible to move a table from a file-per-table tablespace to the system tablespace. With the general tablespace feature, you can now do so.
General tablespaces are created using
CREATE TABLESPACE syntax.
CREATE TABLESPACEtablespace_name[ADD DATAFILE 'file_name'] [FILE_BLOCK_SIZE =value] [ENGINE [=]engine_name]
A general tablespace can be created in the data directory or
outside of it. To avoid conflicts with implicitly created
file-per-table tablespaces, creating a general tablespace in a
subdirectory under the data directory is not supported. When
creating a general tablespace outside of the data directory, the
directory must exist and must be known to
InnoDB prior to creating the tablespace. To
make an unknown directory known to InnoDB,
add the directory to the
innodb_directories argument
value. innodb_directories is a
read-only startup option. Configuring it requires restarting the
server.
Examples:
Creating a general tablespace in the data directory:
mysql> CREATE TABLESPACE `ts1` ADD DATAFILE 'ts1.ibd' Engine=InnoDB;
or
mysql> CREATE TABLESPACE `ts1` Engine=InnoDB;
The ADD DATAFILE clause is optional as of
MySQL 8.0.14 and required before that. If the ADD
DATAFILE clause is not specified when creating a
tablespace, a tablespace data file with a unique file name is
created implicitly. The unique file name is a 128 bit UUID
formatted into five groups of hexadecimal numbers separated by
dashes
(aaaaaaaa-bbbb-cccc-dddd-eeeeeeeeeeee).
General tablespace data files include an
.ibd file extension. In a replication
environment, the data file name created on the source is not the
same as the data file name created on the replica.
Creating a general tablespace in a directory outside of the data directory:
mysql> CREATE TABLESPACE `ts1` ADD DATAFILE '/my/tablespace/directory/ts1.ibd' Engine=InnoDB;
You can specify a path that is relative to the data directory as
long as the tablespace directory is not under the data
directory. In this example, the
my_tablespace directory is at the same
level as the data directory:
mysql> CREATE TABLESPACE `ts1` ADD DATAFILE '../my_tablespace/ts1.ibd' Engine=InnoDB;
The ENGINE = InnoDB clause must be defined
as part of the CREATE
TABLESPACE statement, or InnoDB
must be defined as the default storage engine
(default_storage_engine=InnoDB).
After creating an InnoDB general tablespace,
you can use CREATE
TABLE or
tbl_name ... TABLESPACE [=]
tablespace_nameALTER TABLE
to add
tables to the tablespace, as shown in the following examples:
tbl_name TABLESPACE [=]
tablespace_name
mysql> CREATE TABLE t1 (c1 INT PRIMARY KEY) TABLESPACE ts1;
mysql> ALTER TABLE t2 TABLESPACE ts1;
Support for adding table partitions to shared tablespaces was
deprecated in MySQL 5.7.24 and removed in MySQL 8.0.13. Shared
tablespaces include the InnoDB system
tablespace and general tablespaces.
For detailed syntax information, see CREATE
TABLE and ALTER TABLE.
General tablespaces support all table row formats
(REDUNDANT, COMPACT,
DYNAMIC, COMPRESSED) with
the caveat that compressed and uncompressed tables cannot
coexist in the same general tablespace due to different physical
page sizes.
For a general tablespace to contain compressed tables
(ROW_FORMAT=COMPRESSED),
FILE_BLOCK_SIZE must be specified, and the
FILE_BLOCK_SIZE value must be a valid
compressed page size in relation to the
innodb_page_size value. Also,
the physical page size of the compressed table
(KEY_BLOCK_SIZE) must be equal to
FILE_BLOCK_SIZE/1024. For example, if
innodb_page_size=16KB and
FILE_BLOCK_SIZE=8K, the
KEY_BLOCK_SIZE of the table must be 8.
The following table shows permitted
innodb_page_size,
FILE_BLOCK_SIZE, and
KEY_BLOCK_SIZE combinations.
FILE_BLOCK_SIZE values may also be specified
in bytes. To determine a valid KEY_BLOCK_SIZE
value for a given FILE_BLOCK_SIZE, divide the
FILE_BLOCK_SIZE value by 1024. Table
compression is not support for 32K and 64K
InnoDB page sizes. For more information about
KEY_BLOCK_SIZE, see
CREATE TABLE, and
Section 15.9.1.2, “Creating Compressed Tables”.
Table 15.3 Permitted Page Size, FILE_BLOCK_SIZE, and KEY_BLOCK_SIZE Combinations for Compressed Tables
| InnoDB Page Size (innodb_page_size) | Permitted FILE_BLOCK_SIZE Value | Permitted KEY_BLOCK_SIZE Value |
|---|---|---|
| 64KB | 64K (65536) | Compression is not supported |
| 32KB | 32K (32768) | Compression is not supported |
| 16KB | 16K (16384) | N/A: If innodb_page_size is equal to
FILE_BLOCK_SIZE, the tablespace cannot
contain a compressed table. |
| 16KB | 8K (8192) | 8 |
| 16KB | 4K (4096) | 4 |
| 16KB | 2K (2048) | 2 |
| 16KB | 1K (1024) | 1 |
| 8KB | 8K (8192) | N/A: If innodb_page_size is equal to
FILE_BLOCK_SIZE, the tablespace cannot
contain a compressed table. |
| 8KB | 4K (4096) | 4 |
| 8KB | 2K (2048) | 2 |
| 8KB | 1K (1024) | 1 |
| 4KB | 4K (4096) | N/A: If innodb_page_size is equal to
FILE_BLOCK_SIZE, the tablespace cannot
contain a compressed table. |
| 4KB | 2K (2048) | 2 |
| 4KB | 1K (1024) | 1 |
This example demonstrates creating a general tablespace and
adding a compressed table. The example assumes a default
innodb_page_size of 16KB. The
FILE_BLOCK_SIZE of 8192 requires that the
compressed table have a KEY_BLOCK_SIZE of 8.
mysql>CREATE TABLESPACE `ts2` ADD DATAFILE 'ts2.ibd' FILE_BLOCK_SIZE = 8192 Engine=InnoDB;mysql>CREATE TABLE t4 (c1 INT PRIMARY KEY) TABLESPACE ts2 ROW_FORMAT=COMPRESSED KEY_BLOCK_SIZE=8;
If you do not specify FILE_BLOCK_SIZE when
creating a general tablespace,
FILE_BLOCK_SIZE defaults to
innodb_page_size. When
FILE_BLOCK_SIZE is equal to
innodb_page_size, the
tablespace may only contain tables with an uncompressed row
format (COMPACT,
REDUNDANT, and DYNAMIC row
formats).
You can use ALTER TABLE with the
TABLESPACE option to move a table to an
existing general tablespace, to a new file-per-table tablespace,
or to the system tablespace.
Support for placing table partitions in shared tablespaces was
deprecated in MySQL 5.7.24 and removed MySQL 8.0.13. Shared
tablespaces include the InnoDB system
tablespace and general tablespaces.
To move a table from a file-per-table tablespace or from the
system tablespace to a general tablespace, specify the name of
the general tablespace. The general tablespace must exist. See
CREATE TABLESPACE for more
information.
ALTER TABLE tbl_name TABLESPACE [=] tablespace_name;
To move a table from a general tablespace or file-per-table
tablespace to the system tablespace, specify
innodb_system as the tablespace name.
ALTER TABLE tbl_name TABLESPACE [=] innodb_system;
To move a table from the system tablespace or a general
tablespace to a file-per-table tablespace, specify
innodb_file_per_table as the tablespace name.
ALTER TABLE tbl_name TABLESPACE [=] innodb_file_per_table;
ALTER TABLE ... TABLESPACE operations always
cause a full table rebuild, even if the
TABLESPACE attribute has not changed from its
previous value.
ALTER TABLE ... TABLESPACE syntax does not
support moving a table from a temporary tablespace to a
persistent tablespace.
The DATA DIRECTORY clause is permitted with
CREATE TABLE ...
TABLESPACE=innodb_file_per_table but is otherwise not
supported for use in combination with the
TABLESPACE option. As of MySQL 8.0.21, the
directory specified in a DATA DIRECTORY
clause must be known to InnoDB. For more
information, see
Using the DATA DIRECTORY Clause.
Restrictions apply when moving tables from encrypted tablespaces. See Encryption Limitations.
Renaming a general tablespace is supported using
ALTER
TABLESPACE ... RENAME TO syntax.
ALTER TABLESPACE s1 RENAME TO s2;
The CREATE TABLESPACE privilege
is required to rename a general tablespace.
RENAME TO operations are implicitly performed
in autocommit mode, regardless
of the autocommit setting.
A RENAME TO operation cannot be performed
while LOCK TABLES or
FLUSH TABLES WITH READ
LOCK is in effect for tables that reside in the
tablespace.
Exclusive metadata locks are taken on tables within a general tablespace while the tablespace is renamed, which prevents concurrent DDL. Concurrent DML is supported.
The DROP TABLESPACE statement is
used to drop an InnoDB general tablespace.
All tables must be dropped from the tablespace prior to a
DROP TABLESPACE operation. If the
tablespace is not empty, DROP
TABLESPACE returns an error.
Use a query similar to the following to identify tables in a general tablespace.
mysql>SELECT a.NAME AS space_name, b.NAME AS table_name FROM INFORMATION_SCHEMA.INNODB_TABLESPACES a,INFORMATION_SCHEMA.INNODB_TABLES b WHERE a.SPACE=b.SPACE AND a.NAME LIKE 'ts1';+------------+------------+ | space_name | table_name | +------------+------------+ | ts1 | test/t1 | | ts1 | test/t2 | | ts1 | test/t3 | +------------+------------+
A general InnoDB tablespace is not deleted
automatically when the last table in the tablespace is dropped.
The tablespace must be dropped explicitly using
DROP TABLESPACE
.
tablespace_name
A general tablespace does not belong to any particular database.
A DROP DATABASE operation can
drop tables that belong to a general tablespace but it cannot
drop the tablespace, even if the DROP
DATABASE operation drops all tables that belong to the
tablespace. A general tablespace must be dropped explicitly
using DROP
TABLESPACE .
tablespace_name
Similar to the system tablespace, truncating or dropping tables
stored in a general tablespace creates free space internally in
the general tablespace .ibd data
file which can only be used for new
InnoDB data. Space is not released back to
the operating system as it is when a file-per-table tablespace
is deleted during a DROP TABLE
operation.
This example demonstrates how to drop an
InnoDB general tablespace. The general
tablespace ts1 is created with a single
table. The table must be dropped before dropping the tablespace.
mysql>CREATE TABLESPACE `ts1` ADD DATAFILE 'ts1.ibd' Engine=InnoDB;mysql>CREATE TABLE t1 (c1 INT PRIMARY KEY) TABLESPACE ts1 Engine=InnoDB;mysql>DROP TABLE t1;mysql>DROP TABLESPACE ts1;
tablespace_name
A generated or existing tablespace cannot be changed to a general tablespace.
Creation of temporary general tablespaces is not supported.
General tablespaces do not support temporary tables.
Similar to the system tablespace, truncating or dropping tables stored in a general tablespace creates free space internally in the general tablespace .ibd data file which can only be used for new
InnoDBdata. Space is not released back to the operating system as it is for file-per-table tablespaces.Additionally, a table-copying
ALTER TABLEoperation on table that resides in a shared tablespace (a general tablespace or the system tablespace) can increase the amount of space used by the tablespace. Such operations require as much additional space as the data in the table plus indexes. The additional space required for the table-copyingALTER TABLEoperation is not released back to the operating system as it is for file-per-table tablespaces.ALTER TABLE ... DISCARD TABLESPACEandALTER TABLE ...IMPORT TABLESPACEare not supported for tables that belong to a general tablespace.Support for placing table partitions in general tablespaces was deprecated in MySQL 5.7.24 and removed in MySQL 8.0.13.
An
ADD DATAFILEclause is not supported in a replication environment where the source and replica reside on the same host, as it would cause the source and replica to create a tablespace of the same name in the same location, which is not supported. However, if theADD DATAFILEclause is omitted, the tablespace is created in the data directory with a generated file name that is unique, which is permitted.As of MySQL 8.0.21, general tablespaces cannot be created in the undo tablespace directory (
innodb_undo_directory) unless that directly is known toInnoDB. Known directories are those defined by thedatadir,innodb_data_home_dir, andinnodb_directoriesvariables.
Undo tablespaces contain undo logs, which are collections of undo
log records that contain information about how to undo the latest
change by a transaction to a clustered index record. Undo logs
exist within undo log segments, which are contained within
rollback segments. The
innodb_rollback_segments variable
defines the number of rollback segments allocated to each undo
tablespace.
Two default undo tablespaces are created when the MySQL instance is initialized. Default undo tablespaces are created at initialization time to provide a location for rollback segments that must exist before SQL statements can be accepted. A minimum of two undo tablespaces is required to support automated truncation of undo tablespaces. See Truncating Undo Tablespaces.
Default undo tablespaces are created in the location defined by
the innodb_undo_directory
variable. If the
innodb_undo_directory variable is
undefined, default undo tablespaces are created in the data
directory. Default undo tablespace data files are named
undo_001 and undo_002.
The corresponding undo tablespace names defined in the data
dictionary are innodb_undo_001 and
innodb_undo_002.
As of MySQL 8.0.14, additional undo tablespaces can be created at runtime using SQL. See Adding Undo Tablespaces.
Prior to MySQL 8.0.23, the initial size of an undo tablespace
depends on the innodb_page_size
value. For the default 16KB page size, the initial undo tablespace
file size is 10MiB. For 4KB, 8KB, 32KB, and 64KB page sizes, the
initial undo tablespace files sizes are 7MiB, 8MiB, 20MiB, and
40MiB, respectively. As of MySQL 8.0.23, the initial undo
tablespace size is normally 16MiB. The initial size may differ
when a new undo tablespace is created by a truncate operation. In
this case, if the file extension size is larger than 16MB, and the
previous file extension occurred within the last second, the new
undo tablespace is created at a quarter of the size defined by the
innodb_max_undo_log_size
variable.
Prior to MySQL 8.0.23, undo tablespace are extended four extents
at a time. From MySQL 8.0.23, undo tablespace are extended by a
minimum of 16MB. To handle aggressive growth, the file extension
size is doubled if the previous file extension happened less than
0.1 seconds earlier. Doubling of the extension size can occur
multiple times to a maximum of 256MB. If the previous file
extension occurred more than 0.1 seconds earlier, the extension
size is reduced by half, which can also occur multiple times, to a
minimum of 16MB. If the AUTOEXTEND_SIZE option
is defined for an undo tablespace, it is extended by the greater
of the AUTOEXTEND_SIZE setting and the
extension size determined by the logic described above. For
information about the AUTOEXTEND_SIZE option,
see Section 15.6.3.9, “Tablespace AUTOEXTEND_SIZE Configuration”.
Because undo logs can become large during long-running
transactions, creating additional undo tablespaces can help
prevent individual undo tablespaces from becoming too large. As
of MySQL 8.0.14, additional undo tablespaces can be created at
runtime using
CREATE UNDO
TABLESPACE syntax.
CREATE UNDO TABLESPACEtablespace_nameADD DATAFILE 'file_name.ibu';
The undo tablespace file name must have an
.ibu extension. It is not permitted to
specify a relative path when defining the undo tablespace file
name. A fully qualified path is permitted, but the path must be
known to InnoDB. Known paths are those
defined by the
innodb_directories variable.
Unique undo tablespace file names are recommended to avoid
potential file name conflicts when moving or cloning data.
In a replication environment, the source and each replica must have its own undo tablespace file directory. Replicating the creation of an undo tablespace file to a common directory would cause a file name conflict.
At startup, directories defined by the
innodb_directories variable are
scanned for undo tablespace files. (The scan also traverses
subdirectories.) Directories defined by the
innodb_data_home_dir,
innodb_undo_directory, and
datadir variables are
automatically appended to the
innodb_directories value,
regardless of whether the
innodb_directories variable is
defined explicitly. An undo tablespace can therefore reside in
paths defined by any of those variables.
If the undo tablespace file name does not include a path, the
undo tablespace is created in the directory defined by the
innodb_undo_directory variable.
If that variable is undefined, the undo tablespace is created in
the data directory.
The InnoDB recovery process requires that
undo tablespace files reside in known directories. Undo
tablespace files must be discovered and opened before redo
recovery and before other data files are opened to permit
uncommitted transactions and data dictionary changes to be
rolled back. An undo tablespace not found before recovery
cannot be used, which can cause database inconsistencies. An
error message is reported at startup if an undo tablespace
known to the data dictionary is not found. The known directory
requirement also supports undo tablespace portability. See
Moving Undo Tablespaces.
To create undo tablespaces in a path relative to the data
directory, set the
innodb_undo_directory variable
to the relative path, and specify the file name only when
creating an undo tablespace.
To view undo tablespace names and paths, query
INFORMATION_SCHEMA.FILES:
SELECT TABLESPACE_NAME, FILE_NAME FROM INFORMATION_SCHEMA.FILES WHERE FILE_TYPE LIKE 'UNDO LOG';
A MySQL instance supports up to 127 undo tablespaces including the two default undo tablespaces created when the MySQL instance is initialized.
Prior to MySQL 8.0.14, additional undo tablespaces are created
by configuring the
innodb_undo_tablespaces
startup variable. This variable is deprecated and no longer
configurable as of MySQL 8.0.14.
Prior to MySQL 8.0.14, increasing the
innodb_undo_tablespaces
setting creates the specified number of undo tablespaces and
adds them to the list of active undo tablespaces. Decreasing
the innodb_undo_tablespaces
setting removes undo tablespaces from the list of active undo
tablespaces. Undo tablespaces that are removed from the active
list remain active until they are no longer used by existing
transactions. The
innodb_undo_tablespaces
variable can be configured at runtime using a
SET
statement or defined in a configuration file.
Prior to MySQL 8.0.14, deactivated undo tablespaces cannot be
removed. Manual removal of undo tablespace files is possible
after a slow shutdown but is not recommended, as deactivated
undo tablespaces may contain active undo logs for some time
after the server is restarted if open transactions were
present when shutting down the server. As of MySQL 8.0.14,
undo tablespaces can be dropped using
DROP UNDO
TABALESPACE syntax. See
Dropping Undo Tablespaces.
As of MySQL 8.0.14, undo tablespaces created using
CREATE UNDO
TABLESPACE syntax can be dropped at runtime using
DROP UNDO
TABALESPACE syntax.
An undo tablespace must be empty before it can be dropped. To
empty an undo tablespace, the undo tablespace must first be
marked as inactive using
ALTER UNDO
TABLESPACE syntax so that the tablespace is no longer
used for assigning rollback segments to new transactions.
ALTER UNDO TABLESPACE tablespace_name SET INACTIVE;
After an undo tablespace is marked as inactive, transactions currently using rollback segments in the undo tablespace are permitted to finish, as are any transactions started before those transactions are completed. After transactions are completed, the purge system frees the rollback segments in the undo tablespace, and the undo tablespace is truncated to its initial size. (The same process is used when truncating undo tablespaces. See Truncating Undo Tablespaces.) When the undo tablespace is empty, it can be dropped.
DROP UNDO TABLESPACE tablespace_name;
Alternatively, the undo tablespace can be left in an empty
state and reactivated later, when needed, by issuing an
ALTER UNDO
TABLESPACE statement.
tablespace_name SET
ACTIVE
The state of an undo tablespace can be monitored by querying the
INFORMATION_SCHEMA.INNODB_TABLESPACES
table.
SELECT NAME, STATE FROM INFORMATION_SCHEMA.INNODB_TABLESPACES
WHERE NAME LIKE 'tablespace_name';
An inactive state indicates that rollback
segments in an undo tablespace are no longer used by new
transactions. An empty state indicates that
an undo tablespace is empty and ready to be dropped, or made
active again using an
ALTER UNDO
TABLESPACE statement. Attempting to drop an undo
tablespace that is not empty returns an error.
tablespace_name SET
ACTIVE
The default undo tablespaces (innodb_undo_001
and innodb_undo_002) created when the MySQL
instance is initialized cannot be dropped. They can, however, be
made inactive using an
ALTER UNDO
TABLESPACE statement. Before a default undo tablespace
can be made inactive, there must be an undo tablespace to take
its place. A minimum of two active undo tablespaces are required
at all times to support automated truncation of undo
tablespaces.
tablespace_name SET
INACTIVE
Undo tablespaces created with
CREATE UNDO
TABLESPACE syntax can be moved while the server is
offline to any known directory. Known directories are those
defined by the
innodb_directories variable.
Directories defined by
innodb_data_home_dir,
innodb_undo_directory, and
datadir are automatically
appended to the
innodb_directories value
regardless of whether the
innodb_directories variable is
defined explicitly. Those directories and their subdirectories
are scanned at startup for undo tablespaces files. An undo
tablespace file moved to any of those directories is discovered
at startup and assumed to be the undo tablespace that was moved.
The default undo tablespaces (innodb_undo_001
and innodb_undo_002) created when the MySQL
instance is initialized must always reside in the directory
defined by the
innodb_undo_directory variable.
If the innodb_undo_directory
variable is undefined, default undo tablespaces reside in the
data directory. If default undo tablespaces are moved while the
server is offline, the server must be started with the
innodb_undo_directory variable
configured to the new directory.
The I/O patterns for undo logs make undo tablespaces good candidates for SSD storage.
The innodb_rollback_segments
variable defines the number of
rollback segments
allocated to each undo tablespace and to the global temporary
tablespace. The
innodb_rollback_segments
variable can be configured at startup or while the server is
running.
The default setting for
innodb_rollback_segments is
128, which is also the maximum value. For information about the
number of transactions that a rollback segment supports, see
Section 15.6.6, “Undo Logs”.
There are two methods of truncating undo tablespaces, which can be used individually or in combination to manage undo tablespace size. One method is automated, enabled using configuration variables. The other method is manual, performed using SQL statements.
The automated method does not require monitoring undo tablespace size and, once enabled, it performs deactivation, truncation, and reactivation of undo tablespaces without manual intervention. The manual truncation method may be preferable if you want to control when undo tablespaces are taken offline for truncation. For example, you may want to avoid truncating undo tablespaces during peak workload times.
Automated Truncation
Automated truncation of undo tablespaces requires a minimum of two active undo tablespaces, which ensures that one undo tablespace remains active while the other is taken offline to be truncated. By default, two undo tablespaces are created when the MySQL instance is initialized.
To have undo tablespaces automatically truncated, enable the
innodb_undo_log_truncate
variable. For example:
mysql> SET GLOBAL innodb_undo_log_truncate=ON;
When the
innodb_undo_log_truncate
variable is enabled, undo tablespaces that exceed the size limit
defined by the
innodb_max_undo_log_size
variable are subject to truncation. The
innodb_max_undo_log_size
variable is dynamic and has a default value of 1073741824 bytes
(1024 MiB).
mysql> SELECT @@innodb_max_undo_log_size;
+----------------------------+
| @@innodb_max_undo_log_size |
+----------------------------+
| 1073741824 |
+----------------------------+
When the
innodb_undo_log_truncate
variable is enabled:
Default and user-defined undo tablespaces that exceed the
innodb_max_undo_log_sizesetting are marked for truncation. Selection of an undo tablespace for truncation is performed in a circular fashion to avoid truncating the same undo tablespace each time.Rollback segments residing in the selected undo tablespace are made inactive so that they are not assigned to new transactions. Existing transactions that are currently using rollback segments are permitted to finish.
The purge system empties rollback segments by freeing undo logs that are no longer in use.
After all rollback segments in the undo tablespace are freed, the truncate operation runs and truncates the undo tablespace to its initial size.
The size of an undo tablespace after a truncate operation may be larger than the initial size due to immediate use following the completion of the operation.
The
innodb_undo_directoryvariable defines the location of default undo tablespace files. If theinnodb_undo_directoryvariable is undefined, default undo tablespaces reside in the data directory. The location of all undo tablespace files including user-defined undo tablespaces created usingCREATE UNDO TABLESPACEsyntax can be determined by querying theINFORMATION_SCHEMA.FILEStable:SELECT TABLESPACE_NAME, FILE_NAME FROM INFORMATION_SCHEMA.FILES WHERE FILE_TYPE LIKE 'UNDO LOG';
Rollback segments are reactivated so that they can be assigned to new transactions.
Manual Truncation
Manual truncation of undo tablespaces requires a minimum of three active undo tablespaces. Two active undo tablespaces are required at all times to support the possibility that automated truncation is enabled. A minimum of three undo tablespaces satisfies this requirement while permitting an undo tablespace to be taken offline manually.
To manually initiate truncation of an undo tablespace, deactivate the undo tablespace by issuing the following statement:
ALTER UNDO TABLESPACE tablespace_name SET INACTIVE;
After the undo tablespace is marked as inactive, transactions
currently using rollback segments in the undo tablespace are
permitted to finish, as are any transactions started before
those transactions are completed. After transactions are
completed, the purge system frees the rollback segments in the
undo tablespace, the undo tablespace is truncated to its initial
size, and the undo tablespace state changes from
inactive to empty.
When an ALTER UNDO TABLESPACE
statement deactivates an undo tablespace,
the purge thread looks for that undo tablespaces at the next
opportunity. Once the undo tablespace is found and marked for
truncation, the purge thread returns with increased frequency
to quickly empty and truncate the undo tablespace.
tablespace_name SET
INACTIVE
To check the state of an undo tablespace, query the
INFORMATION_SCHEMA.INNODB_TABLESPACES
table.
SELECT NAME, STATE FROM INFORMATION_SCHEMA.INNODB_TABLESPACES
WHERE NAME LIKE 'tablespace_name';
Once the undo tablespace is in an empty
state, it can be reactivated by issuing the following statement:
ALTER UNDO TABLESPACE tablespace_name SET ACTIVE;
An undo tablespace in an empty state can also
be dropped. See Dropping Undo Tablespaces.
Expediting Automated Truncation of Undo Tablespaces
The purge thread is responsible for emptying and truncating undo
tablespaces. By default, the purge thread looks for undo
tablespaces to truncate once every 128 times that purge is
invoked. The frequency with which the purge thread looks for
undo tablespaces to truncate is controlled by the
innodb_purge_rseg_truncate_frequency
variable, which has a default setting of 128.
mysql> SELECT @@innodb_purge_rseg_truncate_frequency;
+----------------------------------------+
| @@innodb_purge_rseg_truncate_frequency |
+----------------------------------------+
| 128 |
+----------------------------------------+
To increase that frequency, decrease the
innodb_purge_rseg_truncate_frequency
setting. For example, to have the purge thread look for undo
tabespaces once every 32 times that purge is invoked, set
innodb_purge_rseg_truncate_frequency
to 32.
mysql> SET GLOBAL innodb_purge_rseg_truncate_frequency=32;
Performance Impact of Truncating Undo Tablespace Files
When an undo tablespace is truncated, the rollback segments in the undo tablespace are deactivated. The active rollback segments in other undo tablespaces assume responsibility for the entire system load, which may result in a slight performance degradation. The amount of performance degradation depends on a number of factors:
Number of undo tablespaces
Number of undo logs
Undo tablespace size
Speed of the I/O susbsystem
Existing long running transactions
System load
The easiest way to avoid this potential performance issue is to increase the number of undo tablespaces.
Also, prior to MySQL 8.0.21, two flushing operations are performed during an undo tablespace truncate operation. The first flushing operation removes the old undo tablespace pages from the buffer pool. The second flushing operation writes the initial pages of the new undo tablespace to disk. On a busy system, the first flushing operation in particular can temporarily affect system performance if there is a large number of pages to remove. As of MySQL 8.0.21, both flushing operations are removed. Old undo tablespace pages are either released passively as they become least recently used or released at the next full checkpoint. The initial pages of the new undo tablespace pages are redo logged instead of flushed to disk during the truncate operation.
Monitoring Undo Tablespace Truncation
As of MySQL 8.0.16, undo and
purge susbsystem counters are provided for
monitoring background activities associated with undo log
truncation. For counter names and descriptions, query the
INFORMATION_SCHEMA.INNODB_METRICS
table.
SELECT NAME, SUBSYSTEM, COMMENT FROM INFORMATION_SCHEMA.INNODB_METRICS WHERE NAME LIKE '%truncate%';
For information about enabling counters and querying counter data, see Section 15.15.6, “InnoDB INFORMATION_SCHEMA Metrics Table”.
Undo Tablespace Truncation Limit
As of MySQL 8.0.21, the number of truncate operations on the
same undo tablespace between checkpoints is limited to 64. The
limit prevents potential issues caused by an excessive number of
undo tablespace truncate operations, which can occur if
innodb_max_undo_log_size is set
too low on a busy system, for example. If the limit is exceeded,
an undo tablespace can still be made inactive, but it is not
truncated until after the next checkpoint. As of MySQL 8.0.22,
the limit was raised from 64 to 50,000.
Undo Tablespace Truncation Recovery
An undo tablespace truncate operation creates a temporary
undo_
file in the server log directory. That log directory is defined
by space_number_trunc.loginnodb_log_group_home_dir.
If a system failure occurs during the truncate operation, the
temporary log file permits the startup process to identify undo
tablespaces that were being truncated and to continue the
operation.
The following status variables permit tracking the total number
of undo tablespaces, implicit
(InnoDB-created) undo tablespaces, explicit
(user-created) undo tablespaces, and the number of active undo
tablespaces:
mysql> SHOW STATUS LIKE 'Innodb_undo_tablespaces%';
+----------------------------------+-------+
| Variable_name | Value |
+----------------------------------+-------+
| Innodb_undo_tablespaces_total | 2 |
| Innodb_undo_tablespaces_implicit | 2 |
| Innodb_undo_tablespaces_explicit | 0 |
| Innodb_undo_tablespaces_active | 2 |
+----------------------------------+-------+
For status variable descriptions, see Section 5.1.10, “Server Status Variables”.
InnoDB uses session temporary tablespaces and a
global temporary tablespace.
Session temporary tablespaces store user-created temporary
tables and internal temporary tables created by the optimizer
when InnoDB is configured as the storage
engine for on-disk internal temporary tables. Beginning with
MySQL 8.0.16, the storage engine used for on-disk internal
temporary tables is always InnoDB.
(Previously, the storage engine was determined by the value of
internal_tmp_disk_storage_engine.)
Session temporary tablespaces are allocated to a session from a
pool of temporary tablespaces on the first request to create an
on-disk temporary table. A maximum of two tablespaces is
allocated to a session, one for user-created temporary tables
and the other for internal temporary tables created by the
optimizer. The temporary tablespaces allocated to a session are
used for all on-disk temporary tables created by the session.
When a session disconnects, its temporary tablespaces are
truncated and released back to the pool. A pool of 10 temporary
tablespaces is created when the server is started. The size of
the pool never shrinks and tablespaces are added to the pool
automatically as necessary. The pool of temporary tablespaces is
removed on normal shutdown or on an aborted initialization.
Session temporary tablespace files are five pages in size when
created and have an .ibt file name
extension.
A range of 400 thousand space IDs is reserved for session temporary tablespaces. Because the pool of session temporary tablespaces is recreated each time the server is started, space IDs for session temporary tablespaces are not persisted when the server is shut down and may be reused.
The innodb_temp_tablespaces_dir
variable defines the location where session temporary
tablespaces are created. The default location is the
#innodb_temp directory in the data
directory. Startup is refused if the pool of temporary
tablespaces cannot be created.
shell> cd BASEDIR/data/#innodb_temp
shell> ls
temp_10.ibt temp_2.ibt temp_4.ibt temp_6.ibt temp_8.ibt
temp_1.ibt temp_3.ibt temp_5.ibt temp_7.ibt temp_9.ibt
In statement based replication (SBR) mode, temporary tables created on a replica reside in a single session temporary tablespace that is truncated only when the MySQL server is shut down.
The INNODB_SESSION_TEMP_TABLESPACES
table provides metadata about session temporary tablespaces.
The
INFORMATION_SCHEMA.INNODB_TEMP_TABLE_INFO
table provides metadata about user-created temporary tables that
are active in an InnoDB instance.
The global temporary tablespace (ibtmp1)
stores rollback segments for changes made to user-created
temporary tables.
The innodb_temp_data_file_path
variable defines the relative path, name, size, and attributes
for global temporary tablespace data files. If no value is
specified for
innodb_temp_data_file_path, the
default behavior is to create a single auto-extending data file
named ibtmp1 in the
innodb_data_home_dir directory.
The initial file size is slightly larger than 12MB.
The global temporary tablespace is removed on normal shutdown or on an aborted initialization, and recreated each time the server is started. The global temporary tablespace receives a dynamically generated space ID when it is created. Startup is refused if the global temporary tablespace cannot be created. The global temporary tablespace is not removed if the server halts unexpectedly. In this case, a database administrator can remove the global temporary tablespace manually or restart the MySQL server. Restarting the MySQL server removes and recreates the global temporary tablespace automatically.
The global temporary tablespace cannot reside on a raw device.
INFORMATION_SCHEMA.FILES provides
metadata about the global temporary tablespace. Issue a query
similar to this one to view global temporary tablespace
metadata:
mysql> SELECT * FROM INFORMATION_SCHEMA.FILES WHERE TABLESPACE_NAME='innodb_temporary'\G
By default, the global temporary tablespace data file is autoextending and increases in size as necessary.
To determine if a global temporary tablespace data file is
autoextending, check the
innodb_temp_data_file_path
setting:
mysql> SELECT @@innodb_temp_data_file_path;
+------------------------------+
| @@innodb_temp_data_file_path |
+------------------------------+
| ibtmp1:12M:autoextend |
+------------------------------+
To check the size of global temporary tablespace data files,
query the INFORMATION_SCHEMA.FILES
table using a query similar to this one:
mysql>SELECT FILE_NAME, TABLESPACE_NAME, ENGINE, INITIAL_SIZE, TOTAL_EXTENTS*EXTENT_SIZEAS TotalSizeBytes, DATA_FREE, MAXIMUM_SIZE FROM INFORMATION_SCHEMA.FILESWHERE TABLESPACE_NAME = 'innodb_temporary'\G*************************** 1. row *************************** FILE_NAME: ./ibtmp1 TABLESPACE_NAME: innodb_temporary ENGINE: InnoDB INITIAL_SIZE: 12582912 TotalSizeBytes: 12582912 DATA_FREE: 6291456 MAXIMUM_SIZE: NULL
TotalSizeBytes shows the current size of the
global temporary tablespace data file. For information about
other field values, see
Section 26.15, “The INFORMATION_SCHEMA FILES Table”.
Alternatively, check the global temporary tablespace data file
size on your operating system. The global temporary tablespace
data file is located in the directory defined by the
innodb_temp_data_file_path
variable.
To reclaim disk space occupied by a global temporary tablespace
data file, restart the MySQL server. Restarting the server
removes and recreates the global temporary tablespace data file
according to the attributes defined by
innodb_temp_data_file_path.
To limit the size of the global temporary tablespace data file,
configure
innodb_temp_data_file_path to
specify a maximum file size. For example:
[mysqld] innodb_temp_data_file_path=ibtmp1:12M:autoextend:max:500M
Configuring
innodb_temp_data_file_path
requires restarting the server.
The innodb_directories option,
which defines directories to scan at startup for tablespace files,
supports moving or restoring tablespace files to a new location
while the server is offline. During startup, discovered tablespace
files are used instead those referenced in the data dictionary,
and the data dictionary is updated to reference the relocated
files. If duplicate tablespace files are discovered by the scan,
startup fails with an error indicating that multiple files were
found for the same tablespace ID.
The directories defined by the
innodb_data_home_dir,
innodb_undo_directory, and
datadir configuration options are
automatically appended to the
innodb_directories argument
value. These directories are scanned at startup regardless of
whether the innodb_directories
option is specified explicitly. The implicit addition of these
directories permits moving system tablespace files, the data
directory, or undo tablespace files without configuring the
innodb_directories setting.
However, settings must be updated when directories change. For
example, after relocating the data directory, you must update the
--datadir setting before
restarting the server.
The innodb_directories option may
be specified in a startup command or MySQL option file. Quotes are
used around the argument value because otherwise a semicolon (;)
is interpreted as a special character by some command
interpreters. (Unix shells treat it as a command terminator, for
example.)
Startup command:
mysqld --innodb-directories="directory_path_1;directory_path_2"
MySQL option file:
[mysqld] innodb_directories="directory_path_1;directory_path_2"
The following procedure is applicable to moving individual file-per-table and general tablespace files, system tablespace files, undo tablespace files, or the data directory. Before moving files or directories, review the usage notes that follow.
Stop the server.
Move the tablespace files or directories.
Make the new directory known to
InnoDB.If moving individual file-per-table or general tablespace files, add unknown directories to the
innodb_directoriesvalue.The directories defined by the
innodb_data_home_dir,innodb_undo_directory, anddatadirconfiguration options are automatically appended to theinnodb_directoriesargument value, so you need not specify these.A file-per-table tablespace file can only be moved to a directory with same name as the schema. For example, if the
actortable belongs to thesakilaschema, then theactor.ibddata file can only be moved to a directory namedsakila.General tablespace files cannot be moved to the data directory or a subdirectory of the data directory.
If moving system tablespace files, undo tablespaces, or the data directory, update the
innodb_data_home_dir,innodb_undo_directory, anddatadirsettings, as necessary.
Restart the server.
Usage Notes
Wildcard expressions cannot be used in the
innodb_directoriesargument value.The
innodb_directoriesscan also traverses subdirectories of specified directories. Duplicate directories and subdirectories are discarded from the list of directories to be scanned.The
innodb_directoriesoption only supports movingInnoDBtablespace files. Moving files that belong to a storage engine other thanInnoDBis not supported. This restriction also applies when moving the entire data directory.The
innodb_directoriesoption supports renaming of tablespace files when moving files to a scanned directory. It also supports moving tablespaces files to other supported operating systems.When moving tablespace files to a different operating system, ensure that tablespace file names do not include prohibited characters or characters with a special meaning on the destination system.
When moving a data directory from a Windows operating system to a Linux operating system, modify the binary log file paths in the binary log index file to use backward slashes instead of forward slashes. By default, the binary log index file has the same base name as the binary log file, with the extension '
.index'. The location of the binary log index file is defined by--log-bin. The default location is the data directory.If moving tablespace files to a different operating system introduces cross-platform replication, it is the database administrator's responsibility to ensure proper replication of DDL statements that contain platform-specific directories. Statements that permit specifying directories include
CREATE TABLE ... DATA DIRECTORYandCREATE TABLESPACE ... ADD DATAFILE.Add the directories of file-per-table and general tablespaces created with an absolute path or in a location outside of the data directory to the
innodb_directoriessetting. Otherwise,InnoDBis not able to locate the files during recovery. For related information, see Tablespace Discovery During Crash Recovery.To view tablespace file locations, query the
INFORMATION_SCHEMA.FILEStable:mysql>
SELECT TABLESPACE_NAME, FILE_NAME FROM INFORMATION_SCHEMA.FILES \G
At startup, InnoDB scans directories defined by
the innodb_directories variable
for tablespace files. The paths of discovered tablespace files are
validated against the paths recorded in the data dictionary. If
the paths do not match, the paths in the data dictionary are
updated.
The
innodb_validate_tablespace_paths
variable, introduced in MySQL 8.0.21, permits disabling tablespace
path validation. This feature is intended for environments where
tablespaces files are not moved. Disabling path validation
improves startup time on systems with a large number of tablespace
files. If log_error_verbosity is
set to 3, the following message is printed at startup when
tablespace path validation is disabled:
[InnoDB] Skipping InnoDB tablespace path validation. Manually moved tablespace files will not be detected!
Starting the server with tablespace path validation disabled after moving tablespace files can lead to undefined behavior.
As of MySQL 8.0.22, you can optimize how InnoDB
allocates space to file-per-table and general tablespaces on
Linux. By default, when additional space is required,
InnoDB allocates pages to the tablespace and
physically writes NULLs to those pages. This behavior can affect
performance if new pages are allocated frequently. As of MySQL
8.0.22, you can disable
innodb_extend_and_initialize on
Linux systems to avoid physically writing NULLs to newly allocated
tablespace pages. When
innodb_extend_and_initialize is
disabled, space is allocated to tablespace files using
posix_fallocate() calls, which reserve space
without physically writing NULLs.
A posix_fallocate() operation is not atomic,
which makes it possible for a failure to occur between allocating
space to a tablespace file and updating the file metadata. Such a
failure can leave newly allocated pages in an uninitialized state,
resulting in a failure when InnoDB attempts to
access those pages. To prevent this scenario,
InnoDB writes a redo log record before
allocating a new tablespace page. If a page allocation operation
is interrupted, the operation is replayed from the redo log record
during recovery. (A page allocation operation replayed from a redo
log record physically writes NULLs to the newly allocated page.) A
redo log record is written before allocating a page regardless of
the innodb_extend_and_initialize
setting.
On non-Linux systems and Windows, InnoDB
allocates new pages to the tablespace and physically writes NULLs
to those pages, which is the default behavior. Attempting to
disable
innodb_extend_and_initialize on
those systems returns the following error:
Changing innodb_extend_and_initialize not supported on this platform. Falling back to the default.
The AUTOEXTEND_SIZE option, introduced in MySQL
8.0.23, defines the amount of space allocated by
posix_fallocate() calls. Allocating space in
larger amounts helps avoid fragmentation and facilitates ingestion
of large amounts of data. For more information, see
Section 15.6.3.9, “Tablespace AUTOEXTEND_SIZE Configuration”.
By default, when a file-per-table or general tablespace requires additional space, the tablespace is extended incrementally according to the following rules:
If the tablespace is less than an extent in size, it is extended one page at a time.
If the tablespace is greater than 1 extent but smaller than 32 extents in size, it is extended one extent at a time.
If the tablespace is more than 32 extents in size, it is extended four extents at a time.
For information about extent size, see Section 15.11.2, “File Space Management”.
From MySQL 8.0.23, the amount by which a file-per-table or general
tablespace is extended is configurable by specifying the
AUTOEXTEND_SIZE option. Configuring a larger
extension size can help avoid fragmentation and facilitate
ingestion of large amounts of data.
To configure the extension size for a file-per-table tablespace,
specify the AUTOEXTEND_SIZE size in a
CREATE TABLE or
ALTER TABLE statement:
CREATE TABLE t1 (c1 INT) AUTOEXTEND_SIZE = 4M;
ALTER TABLE t1 AUTOEXTEND_SIZE = 8M;
To configure the extension size for a general tablespace, specify
the AUTOEXTEND_SIZE size in a
CREATE TABLESPACE or
ALTER TABLESPACE statement:
CREATE TABLESPACE ts1 AUTOEXTEND_SIZE = 4M;
ALTER TABLESPACE ts1 AUTOEXTEND_SIZE = 8M;
The AUTOEXTEND_SIZE option can also be used
when creating an undo tablespace, but the extension behavior for
undo tablespaces differs. For more information, see
Section 15.6.3.4, “Undo Tablespaces”.
The AUTOEXTEND_SIZE setting must be a multiple
of 4M. Specifying an AUTOEXTEND_SIZE setting
that is not a multiple of 4M returns an error.
The AUTOEXTEND_SIZE default setting is 0, which
causes the tablespace to be extended according to the default
behavior described above.
The maximum AUTOEXTEND_SIZE setting is 64M.
The minimum AUTOEXTEND_SIZE setting depends on
the InnoDB page size, as shown in the following
table:
| InnoDB Page Size | Minimum AUTOEXTEND_SIZE |
|---|---|
4K |
4M |
8K |
4M |
16K |
4M |
32K |
8M |
64K |
16M |
The default InnoDB page size is 16K (16384
bytes). To determine the InnoDB page size for
your MySQL instance, query the
innodb_page_size setting:
mysql> SELECT @@GLOBAL.innodb_page_size;
+---------------------------+
| @@GLOBAL.innodb_page_size |
+---------------------------+
| 16384 |
+---------------------------+
When the AUTOEXTEND_SIZE setting for a
tablespace is altered, the first extension that occurs afterward
increases the tablespace size to a multiple of the
AUTOEXTEND_SIZE setting. Subsequent extensions
are of the configured size.
When a file-per-table or general tablespace is created with a
non-zero AUTOEXTEND_SIZE setting, the
tablespace is initialized at the specified
AUTOEXTEND_SIZE size.
ALTER TABLESPACE cannot be used to
configure the AUTOEXTEND_SIZE of a
file-per-table tablespace. ALTER
TABLE must be used.
For tables created in file-per-table tablespaces,
SHOW CREATE TABLE shows the
AUTOEXTEND_SIZE option only when it is
configured to a non-zero value.
To determine the AUTOEXTEND_SIZE for any
InnoDB tablespace, query the
INFORMATION_SCHEMA.INNODB_TABLESPACES
table. For example:
mysql>SELECT NAME, AUTOEXTEND_SIZE FROM INFORMATION_SCHEMA.INNODB_TABLESPACESWHERE NAME LIKE 'test/t1';+---------+-----------------+ | NAME | AUTOEXTEND_SIZE | +---------+-----------------+ | test/t1 | 4194304 | +---------+-----------------+ mysql>SELECT NAME, AUTOEXTEND_SIZE FROM INFORMATION_SCHEMA.INNODB_TABLESPACESWHERE NAME LIKE 'ts1';+------+-----------------+ | NAME | AUTOEXTEND_SIZE | +------+-----------------+ | ts1 | 4194304 | +------+-----------------+
An AUTOEXTEND_SIZE of 0, which is the default
setting, means that the tablespace is extended according to the
default tablespace extension behavior described above.
The doublewrite buffer is a storage area where
InnoDB writes pages flushed from the buffer
pool before writing the pages to their proper positions in the
InnoDB data files. If there is an operating
system, storage subsystem, or unexpected mysqld
process exit in the middle of a page write,
InnoDB can find a good copy of the page from
the doublewrite buffer during crash recovery.
Although data is written twice, the doublewrite buffer does not
require twice as much I/O overhead or twice as many I/O
operations. Data is written to the doublewrite buffer in a large
sequential chunk, with a single fsync() call to
the operating system (except in the case that
innodb_flush_method is set to
O_DIRECT_NO_FSYNC).
Prior to MySQL 8.0.20, the doublewrite buffer storage area is
located in the InnoDB system tablespace. As of
MySQL 8.0.20, the doublewrite buffer storage area is located in
doublewrite files.
The following variables are provided for doublewrite buffer configuration:
The
innodb_doublewritevariable controls whether the doublwrite buffer is enabled. It is enabled by default in most cases. To disable the doublewrite buffer, setinnodb_doublewriteto 0 or start the server with--skip-innodb-doublewrite. You might consider disabling the doublewrite buffer if you are more concerned with performance than data integrity, as may be the case when performing benchmarks, for example.If the doublewrite buffer is located on a Fusion-io device that supports atomic writes, the doublewrite buffer is automatically disabled and data file writes are performed using Fusion-io atomic writes instead. However, be aware that the
innodb_doublewritesetting is global. When the doublewrite buffer is disabled, it is disabled for all data files including those that do not reside on Fusion-io hardware. This feature is only supported on Fusion-io hardware and is only enabled for Fusion-io NVMFS on Linux. To take full advantage of this feature, aninnodb_flush_methodsetting ofO_DIRECTis recommended.The
innodb_doublewrite_dirvariable (introduced in MySQL 8.0.20) defines the directory whereInnoDBcreates doublewrite files. If no directory is specified, doublewrite files are created in theinnodb_data_home_dirdirectory, which defaults to the data directory if unspecified.A hash symbol '#' is automatically prefixed to the specified directory name to avoid conflicts with schema names. However, if a '.', '#'. or '/' prefix is specified explicitly in the directory name, the hash symbol '#' is not prefixed to the directory name.
Ideally, the doublewrite directory should be placed on the fastest storage media available.
The
innodb_doublewrite_filesvariable defines the number of doublewrite files. By default, two doublewrite files are created for each buffer pool instance: A flush list doublewrite file and an LRU list doublewrite file.The flush list doublewrite file is for pages flushed from the buffer pool flush list. The default size of a flush list doublewrite file is the
InnoDBpage size * doublewrite page bytes.The LRU list doublewrite file is for pages flushed from the buffer pool LRU list. It also contains slots for single page flushes. The default size of an LRU list doublewrite file is the
InnoDBpage size * (doublewrite pages + (512 / the number of buffer pool instances)) where 512 is the total number of slots reserved for single page flushes.At a minimum, there are two doublewrite files. The maximum number of doublewrite files is two times the number of buffer pool instances. (The number of buffer pool instances is controlled by the
innodb_buffer_pool_instancesvariable.)Doublewrite file names have the following format:
#ib_. For example, the following doublewrite files are created for an MySQL instance with anpage_size_file_number.dblwrInnoDBpages size of 16KB and a single buffer pool:#ib_16384_0.dblwr #ib_16384_1.dblwr
The
innodb_doublewrite_filesvariable is intended for advanced performance tuning. The default setting should be suitable for most users.The
innodb_doublewrite_pagesvariable (introduced in MySQL 8.0.20) controls the number of maximum number of doublewrite pages per thread. If no value is specified,innodb_doublewrite_pagesis set to theinnodb_write_io_threadsvalue. This variable is intended for advanced performance tuning. The default value should be suitable for most users.The
innodb_doublewrite_batch_sizevariable (introduced in MySQL 8.0.20) controls the number of doublewrite pages to write in a batch. This variable is intended for advanced performance tuning. The default value should be suitable for most users.
As of MySQL 8.0.23, InnoDB automatically
encrypts doublewrite file pages that belong to encrypted
tablespaces (see Section 15.13, “InnoDB Data-at-Rest Encryption”).
Likewise, doublewrite file pages belonging page-compressed
tablespaces are compressed. As a result, doublewrite files can
contain different page types including unencrypted and
uncompressed pages, encrypted pages, compressed pages, and pages
that are both encrypted and compressed.
The redo log is a disk-based data structure used during crash recovery to correct data written by incomplete transactions. During normal operations, the redo log encodes requests to change table data that result from SQL statements or low-level API calls. Modifications that did not finish updating the data files before an unexpected shutdown are replayed automatically during initialization, and before the connections are accepted. For information about the role of the redo log in crash recovery, see Section 15.18.2, “InnoDB Recovery”.
By default, the redo log is physically represented on disk by two
files named ib_logfile0 and
ib_logfile1. MySQL writes to the redo log
files in a circular fashion. Data in the redo log is encoded in
terms of records affected; this data is collectively referred to
as redo. The passage of data through the redo log is represented
by an ever-increasing LSN value.
For related information, see Redo Log File Configuration, and Section 8.5.4, “Optimizing InnoDB Redo Logging”.
For information about data-at-rest encryption for redo logs, see Redo Log Encryption.
To change the number or the size of redo log files, perform the following steps:
Stop the MySQL server and make sure that it shuts down without errors.
Edit
my.cnfto change the log file configuration. To change the log file size, configureinnodb_log_file_size. To increase the number of log files, configureinnodb_log_files_in_group.Start the MySQL server again.
If InnoDB detects that the
innodb_log_file_size differs
from the redo log file size, it writes a log checkpoint, closes
and removes the old log files, creates new log files at the
requested size, and opens the new log files.
InnoDB, like any other
ACID-compliant database engine,
flushes the redo log of a
transaction before it is committed. InnoDB
uses group commit
functionality to group multiple such flush requests together to
avoid one flush for each commit. With group commit,
InnoDB issues a single write to the log file
to perform the commit action for multiple user transactions that
commit at about the same time, significantly improving
throughput.
For more information about performance of
COMMIT and other transactional operations,
see Section 8.5.2, “Optimizing InnoDB Transaction Management”.
Backup utilities that copy redo log records may sometimes fail to keep pace with redo log generation while a backup operation is in progress, resulting in lost redo log records due to those records being overwritten. This issue most often occurs when there is significant MySQL server activity during the backup operation, and the redo log file storage media operates at a faster speed than the backup storage media. The redo log archiving feature, introduced in MySQL 8.0.17, addresses this issue by sequentially writing redo log records to an archive file in addition to the redo log files. Backup utilities can copy redo log records from the archive file as necessary, thereby avoiding the potential loss of data.
If redo log archiving is configured on the server, MySQL Enterprise Backup, available with the MySQL Enterprise Edition, uses the redo log archiving feature when backing up a MySQL server.
Enabling redo log archiving on the server requires setting a
value for the
innodb_redo_log_archive_dirs
system variable. The value is specified as a semicolon-separated
list of labeled redo log archive directories. The
label:directory:). For
example:
mysql> SET GLOBAL innodb_redo_log_archive_dirs='label1:directory_path1[;label2:directory_path2;…]';
The label is an arbitrary identifier
for the archive directory. It can be any string of characters,
with the exception of colons (:), which are not permitted. An
empty label is also permitted, but the colon (:) is still
required in this case. A
directory_path must be specified. The
directory that is selected for the redo log archive file must
exist when redo log archiving is activated, or an error is
returned. The path can contain colons (':'), but semicolons (;)
are not permitted.
The
innodb_redo_log_archive_dirs
variable must be configured before the redo log archiving can be
activated. The default value is NULL, which
does not permit activating redo log archiving.
The archive directories that you specify must satisfy the following requirements. (The requirements are enforced when redo log archiving is activated.):
Directories must exist. Directories are not created by the redo log archive process. Otherwise, the following error is returned:
ERROR 3844 (HY000): Redo log archive directory '
directory_path1' does not exist or is not a directoryDirectories must not be world-accessible. This is to prevent the redo log data from being exposed to unauthorized users on the system. Otherwise, the following error is returned:
ERROR 3846 (HY000): Redo log archive directory '
directory_path1' is accessible to all OS usersDirectories cannot be those defined by
datadir,innodb_data_home_dir,innodb_directories,innodb_log_group_home_dir,innodb_temp_tablespaces_dir,innodb_tmpdirinnodb_undo_directory, orsecure_file_priv, nor can they be parent directories or subdirectories of those directories. Otherwise, an error similar to the following is returned:ERROR 3845 (HY000): Redo log archive directory '
directory_path1' is in, under, or over server directory 'datadir' - '/path/to/data_directory'
When a backup utility that supports redo log archiving initiates
a backup, the backup utility activates redo log archiving by
invoking the innodb_redo_log_archive_start()
user-defined function.
If you are not using a backup utility that supports redo log archiving, redo log archiving can also be activated manually, as shown:
mysql> SELECT innodb_redo_log_archive_start('label', 'subdir');
+------------------------------------------+
| innodb_redo_log_archive_start('label') |
+------------------------------------------+
| 0 |
+------------------------------------------+
Or:
mysql> DO innodb_redo_log_archive_start('label', 'subdir');
Query OK, 0 rows affected (0.09 sec)
The MySQL session that activates redo log archiving (using
innodb_redo_log_archive_start()) must
remain open for the duration of the archiving. The same
session must deactivate redo log archiving (using
innodb_redo_log_archive_stop()). If the
session is terminated before the redo log archiving is
explicitly deactivated, the server deactivates redo log
archiving implicitly and removes the redo log archive file.
where label is a label defined by
innodb_redo_log_archive_dirs;
subdir is an optional argument for specifying
a subdirectory of the directory identified by
label for saving the archive file; it
must be a simple directory name (no slash (/), backslash (\), or
colon (:) is permitted). subdir can be empty,
null, or it can be left out.
Only users with the
INNODB_REDO_LOG_ARCHIVE privilege
can activate redo log archiving by invoking
innodb_redo_log_archive_start(), or
deactivate it using
innodb_redo_log_archive_stop(). The MySQL
user running the backup utility or the MySQL user activating and
deactivating redo log archiving manually must have this
privilege.
The redo log archive file path is
directory_identified_by_label/[subdir/]archive.serverUUID.000001.logdirectory_identified_by_labellabelinnodb_redo_log_archive_start().
subdirinnodb_redo_log_archive_start().
For example, the full path and name for a redo log archive file appears similar to the following:
/directory_path/subdirectory/archive.e71a47dc-61f8-11e9-a3cb-080027154b4d.000001.log
After the backup utility finishes copying
InnoDB data files, it deactivates redo log
archiving by calling the
innodb_redo_log_archive_stop() user-defined
function.
If you are not using a backup utility that supports redo log archiving, redo log archiving can also be deactivated manually, as shown:
mysql> SELECT innodb_redo_log_archive_stop();
+--------------------------------+
| innodb_redo_log_archive_stop() |
+--------------------------------+
| 0 |
+--------------------------------+
Or:
mysql> DO innodb_redo_log_archive_stop();
Query OK, 0 rows affected (0.01 sec)
After the stop function completes successfully, the backup utility looks for the relevant section of redo log data from the archive file and copies it into the backup.
After the backup utility finishes copying the redo log data and no longer needs the redo log archive file, it deletes the archive file.
Removal of the archive file is the responsibility of the backup
utility in normal situations. However, if the redo log archiving
operation quits unexpectedly before
innodb_redo_log_archive_stop() is called, the
MySQL server removes the file.
Performance Considerations
Activating redo log archiving typically has a minor performance cost due to the additional write activity.
On Unix and Unix-like operating systems, the performance impact is typically minor, assuming there is not a sustained high rate of updates. On Windows, the performance impact is typically a bit higher, assuming the same.
If there is a sustained high rate of updates and the redo log archive file is on the same storage media as the redo log files, the performance impact may be more significant due to compounded write activity.
If there is a sustained high rate of updates and the redo log archive file is on slower storage media than the redo log files, performance is impacted arbitrarily.
Writing to the redo log archive file does not impede normal transactional logging except in the case that the redo log archive file storage media operates at a much slower rate than the redo log file storage media, and there is a large backlog of persisted redo log blocks waiting to be written to the redo log archive file. In this case, the transactional logging rate is reduced to a level that can be managed by the slower storage media where the redo log archive file resides.
As of MySQL 8.0.21, you can disable redo logging using the
ALTER INSTANCE
DISABLE INNODB REDO_LOG statement. This functionality
is intended for loading data into a new MySQL instance.
Disabling redo logging speeds up data loading by avoiding redo
log writes and doublewrite buffering.
This feature is intended only for loading data into a new MySQL instance. Do not disable redo logging on a production system. It is permitted to shutdown and restart the server while redo logging is disabled, but an unexpected server stoppage while redo logging is disabled can cause data loss and instance corruption.
Attempting to restart the server after an unexpected server stoppage while redo logging is disabled is refused with the following error:
[ERROR] [MY-013578] [InnoDB] Server was killed when Innodb Redo logging was disabled. Data files could be corrupt. You can try to restart the database with innodb_force_recovery=6
In this case, initialize a new MySQL instance and start the data loading procedure again.
The INNODB_REDO_LOG_ENABLE
privilege is required to enable and disable redo logging.
The Innodb_redo_log_enabled
status variable permits monitoring redo logging status.
Cloning operations and redo log archiving are not permitted while redo logging is disabled and vice versa.
An ALTER
INSTANCE [ENABLE|DISABLE] INNODB REDO_LOG operation
requires an exclusive backup metadata lock, which prevents other
ALTER INSTANCE operations from
executing concurrently. Other ALTER
INSTANCE operations must wait for the lock to be
released before executing.
The following procedure demonstrates how to disable redo logging when loading data into a new MySQL instance.
On the new MySQL instance, grant the
INNODB_REDO_LOG_ENABLEprivilege to the user account responsible for disabling redo logging.mysql> GRANT INNODB_REDO_LOG_ENABLE ON *.* to 'data_load_admin';
As the
data_load_adminuser, disable redo logging:mysql> ALTER INSTANCE DISABLE INNODB REDO_LOG;
Check the
Innodb_redo_log_enabledstatus variable to ensure that redo logging is disabled.mysql>
SHOW GLOBAL STATUS LIKE 'Innodb_redo_log_enabled';+-------------------------+-------+ | Variable_name | Value | +-------------------------+-------+ | Innodb_redo_log_enabled | OFF | +-------------------------+-------+Run the data load operation.
As the
data_load_adminuser, enable redo logging after the data load operation finishes:mysql> ALTER INSTANCE ENABLE INNODB REDO_LOG;
Check the
Innodb_redo_log_enabledstatus variable to ensure that redo logging is enabled.mysql>
SHOW GLOBAL STATUS LIKE 'Innodb_redo_log_enabled';+-------------------------+-------+ | Variable_name | Value | +-------------------------+-------+ | Innodb_redo_log_enabled | ON | +-------------------------+-------+
An undo log is a collection of undo log records associated with a single read-write transaction. An undo log record contains information about how to undo the latest change by a transaction to a clustered index record. If another transaction needs to see the original data as part of a consistent read operation, the unmodified data is retrieved from undo log records. Undo logs exist within undo log segments, which are contained within rollback segments. Rollback segments reside in undo tablespaces and in the global temporary tablespace.
Undo logs that reside in the global temporary tablespace are used for transactions that modify data in user-defined temporary tables. These undo logs are not redo-logged, as they are not required for crash recovery. They are used only for rollback while the server is running. This type of undo log benefits performance by avoiding redo logging I/O.
For information about data-at-rest encryption for undo logs, see Undo Log Encryption.
Each undo tablespace and the global temporary tablespace
individually support a maximum of 128 rollback segments. The
innodb_rollback_segments variable
defines the number of rollback segments.
The number of transactions that a rollback segment supports depends on the number of undo slots in the rollback segment and the number of undo logs required by each transaction.
The number of undo slots in a rollback segment differs according
to InnoDB page size.
| InnoDB Page Size | Number of Undo Slots in a Rollback Segment (InnoDB Page Size / 16) |
|---|---|
4096 (4KB) |
256 |
8192 (8KB) |
512 |
16384 (16KB) |
1024 |
32768 (32KB) |
2048 |
65536 (64KB) |
4096 |
A transaction is assigned up to four undo logs, one for each of the following operation types:
Undo logs are assigned as needed. For example, a transaction that
performs INSERT,
UPDATE, and
DELETE operations on regular and
temporary tables requires a full assignment of four undo logs. A
transaction that performs only
INSERT operations on regular tables
requires a single undo log.
A transaction that performs operations on regular tables is assigned undo logs from an assigned undo tablespace rollback segment. A transaction that performs operations on temporary tables is assigned undo logs from an assigned global temporary tablespace rollback segment.
An undo log assigned to a transaction remains tied to the
transaction for its duration. For example, an undo log assigned to
a transaction for an INSERT
operation on a regular table is used for all
INSERT operations on regular tables
performed by that transaction.
Given the factors described above, the following formulas can be
used to estimate the number of concurrent read-write transactions
that InnoDB is capable of supporting.
A transaction can encounter a concurrent transaction limit error
before reaching the number of concurrent read-write transactions
that InnoDB is capable of supporting. This
occurs when a rollback segment assigned to a transaction runs
out of undo slots. In such cases, try rerunning the transaction.
When transactions perform operations on temporary tables, the
number of concurrent read-write transactions that
InnoDB is capable of supporting is
constrained by the number of rollback segments allocated to the
global temporary tablespace, which is 128 by default.
If each transaction performs either an
INSERTor anUPDATEorDELETEoperation, the number of concurrent read-write transactions thatInnoDBis capable of supporting is:(innodb_page_size / 16) * innodb_rollback_segments * number of undo tablespaces
If each transaction performs an
INSERTand anUPDATEorDELETEoperation, the number of concurrent read-write transactions thatInnoDBis capable of supporting is:(innodb_page_size / 16 / 2) * innodb_rollback_segments * number of undo tablespaces
If each transaction performs an
INSERToperation on a temporary table, the number of concurrent read-write transactions thatInnoDBis capable of supporting is:(innodb_page_size / 16) * innodb_rollback_segments
If each transaction performs an
INSERTand anUPDATEorDELETEoperation on a temporary table, the number of concurrent read-write transactions thatInnoDBis capable of supporting is:(innodb_page_size / 16 / 2) * innodb_rollback_segments
To implement a large-scale, busy, or highly reliable database
application, to port substantial code from a different database
system, or to tune MySQL performance, it is important to understand
InnoDB locking and the InnoDB
transaction model.
This section discusses several topics related to
InnoDB locking and the InnoDB
transaction model with which you should be familiar.
Section 15.7.1, “InnoDB Locking” describes lock types used by
InnoDB.Section 15.7.2, “InnoDB Transaction Model” describes transaction isolation levels and the locking strategies used by each. It also discusses the use of
autocommit, consistent non-locking reads, and locking reads.Section 15.7.3, “Locks Set by Different SQL Statements in InnoDB” discusses specific types of locks set in
InnoDBfor various statements.Section 15.7.4, “Phantom Rows” describes how
InnoDBuses next-key locking to avoid phantom rows.Section 15.7.5, “Deadlocks in InnoDB” provides a deadlock example, discusses deadlock detection, and provides tips for minimizing and handling deadlocks in
InnoDB.
This section describes lock types used by
InnoDB.
InnoDB implements standard row-level locking
where there are two types of locks,
shared (S)
locks and exclusive
(X) locks.
A shared (
S) lock permits the transaction that holds the lock to read a row.An exclusive (
X) lock permits the transaction that holds the lock to update or delete a row.
If transaction T1 holds a shared
(S) lock on row r, then
requests from some distinct transaction T2
for a lock on row r are handled as follows:
A request by
T2for anSlock can be granted immediately. As a result, bothT1andT2hold anSlock onr.A request by
T2for anXlock cannot be granted immediately.
If a transaction T1 holds an exclusive
(X) lock on row r, a
request from some distinct transaction T2 for
a lock of either type on r cannot be granted
immediately. Instead, transaction T2 has to
wait for transaction T1 to release its lock
on row r.
InnoDB supports multiple
granularity locking which permits coexistence of row
locks and table locks. For example, a statement such as
LOCK TABLES ...
WRITE takes an exclusive lock (an X
lock) on the specified table. To make locking at multiple
granularity levels practical, InnoDB uses
intention locks.
Intention locks are table-level locks that indicate which type
of lock (shared or exclusive) a transaction requires later for a
row in a table. There are two types of intention locks:
An intention shared lock (
IS) indicates that a transaction intends to set a shared lock on individual rows in a table.An intention exclusive lock (
IX) indicates that a transaction intends to set an exclusive lock on individual rows in a table.
For example, SELECT ...
FOR SHARE sets an IS lock, and
SELECT ... FOR
UPDATE sets an IX lock.
The intention locking protocol is as follows:
Before a transaction can acquire a shared lock on a row in a table, it must first acquire an
ISlock or stronger on the table.Before a transaction can acquire an exclusive lock on a row in a table, it must first acquire an
IXlock on the table.
Table-level lock type compatibility is summarized in the following matrix.
X |
IX |
S |
IS |
|
|---|---|---|---|---|
X |
Conflict | Conflict | Conflict | Conflict |
IX |
Conflict | Compatible | Conflict | Compatible |
S |
Conflict | Conflict | Compatible | Compatible |
IS |
Conflict | Compatible | Compatible | Compatible |
A lock is granted to a requesting transaction if it is compatible with existing locks, but not if it conflicts with existing locks. A transaction waits until the conflicting existing lock is released. If a lock request conflicts with an existing lock and cannot be granted because it would cause deadlock, an error occurs.
Intention locks do not block anything except full table requests
(for example, LOCK
TABLES ... WRITE). The main purpose of intention locks
is to show that someone is locking a row, or going to lock a row
in the table.
Transaction data for an intention lock appears similar to the
following in SHOW
ENGINE INNODB STATUS and
InnoDB monitor
output:
TABLE LOCK table `test`.`t` trx id 10080 lock mode IX
A record lock is a lock on an index record. For example,
SELECT c1 FROM t WHERE c1 = 10 FOR UPDATE;
prevents any other transaction from inserting, updating, or
deleting rows where the value of t.c1 is
10.
Record locks always lock index records, even if a table is
defined with no indexes. For such cases,
InnoDB creates a hidden clustered index and
uses this index for record locking. See
Section 15.6.2.1, “Clustered and Secondary Indexes”.
Transaction data for a record lock appears similar to the
following in SHOW
ENGINE INNODB STATUS and
InnoDB monitor
output:
RECORD LOCKS space id 58 page no 3 n bits 72 index `PRIMARY` of table `test`.`t` trx id 10078 lock_mode X locks rec but not gap Record lock, heap no 2 PHYSICAL RECORD: n_fields 3; compact format; info bits 0 0: len 4; hex 8000000a; asc ;; 1: len 6; hex 00000000274f; asc 'O;; 2: len 7; hex b60000019d0110; asc ;;
A gap lock is a lock on a gap between index records, or a lock
on the gap before the first or after the last index record. For
example, SELECT c1 FROM t WHERE c1 BETWEEN 10 and 20
FOR UPDATE; prevents other transactions from inserting
a value of 15 into column
t.c1, whether or not there was already any
such value in the column, because the gaps between all existing
values in the range are locked.
A gap might span a single index value, multiple index values, or even be empty.
Gap locks are part of the tradeoff between performance and concurrency, and are used in some transaction isolation levels and not others.
Gap locking is not needed for statements that lock rows using a
unique index to search for a unique row. (This does not include
the case that the search condition includes only some columns of
a multiple-column unique index; in that case, gap locking does
occur.) For example, if the id column has a
unique index, the following statement uses only an index-record
lock for the row having id value 100 and it
does not matter whether other sessions insert rows in the
preceding gap:
SELECT * FROM child WHERE id = 100;
If id is not indexed or has a nonunique
index, the statement does lock the preceding gap.
It is also worth noting here that conflicting locks can be held on a gap by different transactions. For example, transaction A can hold a shared gap lock (gap S-lock) on a gap while transaction B holds an exclusive gap lock (gap X-lock) on the same gap. The reason conflicting gap locks are allowed is that if a record is purged from an index, the gap locks held on the record by different transactions must be merged.
Gap locks in InnoDB are “purely
inhibitive”, which means that their only purpose is to
prevent other transactions from inserting to the gap. Gap locks
can co-exist. A gap lock taken by one transaction does not
prevent another transaction from taking a gap lock on the same
gap. There is no difference between shared and exclusive gap
locks. They do not conflict with each other, and they perform
the same function.
Gap locking can be disabled explicitly. This occurs if you
change the transaction isolation level to
READ COMMITTED. Under these
circumstances, gap locking is disabled for searches and index
scans and is used only for foreign-key constraint checking and
duplicate-key checking.
There are also other effects of using the
READ COMMITTED isolation
level. Record locks for nonmatching rows are released after
MySQL has evaluated the WHERE condition. For
UPDATE statements, InnoDB
does a “semi-consistent” read, such that it returns
the latest committed version to MySQL so that MySQL can
determine whether the row matches the WHERE
condition of the UPDATE.
A next-key lock is a combination of a record lock on the index record and a gap lock on the gap before the index record.
InnoDB performs row-level locking in such a
way that when it searches or scans a table index, it sets shared
or exclusive locks on the index records it encounters. Thus, the
row-level locks are actually index-record locks. A next-key lock
on an index record also affects the “gap” before
that index record. That is, a next-key lock is an index-record
lock plus a gap lock on the gap preceding the index record. If
one session has a shared or exclusive lock on record
R in an index, another session cannot insert
a new index record in the gap immediately before
R in the index order.
Suppose that an index contains the values 10, 11, 13, and 20. The possible next-key locks for this index cover the following intervals, where a round bracket denotes exclusion of the interval endpoint and a square bracket denotes inclusion of the endpoint:
(negative infinity, 10] (10, 11] (11, 13] (13, 20] (20, positive infinity)
For the last interval, the next-key lock locks the gap above the largest value in the index and the “supremum” pseudo-record having a value higher than any value actually in the index. The supremum is not a real index record, so, in effect, this next-key lock locks only the gap following the largest index value.
By default, InnoDB operates in
REPEATABLE READ transaction
isolation level. In this case, InnoDB uses
next-key locks for searches and index scans, which prevents
phantom rows (see Section 15.7.4, “Phantom Rows”).
Transaction data for a next-key lock appears similar to the
following in SHOW
ENGINE INNODB STATUS and
InnoDB monitor
output:
RECORD LOCKS space id 58 page no 3 n bits 72 index `PRIMARY` of table `test`.`t` trx id 10080 lock_mode X Record lock, heap no 1 PHYSICAL RECORD: n_fields 1; compact format; info bits 0 0: len 8; hex 73757072656d756d; asc supremum;; Record lock, heap no 2 PHYSICAL RECORD: n_fields 3; compact format; info bits 0 0: len 4; hex 8000000a; asc ;; 1: len 6; hex 00000000274f; asc 'O;; 2: len 7; hex b60000019d0110; asc ;;
An insert intention lock is a type of gap lock set by
INSERT operations prior to row
insertion. This lock signals the intent to insert in such a way
that multiple transactions inserting into the same index gap
need not wait for each other if they are not inserting at the
same position within the gap. Suppose that there are index
records with values of 4 and 7. Separate transactions that
attempt to insert values of 5 and 6, respectively, each lock the
gap between 4 and 7 with insert intention locks prior to
obtaining the exclusive lock on the inserted row, but do not
block each other because the rows are nonconflicting.
The following example demonstrates a transaction taking an insert intention lock prior to obtaining an exclusive lock on the inserted record. The example involves two clients, A and B.
Client A creates a table containing two index records (90 and 102) and then starts a transaction that places an exclusive lock on index records with an ID greater than 100. The exclusive lock includes a gap lock before record 102:
mysql>CREATE TABLE child (id int(11) NOT NULL, PRIMARY KEY(id)) ENGINE=InnoDB;mysql>INSERT INTO child (id) values (90),(102);mysql>START TRANSACTION;mysql>SELECT * FROM child WHERE id > 100 FOR UPDATE;+-----+ | id | +-----+ | 102 | +-----+
Client B begins a transaction to insert a record into the gap. The transaction takes an insert intention lock while it waits to obtain an exclusive lock.
mysql>START TRANSACTION;mysql>INSERT INTO child (id) VALUES (101);
Transaction data for an insert intention lock appears similar to
the following in
SHOW ENGINE INNODB
STATUS and
InnoDB monitor
output:
RECORD LOCKS space id 31 page no 3 n bits 72 index `PRIMARY` of table `test`.`child`
trx id 8731 lock_mode X locks gap before rec insert intention waiting
Record lock, heap no 3 PHYSICAL RECORD: n_fields 3; compact format; info bits 0
0: len 4; hex 80000066; asc f;;
1: len 6; hex 000000002215; asc " ;;
2: len 7; hex 9000000172011c; asc r ;;...
An AUTO-INC lock is a special table-level
lock taken by transactions inserting into tables with
AUTO_INCREMENT columns. In the simplest case,
if one transaction is inserting values into the table, any other
transactions must wait to do their own inserts into that table,
so that rows inserted by the first transaction receive
consecutive primary key values.
The innodb_autoinc_lock_mode
configuration option controls the algorithm used for
auto-increment locking. It allows you to choose how to trade off
between predictable sequences of auto-increment values and
maximum concurrency for insert operations.
For more information, see Section 15.6.1.6, “AUTO_INCREMENT Handling in InnoDB”.
InnoDB supports SPATIAL
indexing of columns containing spatial columns (see
Section 11.4.9, “Optimizing Spatial Analysis”).
To handle locking for operations involving
SPATIAL indexes, next-key locking does not
work well to support REPEATABLE
READ or
SERIALIZABLE transaction
isolation levels. There is no absolute ordering concept in
multidimensional data, so it is not clear which is the
“next” key.
To enable support of isolation levels for tables with
SPATIAL indexes, InnoDB
uses predicate locks. A SPATIAL index
contains minimum bounding rectangle (MBR) values, so
InnoDB enforces consistent read on the index
by setting a predicate lock on the MBR value used for a query.
Other transactions cannot insert or modify a row that would
match the query condition.
In the InnoDB transaction model, the goal is to
combine the best properties of a
multi-versioning database with
traditional two-phase locking. InnoDB performs
locking at the row level and runs queries as nonlocking
consistent reads by
default, in the style of Oracle. The lock information in
InnoDB is stored space-efficiently so that lock
escalation is not needed. Typically, several users are permitted
to lock every row in InnoDB tables, or any
random subset of the rows, without causing
InnoDB memory exhaustion.
Transaction isolation is one of the foundations of database processing. Isolation is the I in the acronym ACID; the isolation level is the setting that fine-tunes the balance between performance and reliability, consistency, and reproducibility of results when multiple transactions are making changes and performing queries at the same time.
InnoDB offers all four transaction isolation
levels described by the SQL:1992 standard:
READ UNCOMMITTED,
READ COMMITTED,
REPEATABLE READ, and
SERIALIZABLE. The default
isolation level for InnoDB is
REPEATABLE READ.
A user can change the isolation level for a single session or
for all subsequent connections with the SET
TRANSACTION statement. To set the server's default
isolation level for all connections, use the
--transaction-isolation option on
the command line or in an option file. For detailed information
about isolation levels and level-setting syntax, see
Section 13.3.7, “SET TRANSACTION Statement”.
InnoDB supports each of the transaction
isolation levels described here using different
locking strategies. You can
enforce a high degree of consistency with the default
REPEATABLE READ level, for
operations on crucial data where
ACID compliance is important.
Or you can relax the consistency rules with
READ COMMITTED or even
READ UNCOMMITTED, in
situations such as bulk reporting where precise consistency and
repeatable results are less important than minimizing the amount
of overhead for locking.
SERIALIZABLE enforces even
stricter rules than REPEATABLE
READ, and is used mainly in specialized situations,
such as with XA transactions and
for troubleshooting issues with concurrency and
deadlocks.
The following list describes how MySQL supports the different transaction levels. The list goes from the most commonly used level to the least used.
This is the default isolation level for
InnoDB. Consistent reads within the same transaction read the snapshot established by the first read. This means that if you issue several plain (nonlocking)SELECTstatements within the same transaction, theseSELECTstatements are consistent also with respect to each other. See Section 15.7.2.3, “Consistent Nonlocking Reads”.For locking reads (
SELECTwithFOR UPDATEorFOR SHARE),UPDATE, andDELETEstatements, locking depends on whether the statement uses a unique index with a unique search condition, or a range-type search condition.For a unique index with a unique search condition,
InnoDBlocks only the index record found, not the gap before it.For other search conditions,
InnoDBlocks the index range scanned, using gap locks or next-key locks to block insertions by other sessions into the gaps covered by the range. For information about gap locks and next-key locks, see Section 15.7.1, “InnoDB Locking”.
Each consistent read, even within the same transaction, sets and reads its own fresh snapshot. For information about consistent reads, see Section 15.7.2.3, “Consistent Nonlocking Reads”.
For locking reads (
SELECTwithFOR UPDATEorFOR SHARE),UPDATEstatements, andDELETEstatements,InnoDBlocks only index records, not the gaps before them, and thus permits the free insertion of new records next to locked records. Gap locking is only used for foreign-key constraint checking and duplicate-key checking.Because gap locking is disabled, phantom problems may occur, as other sessions can insert new rows into the gaps. For information about phantoms, see Section 15.7.4, “Phantom Rows”.
Only row-based binary logging is supported with the
READ COMMITTEDisolation level. If you useREAD COMMITTEDwithbinlog_format=MIXED, the server automatically uses row-based logging.Using
READ COMMITTEDhas additional effects:For
UPDATEorDELETEstatements,InnoDBholds locks only for rows that it updates or deletes. Record locks for nonmatching rows are released after MySQL has evaluated theWHEREcondition. This greatly reduces the probability of deadlocks, but they can still happen.For
UPDATEstatements, if a row is already locked,InnoDBperforms a “semi-consistent” read, returning the latest committed version to MySQL so that MySQL can determine whether the row matches theWHEREcondition of theUPDATE. If the row matches (must be updated), MySQL reads the row again and this timeInnoDBeither locks it or waits for a lock on it.
Consider the following example, beginning with this table:
CREATE TABLE t (a INT NOT NULL, b INT) ENGINE = InnoDB; INSERT INTO t VALUES (1,2),(2,3),(3,2),(4,3),(5,2); COMMIT;
In this case, the table has no indexes, so searches and index scans use the hidden clustered index for record locking (see Section 15.6.2.1, “Clustered and Secondary Indexes”) rather than indexed columns.
Suppose that one session performs an
UPDATEusing these statements:# Session A START TRANSACTION; UPDATE t SET b = 5 WHERE b = 3;
Suppose also that a second session performs an
UPDATEby executing these statements following those of the first session:# Session B UPDATE t SET b = 4 WHERE b = 2;
As
InnoDBexecutes eachUPDATE, it first acquires an exclusive lock for each row, and then determines whether to modify it. IfInnoDBdoes not modify the row, it releases the lock. Otherwise,InnoDBretains the lock until the end of the transaction. This affects transaction processing as follows.When using the default
REPEATABLE READisolation level, the firstUPDATEacquires an x-lock on each row that it reads and does not release any of them:x-lock(1,2); retain x-lock x-lock(2,3); update(2,3) to (2,5); retain x-lock x-lock(3,2); retain x-lock x-lock(4,3); update(4,3) to (4,5); retain x-lock x-lock(5,2); retain x-lock
The second
UPDATEblocks as soon as it tries to acquire any locks (because first update has retained locks on all rows), and does not proceed until the firstUPDATEcommits or rolls back:x-lock(1,2); block and wait for first UPDATE to commit or roll back
If
READ COMMITTEDis used instead, the firstUPDATEacquires an x-lock on each row that it reads and releases those for rows that it does not modify:x-lock(1,2); unlock(1,2) x-lock(2,3); update(2,3) to (2,5); retain x-lock x-lock(3,2); unlock(3,2) x-lock(4,3); update(4,3) to (4,5); retain x-lock x-lock(5,2); unlock(5,2)
For the second
UPDATE,InnoDBdoes a “semi-consistent” read, returning the latest committed version of each row that it reads to MySQL so that MySQL can determine whether the row matches theWHEREcondition of theUPDATE:x-lock(1,2); update(1,2) to (1,4); retain x-lock x-lock(2,3); unlock(2,3) x-lock(3,2); update(3,2) to (3,4); retain x-lock x-lock(4,3); unlock(4,3) x-lock(5,2); update(5,2) to (5,4); retain x-lock
However, if the
WHEREcondition includes an indexed column, andInnoDBuses the index, only the indexed column is considered when taking and retaining record locks. In the following example, the firstUPDATEtakes and retains an x-lock on each row where b = 2. The secondUPDATEblocks when it tries to acquire x-locks on the same records, as it also uses the index defined on column b.CREATE TABLE t (a INT NOT NULL, b INT, c INT, INDEX (b)) ENGINE = InnoDB; INSERT INTO t VALUES (1,2,3),(2,2,4); COMMIT; # Session A START TRANSACTION; UPDATE t SET b = 3 WHERE b = 2 AND c = 3; # Session B UPDATE t SET b = 4 WHERE b = 2 AND c = 4;
The
READ COMMITTEDisolation level can be set at startup or changed at runtime. At runtime, it can be set globally for all sessions, or individually per session.SELECTstatements are performed in a nonlocking fashion, but a possible earlier version of a row might be used. Thus, using this isolation level, such reads are not consistent. This is also called a dirty read. Otherwise, this isolation level works likeREAD COMMITTED.This level is like
REPEATABLE READ, butInnoDBimplicitly converts all plainSELECTstatements toSELECT ... FOR SHAREifautocommitis disabled. Ifautocommitis enabled, theSELECTis its own transaction. It therefore is known to be read only and can be serialized if performed as a consistent (nonlocking) read and need not block for other transactions. (To force a plainSELECTto block if other transactions have modified the selected rows, disableautocommit.)NoteAs of MySQL 8.0.22, DML operations that read data from MySQL grant tables (through a join list or subquery) but do not modify them do not acquire read locks on the MySQL grant tables, regardless of the isolation level. For more information, see Grant Table Concurrency.
In InnoDB, all user activity occurs inside a
transaction. If autocommit mode
is enabled, each SQL statement forms a single transaction on its
own. By default, MySQL starts the session for each new
connection with autocommit
enabled, so MySQL does a commit after each SQL statement if that
statement did not return an error. If a statement returns an
error, the commit or rollback behavior depends on the error. See
Section 15.21.4, “InnoDB Error Handling”.
A session that has autocommit
enabled can perform a multiple-statement transaction by starting
it with an explicit
START
TRANSACTION or
BEGIN
statement and ending it with a
COMMIT or
ROLLBACK
statement. See Section 13.3.1, “START TRANSACTION, COMMIT, and ROLLBACK Statements”.
If autocommit mode is disabled
within a session with SET autocommit = 0, the
session always has a transaction open. A
COMMIT or
ROLLBACK
statement ends the current transaction and a new one starts.
If a session that has
autocommit disabled ends
without explicitly committing the final transaction, MySQL rolls
back that transaction.
Some statements implicitly end a transaction, as if you had done
a COMMIT before executing the
statement. For details, see Section 13.3.3, “Statements That Cause an Implicit Commit”.
A COMMIT means that the changes
made in the current transaction are made permanent and become
visible to other sessions. A
ROLLBACK
statement, on the other hand, cancels all modifications made by
the current transaction. Both
COMMIT and
ROLLBACK
release all InnoDB locks that were set during
the current transaction.
By default, connection to the MySQL server begins with autocommit mode enabled, which automatically commits every SQL statement as you execute it. This mode of operation might be unfamiliar if you have experience with other database systems, where it is standard practice to issue a sequence of DML statements and commit them or roll them back all together.
To use multiple-statement
transactions, switch
autocommit off with the SQL statement SET autocommit
= 0 and end each transaction with
COMMIT or
ROLLBACK as
appropriate. To leave autocommit on, begin each transaction
with START
TRANSACTION and end it with
COMMIT or
ROLLBACK.
The following example shows two transactions. The first is
committed; the second is rolled back.
shell> mysql test
mysql>CREATE TABLE customer (a INT, b CHAR (20), INDEX (a));Query OK, 0 rows affected (0.00 sec) mysql>-- Do a transaction with autocommit turned on.mysql>START TRANSACTION;Query OK, 0 rows affected (0.00 sec) mysql>INSERT INTO customer VALUES (10, 'Heikki');Query OK, 1 row affected (0.00 sec) mysql>COMMIT;Query OK, 0 rows affected (0.00 sec) mysql>-- Do another transaction with autocommit turned off.mysql>SET autocommit=0;Query OK, 0 rows affected (0.00 sec) mysql>INSERT INTO customer VALUES (15, 'John');Query OK, 1 row affected (0.00 sec) mysql>INSERT INTO customer VALUES (20, 'Paul');Query OK, 1 row affected (0.00 sec) mysql>DELETE FROM customer WHERE b = 'Heikki';Query OK, 1 row affected (0.00 sec) mysql>-- Now we undo those last 2 inserts and the delete.mysql>ROLLBACK;Query OK, 0 rows affected (0.00 sec) mysql>SELECT * FROM customer;+------+--------+ | a | b | +------+--------+ | 10 | Heikki | +------+--------+ 1 row in set (0.00 sec) mysql>
Transactions in Client-Side Languages
In APIs such as PHP, Perl DBI, JDBC, ODBC, or the standard C
call interface of MySQL, you can send transaction control
statements such as COMMIT to
the MySQL server as strings just like any other SQL statements
such as SELECT or
INSERT. Some APIs also offer
separate special transaction commit and rollback functions or
methods.
A consistent read
means that InnoDB uses multi-versioning to
present to a query a snapshot of the database at a point in
time. The query sees the changes made by transactions that
committed before that point of time, and no changes made by
later or uncommitted transactions. The exception to this rule is
that the query sees the changes made by earlier statements
within the same transaction. This exception causes the following
anomaly: If you update some rows in a table, a
SELECT sees the latest version of
the updated rows, but it might also see older versions of any
rows. If other sessions simultaneously update the same table,
the anomaly means that you might see the table in a state that
never existed in the database.
If the transaction
isolation level is
REPEATABLE READ (the default
level), all consistent reads within the same transaction read
the snapshot established by the first such read in that
transaction. You can get a fresher snapshot for your queries by
committing the current transaction and after that issuing new
queries.
With READ COMMITTED isolation
level, each consistent read within a transaction sets and reads
its own fresh snapshot.
Consistent read is the default mode in which
InnoDB processes
SELECT statements in
READ COMMITTED and
REPEATABLE READ isolation
levels. A consistent read does not set any locks on the tables
it accesses, and therefore other sessions are free to modify
those tables at the same time a consistent read is being
performed on the table.
Suppose that you are running in the default
REPEATABLE READ isolation
level. When you issue a consistent read (that is, an ordinary
SELECT statement),
InnoDB gives your transaction a timepoint
according to which your query sees the database. If another
transaction deletes a row and commits after your timepoint was
assigned, you do not see the row as having been deleted. Inserts
and updates are treated similarly.
The snapshot of the database state applies to
SELECT statements within a
transaction, not necessarily to
DML statements. If you insert
or modify some rows and then commit that transaction, a
DELETE or
UPDATE statement issued from
another concurrent REPEATABLE READ
transaction could affect those just-committed rows, even
though the session could not query them. If a transaction does
update or delete rows committed by a different transaction,
those changes do become visible to the current transaction.
For example, you might encounter a situation like the
following:
SELECT COUNT(c1) FROM t1 WHERE c1 = 'xyz'; -- Returns 0: no rows match. DELETE FROM t1 WHERE c1 = 'xyz'; -- Deletes several rows recently committed by other transaction. SELECT COUNT(c2) FROM t1 WHERE c2 = 'abc'; -- Returns 0: no rows match. UPDATE t1 SET c2 = 'cba' WHERE c2 = 'abc'; -- Affects 10 rows: another txn just committed 10 rows with 'abc' values. SELECT COUNT(c2) FROM t1 WHERE c2 = 'cba'; -- Returns 10: this txn can now see the rows it just updated.
You can advance your timepoint by committing your transaction
and then doing another SELECT or
START TRANSACTION WITH
CONSISTENT SNAPSHOT.
This is called multi-versioned concurrency control.
In the following example, session A sees the row inserted by B only when B has committed the insert and A has committed as well, so that the timepoint is advanced past the commit of B.
Session A Session B
SET autocommit=0; SET autocommit=0;
time
| SELECT * FROM t;
| empty set
| INSERT INTO t VALUES (1, 2);
|
v SELECT * FROM t;
empty set
COMMIT;
SELECT * FROM t;
empty set
COMMIT;
SELECT * FROM t;
---------------------
| 1 | 2 |
---------------------
If you want to see the “freshest” state of the
database, use either the READ
COMMITTED isolation level or a
locking read:
SELECT * FROM t FOR SHARE;
With READ COMMITTED isolation
level, each consistent read within a transaction sets and reads
its own fresh snapshot. With FOR SHARE, a
locking read occurs instead: A SELECT blocks
until the transaction containing the freshest rows ends (see
Section 15.7.2.4, “Locking Reads”).
Consistent read does not work over certain DDL statements:
Consistent read does not work over
DROP TABLE, because MySQL cannot use a table that has been dropped andInnoDBdestroys the table.Consistent read does not work over
ALTER TABLEoperations that make a temporary copy of the original table and delete the original table when the temporary copy is built. When you reissue a consistent read within a transaction, rows in the new table are not visible because those rows did not exist when the transaction's snapshot was taken. In this case, the transaction returns an error:ER_TABLE_DEF_CHANGED, “Table definition has changed, please retry transaction”.
The type of read varies for selects in clauses like
INSERT INTO ...
SELECT, UPDATE
... (SELECT), and
CREATE TABLE ...
SELECT that do not specify FOR
UPDATE or FOR SHARE:
By default,
InnoDBuses stronger locks for those statements and theSELECTpart acts likeREAD COMMITTED, where each consistent read, even within the same transaction, sets and reads its own fresh snapshot.To perform a nonlocking read in such cases, set the isolation level of the transaction to
READ UNCOMMITTEDorREAD COMMITTEDto avoid setting locks on rows read from the selected table.
If you query data and then insert or update related data within
the same transaction, the regular SELECT
statement does not give enough protection. Other transactions
can update or delete the same rows you just queried.
InnoDB supports two types of
locking reads that
offer extra safety:
Sets a shared mode lock on any rows that are read. Other sessions can read the rows, but cannot modify them until your transaction commits. If any of these rows were changed by another transaction that has not yet committed, your query waits until that transaction ends and then uses the latest values.
NoteSELECT ... FOR SHAREis a replacement forSELECT ... LOCK IN SHARE MODE, butLOCK IN SHARE MODEremains available for backward compatibility. The statements are equivalent. However,FOR SHAREsupportsOF,table_nameNOWAIT, andSKIP LOCKEDoptions. See Locking Read Concurrency with NOWAIT and SKIP LOCKED.Prior to MySQL 8.0.22,
SELECT ... FOR SHARErequires theSELECTprivilege and at least one of theDELETE,LOCK TABLES, orUPDATEprivileges. As of MySQL 8.0.22, only theSELECTprivilege is required.As of MySQL 8.0.22,
SELECT ... FOR SHAREstatements do not acquire read locks on MySQL grant tables. For more information, see Grant Table Concurrency.For index records the search encounters, locks the rows and any associated index entries, the same as if you issued an
UPDATEstatement for those rows. Other transactions are blocked from updating those rows, from doingSELECT ... FOR SHARE, or from reading the data in certain transaction isolation levels. Consistent reads ignore any locks set on the records that exist in the read view. (Old versions of a record cannot be locked; they are reconstructed by applying undo logs on an in-memory copy of the record.)SELECT ... FOR UPDATErequires theSELECTprivilege and at least one of theDELETE,LOCK TABLES, orUPDATEprivileges.
These clauses are primarily useful when dealing with tree-structured or graph-structured data, either in a single table or split across multiple tables. You traverse edges or tree branches from one place to another, while reserving the right to come back and change any of these “pointer” values.
All locks set by FOR SHARE and FOR
UPDATE queries are released when the transaction is
committed or rolled back.
Locking reads are only possible when autocommit is disabled
(either by beginning transaction with
START
TRANSACTION or by setting
autocommit to 0.
A locking read clause in an outer statement does not lock the
rows of a table in a nested subquery unless a locking read
clause is also specified in the subquery. For example, the
following statement does not lock rows in table
t2.
SELECT * FROM t1 WHERE c1 = (SELECT c1 FROM t2) FOR UPDATE;
To lock rows in table t2, add a locking read
clause to the subquery:
SELECT * FROM t1 WHERE c1 = (SELECT c1 FROM t2 FOR UPDATE) FOR UPDATE;
Suppose that you want to insert a new row into a table
child, and make sure that the child row has
a parent row in table parent. Your
application code can ensure referential integrity throughout
this sequence of operations.
First, use a consistent read to query the table
PARENT and verify that the parent row
exists. Can you safely insert the child row to table
CHILD? No, because some other session could
delete the parent row in the moment between your
SELECT and your INSERT,
without you being aware of it.
To avoid this potential issue, perform the
SELECT using FOR
SHARE:
SELECT * FROM parent WHERE NAME = 'Jones' FOR SHARE;
After the FOR SHARE query returns the
parent 'Jones', you can safely add the
child record to the CHILD table and commit
the transaction. Any transaction that tries to acquire an
exclusive lock in the applicable row in the
PARENT table waits until you are finished,
that is, until the data in all tables is in a consistent
state.
For another example, consider an integer counter field in a
table CHILD_CODES, used to assign a unique
identifier to each child added to table
CHILD. Do not use either consistent read or
a shared mode read to read the present value of the counter,
because two users of the database could see the same value for
the counter, and a duplicate-key error occurs if two
transactions attempt to add rows with the same identifier to
the CHILD table.
Here, FOR SHARE is not a good solution
because if two users read the counter at the same time, at
least one of them ends up in deadlock when it attempts to
update the counter.
To implement reading and incrementing the counter, first
perform a locking read of the counter using FOR
UPDATE, and then increment the counter. For example:
SELECT counter_field FROM child_codes FOR UPDATE; UPDATE child_codes SET counter_field = counter_field + 1;
A SELECT ... FOR
UPDATE reads the latest available data, setting
exclusive locks on each row it reads. Thus, it sets the same
locks a searched SQL UPDATE
would set on the rows.
The preceding description is merely an example of how
SELECT ... FOR
UPDATE works. In MySQL, the specific task of
generating a unique identifier actually can be accomplished
using only a single access to the table:
UPDATE child_codes SET counter_field = LAST_INSERT_ID(counter_field + 1); SELECT LAST_INSERT_ID();
The SELECT statement merely
retrieves the identifier information (specific to the current
connection). It does not access any table.
If a row is locked by a transaction, a SELECT ... FOR
UPDATE or SELECT ... FOR SHARE
transaction that requests the same locked row must wait until
the blocking transaction releases the row lock. This behavior
prevents transactions from updating or deleting rows that are
queried for updates by other transactions. However, waiting
for a row lock to be released is not necessary if you want the
query to return immediately when a requested row is locked, or
if excluding locked rows from the result set is acceptable.
To avoid waiting for other transactions to release row locks,
NOWAIT and SKIP LOCKED
options may be used with SELECT ... FOR
UPDATE or SELECT ... FOR SHARE
locking read statements.
NOWAITA locking read that uses
NOWAITnever waits to acquire a row lock. The query executes immediately, failing with an error if a requested row is locked.SKIP LOCKEDA locking read that uses
SKIP LOCKEDnever waits to acquire a row lock. The query executes immediately, removing locked rows from the result set.NoteQueries that skip locked rows return an inconsistent view of the data.
SKIP LOCKEDis therefore not suitable for general transactional work. However, it may be used to avoid lock contention when multiple sessions access the same queue-like table.
NOWAIT and SKIP LOCKED
only apply to row-level locks.
Statements that use NOWAIT or SKIP
LOCKED are unsafe for statement based replication.
The following example demonstrates NOWAIT
and SKIP LOCKED. Session 1 starts a
transaction that takes a row lock on a single record. Session
2 attempts a locking read on the same record using the
NOWAIT option. Because the requested row is
locked by Session 1, the locking read returns immediately with
an error. In Session 3, the locking read with SKIP
LOCKED returns the requested rows except for the row
that is locked by Session 1.
# Session 1: mysql>CREATE TABLE t (i INT, PRIMARY KEY (i)) ENGINE = InnoDB;mysql>INSERT INTO t (i) VALUES(1),(2),(3);mysql>START TRANSACTION;mysql>SELECT * FROM t WHERE i = 2 FOR UPDATE;+---+ | i | +---+ | 2 | +---+ # Session 2: mysql>START TRANSACTION;mysql>SELECT * FROM t WHERE i = 2 FOR UPDATE NOWAIT;ERROR 3572 (HY000): Do not wait for lock. # Session 3: mysql>START TRANSACTION;mysql>SELECT * FROM t FOR UPDATE SKIP LOCKED;+---+ | i | +---+ | 1 | | 3 | +---+
A locking read, an
UPDATE, or a
DELETE generally set record locks
on every index record that is scanned in the processing of the SQL
statement. It does not matter whether there are
WHERE conditions in the statement that would
exclude the row. InnoDB does not remember the
exact WHERE condition, but only knows which
index ranges were scanned. The locks are normally
next-key locks that also
block inserts into the “gap” immediately before the
record. However, gap locking
can be disabled explicitly, which causes next-key locking not to
be used. For more information, see
Section 15.7.1, “InnoDB Locking”. The transaction isolation level
also can affect which locks are set; see
Section 15.7.2.1, “Transaction Isolation Levels”.
If a secondary index is used in a search and index record locks to
be set are exclusive, InnoDB also retrieves the
corresponding clustered index records and sets locks on them.
If you have no indexes suitable for your statement and MySQL must scan the entire table to process the statement, every row of the table becomes locked, which in turn blocks all inserts by other users to the table. It is important to create good indexes so that your queries do not unnecessarily scan many rows.
InnoDB sets specific types of locks as follows.
SELECT ... FROMis a consistent read, reading a snapshot of the database and setting no locks unless the transaction isolation level is set toSERIALIZABLE. ForSERIALIZABLElevel, the search sets shared next-key locks on the index records it encounters. However, only an index record lock is required for statements that lock rows using a unique index to search for a unique row.SELECT ... FOR UPDATEandSELECT ... FOR SHAREstatements that use a unique index acquire locks for scanned rows, and release the locks for rows that do not qualify for inclusion in the result set (for example, if they do not meet the criteria given in theWHEREclause). However, in some cases, rows might not be unlocked immediately because the relationship between a result row and its original source is lost during query execution. For example, in aUNION, scanned (and locked) rows from a table might be inserted into a temporary table before evaluation whether they qualify for the result set. In this circumstance, the relationship of the rows in the temporary table to the rows in the original table is lost and the latter rows are not unlocked until the end of query execution.For locking reads (
SELECTwithFOR UPDATEorFOR SHARE),UPDATE, andDELETEstatements, the locks that are taken depend on whether the statement uses a unique index with a unique search condition, or a range-type search condition.For a unique index with a unique search condition,
InnoDBlocks only the index record found, not the gap before it.For other search conditions, and for non-unique indexes,
InnoDBlocks the index range scanned, using gap locks or next-key locks to block insertions by other sessions into the gaps covered by the range. For information about gap locks and next-key locks, see Section 15.7.1, “InnoDB Locking”.
For index records the search encounters,
SELECT ... FOR UPDATEblocks other sessions from doingSELECT ... FOR SHAREor from reading in certain transaction isolation levels. Consistent reads ignore any locks set on the records that exist in the read view.UPDATE ... WHERE ...sets an exclusive next-key lock on every record the search encounters. However, only an index record lock is required for statements that lock rows using a unique index to search for a unique row.When
UPDATEmodifies a clustered index record, implicit locks are taken on affected secondary index records. TheUPDATEoperation also takes shared locks on affected secondary index records when performing duplicate check scans prior to inserting new secondary index records, and when inserting new secondary index records.DELETE FROM ... WHERE ...sets an exclusive next-key lock on every record the search encounters. However, only an index record lock is required for statements that lock rows using a unique index to search for a unique row.INSERTsets an exclusive lock on the inserted row. This lock is an index-record lock, not a next-key lock (that is, there is no gap lock) and does not prevent other sessions from inserting into the gap before the inserted row.Prior to inserting the row, a type of gap lock called an insert intention gap lock is set. This lock signals the intent to insert in such a way that multiple transactions inserting into the same index gap need not wait for each other if they are not inserting at the same position within the gap. Suppose that there are index records with values of 4 and 7. Separate transactions that attempt to insert values of 5 and 6 each lock the gap between 4 and 7 with insert intention locks prior to obtaining the exclusive lock on the inserted row, but do not block each other because the rows are nonconflicting.
If a duplicate-key error occurs, a shared lock on the duplicate index record is set. This use of a shared lock can result in deadlock should there be multiple sessions trying to insert the same row if another session already has an exclusive lock. This can occur if another session deletes the row. Suppose that an
InnoDBtablet1has the following structure:CREATE TABLE t1 (i INT, PRIMARY KEY (i)) ENGINE = InnoDB;
Now suppose that three sessions perform the following operations in order:
Session 1:
START TRANSACTION; INSERT INTO t1 VALUES(1);
Session 2:
START TRANSACTION; INSERT INTO t1 VALUES(1);
Session 3:
START TRANSACTION; INSERT INTO t1 VALUES(1);
Session 1:
ROLLBACK;
The first operation by session 1 acquires an exclusive lock for the row. The operations by sessions 2 and 3 both result in a duplicate-key error and they both request a shared lock for the row. When session 1 rolls back, it releases its exclusive lock on the row and the queued shared lock requests for sessions 2 and 3 are granted. At this point, sessions 2 and 3 deadlock: Neither can acquire an exclusive lock for the row because of the shared lock held by the other.
A similar situation occurs if the table already contains a row with key value 1 and three sessions perform the following operations in order:
Session 1:
START TRANSACTION; DELETE FROM t1 WHERE i = 1;
Session 2:
START TRANSACTION; INSERT INTO t1 VALUES(1);
Session 3:
START TRANSACTION; INSERT INTO t1 VALUES(1);
Session 1:
COMMIT;
The first operation by session 1 acquires an exclusive lock for the row. The operations by sessions 2 and 3 both result in a duplicate-key error and they both request a shared lock for the row. When session 1 commits, it releases its exclusive lock on the row and the queued shared lock requests for sessions 2 and 3 are granted. At this point, sessions 2 and 3 deadlock: Neither can acquire an exclusive lock for the row because of the shared lock held by the other.
INSERT ... ON DUPLICATE KEY UPDATEdiffers from a simpleINSERTin that an exclusive lock rather than a shared lock is placed on the row to be updated when a duplicate-key error occurs. An exclusive index-record lock is taken for a duplicate primary key value. An exclusive next-key lock is taken for a duplicate unique key value.REPLACEis done like anINSERTif there is no collision on a unique key. Otherwise, an exclusive next-key lock is placed on the row to be replaced.INSERT INTO T SELECT ... FROM S WHERE ...sets an exclusive index record lock (without a gap lock) on each row inserted intoT. If the transaction isolation level isREAD COMMITTED,InnoDBdoes the search onSas a consistent read (no locks). Otherwise,InnoDBsets shared next-key locks on rows fromS.InnoDBhas to set locks in the latter case: During roll-forward recovery using a statement-based binary log, every SQL statement must be executed in exactly the same way it was done originally.CREATE TABLE ... SELECT ...performs theSELECTwith shared next-key locks or as a consistent read, as forINSERT ... SELECT.When a
SELECTis used in the constructsREPLACE INTO t SELECT ... FROM s WHERE ...orUPDATE t ... WHERE col IN (SELECT ... FROM s ...),InnoDBsets shared next-key locks on rows from tables.InnoDBsets an exclusive lock on the end of the index associated with theAUTO_INCREMENTcolumn while initializing a previously specifiedAUTO_INCREMENTcolumn on a table.With
innodb_autoinc_lock_mode=0,InnoDBuses a specialAUTO-INCtable lock mode where the lock is obtained and held to the end of the current SQL statement (not to the end of the entire transaction) while accessing the auto-increment counter. Other clients cannot insert into the table while theAUTO-INCtable lock is held. The same behavior occurs for “bulk inserts” withinnodb_autoinc_lock_mode=1. Table-levelAUTO-INClocks are not used withinnodb_autoinc_lock_mode=2. For more information, See Section 15.6.1.6, “AUTO_INCREMENT Handling in InnoDB”.InnoDBfetches the value of a previously initializedAUTO_INCREMENTcolumn without setting any locks.If a
FOREIGN KEYconstraint is defined on a table, any insert, update, or delete that requires the constraint condition to be checked sets shared record-level locks on the records that it looks at to check the constraint.InnoDBalso sets these locks in the case where the constraint fails.LOCK TABLESsets table locks, but it is the higher MySQL layer above theInnoDBlayer that sets these locks.InnoDBis aware of table locks ifinnodb_table_locks = 1(the default) andautocommit = 0, and the MySQL layer aboveInnoDBknows about row-level locks.Otherwise,
InnoDB's automatic deadlock detection cannot detect deadlocks where such table locks are involved. Also, because in this case the higher MySQL layer does not know about row-level locks, it is possible to get a table lock on a table where another session currently has row-level locks. However, this does not endanger transaction integrity, as discussed in Section 15.7.5.2, “Deadlock Detection”.LOCK TABLESacquires two locks on each table ifinnodb_table_locks=1(the default). In addition to a table lock on the MySQL layer, it also acquires anInnoDBtable lock. Versions of MySQL before 4.1.2 did not acquireInnoDBtable locks; the old behavior can be selected by settinginnodb_table_locks=0. If noInnoDBtable lock is acquired,LOCK TABLEScompletes even if some records of the tables are being locked by other transactions.In MySQL 8.0,
innodb_table_locks=0has no effect for tables locked explicitly withLOCK TABLES ... WRITE. It does have an effect for tables locked for read or write byLOCK TABLES ... WRITEimplicitly (for example, through triggers) or byLOCK TABLES ... READ.All
InnoDBlocks held by a transaction are released when the transaction is committed or aborted. Thus, it does not make much sense to invokeLOCK TABLESonInnoDBtables inautocommit=1mode because the acquiredInnoDBtable locks would be released immediately.You cannot lock additional tables in the middle of a transaction because
LOCK TABLESperforms an implicitCOMMITandUNLOCK TABLES.
The so-called phantom
problem occurs within a transaction when the same query produces
different sets of rows at different times. For example, if a
SELECT is executed twice, but
returns a row the second time that was not returned the first
time, the row is a “phantom” row.
Suppose that there is an index on the id column
of the child table and that you want to read
and lock all rows from the table having an identifier value larger
than 100, with the intention of updating some column in the
selected rows later:
SELECT * FROM child WHERE id > 100 FOR UPDATE;
The query scans the index starting from the first record where
id is bigger than 100. Let the table contain
rows having id values of 90 and 102. If the
locks set on the index records in the scanned range do not lock
out inserts made in the gaps (in this case, the gap between 90 and
102), another session can insert a new row into the table with an
id of 101. If you were to execute the same
SELECT within the same transaction,
you would see a new row with an id of 101 (a
“phantom”) in the result set returned by the query.
If we regard a set of rows as a data item, the new phantom child
would violate the isolation principle of transactions that a
transaction should be able to run so that the data it has read
does not change during the transaction.
To prevent phantoms, InnoDB uses an algorithm
called next-key locking that
combines index-row locking with gap locking.
InnoDB performs row-level locking in such a way
that when it searches or scans a table index, it sets shared or
exclusive locks on the index records it encounters. Thus, the
row-level locks are actually index-record locks. In addition, a
next-key lock on an index record also affects the
“gap” before that index record. That is, a next-key
lock is an index-record lock plus a gap lock on the gap preceding
the index record. If one session has a shared or exclusive lock on
record R in an index, another session cannot
insert a new index record in the gap immediately before
R in the index order.
When InnoDB scans an index, it can also lock
the gap after the last record in the index. Just that happens in
the preceding example: To prevent any insert into the table where
id would be bigger than 100, the locks set by
InnoDB include a lock on the gap following
id value 102.
You can use next-key locking to implement a uniqueness check in your application: If you read your data in share mode and do not see a duplicate for a row you are going to insert, then you can safely insert your row and know that the next-key lock set on the successor of your row during the read prevents anyone meanwhile inserting a duplicate for your row. Thus, the next-key locking enables you to “lock” the nonexistence of something in your table.
Gap locking can be disabled as discussed in Section 15.7.1, “InnoDB Locking”. This may cause phantom problems because other sessions can insert new rows into the gaps when gap locking is disabled.
A deadlock is a situation where different transactions are unable to proceed because each holds a lock that the other needs. Because both transactions are waiting for a resource to become available, neither ever release the locks it holds.
A deadlock can occur when transactions lock rows in multiple
tables (through statements such as
UPDATE or
SELECT ... FOR
UPDATE), but in the opposite order. A deadlock can also
occur when such statements lock ranges of index records and gaps,
with each transaction acquiring some locks but not others due to a
timing issue. For a deadlock example, see
Section 15.7.5.1, “An InnoDB Deadlock Example”.
To reduce the possibility of deadlocks, use transactions rather
than LOCK TABLES statements; keep
transactions that insert or update data small enough that they do
not stay open for long periods of time; when different
transactions update multiple tables or large ranges of rows, use
the same order of operations (such as
SELECT ... FOR
UPDATE) in each transaction; create indexes on the
columns used in SELECT ...
FOR UPDATE and
UPDATE ... WHERE
statements. The possibility of deadlocks is not affected by the
isolation level, because the isolation level changes the behavior
of read operations, while deadlocks occur because of write
operations. For more information about avoiding and recovering
from deadlock conditions, see
Section 15.7.5.3, “How to Minimize and Handle Deadlocks”.
When deadlock detection is enabled (the default) and a deadlock
does occur, InnoDB detects the condition and
rolls back one of the transactions (the victim). If deadlock
detection is disabled using the
innodb_deadlock_detect
configuration option, InnoDB relies on the
innodb_lock_wait_timeout setting
to roll back transactions in case of a deadlock. Thus, even if
your application logic is correct, you must still handle the case
where a transaction must be retried. To see the last deadlock in
an InnoDB user transaction, use the
SHOW ENGINE INNODB
STATUS command. If frequent deadlocks highlight a
problem with transaction structure or application error handling,
run with the
innodb_print_all_deadlocks
setting enabled to print information about all deadlocks to the
mysqld error log. For more information about
how deadlocks are automatically detected and handled, see
Section 15.7.5.2, “Deadlock Detection”.
The following example illustrates how an error can occur when a lock request would cause a deadlock. The example involves two clients, A and B.
First, client A creates a table containing one row, and then
begins a transaction. Within the transaction, A obtains an
S lock on the row by selecting it in share
mode:
mysql>CREATE TABLE t (i INT) ENGINE = InnoDB;Query OK, 0 rows affected (1.07 sec) mysql>INSERT INTO t (i) VALUES(1);Query OK, 1 row affected (0.09 sec) mysql>START TRANSACTION;Query OK, 0 rows affected (0.00 sec) mysql>SELECT * FROM t WHERE i = 1 FOR SHARE;+------+ | i | +------+ | 1 | +------+
Next, client B begins a transaction and attempts to delete the row from the table:
mysql>START TRANSACTION;Query OK, 0 rows affected (0.00 sec) mysql>DELETE FROM t WHERE i = 1;
The delete operation requires an X lock. The
lock cannot be granted because it is incompatible with the
S lock that client A holds, so the request
goes on the queue of lock requests for the row and client B
blocks.
Finally, client A also attempts to delete the row from the table:
mysql> DELETE FROM t WHERE i = 1;
ERROR 1213 (40001): Deadlock found when trying to get lock;
try restarting transaction
Deadlock occurs here because client A needs an
X lock to delete the row. However, that lock
request cannot be granted because client B already has a request
for an X lock and is waiting for client A to
release its S lock. Nor can the
S lock held by A be upgraded to an
X lock because of the prior request by B for
an X lock. As a result,
InnoDB generates an error for one of the
clients and releases its locks. The client returns this error:
ERROR 1213 (40001): Deadlock found when trying to get lock; try restarting transaction
At that point, the lock request for the other client can be granted and it deletes the row from the table.
When deadlock
detection is enabled (the default),
InnoDB automatically detects transaction
deadlocks and rolls back a
transaction or transactions to break the deadlock.
InnoDB tries to pick small transactions to
roll back, where the size of a transaction is determined by the
number of rows inserted, updated, or deleted.
InnoDB is aware of table locks if
innodb_table_locks = 1 (the default) and
autocommit = 0, and the MySQL
layer above it knows about row-level locks. Otherwise,
InnoDB cannot detect deadlocks where a table
lock set by a MySQL LOCK TABLES
statement or a lock set by a storage engine other than
InnoDB is involved. Resolve these situations
by setting the value of the
innodb_lock_wait_timeout system
variable.
If the LATEST DETECTED DEADLOCK section of
InnoDB Monitor output includes a message
stating TOO DEEP OR LONG SEARCH IN THE LOCK TABLE
WAITS-FOR GRAPH, WE WILL ROLL BACK FOLLOWING
TRANSACTION, this indicates that the number of
transactions on the wait-for list has reached a limit of 200. A
wait-for list that exceeds 200 transactions is treated as a
deadlock and the transaction attempting to check the wait-for
list is rolled back. The same error may also occur if the
locking thread must look at more than 1,000,000 locks owned by
transactions on the wait-for list.
For techniques to organize database operations to avoid deadlocks, see Section 15.7.5, “Deadlocks in InnoDB”.
On high concurrency systems, deadlock detection can cause a
slowdown when numerous threads wait for the same lock. At
times, it may be more efficient to disable deadlock detection
and rely on the
innodb_lock_wait_timeout
setting for transaction rollback when a deadlock occurs.
Deadlock detection can be disabled using the
innodb_deadlock_detect
configuration option.
This section builds on the conceptual information about deadlocks in Section 15.7.5.2, “Deadlock Detection”. It explains how to organize database operations to minimize deadlocks and the subsequent error handling required in applications.
Deadlocks are a classic problem in transactional databases, but they are not dangerous unless they are so frequent that you cannot run certain transactions at all. Normally, you must write your applications so that they are always prepared to re-issue a transaction if it gets rolled back because of a deadlock.
InnoDB uses automatic row-level locking. You
can get deadlocks even in the case of transactions that just
insert or delete a single row. That is because these operations
are not really “atomic”; they automatically set
locks on the (possibly several) index records of the row
inserted or deleted.
You can cope with deadlocks and reduce the likelihood of their occurrence with the following techniques:
At any time, issue the
SHOW ENGINE INNODB STATUScommand to determine the cause of the most recent deadlock. That can help you to tune your application to avoid deadlocks.If frequent deadlock warnings cause concern, collect more extensive debugging information by enabling the
innodb_print_all_deadlocksconfiguration option. Information about each deadlock, not just the latest one, is recorded in the MySQL error log. Disable this option when you are finished debugging.Always be prepared to re-issue a transaction if it fails due to deadlock. Deadlocks are not dangerous. Just try again.
Keep transactions small and short in duration to make them less prone to collision.
Commit transactions immediately after making a set of related changes to make them less prone to collision. In particular, do not leave an interactive mysql session open for a long time with an uncommitted transaction.
If you use locking reads (
SELECT ... FOR UPDATEorSELECT ... FOR SHARE), try using a lower isolation level such asREAD COMMITTED.When modifying multiple tables within a transaction, or different sets of rows in the same table, do those operations in a consistent order each time. Then transactions form well-defined queues and do not deadlock. For example, organize database operations into functions within your application, or call stored routines, rather than coding multiple similar sequences of
INSERT,UPDATE, andDELETEstatements in different places.Add well-chosen indexes to your tables. Then your queries need to scan fewer index records and consequently set fewer locks. Use
EXPLAIN SELECTto determine which indexes the MySQL server regards as the most appropriate for your queries.Use less locking. If you can afford to permit a
SELECTto return data from an old snapshot, do not add the clauseFOR UPDATEorFOR SHAREto it. Using theREAD COMMITTEDisolation level is good here, because each consistent read within the same transaction reads from its own fresh snapshot.If nothing else helps, serialize your transactions with table-level locks. The correct way to use
LOCK TABLESwith transactional tables, such asInnoDBtables, is to begin a transaction withSET autocommit = 0(notSTART TRANSACTION) followed byLOCK TABLES, and to not callUNLOCK TABLESuntil you commit the transaction explicitly. For example, if you need to write to tablet1and read from tablet2, you can do this:SET autocommit=0; LOCK TABLES t1 WRITE, t2 READ, ...;
... do something with tables t1 and t2 here ...COMMIT; UNLOCK TABLES;Table-level locks prevent concurrent updates to the table, avoiding deadlocks at the expense of less responsiveness for a busy system.
Another way to serialize transactions is to create an auxiliary “semaphore” table that contains just a single row. Have each transaction update that row before accessing other tables. In that way, all transactions happen in a serial fashion. Note that the
InnoDBinstant deadlock detection algorithm also works in this case, because the serializing lock is a row-level lock. With MySQL table-level locks, the timeout method must be used to resolve deadlocks.
InnoDB uses the Contention-Aware Transaction
Scheduling (CATS) algorithm to prioritize transactions that are
waiting for locks. When multiple transactions are waiting for a
lock on the same object, the CATS algorithm determines which
transaction receives the lock first.
The CATS algorithm prioritizes waiting transactions by assigning a scheduling weight, which is computed based on the number of transactions that a transaction blocks. For example, if two transactions are waiting for a lock on the same object, the transaction that blocks the most transactions is assigned a greater scheduling weight. If weights are equal, priority is given to the longest waiting transaction.
Prior to MySQL 8.0.20, InnoDB also uses a
First In First Out (FIFO) algorithm to schedule transactions,
and the CATS algorithm is used under heavy lock contention only.
CATS algorithm enhancements in MySQL 8.0.20 rendered the FIFO
algorithm redundant, permitting its removal. Transaction
scheduling previously performed by the FIFO algorithm is
performed by the CATS algorithm as of MySQL 8.0.20. In some
cases, this change may affect the order in which transactions
are granted locks.
You can view transaction scheduling weights by querying the
TRX_SCHEDULE_WEIGHT column in the
INFORMATION_SCHEMA.INNODB_TRX table.
Weights are computed for waiting transactions only. Waiting
transactions are those in a LOCK WAIT
transaction execution state, as reported by the
TRX_STATE column. A transaction that is not
waiting for a lock reports a NULL
TRX_SCHEDULE_WEIGHT value.
INNODB_METRICS counters are provided
for monitoring of code-level transaction scheduling events. For
information about using
INNODB_METRICS counters, see
Section 15.15.6, “InnoDB INFORMATION_SCHEMA Metrics Table”.
lock_rec_release_attemptsThe number of attempts to release record locks. A single attempt may lead to zero or more record locks being released, as there may be zero or more record locks in a single structure.
lock_rec_grant_attemptsThe number of attempts to grant record locks. A single attempt may result in zero or more record locks being granted.
lock_schedule_refreshesThe number of times the wait-for graph was analyzed to update the scheduled transaction weights.
- 15.8.1 InnoDB Startup Configuration
- 15.8.2 Configuring InnoDB for Read-Only Operation
- 15.8.3 InnoDB Buffer Pool Configuration
- 15.8.4 Configuring Thread Concurrency for InnoDB
- 15.8.5 Configuring the Number of Background InnoDB I/O Threads
- 15.8.6 Using Asynchronous I/O on Linux
- 15.8.7 Configuring InnoDB I/O Capacity
- 15.8.8 Configuring Spin Lock Polling
- 15.8.9 Purge Configuration
- 15.8.10 Configuring Optimizer Statistics for InnoDB
- 15.8.11 Configuring the Merge Threshold for Index Pages
- 15.8.12 Enabling Automatic Configuration for a Dedicated MySQL Server
This section provides configuration information and procedures for
InnoDB initialization, startup, and various
components and features of the InnoDB storage
engine. For information about optimizing database operations for
InnoDB tables, see
Section 8.5, “Optimizing for InnoDB Tables”.
The first decisions to make about InnoDB
configuration involve the configuration of data files, log files,
page size, and memory buffers. It is recommended that you define
data file, log file, and page size configuration before creating
the InnoDB instance. Modifying data file or log
file configuration after the InnoDB instance is
created may involve a non-trivial procedure, and page size can
only be defined when the InnoDB instance is
first initialized.
In addition to these topics, this section provides information
about specifying InnoDB options in a
configuration file, viewing InnoDB
initialization information, and important storage considerations.
Because MySQL uses data file, log file, and page size
configuration settings to initialize the
InnoDB instance, it is recommended that you
define these settings in a configuration file that MySQL reads
at startup, prior to initializing InnoDB for
the first time. InnoDB is initialized when
the MySQL server is started, and the first initialization of
InnoDB normally occurs the first time you
start the MySQL server.
You can place InnoDB options in the
[mysqld] group of any option file that your
server reads when it starts. The locations of MySQL option files
are described in Section 4.2.2.2, “Using Option Files”.
To make sure that mysqld reads options only
from a specific file (and mysqld-auto.cnf),
use the --defaults-file option
as the first option on the command line when starting the
server:
mysqld --defaults-file=path_to_configuration_file
To view InnoDB initialization information
during startup, start mysqld from a command
prompt. When mysqld is started from a command
prompt, initialization information is printed to the console.
For example, on Windows, if mysqld is located
in C:\Program Files\MySQL\MySQL Server
8.0\bin, start the MySQL server like
this:
C:\> "C:\Program Files\MySQL\MySQL Server 8.0\bin\mysqld" --console
On Unix-like systems, mysqld is located in
the bin directory of your MySQL
installation:
shell> bin/mysqld --user=mysql &
If you do not send server output to the console, check the error
log after startup to see the initialization information
InnoDB printed during the startup process.
For information about starting MySQL using other methods, see Section 2.10.5, “Starting and Stopping MySQL Automatically”.
InnoDB does not open all user tables and
associated data files at startup. However,
InnoDB does check for the existence of
tablespace files (*.ibd files) that are
referenced in the data dictionary. If a tablespace file is not
found, InnoDB logs an error and continues
the startup sequence. Tablespace files that are referenced in
the redo log may be opened during crash recovery for redo
application.
Review the following storage-related considerations before proceeding with your startup configuration.
In some cases, database performance improves if the data is not all placed on the same physical disk. Putting log files on a different disk from data is very often beneficial for performance. For example, you can place system tablespace data files and log files on different disks. You can also use raw disk partitions (raw devices) for
InnoDBdata files, which may speed up I/O. See Using Raw Disk Partitions for the System Tablespace.InnoDBis a transaction-safe (ACID compliant) storage engine for MySQL that has commit, rollback, and crash-recovery capabilities to protect user data. However, it cannot do so if the underlying operating system or hardware does not work as advertised. Many operating systems or disk subsystems may delay or reorder write operations to improve performance. On some operating systems, the veryfsync()system call that should wait until all unwritten data for a file has been flushed might actually return before the data has been flushed to stable storage. Because of this, an operating system crash or a power outage may destroy recently committed data, or in the worst case, even corrupt the database because of write operations having been reordered. If data integrity is important to you, perform some “pull-the-plug” tests before using anything in production. On macOS,InnoDBuses a specialfcntl()file flush method. Under Linux, it is advisable to disable the write-back cache.On ATA/SATA disk drives, a command such
hdparm -W0 /dev/hdamay work to disable the write-back cache. Beware that some drives or disk controllers may be unable to disable the write-back cache.With regard to
InnoDBrecovery capabilities that protect user data,InnoDBuses a file flush technique involving a structure called the doublewrite buffer, which is enabled by default (innodb_doublewrite=ON). The doublewrite buffer adds safety to recovery following an unexpected exit or power outage, and improves performance on most varieties of Unix by reducing the need forfsync()operations. It is recommended that theinnodb_doublewriteoption remains enabled if you are concerned with data integrity or possible failures. For additional information about the doublewrite buffer, see Section 15.11.1, “InnoDB Disk I/O”.Before using NFS with
InnoDB, review potential issues outlined in Using NFS with MySQL.
The innodb_data_file_path
startup option defines the name, size, and attributes of
InnoDB system tablespace data files. If you
do not configure this option prior to initializing the MySQL
server, the default behavior is to create a single
auto-extending data file, slightly larger than 12MB, named
ibdata1:
mysql> SHOW VARIABLES LIKE 'innodb_data_file_path';
+-----------------------+------------------------+
| Variable_name | Value |
+-----------------------+------------------------+
| innodb_data_file_path | ibdata1:12M:autoextend |
+-----------------------+------------------------+
The full data file specification syntax includes the file name,
file size, autoextend attribute, and
max attribute:
file_name:file_size[:autoextend[:max:max_file_size]]
File sizes are specified in kilobytes, megabytes, or gigabytes
by appending K, M or
G to the size value. If specifying the data
file size in kilobytes, do so in multiples of 1024. Otherwise,
kilobyte values are rounded to nearest megabyte (MB) boundary.
The sum of file sizes must be, at a minimum, slightly larger
than 12MB.
You can specify more than one data file using a semicolon-separated list. For example:
[mysqld] innodb_data_file_path=ibdata1:50M;ibdata2:50M:autoextend
The autoextend and max
attributes can be used only for the data file that is specified
last.
When the autoextend attribute is specified,
the data file automatically increases in size by 64MB increments
as space is required. The
innodb_autoextend_increment
variable controls the increment size.
To specify a maximum size for an auto-extending data file, use
the max attribute following the
autoextend attribute. Use the
max attribute only in cases where
constraining disk usage is of critical importance. The following
configuration permits ibdata1 to grow to a
limit of 500MB:
[mysqld] innodb_data_file_path=ibdata1:12M:autoextend:max:500M
A minimum file size is enforced for the
first system tablespace data file to ensure
that there is enough space for doublewrite buffer pages. The
following table shows minimum file sizes for each
InnoDB page size. The default
InnoDB page size is 16384 (16KB).
| Page Size (innodb_page_size) | Minimum File Size |
|---|---|
| 16384 (16KB) or less | 3MB |
| 32768 (32KB) | 6MB |
| 65536 (64KB) | 12MB |
If your disk becomes full, you can add a data file on another disk. For instructions, see Resizing the System Tablespace.
The size limit for individual files is determined by your operating system. You can set the file size to more than 4GB on operating systems that support large files. You can also use raw disk partitions as data files. See Using Raw Disk Partitions for the System Tablespace.
InnoDB is not aware of the file system
maximum file size, so be cautious on file systems where the
maximum file size is a small value such as 2GB.
System tablespace files are created in the data directory by
default (datadir). To specify
an alternate location, you can use the
innodb_data_home_dir option.
For example, to create a system tablespace data file in a
directory named myibdata, use this
configuration:
[mysqld] innodb_data_home_dir = /myibdata/ innodb_data_file_path=ibdata1:50M:autoextend
A trailing slash is required when specifying a value for
innodb_data_home_dir.
InnoDB does not create directories, so ensure
that the specified directory exists before you start the server.
Also, ensure sure that the MySQL server has the proper access
rights to create files in the directory.
InnoDB forms the directory path for each data
file by textually concatenating the value of
innodb_data_home_dir to the
data file name. If
innodb_data_home_dir is not
defined, the default value is “./”, which is the
data directory. (The MySQL server changes its current working
directory to the data directory when it begins executing.)
Alternatively, you can specify an absolute path for system tablespace data files. The following configuration is equivalent to the preceding one:
[mysqld] innodb_data_file_path=/myibdata/ibdata1:50M:autoextend
When you specify an absolute path for
innodb_data_file_path, the
setting is not concatenated with the
innodb_data_home_dir setting.
System tablespace files are created in the specified absolute
path. The specified directory must exist before you start the
server.
As of MySQL 8.0.20, the doublewrite buffer storage area resides
in doublewrite files, which provides flexibility with respect to
the storage location of doublewrite pages. In previous releases,
the doublwrite buffer storage area resided in the system
tablespace. The
innodb_doublewrite_dir variable
defines the directory where InnoDB creates
doublewrite files at startup. If no directory is specified,
doublewrite files are created in the
innodb_data_home_dir directory,
which defaults to the data directory if unspecified.
To have doublewrite files created in a location other than the
innodb_data_home_dir directory,
configure
innodb_doublewrite_dir
variable. For example:
innodb_doublewrite_dir=/path/to/doublewrite_directory
Other doublewrite buffer variables permit defining the number of doublewrite files, the number of pages per thread, and the doublewrite batch size. For more information about doublewrite buffer configuration, see Section 15.6.4, “Doublewrite Buffer”.
By default, InnoDB creates two 5MB redo log
files in the data directory named
ib_logfile0 and
ib_logfile1.
The following options can be used to modify the default configuration:
innodb_log_group_home_dirdefines directory path to theInnoDBlog files (the redo logs). If this option is not configured,InnoDBlog files are created in the MySQL data directory (datadir).You might use this option to place
InnoDBlog files in a different physical storage location thanInnoDBdata files to avoid potential I/O resource conflicts. For example:[mysqld] innodb_log_group_home_dir = /dr3/iblogs
NoteInnoDBdoes not create directories, so make sure that the log directory exists before you start the server. Use the Unix or DOSmkdircommand to create any necessary directories.Make sure that the MySQL server has the proper access rights to create files in the log directory. More generally, the server must have access rights in any directory where it needs to create log files.
innodb_log_files_in_groupdefines the number of log files in the log group. The default and recommended value is 2.innodb_log_file_sizedefines the size in bytes of each log file in the log group. The combined size of log files (innodb_log_file_size*innodb_log_files_in_group) cannot exceed a maximum value that is slightly less than 512GB. A pair of 255 GB log files, for example, approaches the limit but does not exceed it. The default log file size is 48MB. Generally, the combined size of the log files should be large enough that the server can smooth out peaks and troughs in workload activity, which often means that there is enough redo log space to handle more than an hour of write activity. The larger the value, the less checkpoint flush activity is needed in the buffer pool, saving disk I/O. For additional information, see Section 8.5.4, “Optimizing InnoDB Redo Logging”.
By default, undo logs reside in two undo tablespaces that are created when the MySQL instance is initialized. The I/O patterns for undo logs make undo tablespaces good candidates for SSD storage.
The innodb_undo_directory
variable defines the path where InnoDB
creates default undo tablespaces. If that variable is undefined,
default undo tablespaces are created in the data directory. The
innodb_undo_directory variable
is not dynamic. Configuring it requires restarting the server.
For information about configuring additional undo tablespaces, see Section 15.6.3.4, “Undo Tablespaces”.
The global temporary tablespace stores rollback segments for changes made to user-created temporary tables.
By default, InnoDB creates a single
auto-extending global temporary tablespace data file named
ibtmp1 in the
innodb_data_home_dir directory.
The initial file size is slightly larger than 12MB.
The innodb_temp_data_file_path
variable specifies the path, file name, and file size for global
temporary tablespace data files. File size is specified in KB,
MB, or GB by appending K, M, or G to the size value. The sum of
the sizes of the files must be slightly larger than 12MB.
To specify an alternate location for global temporary tablespace
data files, configure the
innodb_temp_data_file_path
variable at startup.
In MySQL 8.0.15 and earlier, session temporary tablespaces store
user-created temporary tables and internal temporary tables
created by the optimizer when InnoDB is
configured as the on-disk storage engine for internal temporary
tables
(internal_tmp_disk_storage_engine=InnoDB).
In MySQL 8.0.16 and later, the InnoDB storage
engine is always used for internal temporary tables on disk.
The innodb_temp_tablespaces_dir
variable defines the location where InnoDB
creates session temporary tablespaces. The default location is
the #innodb_temp directory in the data
directory.
To specify an alternate location for session temporary
tablespaces, configure the
innodb_temp_tablespaces_dir
variable at startup. A fully qualified path or path relative to
the data directory is permitted.
The innodb_page_size option
specifies the page size for all InnoDB
tablespaces in a MySQL instance. This value is set when the
instance is created and remains constant afterward. Valid values
are 64KB, 32KB, 16KB (the default), 8KB, and 4KB. Alternatively,
you can specify page size in bytes (65536, 32768, 16384, 8192,
4096).
The default page size of 16KB is appropriate for a wide range of
workloads, particularly for queries involving table scans and
DML operations involving bulk updates. Smaller page sizes might
be more efficient for OLTP workloads involving many small
writes, where contention can be an issue when a single page
contains many rows. Smaller pages might also be efficient with
SSD storage devices, which typically use small block sizes.
Keeping the InnoDB page size close to the
storage device block size minimizes the amount of unchanged data
that is rewritten to disk.
MySQL allocates memory to various caches and buffers to improve
performance of database operations. When allocating memory for
InnoDB, always consider memory required by
the operating system, memory allocated to other applications,
and memory allocated for other MySQL buffers and caches. For
example, if you use MyISAM tables, consider
the amount of memory allocated for the key buffer
(key_buffer_size). For an
overview of MySQL buffers and caches, see
Section 8.12.3.1, “How MySQL Uses Memory”.
Buffers specific to InnoDB are configured
using the following parameters:
innodb_buffer_pool_sizedefines size of the buffer pool, which is the memory area that holds cached data forInnoDBtables, indexes, and other auxiliary buffers. The size of the buffer pool is important for system performance, and it is typically recommended thatinnodb_buffer_pool_sizeis configured to 50 to 75 percent of system memory. The default buffer pool size is 128MB. For additional guidance, see Section 8.12.3.1, “How MySQL Uses Memory”. For information about how to configureInnoDBbuffer pool size, see Section 15.8.3.1, “Configuring InnoDB Buffer Pool Size”. Buffer pool size can be configured at startup or dynamically.On systems with a large amount of memory, you can improve concurrency by dividing the buffer pool into multiple buffer pool instances. The number of buffer pool instances is controlled by the by
innodb_buffer_pool_instancesoption. By default,InnoDBcreates one buffer pool instance. The number of buffer pool instances can be configured at startup. For more information, see Section 15.8.3.2, “Configuring Multiple Buffer Pool Instances”.innodb_log_buffer_sizedefines the size in bytes of the buffer thatInnoDBuses to write to the log files on disk. The default size is 16MB. A large log buffer enables large transactions to run without a need to write the log to disk before the transactions commit. If you have transactions that update, insert, or delete many rows, you might consider increasing the size of the log buffer to save disk I/O.innodb_log_buffer_sizecan be configured at startup. For related information, see Section 8.5.4, “Optimizing InnoDB Redo Logging”.
On 32-bit GNU/Linux x86, be careful not to set memory usage
too high. glibc may permit the process heap
to grow over thread stacks, which crashes your server. It is a
risk if the memory allocated to the mysqld
process for global and per-thread buffers and caches is close
to or exceeds 2GB.
A formula similar to the following that calculates global and per-thread memory allocation for MySQL can be used to estimate MySQL memory usage. You may need to modify the formula to account for buffers and caches in your MySQL version and configuration. For an overview of MySQL buffers and caches, see Section 8.12.3.1, “How MySQL Uses Memory”.
innodb_buffer_pool_size + key_buffer_size + max_connections*(sort_buffer_size+read_buffer_size+binlog_cache_size) + max_connections*2MB
Each thread uses a stack (often 2MB, but only 256KB in MySQL
binaries provided by Oracle Corporation.) and in the worst
case also uses sort_buffer_size +
read_buffer_size additional memory.
On Linux, if the kernel is enabled for large page support,
InnoDB can use large pages to allocate memory
for its buffer pool. See Section 8.12.3.2, “Enabling Large Page Support”.
You can query InnoDB tables where the MySQL
data directory is on read-only media by enabling the
--innodb-read-only configuration
option at server startup.
How to Enable
To prepare an instance for read-only operation, make sure all the
necessary information is flushed
to the data files before storing it on the read-only medium. Run
the server with change buffering disabled
(innodb_change_buffering=0) and
do a slow shutdown.
To enable read-only mode for an entire MySQL instance, specify the following configuration options at server startup:
If the instance is on read-only media such as a DVD or CD, or the
/vardirectory is not writeable by all:--pid-file=andpath_on_writeable_media--event-scheduler=disabled--innodb-temp-data-file-path. This option specifies the path, file name, and file size forInnoDBtemporary tablespace data files. The default setting isibtmp1:12M:autoextend, which creates theibtmp1temporary tablespace data file in the data directory. To prepare an instance for read-only operation, setinnodb_temp_data_file_pathto a location outside of the data directory. The path must be relative to the data directory. For example:--innodb-temp-data-file-path=../../../tmp/ibtmp1:12M:autoextend
As of MySQL 8.0, enabling
innodb_read_only prevents table
creation and drop operations for all storage engines. These
operations modify data dictionary tables in the
mysql system database, but those tables use the
InnoDB storage engine and cannot be modified
when innodb_read_only is enabled.
The same restriction applies to any operation that modifies data
dictionary tables, such as ANALYZE
TABLE and
ALTER TABLE
.
tbl_name
ENGINE=engine_name
In addition, other tables in the mysql system
database use the InnoDB storage engine in MySQL
8.0. Making those tables read only results in
restrictions on operations that modify them. For example,
CREATE USER,
GRANT,
REVOKE, and
INSTALL PLUGIN operations are not
permitted in read-only mode.
Usage Scenarios
This mode of operation is appropriate in situations such as:
Distributing a MySQL application, or a set of MySQL data, on a read-only storage medium such as a DVD or CD.
Multiple MySQL instances querying the same data directory simultaneously, typically in a data warehousing configuration. You might use this technique to avoid bottlenecks that can occur with a heavily loaded MySQL instance, or you might use different configuration options for the various instances to tune each one for particular kinds of queries.
Querying data that has been put into a read-only state for security or data integrity reasons, such as archived backup data.
This feature is mainly intended for flexibility in distribution and deployment, rather than raw performance based on the read-only aspect. See Section 8.5.3, “Optimizing InnoDB Read-Only Transactions” for ways to tune the performance of read-only queries, which do not require making the entire server read-only.
How It Works
When the server is run in read-only mode through the
--innodb-read-only option,
certain InnoDB features and components are
reduced or turned off entirely:
No change buffering is done, in particular no merges from the change buffer. To make sure the change buffer is empty when you prepare the instance for read-only operation, disable change buffering (
innodb_change_buffering=0) and do a slow shutdown first.There is no crash recovery phase at startup. The instance must have performed a slow shutdown before being put into the read-only state.
Because the redo log is not used in read-only operation, you can set
innodb_log_file_sizeto the smallest size possible (1 MB) before making the instance read-only.Most background threads are turned off. I/O read threads remain, as well as I/O write threads and a page flush coordinator thread for writes to temporary files, which are permitted in read-only mode. A buffer pool resize thread also remains active to enable online resizing of the buffer pool.
Information about deadlocks, monitor output, and so on is not written to temporary files. As a consequence,
SHOW ENGINE INNODB STATUSdoes not produce any output.Changes to configuration option settings that would normally change the behavior of write operations, have no effect when the server is in read-only mode.
The MVCC processing to enforce isolation levels is turned off. All queries read the latest version of a record, because update and deletes are not possible.
The undo log is not used. Disable any settings for the
innodb_undo_tablespacesandinnodb_undo_directoryconfiguration options.
- 15.8.3.1 Configuring InnoDB Buffer Pool Size
- 15.8.3.2 Configuring Multiple Buffer Pool Instances
- 15.8.3.3 Making the Buffer Pool Scan Resistant
- 15.8.3.4 Configuring InnoDB Buffer Pool Prefetching (Read-Ahead)
- 15.8.3.5 Configuring Buffer Pool Flushing
- 15.8.3.6 Saving and Restoring the Buffer Pool State
- 15.8.3.7 Excluding Buffer Pool Pages from Core Files
This section provides configuration and tuning information for the
InnoDB buffer pool.
You can configure InnoDB buffer pool size
offline or while the server is running. Behavior described in
this section applies to both methods. For additional information
about configuring buffer pool size online, see
Configuring InnoDB Buffer Pool Size Online.
When increasing or decreasing
innodb_buffer_pool_size, the
operation is performed in chunks. Chunk size is defined by the
innodb_buffer_pool_chunk_size
configuration option, which has a default of
128M. For more information, see
Configuring InnoDB Buffer Pool Chunk Size.
Buffer pool size must always be equal to or a multiple of
innodb_buffer_pool_chunk_size *
innodb_buffer_pool_instances.
If you configure
innodb_buffer_pool_size to a
value that is not equal to or a multiple of
innodb_buffer_pool_chunk_size *
innodb_buffer_pool_instances,
buffer pool size is automatically adjusted to a value that is
equal to or a multiple of
innodb_buffer_pool_chunk_size *
innodb_buffer_pool_instances.
In the following example,
innodb_buffer_pool_size is set
to 8G, and
innodb_buffer_pool_instances is
set to 16.
innodb_buffer_pool_chunk_size
is 128M, which is the default value.
8G is a valid
innodb_buffer_pool_size value
because 8G is a multiple of
innodb_buffer_pool_instances=16
*
innodb_buffer_pool_chunk_size=128M,
which is 2G.
shell> mysqld --innodb-buffer-pool-size=8G --innodb-buffer-pool-instances=16
mysql> SELECT @@innodb_buffer_pool_size/1024/1024/1024;
+------------------------------------------+
| @@innodb_buffer_pool_size/1024/1024/1024 |
+------------------------------------------+
| 8.000000000000 |
+------------------------------------------+
In this example,
innodb_buffer_pool_size is set
to 9G, and
innodb_buffer_pool_instances is
set to 16.
innodb_buffer_pool_chunk_size
is 128M, which is the default value. In this
case, 9G is not a multiple of
innodb_buffer_pool_instances=16
*
innodb_buffer_pool_chunk_size=128M,
so innodb_buffer_pool_size is
adjusted to 10G, which is a multiple of
innodb_buffer_pool_chunk_size *
innodb_buffer_pool_instances.
shell> mysqld --innodb-buffer-pool-size=9G --innodb-buffer-pool-instances=16
mysql> SELECT @@innodb_buffer_pool_size/1024/1024/1024;
+------------------------------------------+
| @@innodb_buffer_pool_size/1024/1024/1024 |
+------------------------------------------+
| 10.000000000000 |
+------------------------------------------+
innodb_buffer_pool_chunk_size
can be increased or decreased in 1MB (1048576 byte) units but
can only be modified at startup, in a command line string or
in a MySQL configuration file.
Command line:
shell> mysqld --innodb-buffer-pool-chunk-size=134217728
Configuration file:
[mysqld] innodb_buffer_pool_chunk_size=134217728
The following conditions apply when altering
innodb_buffer_pool_chunk_size:
If the new
innodb_buffer_pool_chunk_sizevalue *innodb_buffer_pool_instancesis larger than the current buffer pool size when the buffer pool is initialized,innodb_buffer_pool_chunk_sizeis truncated toinnodb_buffer_pool_size/innodb_buffer_pool_instances.For example, if the buffer pool is initialized with a size of
2GB(2147483648 bytes),4buffer pool instances, and a chunk size of1GB(1073741824 bytes), chunk size is truncated to a value equal toinnodb_buffer_pool_size/innodb_buffer_pool_instances, as shown below:shell>
mysqld --innodb-buffer-pool-size=2147483648 --innodb-buffer-pool-instances=4--innodb-buffer-pool-chunk-size=1073741824;mysql>
SELECT @@innodb_buffer_pool_size;+---------------------------+ | @@innodb_buffer_pool_size | +---------------------------+ | 2147483648 | +---------------------------+ mysql>SELECT @@innodb_buffer_pool_instances;+--------------------------------+ | @@innodb_buffer_pool_instances | +--------------------------------+ | 4 | +--------------------------------+ # Chunk size was set to 1GB (1073741824 bytes) on startup but was # truncated to innodb_buffer_pool_size / innodb_buffer_pool_instances mysql>SELECT @@innodb_buffer_pool_chunk_size;+---------------------------------+ | @@innodb_buffer_pool_chunk_size | +---------------------------------+ | 536870912 | +---------------------------------+Buffer pool size must always be equal to or a multiple of
innodb_buffer_pool_chunk_size*innodb_buffer_pool_instances. If you alterinnodb_buffer_pool_chunk_size,innodb_buffer_pool_sizeis automatically adjusted to a value that is equal to or a multiple ofinnodb_buffer_pool_chunk_size*innodb_buffer_pool_instances. The adjustment occurs when the buffer pool is initialized. This behavior is demonstrated in the following example:# The buffer pool has a default size of 128MB (134217728 bytes) mysql>
SELECT @@innodb_buffer_pool_size;+---------------------------+ | @@innodb_buffer_pool_size | +---------------------------+ | 134217728 | +---------------------------+ # The chunk size is also 128MB (134217728 bytes) mysql>SELECT @@innodb_buffer_pool_chunk_size;+---------------------------------+ | @@innodb_buffer_pool_chunk_size | +---------------------------------+ | 134217728 | +---------------------------------+ # There is a single buffer pool instance mysql>SELECT @@innodb_buffer_pool_instances;+--------------------------------+ | @@innodb_buffer_pool_instances | +--------------------------------+ | 1 | +--------------------------------+ # Chunk size is decreased by 1MB (1048576 bytes) at startup # (134217728 - 1048576 = 133169152): shell>mysqld --innodb-buffer-pool-chunk-size=133169152mysql>SELECT @@innodb_buffer_pool_chunk_size;+---------------------------------+ | @@innodb_buffer_pool_chunk_size | +---------------------------------+ | 133169152 | +---------------------------------+ # Buffer pool size increases from 134217728 to 266338304 # Buffer pool size is automatically adjusted to a value that is equal to # or a multiple of innodb_buffer_pool_chunk_size * innodb_buffer_pool_instances mysql>SELECT @@innodb_buffer_pool_size;+---------------------------+ | @@innodb_buffer_pool_size | +---------------------------+ | 266338304 | +---------------------------+This example demonstrates the same behavior but with multiple buffer pool instances:
# The buffer pool has a default size of 2GB (2147483648 bytes) mysql>
SELECT @@innodb_buffer_pool_size;+---------------------------+ | @@innodb_buffer_pool_size | +---------------------------+ | 2147483648 | +---------------------------+ # The chunk size is .5 GB (536870912 bytes) mysql>SELECT @@innodb_buffer_pool_chunk_size;+---------------------------------+ | @@innodb_buffer_pool_chunk_size | +---------------------------------+ | 536870912 | +---------------------------------+ # There are 4 buffer pool instances mysql>SELECT @@innodb_buffer_pool_instances;+--------------------------------+ | @@innodb_buffer_pool_instances | +--------------------------------+ | 4 | +--------------------------------+ # Chunk size is decreased by 1MB (1048576 bytes) at startup # (536870912 - 1048576 = 535822336): shell>mysqld --innodb-buffer-pool-chunk-size=535822336mysql>SELECT @@innodb_buffer_pool_chunk_size;+---------------------------------+ | @@innodb_buffer_pool_chunk_size | +---------------------------------+ | 535822336 | +---------------------------------+ # Buffer pool size increases from 2147483648 to 4286578688 # Buffer pool size is automatically adjusted to a value that is equal to # or a multiple of innodb_buffer_pool_chunk_size * innodb_buffer_pool_instances mysql>SELECT @@innodb_buffer_pool_size;+---------------------------+ | @@innodb_buffer_pool_size | +---------------------------+ | 4286578688 | +---------------------------+Care should be taken when changing
innodb_buffer_pool_chunk_size, as changing this value can increase the size of the buffer pool, as shown in the examples above. Before you changeinnodb_buffer_pool_chunk_size, calculate the effect oninnodb_buffer_pool_sizeto ensure that the resulting buffer pool size is acceptable.
To avoid potential performance issues, the number of chunks
(innodb_buffer_pool_size /
innodb_buffer_pool_chunk_size)
should not exceed 1000.
The innodb_buffer_pool_size
configuration option can be set dynamically using a
SET statement, allowing you to
resize the buffer pool without restarting the server. For
example:
mysql> SET GLOBAL innodb_buffer_pool_size=402653184;
The buffer pool size must be equal to or a multiple of
innodb_buffer_pool_chunk_size
*
innodb_buffer_pool_instances.
Changing those variable settings requires restarting the
server.
Active transactions and operations performed through
InnoDB APIs should be completed before
resizing the buffer pool. When initiating a resizing
operation, the operation does not start until all active
transactions are completed. Once the resizing operation is in
progress, new transactions and operations that require access
to the buffer pool must wait until the resizing operation
finishes. The exception to the rule is that concurrent access
to the buffer pool is permitted while the buffer pool is
defragmented and pages are withdrawn when buffer pool size is
decreased. A drawback of allowing concurrent access is that it
could result in a temporary shortage of available pages while
pages are being withdrawn.
Nested transactions could fail if initiated after the buffer pool resizing operation begins.
The
Innodb_buffer_pool_resize_status
reports buffer pool resizing progress. For example:
mysql> SHOW STATUS WHERE Variable_name='InnoDB_buffer_pool_resize_status';
+----------------------------------+----------------------------------+
| Variable_name | Value |
+----------------------------------+----------------------------------+
| Innodb_buffer_pool_resize_status | Resizing also other hash tables. |
+----------------------------------+----------------------------------+
Buffer pool resizing progress is also logged in the server error log. This example shows notes that are logged when increasing the size of the buffer pool:
[Note] InnoDB: Resizing buffer pool from 134217728 to 4294967296. (unit=134217728) [Note] InnoDB: disabled adaptive hash index. [Note] InnoDB: buffer pool 0 : 31 chunks (253952 blocks) was added. [Note] InnoDB: buffer pool 0 : hash tables were resized. [Note] InnoDB: Resized hash tables at lock_sys, adaptive hash index, dictionary. [Note] InnoDB: completed to resize buffer pool from 134217728 to 4294967296. [Note] InnoDB: re-enabled adaptive hash index.
This example shows notes that are logged when decreasing the size of the buffer pool:
[Note] InnoDB: Resizing buffer pool from 4294967296 to 134217728. (unit=134217728) [Note] InnoDB: disabled adaptive hash index. [Note] InnoDB: buffer pool 0 : start to withdraw the last 253952 blocks. [Note] InnoDB: buffer pool 0 : withdrew 253952 blocks from free list. tried to relocate 0 pages. (253952/253952) [Note] InnoDB: buffer pool 0 : withdrawn target 253952 blocks. [Note] InnoDB: buffer pool 0 : 31 chunks (253952 blocks) was freed. [Note] InnoDB: buffer pool 0 : hash tables were resized. [Note] InnoDB: Resized hash tables at lock_sys, adaptive hash index, dictionary. [Note] InnoDB: completed to resize buffer pool from 4294967296 to 134217728. [Note] InnoDB: re-enabled adaptive hash index.
The resizing operation is performed by a background thread. When increasing the size of the buffer pool, the resizing operation:
Adds pages in
chunks(chunk size is defined byinnodb_buffer_pool_chunk_size)Coverts hash tables, lists, and pointers to use new addresses in memory
Adds new pages to the free list
While these operations are in progress, other threads are blocked from accessing the buffer pool.
When decreasing the size of the buffer pool, the resizing operation:
Defragments the buffer pool and withdraws (frees) pages
Removes pages in
chunks(chunk size is defined byinnodb_buffer_pool_chunk_size)Converts hash tables, lists, and pointers to use new addresses in memory
Of these operations, only defragmenting the buffer pool and withdrawing pages allow other threads to access to the buffer pool concurrently.
For systems with buffer pools in the multi-gigabyte range,
dividing the buffer pool into separate instances can improve
concurrency, by reducing contention as different threads read
and write to cached pages. This feature is typically intended
for systems with a buffer
pool size in the multi-gigabyte range. Multiple buffer
pool instances are configured using the
innodb_buffer_pool_instances
configuration option, and you might also adjust the
innodb_buffer_pool_size value.
When the InnoDB buffer pool is large, many
data requests can be satisfied by retrieving from memory. You
might encounter bottlenecks from multiple threads trying to
access the buffer pool at once. You can enable multiple buffer
pools to minimize this contention. Each page that is stored in
or read from the buffer pool is assigned to one of the buffer
pools randomly, using a hashing function. Each buffer pool
manages its own free lists, flush lists, LRUs, and all other
data structures connected to a buffer pool. Prior to MySQL 8.0,
each buffer pool was protected by its own buffer pool mutex. In
MySQL 8.0 and later, the buffer pool mutex was replaced by
several list and hash protecting mutexes, to reduce contention.
To enable multiple buffer pool instances, set the
innodb_buffer_pool_instances configuration
option to a value greater than 1 (the default) up to 64 (the
maximum). This option takes effect only when you set
innodb_buffer_pool_size to a size of 1GB or
more. The total size you specify is divided among all the buffer
pools. For best efficiency, specify a combination of
innodb_buffer_pool_instances
and innodb_buffer_pool_size so
that each buffer pool instance is at least 1GB.
For information about modifying InnoDB buffer
pool size, see Section 15.8.3.1, “Configuring InnoDB Buffer Pool Size”.
Rather than using a strict LRU
algorithm, InnoDB uses a technique to
minimize the amount of data that is brought into the
buffer pool and never
accessed again. The goal is to make sure that frequently
accessed (“hot”) pages remain in the buffer pool,
even as read-ahead and
full table scans
bring in new blocks that might or might not be accessed
afterward.
Newly read blocks are inserted into the middle of the LRU list.
All newly read pages are inserted at a location that by default
is 3/8 from the tail of the LRU list. The
pages are moved to the front of the list (the most-recently used
end) when they are accessed in the buffer pool for the first
time. Thus, pages that are never accessed never make it to the
front portion of the LRU list, and “age out” sooner
than with a strict LRU approach. This arrangement divides the
LRU list into two segments, where the pages downstream of the
insertion point are considered “old” and are
desirable victims for LRU eviction.
For an explanation of the inner workings of the
InnoDB buffer pool and specifics about the
LRU algorithm, see Section 15.5.1, “Buffer Pool”.
You can control the insertion point in the LRU list and choose
whether InnoDB applies the same optimization
to blocks brought into the buffer pool by table or index scans.
The configuration parameter
innodb_old_blocks_pct controls
the percentage of “old” blocks in the LRU list. The
default value of
innodb_old_blocks_pct is
37, corresponding to the original fixed ratio
of 3/8. The value range is 5 (new pages in
the buffer pool age out very quickly) to 95
(only 5% of the buffer pool is reserved for hot pages, making
the algorithm close to the familiar LRU strategy).
The optimization that keeps the buffer pool from being churned
by read-ahead can avoid similar problems due to table or index
scans. In these scans, a data page is typically accessed a few
times in quick succession and is never touched again. The
configuration parameter
innodb_old_blocks_time
specifies the time window (in milliseconds) after the first
access to a page during which it can be accessed without being
moved to the front (most-recently used end) of the LRU list. The
default value of
innodb_old_blocks_time is
1000. Increasing this value makes more and
more blocks likely to age out faster from the buffer pool.
Both innodb_old_blocks_pct and
innodb_old_blocks_time can be
specified in the MySQL option file (my.cnf or
my.ini) or changed at runtime with the
SET
GLOBAL statement. Changing the value at runtime
requires privileges sufficient to set global system variables.
See Section 5.1.9.1, “System Variable Privileges”.
To help you gauge the effect of setting these parameters, the
SHOW ENGINE INNODB STATUS command reports
buffer pool statistics. For details, see
Monitoring the Buffer Pool Using the InnoDB Standard Monitor.
Because the effects of these parameters can vary widely based on your hardware configuration, your data, and the details of your workload, always benchmark to verify the effectiveness before changing these settings in any performance-critical or production environment.
In mixed workloads where most of the activity is OLTP type with
periodic batch reporting queries which result in large scans,
setting the value of
innodb_old_blocks_time during
the batch runs can help keep the working set of the normal
workload in the buffer pool.
When scanning large tables that cannot fit entirely in the
buffer pool, setting
innodb_old_blocks_pct to a
small value keeps the data that is only read once from consuming
a significant portion of the buffer pool. For example, setting
innodb_old_blocks_pct=5 restricts this data
that is only read once to 5% of the buffer pool.
When scanning small tables that do fit into memory, there is
less overhead for moving pages around within the buffer pool, so
you can leave
innodb_old_blocks_pct at its
default value, or even higher, such as
innodb_old_blocks_pct=50.
The effect of the
innodb_old_blocks_time
parameter is harder to predict than the
innodb_old_blocks_pct
parameter, is relatively small, and varies more with the
workload. To arrive at an optimal value, conduct your own
benchmarks if the performance improvement from adjusting
innodb_old_blocks_pct is not
sufficient.
A read-ahead request is
an I/O request to prefetch multiple pages in the
buffer pool
asynchronously, in anticipation of impending need for these
pages. The requests bring in all the pages in one
extent.
InnoDB uses two read-ahead algorithms to
improve I/O performance:
Linear read-ahead is a
technique that predicts what pages might be needed soon based on
pages in the buffer pool being accessed sequentially. You
control when InnoDB performs a read-ahead
operation by adjusting the number of sequential page accesses
required to trigger an asynchronous read request, using the
configuration parameter
innodb_read_ahead_threshold.
Before this parameter was added, InnoDB would
only calculate whether to issue an asynchronous prefetch request
for the entire next extent when it read the last page of the
current extent.
The configuration parameter
innodb_read_ahead_threshold
controls how sensitive InnoDB is in detecting
patterns of sequential page access. If the number of pages read
sequentially from an extent is greater than or equal to
innodb_read_ahead_threshold,
InnoDB initiates an asynchronous read-ahead
operation of the entire following extent.
innodb_read_ahead_threshold can
be set to any value from 0-64. The default value is 56. The
higher the value, the more strict the access pattern check. For
example, if you set the value to 48, InnoDB
triggers a linear read-ahead request only when 48 pages in the
current extent have been accessed sequentially. If the value is
8, InnoDB triggers an asynchronous read-ahead
even if as few as 8 pages in the extent are accessed
sequentially. You can set the value of this parameter in the
MySQL configuration
file, or change it dynamically with the
SET
GLOBAL statement, which requires privileges sufficient
to set global system variables. See
Section 5.1.9.1, “System Variable Privileges”.
Random read-ahead is a
technique that predicts when pages might be needed soon based on
pages already in the buffer pool, regardless of the order in
which those pages were read. If 13 consecutive pages from the
same extent are found in the buffer pool,
InnoDB asynchronously issues a request to
prefetch the remaining pages of the extent. To enable this
feature, set the configuration variable
innodb_random_read_ahead to
ON.
The SHOW ENGINE INNODB STATUS command
displays statistics to help you evaluate the effectiveness of
the read-ahead algorithm. Statistics include counter information
for the following global status variables:
This information can be useful when fine-tuning the
innodb_random_read_ahead
setting.
For more information about I/O performance, see Section 8.5.8, “Optimizing InnoDB Disk I/O” and Section 8.12.1, “Optimizing Disk I/O”.
InnoDB performs certain tasks in the
background, including flushing of dirty pages from the buffer
pool. Dirty pages are those that have been modified but are not
yet written to the data files on disk.
In MySQL 8.0, buffer pool flushing is performed by
page cleaner threads. The number of page cleaner threads is
controlled by the
innodb_page_cleaners variable,
which has a default value of 4. However, if the number of page
cleaner threads exceeds the number of buffer pool instances,
innodb_page_cleaners is
automatically set to the same value as
innodb_buffer_pool_instances.
Buffer pool flushing is initiated when the percentage of dirty
pages reaches the low water mark value defined by the
innodb_max_dirty_pages_pct_lwm
variable. The default low water mark is 10% of buffer pool
pages. A
innodb_max_dirty_pages_pct_lwm
value of 0 disables this early flushing behaviour.
The purpose of the
innodb_max_dirty_pages_pct_lwm
threshold is to control the percentage dirty pages in the buffer
pool, and to prevent the amount of dirty pages from reaching the
threshold defined by the
innodb_max_dirty_pages_pct
variable, which has a default value of 90.
InnoDB aggressively flushes buffer pool pages
if the percentage of dirty pages in the buffer pool reaches the
innodb_max_dirty_pages_pct
threshold.
Additional variables permit fine-tuning of buffer pool flushing behavior:
The
innodb_flush_neighborsvariable defines whether flushing a page from the buffer pool also flushes other dirty pages in the same extent.The default setting of 0 disables
innodb_flush_neighbors. Dirty pages in the same extent are not flushed. This setting is recommended for non-rotational storage (SSD) devices where seek time is not a significant factor.A setting of 1 flushes contiguous dirty pages in the same extent.
A setting of 2 flushes dirty pages in the same extent.
When table data is stored on a traditional HDD storage device, flushing neighbor pages in one operation reduces I/O overhead (primarily for disk seek operations) compared to flushing individual pages at different times. For table data stored on SSD, seek time is not a significant factor and you can disable this setting to spread out write operations.
The
innodb_lru_scan_depthvariable specifies, per buffer pool instance, how far down the buffer pool LRU list the page cleaner thread scans looking for dirty pages to flush. This is a background operation performed by a page cleaner thread once per second.A setting smaller than the default is generally suitable for most workloads. A value that is significantly higher than necessary may impact performance. Only consider increasing the value if you have spare I/O capacity under a typical workload. Conversely, if a write-intensive workload saturates your I/O capacity, decrease the value, especially in the case of a large buffer pool.
When tuning
innodb_lru_scan_depth, start with a low value and configure the setting upward with the goal of rarely seeing zero free pages. Also, consider adjustinginnodb_lru_scan_depthwhen changing the number of buffer pool instances, sinceinnodb_lru_scan_depth*innodb_buffer_pool_instancesdefines the amount of work performed by the page cleaner thread each second.
The innodb_flush_neighbors and
innodb_lru_scan_depth variables
are primarily intended for write-intensive workloads. With heavy
DML activity, flushing can fall behind if it is not aggressive
enough, or disk writes can saturate I/O capacity if flushing is
too aggressive. The ideal settings depend on your workload, data
access patterns, and storage configuration (for example, whether
data is stored on HDD or SSD devices).
InnoDB uses an adaptive flushing algorithm
to dynamically adjust the rate of flushing based on the speed
of redo log generation and the current rate of flushing. The
intent is to smooth overall performance by ensuring that
flushing activity keeps pace with the current workload.
Automatically adjusting the flushing rate helps avoid sudden
dips in throughput that can occur when bursts of I/O activity
due to buffer pool flushing affects the I/O capacity available
for ordinary read and write activity.
Sharp checkpoints, which are typically associated with
write-intensive workloads that generate a lot of redo entries,
can cause a sudden change in throughput, for example. A sharp
checkpoint occurs when InnoDB wants to
reuse a portion of a log file. Before doing so, all dirty
pages with redo entries in that portion of the log file must
be flushed. If log files become full, a sharp checkpoint
occurs, causing a temporary reduction in throughput. This
scenario can occur even if
innodb_max_dirty_pages_pct
threshold is not reached.
The adaptive flushing algorithm helps avoid such scenarios by tracking the number of dirty pages in the buffer pool and the rate at which redo log records are being generated. Based on this information, it decides how many dirty pages to flush from the buffer pool each second, which permits it to manage sudden changes in workload.
The
innodb_adaptive_flushing_lwm
variable defines a low water mark for redo log capacity. When
that threshold is crossed, adaptive flushing is enabled, even
if the
innodb_adaptive_flushing
variable is disabled.
Internal benchmarking has shown that the algorithm not only
maintains throughput over time, but can also improve overall
throughput significantly. However, adaptive flushing can
affect the I/O pattern of a workload significantly and may not
be appropriate in all cases. It gives the most benefit when
the redo log is in danger of filling up. If adaptive flushing
is not appropriate to the characteristics of your workload,
you can disable it. Adaptive flushing controlled by the
innodb_adaptive_flushing
variable, which is enabled by default.
innodb_flushing_avg_loops
defines the number of iterations that
InnoDB keeps the previously calculated
snapshot of the flushing state, controlling how quickly
adaptive flushing responds to foreground workload changes. A
high
innodb_flushing_avg_loops
value means that InnoDB keeps the
previously calculated snapshot longer, so adaptive flushing
responds more slowly. When setting a high value it is
important to ensure that redo log utilization does not reach
75% (the hardcoded limit at which asynchronous flushing
starts), and that the
innodb_max_dirty_pages_pct
threshold keeps the number of dirty pages to a level that is
appropriate for the workload.
Systems with consistent workloads, a large log file size
(innodb_log_file_size), and
small spikes that do not reach 75% log space utilization
should use a high
innodb_flushing_avg_loops
value to keep flushing as smooth as possible. For systems with
extreme load spikes or log files that do not provide a lot of
space, a smaller value allows flushing to closely track
workload changes, and helps to avoid reaching 75% log space
utilization.
Be aware that if flushing falls behind, the rate of buffer
pool flushing can exceed the I/O capacity available to
InnoDB, as defined by
innodb_io_capacity setting.
The innodb_io_capacity_max
value defines an upper limit on I/O capacity in such
situations, so that a spike in I/O activity does not consume
the entire I/O capacity of the server.
The innodb_io_capacity
setting is applicable to all buffer pool instances. When dirty
pages are flushed, I/O capacity is divided equally among
buffer pool instances.
As of MySQL 8.0.18, you can use the
innodb_idle_flush_pct
variable to limit the rate of buffer pool flushing during idle
periods, which are periods of time that database pages are not
modified. The
innodb_idle_flush_pct value
is a percentage of the
innodb_io_capacity setting,
which defines the number of I/O operations per second
available to InnoDB. The default
innodb_idle_flush_pct value
is 100, which is 100 percent of the
innodb_io_capacity setting.
To limit flushing during idle periods, define an
innodb_idle_flush_pct value
less than 100.
Limiting page flushing during idle periods can help extend the life of solid state storage devices. Side effects of limiting page flushing during idle periods may include a longer shutdown time following a lengthy idle period, and a longer recovery period should a server failure occur.
To reduce the warmup period
after restarting the server, InnoDB saves a
percentage of the most recently used pages for each buffer pool
at server shutdown and restores these pages at server startup.
The percentage of recently used pages that is stored is defined
by the
innodb_buffer_pool_dump_pct
configuration option.
After restarting a busy server, there is typically a warmup period with steadily increasing throughput, as disk pages that were in the buffer pool are brought back into memory (as the same data is queried, updated, and so on). The ability to restore the buffer pool at startup shortens the warmup period by reloading disk pages that were in the buffer pool before the restart rather than waiting for DML operations to access corresponding rows. Also, I/O requests can be performed in large batches, making the overall I/O faster. Page loading happens in the background, and does not delay database startup.
In addition to saving the buffer pool state at shutdown and restoring it at startup, you can save and restore the buffer pool state at any time, while the server is running. For example, you can save the state of the buffer pool after reaching a stable throughput under a steady workload. You could also restore the previous buffer pool state after running reports or maintenance jobs that bring data pages into the buffer pool that are only requited for those operations, or after running some other non-typical workload.
Even though a buffer pool can be many gigabytes in size, the
buffer pool data that InnoDB saves to disk is
tiny by comparison. Only tablespace IDs and page IDs necessary
to locate the appropriate pages are saved to disk. This
information is derived from the
INNODB_BUFFER_PAGE_LRU
INFORMATION_SCHEMA table. By default,
tablespace ID and page ID data is saved in a file named
ib_buffer_pool, which is saved to the
InnoDB data directory. The file name and
location can be modified using the
innodb_buffer_pool_filename
configuration parameter.
Because data is cached in and aged out of the buffer pool as it is with regular database operations, there is no problem if the disk pages are recently updated, or if a DML operation involves data that has not yet been loaded. The loading mechanism skips requested pages that no longer exist.
The underlying mechanism involves a background thread that is dispatched to perform the dump and load operations.
Disk pages from compressed tables are loaded into the buffer pool in their compressed form. Pages are uncompressed as usual when page contents are accessed during DML operations. Because uncompressing pages is a CPU-intensive process, it is more efficient for concurrency to perform the operation in a connection thread rather than in the single thread that performs the buffer pool restore operation.
Operations related to saving and restoring the buffer pool state are described in the following topics:
Before dumping pages from the buffer pool, you can configure
the percentage of most-recently-used buffer pool pages that
you want to dump by setting the
innodb_buffer_pool_dump_pct
option. If you plan to dump buffer pool pages while the server
is running, you can configure the option dynamically:
SET GLOBAL innodb_buffer_pool_dump_pct=40;
If you plan to dump buffer pool pages at server shutdown, set
innodb_buffer_pool_dump_pct
in your configuration file.
[mysqld] innodb_buffer_pool_dump_pct=40
The
innodb_buffer_pool_dump_pct
default value is 25 (dump 25% of most-recently-used pages).
To save the state of the buffer pool at server shutdown, issue the following statement prior to shutting down the server:
SET GLOBAL innodb_buffer_pool_dump_at_shutdown=ON;
innodb_buffer_pool_dump_at_shutdown
is enabled by default.
To restore the buffer pool state at server startup, specify
the --innodb-buffer-pool-load-at-startup
option when starting the server:
mysqld --innodb-buffer-pool-load-at-startup=ON;
innodb_buffer_pool_load_at_startup
is enabled by default.
To save the state of the buffer pool while MySQL server is running, issue the following statement:
SET GLOBAL innodb_buffer_pool_dump_now=ON;
To restore the buffer pool state while MySQL is running, issue the following statement:
SET GLOBAL innodb_buffer_pool_load_now=ON;
To display progress when saving the buffer pool state to disk, issue the following statement:
SHOW STATUS LIKE 'Innodb_buffer_pool_dump_status';
If the operation has not yet started, “not started” is returned. If the operation is complete, the completion time is printed (e.g. Finished at 110505 12:18:02). If the operation is in progress, status information is provided (e.g. Dumping buffer pool 5/7, page 237/2873).
To display progress when loading the buffer pool, issue the following statement:
SHOW STATUS LIKE 'Innodb_buffer_pool_load_status';
If the operation has not yet started, “not started” is returned. If the operation is complete, the completion time is printed (e.g. Finished at 110505 12:23:24). If the operation is in progress, status information is provided (e.g. Loaded 123/22301 pages).
To abort a buffer pool load operation, issue the following statement:
SET GLOBAL innodb_buffer_pool_load_abort=ON;
You can monitor buffer pool load progress using Performance Schema.
The following example demonstrates how to enable the
stage/innodb/buffer pool load stage event
instrument and related consumer tables to monitor buffer pool
load progress.
For information about buffer pool dump and load procedures used in this example, see Section 15.8.3.6, “Saving and Restoring the Buffer Pool State”. For information about Performance Schema stage event instruments and related consumers, see Section 27.12.5, “Performance Schema Stage Event Tables”.
Enable the
stage/innodb/buffer pool loadinstrument:mysql>
UPDATE performance_schema.setup_instruments SET ENABLED = 'YES'WHERE NAME LIKE 'stage/innodb/buffer%';Enable the stage event consumer tables, which include
events_stages_current,events_stages_history, andevents_stages_history_long.mysql>
UPDATE performance_schema.setup_consumers SET ENABLED = 'YES'WHERE NAME LIKE '%stages%';Dump the current buffer pool state by enabling
innodb_buffer_pool_dump_now.mysql>
SET GLOBAL innodb_buffer_pool_dump_now=ON;Check the buffer pool dump status to ensure that the operation has completed.
mysql>
SHOW STATUS LIKE 'Innodb_buffer_pool_dump_status'\G*************************** 1. row *************************** Variable_name: Innodb_buffer_pool_dump_status Value: Buffer pool(s) dump completed at 150202 16:38:58Load the buffer pool by enabling
innodb_buffer_pool_load_now:mysql>
SET GLOBAL innodb_buffer_pool_load_now=ON;Check the current status of the buffer pool load operation by querying the Performance Schema
events_stages_currenttable. TheWORK_COMPLETEDcolumn shows the number of buffer pool pages loaded. TheWORK_ESTIMATEDcolumn provides an estimate of the remaining work, in pages.mysql>
SELECT EVENT_NAME, WORK_COMPLETED, WORK_ESTIMATEDFROM performance_schema.events_stages_current;+-------------------------------+----------------+----------------+ | EVENT_NAME | WORK_COMPLETED | WORK_ESTIMATED | +-------------------------------+----------------+----------------+ | stage/innodb/buffer pool load | 5353 | 7167 | +-------------------------------+----------------+----------------+The
events_stages_currenttable returns an empty set if the buffer pool load operation has completed. In this case, you can check theevents_stages_historytable to view data for the completed event. For example:mysql>
SELECT EVENT_NAME, WORK_COMPLETED, WORK_ESTIMATEDFROM performance_schema.events_stages_history;+-------------------------------+----------------+----------------+ | EVENT_NAME | WORK_COMPLETED | WORK_ESTIMATED | +-------------------------------+----------------+----------------+ | stage/innodb/buffer pool load | 7167 | 7167 | +-------------------------------+----------------+----------------+
You can also monitor buffer pool load progress using
Performance Schema when loading the buffer pool at startup
using
innodb_buffer_pool_load_at_startup.
In this case, the stage/innodb/buffer pool
load instrument and related consumers must be
enabled at startup. For more information, see
Section 27.3, “Performance Schema Startup Configuration”.
A core file records the status and memory image of a running process. Because the buffer pool resides in main memory, and the memory image of a running process is dumped to the core file, systems with large buffer pools can produce large core files when the mysqld process dies.
Large core files can be problematic for a number of reasons including the time it takes to write them, the amount of disk space they consume, and the challenges associated with transferring large files.
To reduce core file size, you can disable the
innodb_buffer_pool_in_core_file
variable to omit buffer pool pages from core dumps. The
innodb_buffer_pool_in_core_file
variable was introduced in MySQL 8.0.14 and is enabled by
default.
Excluding buffer pool pages may also be desirable from a security perspective if you have concerns about dumping database pages to core files that may be shared inside or outside of your organization for debugging purposes.
Access to the data present in buffer pool pages at the time the mysqld process died may be beneficial in some debugging scenarios. If in doubt whether to include or exclude buffer pool pages, consult MySQL Support.
Disabling
innodb_buffer_pool_in_core_file
takes effect only if the
core_file variable is enabled
and the operating system supports the
MADV_DONTDUMP non-POSIX extension to the
madvise()
system call, which is supported in Linux 3.4 and later. The
MADV_DONTDUMP extension causes pages in a
specified range to be excluded from core dumps.
Assuming the operating system supports the
MADV_DONTDUMP extension, start the server
with the --core-file and
--innodb-buffer-pool-in-core-file=OFF
options to generate core files without buffer pool pages.
shell> mysqld --core-file --innodb-buffer-pool-in-core-file=OFF
The core_file variable is read
only and disabled by default. It is enabled by specifying the
--core-file option at startup.
The
innodb_buffer_pool_in_core_file
variable is dynamic. It can be specified at startup or
configured at runtime using a
SET
statement.
mysql> SET GLOBAL innodb_buffer_pool_in_core_file=OFF;
If the
innodb_buffer_pool_in_core_file
variable is disabled but MADV_DONTDUMP is not
supported by the operating system, or an
madvise() failure occurs, a warning is
written to the MySQL server error log and the
core_file variable is disabled
to prevent writing core files that unintentionally include
buffer pool pages. If the read-only
core_file variable becomes
disabled, the server must be restarted to enable it again.
The following table shows configuration and
MADV_DONTDUMP support scenarios that
determine whether core files are generated and whether they
include buffer pool pages.
Table 15.4 Core File Configuration Scenarios
core_file variable |
innodb_buffer_pool_in_core_file
variable |
madvise() MADV_DONTDUMP Support | Outcome |
|---|---|---|---|
| OFF (default) | Not relevant to outcome | Not relevant to outcome | Core file is not generated |
| ON | ON (default) | Not relevant to outcome | Core file is generated with buffer pool pages |
| ON | OFF | Yes | Core file is generated without buffer pool pages |
| ON | OFF | No | Core file is not generated, core_file
is disabled, and a warning is written to the server error
log |
The reduction in core file size achieved by disabling the
innodb_buffer_pool_in_core_file
variable depends on the size of the buffer pool, but it is also
affected by the InnoDB page size. A smaller
page size means more pages are required for the same amount of
data, and more pages means more page metadata. The following
table provides size reduction examples that you might see for a
1GB buffer pool with different pages sizes.
Table 15.5 Core File Size with Buffer Pool Pages Included and Excluded
innodb_page_size Setting |
Buffer Pool Pages Included
(innodb_buffer_pool_in_core_file=ON) |
Buffer Pool Pages Excluded
(innodb_buffer_pool_in_core_file=OFF) |
|---|---|---|
| 4KB | 2.1GB | 0.9GB |
| 64KB | 1.7GB | 0.7GB |
InnoDB uses operating system
threads to process requests
from user transactions. (Transactions may issue many requests to
InnoDB before they commit or roll back.) On
modern operating systems and servers with multi-core processors,
where context switching is efficient, most workloads run well
without any limit on the number of concurrent threads.
In situations where it is helpful to minimize context switching
between threads, InnoDB can use a number of
techniques to limit the number of concurrently executing operating
system threads (and thus the number of requests that are processed
at any one time). When InnoDB receives a new
request from a user session, if the number of threads concurrently
executing is at a pre-defined limit, the new request sleeps for a
short time before it tries again. A request that cannot be
rescheduled after the sleep is put in a first-in/first-out queue
and eventually is processed. Threads waiting for locks are not
counted in the number of concurrently executing threads.
You can limit the number of concurrent threads by setting the
configuration parameter
innodb_thread_concurrency. Once
the number of executing threads reaches this limit, additional
threads sleep for a number of microseconds, set by the
configuration parameter
innodb_thread_sleep_delay, before
being placed into the queue.
You can set the configuration option
innodb_adaptive_max_sleep_delay
to the highest value you would allow for
innodb_thread_sleep_delay, and
InnoDB automatically adjusts
innodb_thread_sleep_delay up or
down depending on the current thread-scheduling activity. This
dynamic adjustment helps the thread scheduling mechanism to work
smoothly during times when the system is lightly loaded and when
it is operating near full capacity.
The default value for
innodb_thread_concurrency and the
implied default limit on the number of concurrent threads has been
changed in various releases of MySQL and
InnoDB. The default value of
innodb_thread_concurrency is
0, so that by default there is no limit on the
number of concurrently executing threads.
InnoDB causes threads to sleep only when the
number of concurrent threads is limited. When there is no limit on
the number of threads, all contend equally to be scheduled. That
is, if innodb_thread_concurrency
is 0, the value of
innodb_thread_sleep_delay is
ignored.
When there is a limit on the number of threads (when
innodb_thread_concurrency is >
0), InnoDB reduces context switching overhead
by permitting multiple requests made during the execution of a
single SQL statement to enter
InnoDB without observing the limit set by
innodb_thread_concurrency. Since
an SQL statement (such as a join) may comprise multiple row
operations within InnoDB,
InnoDB assigns a specified number of
“tickets” that allow a thread to be scheduled
repeatedly with minimal overhead.
When a new SQL statement starts, a thread has no tickets, and it
must observe
innodb_thread_concurrency. Once
the thread is entitled to enter InnoDB, it is
assigned a number of tickets that it can use for subsequently
entering InnoDB to perform row operations. If
the tickets run out, the thread is evicted, and
innodb_thread_concurrency is
observed again which may place the thread back into the
first-in/first-out queue of waiting threads. When the thread is
once again entitled to enter InnoDB, tickets
are assigned again. The number of tickets assigned is specified by
the global option
innodb_concurrency_tickets, which
is 5000 by default. A thread that is waiting for a lock is given
one ticket once the lock becomes available.
The correct values of these variables depend on your environment
and workload. Try a range of different values to determine what
value works for your applications. Before limiting the number of
concurrently executing threads, review configuration options that
may improve the performance of InnoDB on
multi-core and multi-processor computers, such as
innodb_adaptive_hash_index.
For general performance information about MySQL thread handling, see Section 5.1.12.1, “Connection Interfaces”.
InnoDB uses background
threads to service various
types of I/O requests. You can configure the number of background
threads that service read and write I/O on data pages using the
innodb_read_io_threads and
innodb_write_io_threads
configuration parameters. These parameters signify the number of
background threads used for read and write requests, respectively.
They are effective on all supported platforms. You can set values
for these parameters in the MySQL option file
(my.cnf or my.ini); you
cannot change values dynamically. The default value for these
parameters is 4 and permissible values range
from 1-64.
The purpose of these configuration options to make
InnoDB more scalable on high end systems. Each
background thread can handle up to 256 pending I/O requests. A
major source of background I/O is
read-ahead requests.
InnoDB tries to balance the load of incoming
requests in such way that most background threads share work
equally. InnoDB also attempts to allocate read
requests from the same extent to the same thread, to increase the
chances of coalescing the requests. If you have a high end I/O
subsystem and you see more than 64 ×
innodb_read_io_threads pending
read requests in SHOW ENGINE INNODB STATUS
output, you might improve performance by increasing the value of
innodb_read_io_threads.
On Linux systems, InnoDB uses the asynchronous
I/O subsystem by default to perform read-ahead and write requests
for data file pages, which changes the way that
InnoDB background threads service these types
of I/O requests. For more information, see
Section 15.8.6, “Using Asynchronous I/O on Linux”.
For more information about InnoDB I/O
performance, see Section 8.5.8, “Optimizing InnoDB Disk I/O”.
InnoDB uses the asynchronous I/O subsystem
(native AIO) on Linux to perform read-ahead and write requests for
data file pages. This behavior is controlled by the
innodb_use_native_aio
configuration option, which applies to Linux systems only and is
enabled by default. On other Unix-like systems,
InnoDB uses synchronous I/O only. Historically,
InnoDB only used asynchronous I/O on Windows
systems. Using the asynchronous I/O subsystem on Linux requires
the libaio library.
With synchronous I/O, query threads queue I/O requests, and
InnoDB background threads retrieve the queued
requests one at a time, issuing a synchronous I/O call for each.
When an I/O request is completed and the I/O call returns, the
InnoDB background thread that is handling the
request calls an I/O completion routine and returns to process the
next request. The number of requests that can be processed in
parallel is n, where
n is the number of
InnoDB background threads. The number of
InnoDB background threads is controlled by
innodb_read_io_threads and
innodb_write_io_threads. See
Section 15.8.5, “Configuring the Number of Background InnoDB I/O Threads”.
With native AIO, query threads dispatch I/O requests directly to
the operating system, thereby removing the limit imposed by the
number of background threads. InnoDB background
threads wait for I/O events to signal completed requests. When a
request is completed, a background thread calls an I/O completion
routine and resumes waiting for I/O events.
The advantage of native AIO is scalability for heavily I/O-bound
systems that typically show many pending reads/writes in
SHOW ENGINE INNODB STATUS\G output. The
increase in parallel processing when using native AIO means that
the type of I/O scheduler or properties of the disk array
controller have a greater influence on I/O performance.
A potential disadvantage of native AIO for heavily I/O-bound systems is lack of control over the number of I/O write requests dispatched to the operating system at once. Too many I/O write requests dispatched to the operating system for parallel processing could, in some cases, result in I/O read starvation, depending on the amount of I/O activity and system capabilities.
If a problem with the asynchronous I/O subsystem in the OS
prevents InnoDB from starting, you can start
the server with
innodb_use_native_aio=0. This
option may also be disabled automatically during startup if
InnoDB detects a potential problem such as a
combination of tmpdir location,
tmpfs file system, and Linux kernel that does
not support asynchronous I/O on tmpfs.
The InnoDB master thread and other threads
perform various tasks in the background, most of which are I/O
related, such as flushing dirty pages from the buffer pool and
writing changes from the change buffer to the appropriate
secondary indexes. InnoDB attempts to perform
these tasks in a way that does not adversely affect the normal
working of the server. It tries to estimate the available I/O
bandwidth and tune its activities to take advantage of available
capacity.
The innodb_io_capacity variable
defines the overall I/O capacity available to
InnoDB. It should be set to approximately the
number of I/O operations that the system can perform per second
(IOPS). When innodb_io_capacity
is set, InnoDB estimates the I/O bandwidth
available for background tasks based on the set value.
You can set innodb_io_capacity to
a value of 100 or greater. The default value is
200. Typically, values around 100 are
appropriate for consumer-level storage devices, such as hard
drives up to 7200 RPMs. Faster hard drives, RAID configurations,
and solid state drives (SSDs) benefit from higher values.
Ideally, keep the setting as low as practical, but not so low that
background activities fall behind. If the value is too high, data
is removed from the buffer pool and change buffer too quickly for
caching to provide a significant benefit. For busy systems capable
of higher I/O rates, you can set a higher value to help the server
handle the background maintenance work associated with a high rate
of row changes. Generally, you can increase the value as a
function of the number of drives used for
InnoDB I/O. For example, you can increase the
value on systems that use multiple disks or SSDs.
The default setting of 200 is generally sufficient for a lower-end SSD. For a higher-end, bus-attached SSD, consider a higher setting such as 1000, for example. For systems with individual 5400 RPM or 7200 RPM drives, you might lower the value to 100, which represents an estimated proportion of the I/O operations per second (IOPS) available to older-generation disk drives that can perform about 100 IOPS.
Although you can specify a high value such as a million, in practice such large values have little benefit. Generally, a value higher than 20000 is not recommended unless you are certain that lower values are insufficient for your workload.
Consider write workload when tuning
innodb_io_capacity. Systems with
large write workloads are likely to benefit from a higher setting.
A lower setting may be sufficient for systems with a small write
workload.
The innodb_io_capacity setting is
not a per buffer pool instance setting. Available I/O capacity is
distributed equally among buffer pool instances for flushing
activities.
You can set the
innodb_io_capacity value in the
MySQL option file (my.cnf or
my.ini) or modify it at runtime using a
SET GLOBAL
statement, which requires privileges sufficient to set global
system variables. See
Section 5.1.9.1, “System Variable Privileges”.
The innodb_flush_sync variable,
which is enabled by default, causes the
innodb_io_capacity setting to
be ignored during bursts of I/O activity that occur at
checkpoints. To adhere to
the I/O rate defined by the
innodb_io_capacity setting,
disable innodb_flush_sync.
You can set the
innodb_flush_sync value in the
MySQL option file (my.cnf or
my.ini) or modify it at runtime using a
SET
GLOBAL statement, which requires privileges sufficient
to set global system variables. See
Section 5.1.9.1, “System Variable Privileges”.
If flushing activity falls behind, InnoDB can
flush more aggressively, at a higher rate of I/O operations per
second (IOPS) than defined by the
innodb_io_capacity variable.
The innodb_io_capacity_max
variable defines a maximum number of IOPS performed by
InnoDB background tasks in such situations.
If you specify an
innodb_io_capacity setting at
startup but do not specify a value for
innodb_io_capacity_max,
innodb_io_capacity_max defaults
to twice the value of
innodb_io_capacity, with a
minimum value of 2000.
When configuring
innodb_io_capacity_max, twice
the innodb_io_capacity is often
a good starting point. The default value of 2000 is intended for
workloads that use an SSD or more than one regular disk drive. A
setting of 2000 is likely too high for workloads that do not use
SSDs or multiple disk drives, and could allow too much flushing.
For a single regular disk drive, a setting between 200 and 400
is recommended. For a high-end, bus-attached SSD, consider a
higher setting such as 2500. As with the
innodb_io_capacity setting,
keep the setting as low as practical, but not so low that
InnoDB cannot sufficiently extend rate of
IOPS beyond the
innodb_io_capacity setting.
Consider write workload when tuning
innodb_io_capacity_max. Systems
with large write workloads may benefit from a higher setting. A
lower setting may be sufficient for systems with a small write
workload.
innodb_io_capacity_max cannot
be set to a value lower than the
innodb_io_capacity value.
Setting innodb_io_capacity_max
to DEFAULT using a
SET
statement (SET GLOBAL
innodb_io_capacity_max=DEFAULT) sets
innodb_io_capacity_max to the
maximum value.
The innodb_io_capacity_max
limit applies to all buffer pool instances. It is not a per
buffer pool instance setting.
InnoDB
mutexes and
rw-locks are typically
reserved for short intervals. On a multi-core system, it can be
more efficient for a thread to continuously check if it can
acquire a mutex or rw-lock for a period of time before it sleeps.
If the mutex or rw-lock becomes available during this period, the
thread can continue immediately, in the same time slice. However,
too-frequent polling of a shared object such as a mutex or rw-lock
by multiple threads can cause “cache ping pong”,
which results in processors invalidating portions of each
other's cache. InnoDB minimizes this issue
by forcing a random delay between polls to desychronize polling
activity. The random delay is implemented as a spin-wait loop.
The duration of a spin-wait loop is determined by the number of
PAUSE instructions that occur in the loop. That number is
generated by randomly selecting an integer ranging from 0 up to
but not including the
innodb_spin_wait_delay value, and
multiplying that value by 50. (The multiplier value, 50, is
hardcoded before MySQL 8.0.16, and configurable thereafter.) For
example, an integer is randomly selected from the following range
for an innodb_spin_wait_delay
setting of 6:
{0,1,2,3,4,5}The selected integer is multiplied by 50, resulting in one of six possible PAUSE instruction values:
{0,50,100,150,200,250}
For that set of values, 250 is the maximum number of PAUSE
instructions that can occur in a spin-wait loop. An
innodb_spin_wait_delay setting of
5 results in a set of five possible values
{0,50,100,150,200}, where 200 is the maximum
number of PAUSE instructions, and so on. In this way, the
innodb_spin_wait_delay setting
controls the maximum delay between spin lock polls.
On a system where all processor cores share a fast cache memory,
you might reduce the maximum delay or disable the busy loop
altogether by setting
innodb_spin_wait_delay=0. On a
system with multiple processor chips, the effect of cache
invalidation can be more significant and you might increase the
maximum delay.
In the 100MHz Pentium era, an
innodb_spin_wait_delay unit was
calibrated to be equivalent to one microsecond. That time
equivalence did not hold, but PAUSE instruction duration remained
fairly constant in terms of processor cycles relative to other CPU
instructions until the introduction of the Skylake generation of
processors, which have a comparatively longer PAUSE instruction.
The
innodb_spin_wait_pause_multiplier
variable was introduced in MySQL 8.0.16 to provide a way to
account for differences in PAUSE instruction duration.
The
innodb_spin_wait_pause_multiplier
variable controls the size of PAUSE instruction values. For
example, assuming an
innodb_spin_wait_delay setting of
6, decreasing the
innodb_spin_wait_pause_multiplier
value from 50 (the default and previously hardcoded value) to 5
generates a set of smaller PAUSE instruction values:
{0,5,10,15,20,25}
The ability to increase or decrease PAUSE instruction values
permits fine tuning InnoDB for different
processor architectures. Smaller PAUSE instruction values would be
appropriate for processor architectures with a comparatively
longer PAUSE instruction, for example.
The innodb_spin_wait_delay and
innodb_spin_wait_pause_multiplier
variables are dynamic. They can be specified in a MySQL option
file or modified at runtime using a
SET GLOBAL
statement. Modifying the variables at runtime requires privileges
sufficient to set global system variables. See
Section 5.1.9.1, “System Variable Privileges”.
InnoDB does not physically remove a row from
the database immediately when you delete it with an SQL statement.
A row and its index records are only physically removed when
InnoDB discards the undo log record written for
the deletion. This removal operation, which only occurs after the
row is no longer required for multi-version concurrency control
(MVCC) or rollback, is called a purge.
Purge runs on a periodic schedule. It parses and processes undo
log pages from the history list, which is a list of undo log pages
for committed transactions that is maintained by the
InnoDB transaction system. Purge frees the undo
log pages from the history list after processing them.
Configuring Purge Threads
Purge operations are performed in the background by one or more
purge threads. The number of purge threads is controlled by the
innodb_purge_threads variable.
The default value is 4. If DML action is concentrated on a single
table or a few tables, keep the setting low so that the threads do
not contend with each other for access to the tables. If DML
operations are spread across many tables, increase the setting.
The maximum number of purge threads is 32.
The innodb_purge_threads setting
is the maximum number of purge threads permitted. The purge system
automatically adjusts the number of purge threads as necessary.
Configuring Purge Batch Size
The innodb_purge_batch_size
variable defines the number of undo log pages that purge parses
and processes in one batch from the history list. The default
value is 300. In a multithreaded purge configuration, the
coordinator purge thread divides
innodb_purge_batch_size by
innodb_purge_threads and assigns
that number of pages to each purge thread.
The purge system also frees the undo log pages that are no longer
required. It does so every 128 iterations through the undo logs.
In addition to defining the number of undo log pages parsed and
processed in a batch, the
innodb_purge_batch_size variable
defines the number of undo log pages that purge frees every 128
iterations through the undo logs.
The innodb_purge_batch_size
variable is intended for advanced performance tuning and
experimentation. Most users need not change
innodb_purge_batch_size from its
default value.
Configuring the Maximum Purge Lag
The innodb_max_purge_lag variable
defines the desired maximum purge lag. When the purge lag exceeds
the innodb_max_purge_lag
threshold, a delay is imposed on
INSERT,
UPDATE, and
DELETE operations to allow time for
purge operations to catch up. The default value is 0, which means
there is no maximum purge lag and no delay.
The InnoDB transaction system maintains a list
of transactions that have index records delete-marked by
UPDATE or
DELETE operations. The length of
the list is the purge lag. Prior to MySQL 8.0.14, the purge lag
delay is calculated by the following formula, which results in a
minimum delay of 5000 microseconds:
(purge lag/innodb_max_purge_lag - 0.5) * 10000
As of MySQL 8.0.14, the purge lag delay is calculated by the following revised formula, which reduces the minimum delay to 5 microseconds. A delay of 5 microseconds is more appropriate for modern systems.
(purge_lag/innodb_max_purge_lag - 0.9995) * 10000
The delay is calculated at the beginning of a purge batch.
A typical innodb_max_purge_lag
setting for a problematic workload might be 1000000 (1 million),
assuming that transactions are small, only 100 bytes in size, and
it is permissible to have 100MB of unpurged table rows.
The purge lag is presented as the History list
length value in the TRANSACTIONS
section of SHOW
ENGINE INNODB STATUS output.
mysql> SHOW ENGINE INNODB STATUS; ... ------------ TRANSACTIONS ------------ Trx id counter 0 290328385 Purge done for trx's n:o < 0 290315608 undo n:o < 0 17 History list length 20
The History list length is typically a low
value, usually less than a few thousand, but a write-heavy
workload or long running transactions can cause it to increase,
even for transactions that are read only. The reason that a long
running transaction can cause the History list
length to increase is that under a consistent read
transaction isolation level such as
REPEATABLE READ, a transaction
must return the same result as when the read view for that
transaction was created. Consequently, the
InnoDB multi-version concurrency control (MVCC)
system must keep a copy of the data in the undo log until all
transactions that depend on that data have completed. The
following are examples of long running transactions that could
cause the History list length to increase:
A mysqldump operation that uses the
--single-transactionoption while there is a significant amount of concurrent DML.Running a
SELECTquery after disablingautocommit, and forgetting to issue an explicitCOMMITorROLLBACK.
To prevent excessive delays in extreme situations where the purge
lag becomes huge, you can limit the delay by setting the
innodb_max_purge_lag_delay
variable. The
innodb_max_purge_lag_delay
variable specifies the maximum delay in microseconds for the delay
imposed when the
innodb_max_purge_lag threshold is
exceeded. The specified
innodb_max_purge_lag_delay value
is an upper limit on the delay period calculated by the
innodb_max_purge_lag formula.
Purge and Undo Tablespace Truncation
The purge system is also responsible for truncating undo
tablespaces. You can configure the
innodb_purge_rseg_truncate_frequency
variable to control the frequency with which the purge system
looks for undo tablespaces to truncate. For more information, see
Truncating Undo Tablespaces.
This section describes how to configure persistent and
non-persistent optimizer statistics for InnoDB
tables.
Persistent optimizer statistics are persisted across server restarts, allowing for greater plan stability and more consistent query performance. Persistent optimizer statistics also provide control and flexibility with these additional benefits:
You can use the
innodb_stats_auto_recalcconfiguration option to control whether statistics are updated automatically after substantial changes to a table.You can use the
STATS_PERSISTENT,STATS_AUTO_RECALC, andSTATS_SAMPLE_PAGESclauses withCREATE TABLEandALTER TABLEstatements to configure optimizer statistics for individual tables.You can query optimizer statistics data in the
mysql.innodb_table_statsandmysql.innodb_index_statstables.You can view the
last_updatecolumn of themysql.innodb_table_statsandmysql.innodb_index_statstables to see when statistics were last updated.You can manually modify the
mysql.innodb_table_statsandmysql.innodb_index_statstables to force a specific query optimization plan or to test alternative plans without modifying the database.
The persistent optimizer statistics feature is enabled by default
(innodb_stats_persistent=ON).
Non-persistent optimizer statistics are cleared on each server restart and after some other operations, and recomputed on the next table access. As a result, different estimates could be produced when recomputing statistics, leading to different choices in execution plans and variations in query performance.
This section also provides information about estimating
ANALYZE TABLE complexity, which may
be useful when attempting to achieve a balance between accurate
statistics and ANALYZE TABLE
execution time.
The persistent optimizer statistics feature improves plan stability by storing statistics to disk and making them persistent across server restarts so that the optimizer is more likely to make consistent choices each time for a given query.
Optimizer statistics are persisted to disk when
innodb_stats_persistent=ON or
when individual tables are defined with
STATS_PERSISTENT=1.
innodb_stats_persistent is
enabled by default.
Formerly, optimizer statistics were cleared when restarting the server and after some other types of operations, and recomputed on the next table access. Consequently, different estimates could be produced when recalculating statistics leading to different choices in query execution plans and variation in query performance.
Persistent statistics are stored in the
mysql.innodb_table_stats and
mysql.innodb_index_stats tables. See
Section 15.8.10.1.5, “InnoDB Persistent Statistics Tables”.
If you prefer not to persist optimizer statistics to disk, see Section 15.8.10.2, “Configuring Non-Persistent Optimizer Statistics Parameters”
The innodb_stats_auto_recalc
variable, which is enabled by default, controls whether
statistics are calculated automatically when a table undergoes
changes to more than 10% of its rows. You can also configure
automatic statistics recalculation for individual tables by
specifying the STATS_AUTO_RECALC clause
when creating or altering a table.
Because of the asynchronous nature of automatic statistics
recalculation, which occurs in the background, statistics may
not be recalculated instantly after running a DML operation
that affects more than 10% of a table, even when
innodb_stats_auto_recalc is
enabled. Statistics recalculation can be delayed by few
seconds in some cases. If up-to-date statistics are required
immediately, run ANALYZE TABLE
to initiate a synchronous (foreground) recalculation of
statistics.
If innodb_stats_auto_recalc
is disabled, you can ensure the accuracy of optimizer
statistics by executing the ANALYZE
TABLE statement after making substantial changes to
indexed columns. You might also consider adding
ANALYZE TABLE to setup scripts
that you run after loading data, and running
ANALYZE TABLE on a schedule at
times of low activity.
When an index is added to an existing table, or when a column
is added or dropped, index statistics are calculated and added
to the innodb_index_stats table regardless
of the value of
innodb_stats_auto_recalc.
innodb_stats_persistent,
innodb_stats_auto_recalc, and
innodb_stats_persistent_sample_pages
are global variables. To override these system-wide settings
and configure optimizer statistics parameters for individual
tables, you can define STATS_PERSISTENT,
STATS_AUTO_RECALC, and
STATS_SAMPLE_PAGES clauses in
CREATE TABLE or
ALTER TABLE statements.
STATS_PERSISTENTspecifies whether to enable persistent statistics for anInnoDBtable. The valueDEFAULTcauses the persistent statistics setting for the table to be determined by theinnodb_stats_persistentsetting. A value of1enables persistent statistics for the table, while a value of0disables the feature. After enabling persistent statistics for an individual table, useANALYZE TABLEto calculate statistics after table data is loaded.STATS_AUTO_RECALCspecifies whether to automatically recalculate persistent statistics. The valueDEFAULTcauses the persistent statistics setting for the table to be determined by theinnodb_stats_auto_recalcsetting. A value of1causes statistics to be recalculated when 10% of table data has changed. A value0prevents automatic recalculation for the table. When using a value of 0, useANALYZE TABLEto recalculate statistics after making substantial changes to the table.STATS_SAMPLE_PAGESspecifies the number of index pages to sample when cardinality and other statistics are calculated for an indexed column, by anANALYZE TABLEoperation, for example.
All three clauses are specified in the following
CREATE TABLE example:
CREATE TABLE `t1` ( `id` int(8) NOT NULL auto_increment, `data` varchar(255), `date` datetime, PRIMARY KEY (`id`), INDEX `DATE_IX` (`date`) ) ENGINE=InnoDB, STATS_PERSISTENT=1, STATS_AUTO_RECALC=1, STATS_SAMPLE_PAGES=25;
The optimizer uses estimated
statistics about key
distributions to choose the indexes for an execution plan,
based on the relative
selectivity of the
index. Operations such as ANALYZE
TABLE cause InnoDB to sample
random pages from each index on a table to estimate the
cardinality of the
index. This sampling technique is known as a
random dive.
The
innodb_stats_persistent_sample_pages
controls the number of sampled pages. You can adjust the
setting at runtime to manage the quality of statistics
estimates used by the optimizer. The default value is 20.
Consider modifying the setting when encountering the following
issues:
Statistics are not accurate enough and the optimizer chooses suboptimal plans, as shown in
EXPLAINoutput. You can check the accuracy of statistics by comparing the actual cardinality of an index (determined by runningSELECT DISTINCTon the index columns) with the estimates in themysql.innodb_index_statstable.If it is determined that statistics are not accurate enough, the value of
innodb_stats_persistent_sample_pagesshould be increased until the statistics estimates are sufficiently accurate. Increasinginnodb_stats_persistent_sample_pagestoo much, however, could causeANALYZE TABLEto run slowly.ANALYZE TABLEis too slow. In this caseinnodb_stats_persistent_sample_pagesshould be decreased untilANALYZE TABLEexecution time is acceptable. Decreasing the value too much, however, could lead to the first problem of inaccurate statistics and suboptimal query execution plans.If a balance cannot be achieved between accurate statistics and
ANALYZE TABLEexecution time, consider decreasing the number of indexed columns in the table or limiting the number of partitions to reduceANALYZE TABLEcomplexity. The number of columns in the table's primary key is also important to consider, as primary key columns are appended to each nonunique index.For related information, see Section 15.8.10.3, “Estimating ANALYZE TABLE Complexity for InnoDB Tables”.
By default, InnoDB reads uncommitted data
when calculating statistics. In the case of an uncommitted
transaction that deletes rows from a table, delete-marked
records are excluded when calculating row estimates and index
statistics, which can lead to non-optimal execution plans for
other transactions that are operating on the table
concurrently using a transaction isolation level other than
READ UNCOMMITTED. To avoid
this scenario,
innodb_stats_include_delete_marked
can be enabled to ensure that delete-marked records are
included when calculating persistent optimizer statistics.
When
innodb_stats_include_delete_marked
is enabled, ANALYZE TABLE
considers delete-marked records when recalculating statistics.
innodb_stats_include_delete_marked
is a global setting that affects all InnoDB
tables, and it is only applicable to persistent optimizer
statistics.
The persistent statistics feature relies on the internally
managed tables in the mysql database, named
innodb_table_stats and
innodb_index_stats. These tables are set up
automatically in all install, upgrade, and build-from-source
procedures.
Table 15.6 Columns of innodb_table_stats
| Column name | Description |
|---|---|
database_name |
Database name |
table_name |
Table name, partition name, or subpartition name |
last_update |
A timestamp indicating the last time that InnoDB
updated this row |
n_rows |
The number of rows in the table |
clustered_index_size |
The size of the primary index, in pages |
sum_of_other_index_sizes |
The total size of other (non-primary) indexes, in pages |
Table 15.7 Columns of innodb_index_stats
| Column name | Description |
|---|---|
database_name |
Database name |
table_name |
Table name, partition name, or subpartition name |
index_name |
Index name |
last_update |
A timestamp indicating the last time the row was updated |
stat_name |
The name of the statistic, whose value is reported in the
stat_value column |
stat_value |
The value of the statistic that is named in stat_name
column |
sample_size |
The number of pages sampled for the estimate provided in the
stat_value column |
stat_description |
Description of the statistic that is named in the
stat_name column |
The innodb_table_stats and
innodb_index_stats tables include a
last_update column that shows when index
statistics were last updated:
mysql> SELECT * FROM innodb_table_stats \G
*************************** 1. row ***************************
database_name: sakila
table_name: actor
last_update: 2014-05-28 16:16:44
n_rows: 200
clustered_index_size: 1
sum_of_other_index_sizes: 1
...mysql> SELECT * FROM innodb_index_stats \G
*************************** 1. row ***************************
database_name: sakila
table_name: actor
index_name: PRIMARY
last_update: 2014-05-28 16:16:44
stat_name: n_diff_pfx01
stat_value: 200
sample_size: 1
...
The innodb_table_stats and
innodb_index_stats tables can be updated
manually, which makes it possible to force a specific query
optimization plan or test alternative plans without modifying
the database. If you manually update statistics, use the
FLUSH TABLE
statement to
load the updated statistics.
tbl_name
Persistent statistics are considered local information,
because they relate to the server instance. The
innodb_table_stats and
innodb_index_stats tables are therefore not
replicated when automatic statistics recalculation takes
place. If you run ANALYZE TABLE
to initiate a synchronous recalculation of statistics, the
statement is replicated (unless you suppressed logging for
it), and recalculation takes place on replicas.
The innodb_table_stats table contains one
row for each table. The following example demonstrates the
type of data collected.
Table t1 contains a primary index (columns
a, b) secondary index
(columns c, d), and
unique index (columns e,
f):
CREATE TABLE t1 ( a INT, b INT, c INT, d INT, e INT, f INT, PRIMARY KEY (a, b), KEY i1 (c, d), UNIQUE KEY i2uniq (e, f) ) ENGINE=INNODB;
After inserting five rows of sample data, table
t1 appears as follows:
mysql> SELECT * FROM t1;
+---+---+------+------+------+------+
| a | b | c | d | e | f |
+---+---+------+------+------+------+
| 1 | 1 | 10 | 11 | 100 | 101 |
| 1 | 2 | 10 | 11 | 200 | 102 |
| 1 | 3 | 10 | 11 | 100 | 103 |
| 1 | 4 | 10 | 12 | 200 | 104 |
| 1 | 5 | 10 | 12 | 100 | 105 |
+---+---+------+------+------+------+
To immediately update statistics, run
ANALYZE TABLE (if
innodb_stats_auto_recalc is
enabled, statistics are updated automatically within a few
seconds assuming that the 10% threshold for changed table rows
is reached):
mysql> ANALYZE TABLE t1;
+---------+---------+----------+----------+
| Table | Op | Msg_type | Msg_text |
+---------+---------+----------+----------+
| test.t1 | analyze | status | OK |
+---------+---------+----------+----------+
Table statistics for table t1 show the last
time InnoDB updated the table statistics
(2014-03-14 14:36:34), the number of rows
in the table (5), the clustered index size
(1 page), and the combined size of the
other indexes (2 pages).
mysql> SELECT * FROM mysql.innodb_table_stats WHERE table_name like 't1'\G
*************************** 1. row ***************************
database_name: test
table_name: t1
last_update: 2014-03-14 14:36:34
n_rows: 5
clustered_index_size: 1
sum_of_other_index_sizes: 2
The innodb_index_stats table contains
multiple rows for each index. Each row in the
innodb_index_stats table provides data
related to a particular index statistic which is named in the
stat_name column and described in the
stat_description column. For example:
mysql>SELECT index_name, stat_name, stat_value, stat_descriptionFROM mysql.innodb_index_stats WHERE table_name like 't1';+------------+--------------+------------+-----------------------------------+ | index_name | stat_name | stat_value | stat_description | +------------+--------------+------------+-----------------------------------+ | PRIMARY | n_diff_pfx01 | 1 | a | | PRIMARY | n_diff_pfx02 | 5 | a,b | | PRIMARY | n_leaf_pages | 1 | Number of leaf pages in the index | | PRIMARY | size | 1 | Number of pages in the index | | i1 | n_diff_pfx01 | 1 | c | | i1 | n_diff_pfx02 | 2 | c,d | | i1 | n_diff_pfx03 | 2 | c,d,a | | i1 | n_diff_pfx04 | 5 | c,d,a,b | | i1 | n_leaf_pages | 1 | Number of leaf pages in the index | | i1 | size | 1 | Number of pages in the index | | i2uniq | n_diff_pfx01 | 2 | e | | i2uniq | n_diff_pfx02 | 5 | e,f | | i2uniq | n_leaf_pages | 1 | Number of leaf pages in the index | | i2uniq | size | 1 | Number of pages in the index | +------------+--------------+------------+-----------------------------------+
The stat_name column shows the following
types of statistics:
size: Wherestat_name=size, thestat_valuecolumn displays the total number of pages in the index.n_leaf_pages: Wherestat_name=n_leaf_pages, thestat_valuecolumn displays the number of leaf pages in the index.n_diff_pfx: WhereNNstat_name=n_diff_pfx01, thestat_valuecolumn displays the number of distinct values in the first column of the index. Wherestat_name=n_diff_pfx02, thestat_valuecolumn displays the number of distinct values in the first two columns of the index, and so on. Wherestat_name=n_diff_pfx, theNNstat_descriptioncolumn shows a comma separated list of the index columns that are counted.
To further illustrate the
n_diff_pfx
statistic, which provides cardinality data, consider once
again the NNt1 table example that was
introduced previously. As shown below, the
t1 table is created with a primary index
(columns a, b), a
secondary index (columns c,
d), and a unique index (columns
e, f):
CREATE TABLE t1 ( a INT, b INT, c INT, d INT, e INT, f INT, PRIMARY KEY (a, b), KEY i1 (c, d), UNIQUE KEY i2uniq (e, f) ) ENGINE=INNODB;
After inserting five rows of sample data, table
t1 appears as follows:
mysql> SELECT * FROM t1;
+---+---+------+------+------+------+
| a | b | c | d | e | f |
+---+---+------+------+------+------+
| 1 | 1 | 10 | 11 | 100 | 101 |
| 1 | 2 | 10 | 11 | 200 | 102 |
| 1 | 3 | 10 | 11 | 100 | 103 |
| 1 | 4 | 10 | 12 | 200 | 104 |
| 1 | 5 | 10 | 12 | 100 | 105 |
+---+---+------+------+------+------+
When you query the index_name,
stat_name, stat_value,
and stat_description, where
stat_name LIKE 'n_diff%', the following
result set is returned:
mysql>SELECT index_name, stat_name, stat_value, stat_descriptionFROM mysql.innodb_index_statsWHERE table_name like 't1' AND stat_name LIKE 'n_diff%';+------------+--------------+------------+------------------+ | index_name | stat_name | stat_value | stat_description | +------------+--------------+------------+------------------+ | PRIMARY | n_diff_pfx01 | 1 | a | | PRIMARY | n_diff_pfx02 | 5 | a,b | | i1 | n_diff_pfx01 | 1 | c | | i1 | n_diff_pfx02 | 2 | c,d | | i1 | n_diff_pfx03 | 2 | c,d,a | | i1 | n_diff_pfx04 | 5 | c,d,a,b | | i2uniq | n_diff_pfx01 | 2 | e | | i2uniq | n_diff_pfx02 | 5 | e,f | +------------+--------------+------------+------------------+
For the PRIMARY index, there are two
n_diff% rows. The number of rows is equal
to the number of columns in the index.
For nonunique indexes, InnoDB appends the
columns of the primary key.
Where
index_name=PRIMARYandstat_name=n_diff_pfx01, thestat_valueis1, which indicates that there is a single distinct value in the first column of the index (columna). The number of distinct values in columnais confirmed by viewing the data in columnain tablet1, in which there is a single distinct value (1). The counted column (a) is shown in thestat_descriptioncolumn of the result set.Where
index_name=PRIMARYandstat_name=n_diff_pfx02, thestat_valueis5, which indicates that there are five distinct values in the two columns of the index (a,b). The number of distinct values in columnsaandbis confirmed by viewing the data in columnsaandbin tablet1, in which there are five distinct values: (1,1), (1,2), (1,3), (1,4) and (1,5). The counted columns (a,b) are shown in thestat_descriptioncolumn of the result set.
For the secondary index (i1), there are
four n_diff% rows. Only two columns are
defined for the secondary index (c,d) but
there are four n_diff% rows for the
secondary index because InnoDB suffixes all
nonunique indexes with the primary key. As a result, there are
four n_diff% rows instead of two to account
for the both the secondary index columns
(c,d) and the primary key columns
(a,b).
Where
index_name=i1andstat_name=n_diff_pfx01, thestat_valueis1, which indicates that there is a single distinct value in the first column of the index (columnc). The number of distinct values in columncis confirmed by viewing the data in columncin tablet1, in which there is a single distinct value: (10). The counted column (c) is shown in thestat_descriptioncolumn of the result set.Where
index_name=i1andstat_name=n_diff_pfx02, thestat_valueis2, which indicates that there are two distinct values in the first two columns of the index (c,d). The number of distinct values in columnscandis confirmed by viewing the data in columnscanddin tablet1, in which there are two distinct values: (10,11) and (10,12). The counted columns (c,d) are shown in thestat_descriptioncolumn of the result set.Where
index_name=i1andstat_name=n_diff_pfx03, thestat_valueis2, which indicates that there are two distinct values in the first three columns of the index (c,d,a). The number of distinct values in columnsc,d, andais confirmed by viewing the data in columnc,d, andain tablet1, in which there are two distinct values: (10,11,1) and (10,12,1). The counted columns (c,d,a) are shown in thestat_descriptioncolumn of the result set.Where
index_name=i1andstat_name=n_diff_pfx04, thestat_valueis5, which indicates that there are five distinct values in the four columns of the index (c,d,a,b). The number of distinct values in columnsc,d,aandbis confirmed by viewing the data in columnsc,d,a, andbin tablet1, in which there are five distinct values: (10,11,1,1), (10,11,1,2), (10,11,1,3), (10,12,1,4), and (10,12,1,5). The counted columns (c,d,a,b) are shown in thestat_descriptioncolumn of the result set.
For the unique index (i2uniq), there are
two n_diff% rows.
Where
index_name=i2uniqandstat_name=n_diff_pfx01, thestat_valueis2, which indicates that there are two distinct values in the first column of the index (columne). The number of distinct values in columneis confirmed by viewing the data in columnein tablet1, in which there are two distinct values: (100) and (200). The counted column (e) is shown in thestat_descriptioncolumn of the result set.Where
index_name=i2uniqandstat_name=n_diff_pfx02, thestat_valueis5, which indicates that there are five distinct values in the two columns of the index (e,f). The number of distinct values in columnseandfis confirmed by viewing the data in columnseandfin tablet1, in which there are five distinct values: (100,101), (200,102), (100,103), (200,104), and (100,105). The counted columns (e,f) are shown in thestat_descriptioncolumn of the result set.
You can retrieve the index size for tables, partitions, or
subpartitions can using the
innodb_index_stats table. In the following
example, index sizes are retrieved for table
t1. For a definition of table
t1 and corresponding index statistics, see
Section 15.8.10.1.6, “InnoDB Persistent Statistics Tables Example”.
mysql>SELECT SUM(stat_value) pages, index_name,SUM(stat_value)*@@innodb_page_size sizeFROM mysql.innodb_index_stats WHERE table_name='t1'AND stat_name = 'size' GROUP BY index_name;+-------+------------+-------+ | pages | index_name | size | +-------+------------+-------+ | 1 | PRIMARY | 16384 | | 1 | i1 | 16384 | | 1 | i2uniq | 16384 | +-------+------------+-------+
For partitions or subpartitions, you can use the same query
with a modified WHERE clause to retrieve
index sizes. For example, the following query retrieves index
sizes for partitions of table t1:
mysql>SELECT SUM(stat_value) pages, index_name,SUM(stat_value)*@@innodb_page_size sizeFROM mysql.innodb_index_stats WHERE table_name like 't1#P%'AND stat_name = 'size' GROUP BY index_name;
This section describes how to configure non-persistent optimizer
statistics. Optimizer statistics are not persisted to disk when
innodb_stats_persistent=OFF or
when individual tables are created or altered with
STATS_PERSISTENT=0.
Instead, statistics are stored in memory, and are lost when the
server is shut down. Statistics are also updated periodically by
certain operations and under certain conditions.
Optimizer statistics are persisted to disk by default, enabled
by the innodb_stats_persistent
configuration option. For information about persistent optimizer
statistics, see Section 15.8.10.1, “Configuring Persistent Optimizer Statistics Parameters”.
Optimizer Statistics Updates
Non-persistent optimizer statistics are updated when:
Running
ANALYZE TABLE.Running
SHOW TABLE STATUS,SHOW INDEX, or querying theINFORMATION_SCHEMA.TABLESorINFORMATION_SCHEMA.STATISTICStables with theinnodb_stats_on_metadataoption enabled.The default setting for
innodb_stats_on_metadataisOFF. Enablinginnodb_stats_on_metadatamay reduce access speed for schemas that have a large number of tables or indexes, and reduce stability of execution plans for queries that involveInnoDBtables.innodb_stats_on_metadatais configured globally using aSETstatement.SET GLOBAL innodb_stats_on_metadata=ON
Noteinnodb_stats_on_metadataonly applies when optimizer statistics are configured to be non-persistent (wheninnodb_stats_persistentis disabled).Starting a mysql client with the
--auto-rehashoption enabled, which is the default. Theauto-rehashoption causes allInnoDBtables to be opened, and the open table operations cause statistics to be recalculated.To improve the start up time of the mysql client and to updating statistics, you can turn off
auto-rehashusing the--disable-auto-rehashoption. Theauto-rehashfeature enables automatic name completion of database, table, and column names for interactive users.A table is first opened.
InnoDBdetects that 1 / 16 of table has been modified since the last time statistics were updated.
Configuring the Number of Sampled Pages
The MySQL query optimizer uses estimated
statistics about key
distributions to choose the indexes for an execution plan, based
on the relative
selectivity of the
index. When InnoDB updates optimizer
statistics, it samples random pages from each index on a table
to estimate the
cardinality of the
index. (This technique is known as
random dives.)
To give you control over the quality of the statistics estimate
(and thus better information for the query optimizer), you can
change the number of sampled pages using the parameter
innodb_stats_transient_sample_pages.
The default number of sampled pages is 8, which could be
insufficient to produce an accurate estimate, leading to poor
index choices by the query optimizer. This technique is
especially important for large tables and tables used in
joins. Unnecessary
full table scans for
such tables can be a substantial performance issue. See
Section 8.2.1.23, “Avoiding Full Table Scans” for tips on tuning such
queries.
innodb_stats_transient_sample_pages
is a global parameter that can be set at runtime.
The value of
innodb_stats_transient_sample_pages
affects the index sampling for all InnoDB
tables and indexes when
innodb_stats_persistent=0. Be
aware of the following potentially significant impacts when you
change the index sample size:
Small values like 1 or 2 can result in inaccurate estimates of cardinality.
Increasing the
innodb_stats_transient_sample_pagesvalue might require more disk reads. Values much larger than 8 (say, 100), can cause a significant slowdown in the time it takes to open a table or executeSHOW TABLE STATUS.The optimizer might choose very different query plans based on different estimates of index selectivity.
Whatever value of
innodb_stats_transient_sample_pages
works best for a system, set the option and leave it at that
value. Choose a value that results in reasonably accurate
estimates for all tables in your database without requiring
excessive I/O. Because the statistics are automatically
recalculated at various times other than on execution of
ANALYZE TABLE, it does not make
sense to increase the index sample size, run
ANALYZE TABLE, then decrease
sample size again.
Smaller tables generally require fewer index samples than larger
tables. If your database has many large tables, consider using a
higher value for
innodb_stats_transient_sample_pages
than if you have mostly smaller tables.
ANALYZE TABLE complexity for
InnoDB tables is dependent on:
The number of pages sampled, as defined by
innodb_stats_persistent_sample_pages.The number of indexed columns in a table
The number of partitions. If a table has no partitions, the number of partitions is considered to be 1.
Using these parameters, an approximate formula for estimating
ANALYZE TABLE complexity would
be:
The value of
innodb_stats_persistent_sample_pages
* number of indexed columns in a table * the number of
partitions
Typically, the greater the resulting value, the greater the
execution time for ANALYZE TABLE.
innodb_stats_persistent_sample_pages
defines the number of pages sampled at a global level. To set
the number of pages sampled for an individual table, use the
STATS_SAMPLE_PAGES option with
CREATE TABLE or
ALTER TABLE. For more
information, see Section 15.8.10.1, “Configuring Persistent Optimizer Statistics Parameters”.
If
innodb_stats_persistent=OFF,
the number of pages sampled is defined by
innodb_stats_transient_sample_pages.
See Section 15.8.10.2, “Configuring Non-Persistent Optimizer Statistics Parameters” for
additional information.
For a more in-depth approach to estimating ANALYZE
TABLE complexity, consider the following example.
In Big
O notation, ANALYZE TABLE
complexity is described as:
O(n_sample
* (n_cols_in_uniq_i
+ n_cols_in_non_uniq_i
+ n_cols_in_pk * (1 + n_non_uniq_i))
* n_part)
where:
n_sampleis the number of pages sampled (defined byinnodb_stats_persistent_sample_pages)n_cols_in_uniq_iis total number of all columns in all unique indexes (not counting the primary key columns)n_cols_in_non_uniq_iis the total number of all columns in all nonunique indexesn_cols_in_pkis the number of columns in the primary key (if a primary key is not defined,InnoDBcreates a single column primary key internally)n_non_uniq_iis the number of nonunique indexes in the tablen_partis the number of partitions. If no partitions are defined, the table is considered to be a single partition.
Now, consider the following table (table t),
which has a primary key (2 columns), a unique index (2 columns),
and two nonunique indexes (two columns each):
CREATE TABLE t ( a INT, b INT, c INT, d INT, e INT, f INT, g INT, h INT, PRIMARY KEY (a, b), UNIQUE KEY i1uniq (c, d), KEY i2nonuniq (e, f), KEY i3nonuniq (g, h) );
For the column and index data required by the algorithm
described above, query the
mysql.innodb_index_stats persistent index
statistics table for table t. The
n_diff_pfx% statistics show the columns that
are counted for each index. For example, columns
a and b are counted for
the primary key index. For the nonunique indexes, the primary
key columns (a,b) are counted in addition to the user defined
columns.
For additional information about the InnoDB
persistent statistics tables, see
Section 15.8.10.1, “Configuring Persistent Optimizer Statistics Parameters”
mysql>SELECT index_name, stat_name, stat_descriptionFROM mysql.innodb_index_stats WHEREdatabase_name='test' ANDtable_name='t' ANDstat_name like 'n_diff_pfx%';+------------+--------------+------------------+ | index_name | stat_name | stat_description | +------------+--------------+------------------+ | PRIMARY | n_diff_pfx01 | a | | PRIMARY | n_diff_pfx02 | a,b | | i1uniq | n_diff_pfx01 | c | | i1uniq | n_diff_pfx02 | c,d | | i2nonuniq | n_diff_pfx01 | e | | i2nonuniq | n_diff_pfx02 | e,f | | i2nonuniq | n_diff_pfx03 | e,f,a | | i2nonuniq | n_diff_pfx04 | e,f,a,b | | i3nonuniq | n_diff_pfx01 | g | | i3nonuniq | n_diff_pfx02 | g,h | | i3nonuniq | n_diff_pfx03 | g,h,a | | i3nonuniq | n_diff_pfx04 | g,h,a,b | +------------+--------------+------------------+
Based on the index statistics data shown above and the table definition, the following values can be determined:
n_cols_in_uniq_i, the total number of all columns in all unique indexes not counting the primary key columns, is 2 (candd)n_cols_in_non_uniq_i, the total number of all columns in all nonunique indexes, is 4 (e,f,gandh)n_cols_in_pk, the number of columns in the primary key, is 2 (aandb)n_non_uniq_i, the number of nonunique indexes in the table, is 2 (i2nonuniqandi3nonuniq))n_part, the number of partitions, is 1.
You can now calculate
innodb_stats_persistent_sample_pages * (2 + 4
+ 2 * (1 + 2)) * 1 to determine the number of leaf pages that
are scanned. With
innodb_stats_persistent_sample_pages set to
the default value of 20, and with a default
page size of 16 KiB
(innodb_page_size=16384), you
can then estimate that 20 * 12 * 16384 bytes
are read for table t, or about 4
MiB.
All 4 MiB may not be read from disk, as
some leaf pages may already be cached in the buffer pool.
You can configure the MERGE_THRESHOLD value for
index pages. If the “page-full” percentage for an
index page falls below the MERGE_THRESHOLD
value when a row is deleted or when a row is shortened by an
UPDATE operation,
InnoDB attempts to merge the index page with a
neighboring index page. The default
MERGE_THRESHOLD value is 50, which is the
previously hardcoded value. The minimum
MERGE_THRESHOLD value is 1 and the maximum
value is 50.
When the “page-full” percentage for an index page
falls below 50%, which is the default
MERGE_THRESHOLD setting,
InnoDB attempts to merge the index page with a
neighboring page. If both pages are close to 50% full, a page
split can occur soon after the pages are merged. If this
merge-split behavior occurs frequently, it can have an adverse
affect on performance. To avoid frequent merge-splits, you can
lower the MERGE_THRESHOLD value so that
InnoDB attempts page merges at a lower
“page-full” percentage. Merging pages at a lower
page-full percentage leaves more room in index pages and helps
reduce merge-split behavior.
The MERGE_THRESHOLD for index pages can be
defined for a table or for individual indexes. A
MERGE_THRESHOLD value defined for an individual
index takes priority over a MERGE_THRESHOLD
value defined for the table. If undefined, the
MERGE_THRESHOLD value defaults to 50.
Setting MERGE_THRESHOLD for a Table
You can set the MERGE_THRESHOLD value for a
table using the table_option
COMMENT clause of the
CREATE TABLE statement. For
example:
CREATE TABLE t1 ( id INT, KEY id_index (id) ) COMMENT='MERGE_THRESHOLD=45';
You can also set the MERGE_THRESHOLD value for
an existing table using the
table_option COMMENT
clause with ALTER TABLE:
CREATE TABLE t1 ( id INT, KEY id_index (id) ); ALTER TABLE t1 COMMENT='MERGE_THRESHOLD=40';
Setting MERGE_THRESHOLD for Individual Indexes
To set the MERGE_THRESHOLD value for an
individual index, you can use the
index_option COMMENT
clause with CREATE TABLE,
ALTER TABLE, or
CREATE INDEX, as shown in the
following examples:
Setting
MERGE_THRESHOLDfor an individual index usingCREATE TABLE:CREATE TABLE t1 ( id INT, KEY id_index (id) COMMENT 'MERGE_THRESHOLD=40' );
Setting
MERGE_THRESHOLDfor an individual index usingALTER TABLE:CREATE TABLE t1 ( id INT, KEY id_index (id) ); ALTER TABLE t1 DROP KEY id_index; ALTER TABLE t1 ADD KEY id_index (id) COMMENT 'MERGE_THRESHOLD=40';
Setting
MERGE_THRESHOLDfor an individual index usingCREATE INDEX:CREATE TABLE t1 (id INT); CREATE INDEX id_index ON t1 (id) COMMENT 'MERGE_THRESHOLD=40';
You cannot modify the MERGE_THRESHOLD value
at the index level for GEN_CLUST_INDEX, which
is the clustered index created by InnoDB when
an InnoDB table is created without a primary
key or unique key index. You can only modify the
MERGE_THRESHOLD value for
GEN_CLUST_INDEX by setting
MERGE_THRESHOLD for the table.
Querying the MERGE_THRESHOLD Value for an Index
The current MERGE_THRESHOLD value for an index
can be obtained by querying the
INNODB_INDEXES table. For example:
mysql> SELECT * FROM INFORMATION_SCHEMA.INNODB_INDEXES WHERE NAME='id_index' \G
*************************** 1. row ***************************
INDEX_ID: 91
NAME: id_index
TABLE_ID: 68
TYPE: 0
N_FIELDS: 1
PAGE_NO: 4
SPACE: 57
MERGE_THRESHOLD: 40
You can use SHOW CREATE TABLE to
view the MERGE_THRESHOLD value for a table, if
explicitly defined using the
table_option COMMENT
clause:
mysql> SHOW CREATE TABLE t2 \G
*************************** 1. row ***************************
Table: t2
Create Table: CREATE TABLE `t2` (
`id` int(11) DEFAULT NULL,
KEY `id_index` (`id`) COMMENT 'MERGE_THRESHOLD=40'
) ENGINE=InnoDB DEFAULT CHARSET=utf8mb4
A MERGE_THRESHOLD value defined at the index
level takes priority over a MERGE_THRESHOLD
value defined for the table. If undefined,
MERGE_THRESHOLD defaults to 50%
(MERGE_THRESHOLD=50, which is the previously
hardcoded value.
Likewise, you can use SHOW INDEX to
view the MERGE_THRESHOLD value for an index, if
explicitly defined using the
index_option COMMENT
clause:
mysql> SHOW INDEX FROM t2 \G
*************************** 1. row ***************************
Table: t2
Non_unique: 1
Key_name: id_index
Seq_in_index: 1
Column_name: id
Collation: A
Cardinality: 0
Sub_part: NULL
Packed: NULL
Null: YES
Index_type: BTREE
Comment:
Index_comment: MERGE_THRESHOLD=40
Measuring the Effect of MERGE_THRESHOLD Settings
The INNODB_METRICS table provides two
counters that can be used to measure the effect of a
MERGE_THRESHOLD setting on index page merges.
mysql>SELECT NAME, COMMENT FROM INFORMATION_SCHEMA.INNODB_METRICSWHERE NAME like '%index_page_merge%';+-----------------------------+----------------------------------------+ | NAME | COMMENT | +-----------------------------+----------------------------------------+ | index_page_merge_attempts | Number of index page merge attempts | | index_page_merge_successful | Number of successful index page merges | +-----------------------------+----------------------------------------+
When lowering the MERGE_THRESHOLD value, the
objectives are:
A smaller number of page merge attempts and successful page merges
A similar number of page merge attempts and successful page merges
A MERGE_THRESHOLD setting that is too small
could result in large data files due to an excessive amount of
empty page space.
For information about using
INNODB_METRICS counters, see
Section 15.15.6, “InnoDB INFORMATION_SCHEMA Metrics Table”.
When innodb_dedicated_server is
enabled, InnoDB automatically configures the
following variables:
innodb_log_files_in_group(as of MySQL 8.0.14)
Only consider enabling
innodb_dedicated_server if the
MySQL instance resides on a dedicated server where it can use all
available system resources. For example, consider enabling if you
run MySQL Server in a Docker container or dedicated VM that only
runs MySQL. Enabling
innodb_dedicated_server is not
recommended if the MySQL instance shares system resources with
other applications.
The information that follows describes how each variable is automatically configured.
Buffer pool size is configured according to the amount of memory detected on the server.
Table 15.8 Automatically Configured Buffer Pool Size
Detected Server Memory Buffer Pool Size Less than 1GB 128MiB (the default value) 1GB to 4GB detected server memory* 0.5Greater than 4GB detected server memory* 0.75As of MySQL 8.0.14, log file size is configured according to the automatically configured buffer pool size.
Table 15.9 Automatically Configured Log File Size
Buffer Pool Size Log File Size Less than 8GB 512MiB 8GB to 128GB 1024MiB Greater than 128GB 2048MiB
NotePrior to MySQL 8.0.14, the
innodb_log_file_sizevariable was automatically configured according to the amount of memory detected on the server, as shown below:Table 15.10 Automatically Configured Log File Size (MySQL 8.0.13 and Earlier)
Detected Server Memory Log File Size < 1GB 48MiB (the default value) <= 4GB 128MiB <= 8GB 512MiB <= 16GB 1024MiB > 16GB 2048MiB
The number of log files is configured according to the automatically configured buffer pool size (in gigabytes). Automatic configuration of the
innodb_log_files_in_groupvariable was added in MySQL 8.0.14.Table 15.11 Automatically Configured Number of Log Files
Buffer Pool Size Number of Log Files Less than 8GB ROUND( buffer pool size)8GB to 128GB ROUND( buffer pool size* 0.75)Greater than 128GB 64
NoteThe minimum
innodb_log_files_in_groupvalue of 2 is enforced if the rounded buffer pool size value is less than 2GB.The flush method is set to
O_DIRECT_NO_FSYNCwheninnodb_dedicated_serveris enabled. If theO_DIRECT_NO_FSYNCsetting is not available, the defaultinnodb_flush_methodsetting is used.InnoDBusesO_DIRECTduring flushing I/O, but skips thefsync()system call after each write operation.WarningPrior to MySQL 8.0.14, this setting is not suitable for file systems such as XFS and EXT4, which require an
fsync()system call to synchronize file system metadata changes.As of MySQL 8.0.14,
fsync()is called after creating a new file, after increasing file size, and after closing a file, to ensure that file system metadata changes are synchronized. Thefsync()system call is still skipped after each write operation.Data loss is possible if redo log files and data files reside on different storage devices, and an unexpected exit occurs before data file writes are flushed from a device cache that is not battery-backed. If you use or intend to use different storage devices for redo log files and data files, and your data files reside on a device with a cache that is not battery-backed, use
O_DIRECTinstead.
If an automatically configured option is configured explicitly in
an option file or elsewhere, the explicitly specified setting is
used, and a startup warning similar to this is printed to
stderr:
[Warning] [000000] InnoDB: Option innodb_dedicated_server is ignored for innodb_buffer_pool_size because innodb_buffer_pool_size=134217728 is specified explicitly.
Explicit configuration of one option does not prevent the automatic configuration of other options.
If innodb_dedicated_server is
enabled and
innodb_buffer_pool_size is
configured explicitly in an option file,
innodb_log_file_size and
innodb_log_files_in_group are
still automatically configured based on a buffer pool size value
calculated according to the amount of memory detected on the
server, even though that value is not used to configure the size
of the buffer pool.
Automatically configured settings are evaluated and reconfigured if necessary each time the MySQL server is started.
This section provides information about the
InnoDB table compression and
InnoDB page compression features. The page
compression feature is also referred to as
transparent page
compression.
Using the compression features of InnoDB, you can
create tables where the data is stored in compressed form.
Compression can help to improve both raw performance and
scalability. The compression means less data is transferred between
disk and memory, and takes up less space on disk and in memory. The
benefits are amplified for tables with
secondary indexes,
because index data is compressed also. Compression can be especially
important for SSD storage devices,
because they tend to have lower capacity than
HDD devices.
- 15.9.1.1 Overview of Table Compression
- 15.9.1.2 Creating Compressed Tables
- 15.9.1.3 Tuning Compression for InnoDB Tables
- 15.9.1.4 Monitoring InnoDB Table Compression at Runtime
- 15.9.1.5 How Compression Works for InnoDB Tables
- 15.9.1.6 Compression for OLTP Workloads
- 15.9.1.7 SQL Compression Syntax Warnings and Errors
This section describes InnoDB table
compression, which is supported with InnoDB
tables that reside in
file_per_table
tablespaces or general
tablespaces. Table compression is enabled using the
ROW_FORMAT=COMPRESSED attribute with
CREATE TABLE or
ALTER TABLE.
Because processors and cache memories have increased in speed more than disk storage devices, many workloads are disk-bound. Data compression enables smaller database size, reduced I/O, and improved throughput, at the small cost of increased CPU utilization. Compression is especially valuable for read-intensive applications, on systems with enough RAM to keep frequently used data in memory.
An InnoDB table created with
ROW_FORMAT=COMPRESSED can use a smaller
page size on disk than the
configured innodb_page_size
value. Smaller pages require less I/O to read from and write to
disk, which is especially valuable for
SSD devices.
The compressed page size is specified through the
CREATE TABLE or
ALTER TABLE
KEY_BLOCK_SIZE parameter. The different page
size requires that the table be placed in a
file-per-table
tablespace or general
tablespace rather than in the
system tablespace,
as the system tablespace cannot store compressed tables. For
more information, see
Section 15.6.3.2, “File-Per-Table Tablespaces”, and
Section 15.6.3.3, “General Tablespaces”.
The level of compression is the same regardless of the
KEY_BLOCK_SIZE value. As you specify smaller
values for KEY_BLOCK_SIZE, you get the I/O
benefits of increasingly smaller pages. But if you specify a
value that is too small, there is additional overhead to
reorganize the pages when data values cannot be compressed
enough to fit multiple rows in each page. There is a hard limit
on how small KEY_BLOCK_SIZE can be for a
table, based on the lengths of the key columns for each of its
indexes. Specify a value that is too small, and the
CREATE TABLE or
ALTER TABLE statement fails.
In the buffer pool, the compressed data is held in small pages,
with a page size based on the KEY_BLOCK_SIZE
value. For extracting or updating the column values, MySQL also
creates an uncompressed page in the buffer pool with the
uncompressed data. Within the buffer pool, any updates to the
uncompressed page are also re-written back to the equivalent
compressed page. You might need to size your buffer pool to
accommodate the additional data of both compressed and
uncompressed pages, although the uncompressed pages are
evicted from the buffer
pool when space is needed, and then uncompressed again on the
next access.
Compressed tables can be created in file-per-table tablespaces or in general tablespaces. Table compression is not available for the InnoDB system tablespace. The system tablespace (space 0, the .ibdata files) can contain user-created tables, but it also contains internal system data, which is never compressed. Thus, compression applies only to tables (and indexes) stored in file-per-table or general tablespaces.
Creating a Compressed Table in File-Per-Table Tablespace
To create a compressed table in a file-per-table tablespace,
innodb_file_per_table must be
enabled (the default). You can set this parameter in the MySQL
configuration file (my.cnf or
my.ini) or dynamically, using a
SET
statement.
After the innodb_file_per_table
option is configured, specify the
ROW_FORMAT=COMPRESSED clause or
KEY_BLOCK_SIZE clause, or both, in a
CREATE TABLE or
ALTER TABLE statement to create a
compressed table in a file-per-table tablespace.
For example, you might use the following statements:
SET GLOBAL innodb_file_per_table=1; CREATE TABLE t1 (c1 INT PRIMARY KEY) ROW_FORMAT=COMPRESSED KEY_BLOCK_SIZE=8;
Creating a Compressed Table in a General Tablespace
To create a compressed table in a general tablespace,
FILE_BLOCK_SIZE must be defined for the
general tablespace, which is specified when the tablespace is
created. The FILE_BLOCK_SIZE value must be a
valid compressed page size in relation to the
innodb_page_size value, and the
page size of the compressed table, defined by the
CREATE TABLE or
ALTER TABLE
KEY_BLOCK_SIZE clause, must be equal to
FILE_BLOCK_SIZE/1024. For example, if
innodb_page_size=16384 and
FILE_BLOCK_SIZE=8192, the
KEY_BLOCK_SIZE of the table must be 8. For
more information, see Section 15.6.3.3, “General Tablespaces”.
The following example demonstrates creating a general tablespace
and adding a compressed table. The example assumes a default
innodb_page_size of 16K. The
FILE_BLOCK_SIZE of 8192 requires that the
compressed table have a KEY_BLOCK_SIZE of 8.
mysql>CREATE TABLESPACE `ts2` ADD DATAFILE 'ts2.ibd' FILE_BLOCK_SIZE = 8192 Engine=InnoDB;mysql>CREATE TABLE t4 (c1 INT PRIMARY KEY) TABLESPACE ts2 ROW_FORMAT=COMPRESSED KEY_BLOCK_SIZE=8;
Notes
As of MySQL 8.0, the tablespace file for a compressed table is created using the physical page size instead of the
InnoDBpage size, which makes the initial size of a tablespace file for an empty compressed table smaller than in previous MySQL releases.If you specify
ROW_FORMAT=COMPRESSED, you can omitKEY_BLOCK_SIZE; theKEY_BLOCK_SIZEsetting defaults to half theinnodb_page_sizevalue.If you specify a valid
KEY_BLOCK_SIZEvalue, you can omitROW_FORMAT=COMPRESSED; compression is enabled automatically.To determine the best value for
KEY_BLOCK_SIZE,typically you create several copies of the same table with different values for this clause, then measure the size of the resulting.ibdfiles and see how well each performs with a realistic workload. For general tablespaces, keep in mind that dropping a table does not reduce the size of the general tablespace.ibdfile, nor does it return disk space to the operating system. For more information, see Section 15.6.3.3, “General Tablespaces”.The
KEY_BLOCK_SIZEvalue is treated as a hint; a different size could be used byInnoDBif necessary. For file-per-table tablespaces, theKEY_BLOCK_SIZEcan only be less than or equal to theinnodb_page_sizevalue. If you specify a value greater than theinnodb_page_sizevalue, the specified value is ignored, a warning is issued, andKEY_BLOCK_SIZEis set to half of theinnodb_page_sizevalue. Ifinnodb_strict_mode=ON, specifying an invalidKEY_BLOCK_SIZEvalue returns an error. For general tablespaces, validKEY_BLOCK_SIZEvalues depend on theFILE_BLOCK_SIZEsetting of the tablespace. For more information, see Section 15.6.3.3, “General Tablespaces”.InnoDBsupports 32KB and 64KB page sizes but these page sizes do not support compression. For more information, refer to theinnodb_page_sizedocumentation.The default uncompressed size of
InnoDBdata pages is 16KB. Depending on the combination of option values, MySQL uses a page size of 1KB, 2KB, 4KB, 8KB, or 16KB for the tablespace data file (.ibdfile). The actual compression algorithm is not affected by theKEY_BLOCK_SIZEvalue; the value determines how large each compressed chunk is, which in turn affects how many rows can be packed into each compressed page.When creating a compressed table in a file-per-table tablespace, setting
KEY_BLOCK_SIZEequal to theInnoDBpage size does not typically result in much compression. For example, settingKEY_BLOCK_SIZE=16typically would not result in much compression, since the normalInnoDBpage size is 16KB. This setting may still be useful for tables with many longBLOB,VARCHARorTEXTcolumns, because such values often do compress well, and might therefore require fewer overflow pages as described in Section 15.9.1.5, “How Compression Works for InnoDB Tables”. For general tablespaces, aKEY_BLOCK_SIZEvalue equal to theInnoDBpage size is not permitted. For more information, see Section 15.6.3.3, “General Tablespaces”.All indexes of a table (including the clustered index) are compressed using the same page size, as specified in the
CREATE TABLEorALTER TABLEstatement. Table attributes such asROW_FORMATandKEY_BLOCK_SIZEare not part of theCREATE INDEXsyntax forInnoDBtables, and are ignored if they are specified (although, if specified, they appear in the output of theSHOW CREATE TABLEstatement).For performance-related configuration options, see Section 15.9.1.3, “Tuning Compression for InnoDB Tables”.
Restrictions on Compressed Tables
Compressed tables cannot be stored in the
InnoDBsystem tablespace.General tablespaces can contain multiple tables, but compressed and uncompressed tables cannot coexist within the same general tablespace.
Compression applies to an entire table and all its associated indexes, not to individual rows, despite the clause name
ROW_FORMAT.InnoDBdoes not support compressed temporary tables. Wheninnodb_strict_modeis enabled (the default),CREATE TEMPORARY TABLEreturns errors ifROW_FORMAT=COMPRESSEDorKEY_BLOCK_SIZEis specified. Ifinnodb_strict_modeis disabled, warnings are issued and the temporary table is created using a non-compressed row format. The same restrictions apply toALTER TABLEoperations on temporary tables.
Most often, the internal optimizations described in InnoDB Data Storage and Compression ensure that the system runs well with compressed data. However, because the efficiency of compression depends on the nature of your data, you can make decisions that affect the performance of compressed tables:
Which tables to compress.
What compressed page size to use.
Whether to adjust the size of the buffer pool based on run-time performance characteristics, such as the amount of time the system spends compressing and uncompressing data. Whether the workload is more like a data warehouse (primarily queries) or an OLTP system (mix of queries and DML).
If the system performs DML operations on compressed tables, and the way the data is distributed leads to expensive compression failures at runtime, you might adjust additional advanced configuration options.
Use the guidelines in this section to help make those architectural and configuration choices. When you are ready to conduct long-term testing and put compressed tables into production, see Section 15.9.1.4, “Monitoring InnoDB Table Compression at Runtime” for ways to verify the effectiveness of those choices under real-world conditions.
When to Use Compression
In general, compression works best on tables that include a reasonable number of character string columns and where the data is read far more often than it is written. Because there are no guaranteed ways to predict whether or not compression benefits a particular situation, always test with a specific workload and data set running on a representative configuration. Consider the following factors when deciding which tables to compress.
Data Characteristics and Compression
A key determinant of the efficiency of compression in reducing
the size of data files is the nature of the data itself. Recall
that compression works by identifying repeated strings of bytes
in a block of data. Completely randomized data is the worst
case. Typical data often has repeated values, and so compresses
effectively. Character strings often compress well, whether
defined in CHAR, VARCHAR,
TEXT or BLOB columns. On
the other hand, tables containing mostly binary data (integers
or floating point numbers) or data that is previously compressed
(for example JPEG or PNG
images) may not generally compress well, significantly or at
all.
You choose whether to turn on compression for each InnoDB table. A table and all of its indexes use the same (compressed) page size. It might be that the primary key (clustered) index, which contains the data for all columns of a table, compresses more effectively than the secondary indexes. For those cases where there are long rows, the use of compression might result in long column values being stored “off-page”, as discussed in DYNAMIC Row Format. Those overflow pages may compress well. Given these considerations, for many applications, some tables compress more effectively than others, and you might find that your workload performs best only with a subset of tables compressed.
To determine whether or not to compress a particular table,
conduct experiments. You can get a rough estimate of how
efficiently your data can be compressed by using a utility that
implements LZ77 compression (such as gzip or
WinZip) on a copy of the .ibd
file for an uncompressed table. You can expect less
compression from a MySQL compressed table than from file-based
compression tools, because MySQL compresses data in chunks based
on the page size, 16KB by
default. In addition to user data, the page format includes some
internal system data that is not compressed. File-based
compression utilities can examine much larger chunks of data,
and so might find more repeated strings in a huge file than
MySQL can find in an individual page.
Another way to test compression on a specific table is to copy
some data from your uncompressed table to a similar, compressed
table (having all the same indexes) in a
file-per-table
tablespace and look at the size of the resulting
.ibd file. For example:
USE test; SET GLOBAL innodb_file_per_table=1; SET GLOBAL autocommit=0; -- Create an uncompressed table with a million or two rows. CREATE TABLE big_table AS SELECT * FROM information_schema.columns; INSERT INTO big_table SELECT * FROM big_table; INSERT INTO big_table SELECT * FROM big_table; INSERT INTO big_table SELECT * FROM big_table; INSERT INTO big_table SELECT * FROM big_table; INSERT INTO big_table SELECT * FROM big_table; INSERT INTO big_table SELECT * FROM big_table; INSERT INTO big_table SELECT * FROM big_table; INSERT INTO big_table SELECT * FROM big_table; INSERT INTO big_table SELECT * FROM big_table; INSERT INTO big_table SELECT * FROM big_table; COMMIT; ALTER TABLE big_table ADD id int unsigned NOT NULL PRIMARY KEY auto_increment; SHOW CREATE TABLE big_table\G select count(id) from big_table; -- Check how much space is needed for the uncompressed table. \! ls -l data/test/big_table.ibd CREATE TABLE key_block_size_4 LIKE big_table; ALTER TABLE key_block_size_4 key_block_size=4 row_format=compressed; INSERT INTO key_block_size_4 SELECT * FROM big_table; commit; -- Check how much space is needed for a compressed table -- with particular compression settings. \! ls -l data/test/key_block_size_4.ibd
This experiment produced the following numbers, which of course could vary considerably depending on your table structure and data:
-rw-rw---- 1 cirrus staff 310378496 Jan 9 13:44 data/test/big_table.ibd -rw-rw---- 1 cirrus staff 83886080 Jan 9 15:10 data/test/key_block_size_4.ibd
To see whether compression is efficient for your particular workload:
For simple tests, use a MySQL instance with no other compressed tables and run queries against the
INFORMATION_SCHEMA.INNODB_CMPtable.For more elaborate tests involving workloads with multiple compressed tables, run queries against the
INFORMATION_SCHEMA.INNODB_CMP_PER_INDEXtable. Because the statistics in theINNODB_CMP_PER_INDEXtable are expensive to collect, you must enable the configuration optioninnodb_cmp_per_index_enabledbefore querying that table, and you might restrict such testing to a development server or a non-critical replica server.Run some typical SQL statements against the compressed table you are testing.
Examine the ratio of successful compression operations to overall compression operations by querying the
INFORMATION_SCHEMA.INNODB_CMPorINFORMATION_SCHEMA.INNODB_CMP_PER_INDEXtable, and comparingCOMPRESS_OPStoCOMPRESS_OPS_OK.If a high percentage of compression operations complete successfully, the table might be a good candidate for compression.
If you get a high proportion of compression failures, you can adjust
innodb_compression_level,innodb_compression_failure_threshold_pct, andinnodb_compression_pad_pct_maxoptions as described in Section 15.9.1.6, “Compression for OLTP Workloads”, and try further tests.
Database Compression versus Application Compression
Decide whether to compress data in your application or in the table; do not use both types of compression for the same data. When you compress the data in the application and store the results in a compressed table, extra space savings are extremely unlikely, and the double compression just wastes CPU cycles.
Compressing in the Database
When enabled, MySQL table compression is automatic and applies
to all columns and index values. The columns can still be tested
with operators such as LIKE, and sort
operations can still use indexes even when the index values are
compressed. Because indexes are often a significant fraction of
the total size of a database, compression could result in
significant savings in storage, I/O or processor time. The
compression and decompression operations happen on the database
server, which likely is a powerful system that is sized to
handle the expected load.
Compressing in the Application
If you compress data such as text in your application, before it is inserted into the database, You might save overhead for data that does not compress well by compressing some columns and not others. This approach uses CPU cycles for compression and uncompression on the client machine rather than the database server, which might be appropriate for a distributed application with many clients, or where the client machine has spare CPU cycles.
Hybrid Approach
Of course, it is possible to combine these approaches. For some applications, it may be appropriate to use some compressed tables and some uncompressed tables. It may be best to externally compress some data (and store it in uncompressed tables) and allow MySQL to compress (some of) the other tables in the application. As always, up-front design and real-life testing are valuable in reaching the right decision.
Workload Characteristics and Compression
In addition to choosing which tables to compress (and the page
size), the workload is another key determinant of performance.
If the application is dominated by reads, rather than updates,
fewer pages need to be reorganized and recompressed after the
index page runs out of room for the per-page “modification
log” that MySQL maintains for compressed data. If the
updates predominantly change non-indexed columns or those
containing BLOBs or large strings that happen
to be stored “off-page”, the overhead of
compression may be acceptable. If the only changes to a table
are INSERTs that use a monotonically
increasing primary key, and there are few secondary indexes,
there is little need to reorganize and recompress index pages.
Since MySQL can “delete-mark” and delete rows on
compressed pages “in place” by modifying
uncompressed data, DELETE operations on a
table are relatively efficient.
For some environments, the time it takes to load data can be as important as run-time retrieval. Especially in data warehouse environments, many tables may be read-only or read-mostly. In those cases, it might or might not be acceptable to pay the price of compression in terms of increased load time, unless the resulting savings in fewer disk reads or in storage cost is significant.
Fundamentally, compression works best when the CPU time is available for compressing and uncompressing data. Thus, if your workload is I/O bound, rather than CPU-bound, you might find that compression can improve overall performance. When you test your application performance with different compression configurations, test on a platform similar to the planned configuration of the production system.
Configuration Characteristics and Compression
Reading and writing database pages from and to disk is the slowest aspect of system performance. Compression attempts to reduce I/O by using CPU time to compress and uncompress data, and is most effective when I/O is a relatively scarce resource compared to processor cycles.
This is often especially the case when running in a multi-user environment with fast, multi-core CPUs. When a page of a compressed table is in memory, MySQL often uses additional memory, typically 16KB, in the buffer pool for an uncompressed copy of the page. The adaptive LRU algorithm attempts to balance the use of memory between compressed and uncompressed pages to take into account whether the workload is running in an I/O-bound or CPU-bound manner. Still, a configuration with more memory dedicated to the buffer pool tends to run better when using compressed tables than a configuration where memory is highly constrained.
Choosing the Compressed Page Size
The optimal setting of the compressed page size depends on the type and distribution of data that the table and its indexes contain. The compressed page size should always be bigger than the maximum record size, or operations may fail as noted in Compression of B-Tree Pages.
Setting the compressed page size too large wastes some space, but the pages do not have to be compressed as often. If the compressed page size is set too small, inserts or updates may require time-consuming recompression, and the B-tree nodes may have to be split more frequently, leading to bigger data files and less efficient indexing.
Typically, you set the compressed page size to 8K or 4K bytes.
Given that the maximum row size for an InnoDB table is around
8K, KEY_BLOCK_SIZE=8 is usually a safe
choice.
Overall application performance, CPU and I/O utilization and the size of disk files are good indicators of how effective compression is for your application. This section builds on the performance tuning advice from Section 15.9.1.3, “Tuning Compression for InnoDB Tables”, and shows how to find problems that might not turn up during initial testing.
To dig deeper into performance considerations for compressed tables, you can monitor compression performance at runtime using the Information Schema tables described in Example 15.1, “Using the Compression Information Schema Tables”. These tables reflect the internal use of memory and the rates of compression used overall.
The INNODB_CMP table reports
information about compression activity for each compressed page
size (KEY_BLOCK_SIZE) in use. The information
in these tables is system-wide: it summarizes the compression
statistics across all compressed tables in your database. You
can use this data to help decide whether or not to compress a
table by examining these tables when no other compressed tables
are being accessed. It involves relatively low overhead on the
server, so you might query it periodically on a production
server to check the overall efficiency of the compression
feature.
The INNODB_CMP_PER_INDEX table
reports information about compression activity for individual
tables and indexes. This information is more targeted and more
useful for evaluating compression efficiency and diagnosing
performance issues one table or index at a time. (Because that
each InnoDB table is represented as a
clustered index, MySQL does not make a big distinction between
tables and indexes in this context.) The
INNODB_CMP_PER_INDEX table does
involve substantial overhead, so it is more suitable for
development servers, where you can compare the effects of
different workloads, data,
and compression settings in isolation. To guard against imposing
this monitoring overhead by accident, you must enable the
innodb_cmp_per_index_enabled
configuration option before you can query the
INNODB_CMP_PER_INDEX table.
The key statistics to consider are the number of, and amount of
time spent performing, compression and uncompression operations.
Since MySQL splits B-tree
nodes when they are too full to contain the compressed data
following a modification, compare the number of
“successful” compression operations with the number
of such operations overall. Based on the information in the
INNODB_CMP and
INNODB_CMP_PER_INDEX tables and
overall application performance and hardware resource
utilization, you might make changes in your hardware
configuration, adjust the size of the buffer pool, choose a
different page size, or select a different set of tables to
compress.
If the amount of CPU time required for compressing and uncompressing is high, changing to faster or multi-core CPUs can help improve performance with the same data, application workload and set of compressed tables. Increasing the size of the buffer pool might also help performance, so that more uncompressed pages can stay in memory, reducing the need to uncompress pages that exist in memory only in compressed form.
A large number of compression operations overall (compared to
the number of INSERT,
UPDATE and DELETE
operations in your application and the size of the database)
could indicate that some of your compressed tables are being
updated too heavily for effective compression. If so, choose a
larger page size, or be more selective about which tables you
compress.
If the number of “successful” compression
operations (COMPRESS_OPS_OK) is a high
percentage of the total number of compression operations
(COMPRESS_OPS), then the system is likely
performing well. If the ratio is low, then MySQL is
reorganizing, recompressing, and splitting B-tree nodes more
often than is desirable. In this case, avoid compressing some
tables, or increase KEY_BLOCK_SIZE for some
of the compressed tables. You might turn off compression for
tables that cause the number of “compression
failures” in your application to be more than 1% or 2% of
the total. (Such a failure ratio might be acceptable during a
temporary operation such as a data load).
This section describes some internal implementation details about compression for InnoDB tables. The information presented here may be helpful in tuning for performance, but is not necessary to know for basic use of compression.
Compression Algorithms
Some operating systems implement compression at the file system level. Files are typically divided into fixed-size blocks that are compressed into variable-size blocks, which easily leads into fragmentation. Every time something inside a block is modified, the whole block is recompressed before it is written to disk. These properties make this compression technique unsuitable for use in an update-intensive database system.
MySQL implements compression with the help of the well-known zlib library, which implements the LZ77 compression algorithm. This compression algorithm is mature, robust, and efficient in both CPU utilization and in reduction of data size. The algorithm is “lossless”, so that the original uncompressed data can always be reconstructed from the compressed form. LZ77 compression works by finding sequences of data that are repeated within the data to be compressed. The patterns of values in your data determine how well it compresses, but typical user data often compresses by 50% or more.
InnoDB supports the zlib
library up to version 1.2.11, which is the version bundled
with MySQL 8.0.
Unlike compression performed by an application, or compression
features of some other database management systems, InnoDB
compression applies both to user data and to indexes. In many
cases, indexes can constitute 40-50% or more of the total
database size, so this difference is significant. When
compression is working well for a data set, the size of the
InnoDB data files (the
file-per-table
tablespace or general
tablespace .ibd files) is 25% to 50%
of the uncompressed size or possibly smaller. Depending on the
workload, this smaller
database can in turn lead to a reduction in I/O, and an increase
in throughput, at a modest cost in terms of increased CPU
utilization. You can adjust the balance between compression
level and CPU overhead by modifying the
innodb_compression_level
configuration option.
InnoDB Data Storage and Compression
All user data in InnoDB tables is stored in pages comprising a B-tree index (the clustered index). In some other database systems, this type of index is called an “index-organized table”. Each row in the index node contains the values of the (user-specified or system-generated) primary key and all the other columns of the table.
Secondary indexes in InnoDB tables are also B-trees, containing pairs of values: the index key and a pointer to a row in the clustered index. The pointer is in fact the value of the primary key of the table, which is used to access the clustered index if columns other than the index key and primary key are required. Secondary index records must always fit on a single B-tree page.
The compression of B-tree nodes (of both clustered and secondary
indexes) is handled differently from compression of
overflow pages used to
store long VARCHAR, BLOB,
or TEXT columns, as explained in the
following sections.
Compression of B-Tree Pages
Because they are frequently updated, B-tree pages require special treatment. It is important to minimize the number of times B-tree nodes are split, as well as to minimize the need to uncompress and recompress their content.
One technique MySQL uses is to maintain some system information in the B-tree node in uncompressed form, thus facilitating certain in-place updates. For example, this allows rows to be delete-marked and deleted without any compression operation.
In addition, MySQL attempts to avoid unnecessary uncompression and recompression of index pages when they are changed. Within each B-tree page, the system keeps an uncompressed “modification log” to record changes made to the page. Updates and inserts of small records may be written to this modification log without requiring the entire page to be completely reconstructed.
When the space for the modification log runs out, InnoDB uncompresses the page, applies the changes and recompresses the page. If recompression fails (a situation known as a compression failure), the B-tree nodes are split and the process is repeated until the update or insert succeeds.
To avoid frequent compression failures in write-intensive
workloads, such as for OLTP
applications, MySQL sometimes reserves some empty space
(padding) in the page, so that the modification log fills up
sooner and the page is recompressed while there is still enough
room to avoid splitting it. The amount of padding space left in
each page varies as the system keeps track of the frequency of
page splits. On a busy server doing frequent writes to
compressed tables, you can adjust the
innodb_compression_failure_threshold_pct,
and
innodb_compression_pad_pct_max
configuration options to fine-tune this mechanism.
Generally, MySQL requires that each B-tree page in an InnoDB
table can accommodate at least two records. For compressed
tables, this requirement has been relaxed. Leaf pages of B-tree
nodes (whether of the primary key or secondary indexes) only
need to accommodate one record, but that record must fit, in
uncompressed form, in the per-page modification log. If
innodb_strict_mode is
ON, MySQL checks the maximum row size during
CREATE TABLE or
CREATE INDEX. If the row does not
fit, the following error message is issued: ERROR
HY000: Too big row.
If you create a table when
innodb_strict_mode is OFF, and
a subsequent INSERT or
UPDATE statement attempts to create an index
entry that does not fit in the size of the compressed page, the
operation fails with ERROR 42000: Row size too
large. (This error message does not name the index for
which the record is too large, or mention the length of the
index record or the maximum record size on that particular index
page.) To solve this problem, rebuild the table with
ALTER TABLE and select a larger
compressed page size (KEY_BLOCK_SIZE),
shorten any column prefix indexes, or disable compression
entirely with ROW_FORMAT=DYNAMIC or
ROW_FORMAT=COMPACT.
innodb_strict_mode is not
applicable to general tablespaces, which also support compressed
tables. Tablespace management rules for general tablespaces are
strictly enforced independently of
innodb_strict_mode. For more
information, see Section 13.1.21, “CREATE TABLESPACE Statement”.
Compressing BLOB, VARCHAR, and TEXT Columns
In an InnoDB table, BLOB,
VARCHAR, and
TEXT columns that are not part of
the primary key may be stored on separately allocated
overflow pages. We
refer to these columns as
off-page columns.
Their values are stored on singly-linked lists of overflow
pages.
For tables created in ROW_FORMAT=DYNAMIC or
ROW_FORMAT=COMPRESSED, the values of
BLOB,
TEXT, or
VARCHAR columns may be stored
fully off-page, depending on their length and the length of the
entire row. For columns that are stored off-page, the clustered
index record only contains 20-byte pointers to the overflow
pages, one per column. Whether any columns are stored off-page
depends on the page size and the total size of the row. When the
row is too long to fit entirely within the page of the clustered
index, MySQL chooses the longest columns for off-page storage
until the row fits on the clustered index page. As noted above,
if a row does not fit by itself on a compressed page, an error
occurs.
For tables created in ROW_FORMAT=DYNAMIC or
ROW_FORMAT=COMPRESSED,
TEXT and
BLOB columns that are less than
or equal to 40 bytes are always stored in-line.
Tables that use ROW_FORMAT=REDUNDANT and
ROW_FORMAT=COMPACT store the first 768 bytes
of BLOB,
VARCHAR, and
TEXT columns in the clustered
index record along with the primary key. The 768-byte prefix is
followed by a 20-byte pointer to the overflow pages that contain
the rest of the column value.
When a table is in COMPRESSED format, all
data written to overflow pages is compressed “as
is”; that is, MySQL applies the zlib compression
algorithm to the entire data item. Other than the data,
compressed overflow pages contain an uncompressed header and
trailer comprising a page checksum and a link to the next
overflow page, among other things. Therefore, very significant
storage savings can be obtained for longer
BLOB, TEXT, or
VARCHAR columns if the data is highly
compressible, as is often the case with text data. Image data,
such as JPEG, is typically already compressed
and so does not benefit much from being stored in a compressed
table; the double compression can waste CPU cycles for little or
no space savings.
The overflow pages are of the same size as other pages. A row containing ten columns stored off-page occupies ten overflow pages, even if the total length of the columns is only 8K bytes. In an uncompressed table, ten uncompressed overflow pages occupy 160K bytes. In a compressed table with an 8K page size, they occupy only 80K bytes. Thus, it is often more efficient to use compressed table format for tables with long column values.
For file-per-table
tablespaces, using a 16K compressed page size can reduce storage
and I/O costs for BLOB,
VARCHAR, or
TEXT columns, because such data
often compress well, and might therefore require fewer overflow
pages, even though the B-tree nodes themselves take as many
pages as in the uncompressed form. General tablespaces do not
support a 16K compressed page size
(KEY_BLOCK_SIZE). For more information, see
Section 15.6.3.3, “General Tablespaces”.
Compression and the InnoDB Buffer Pool
In a compressed InnoDB table, every
compressed page (whether 1K, 2K, 4K or 8K) corresponds to an
uncompressed page of 16K bytes (or a smaller size if
innodb_page_size is set). To
access the data in a page, MySQL reads the compressed page from
disk if it is not already in the
buffer pool, then
uncompresses the page to its original form. This section
describes how InnoDB manages the buffer pool
with respect to pages of compressed tables.
To minimize I/O and to reduce the need to uncompress a page, at times the buffer pool contains both the compressed and uncompressed form of a database page. To make room for other required database pages, MySQL can evict from the buffer pool an uncompressed page, while leaving the compressed page in memory. Or, if a page has not been accessed in a while, the compressed form of the page might be written to disk, to free space for other data. Thus, at any given time, the buffer pool might contain both the compressed and uncompressed forms of the page, or only the compressed form of the page, or neither.
MySQL keeps track of which pages to keep in memory and which to evict using a least-recently-used (LRU) list, so that hot (frequently accessed) data tends to stay in memory. When compressed tables are accessed, MySQL uses an adaptive LRU algorithm to achieve an appropriate balance of compressed and uncompressed pages in memory. This adaptive algorithm is sensitive to whether the system is running in an I/O-bound or CPU-bound manner. The goal is to avoid spending too much processing time uncompressing pages when the CPU is busy, and to avoid doing excess I/O when the CPU has spare cycles that can be used for uncompressing compressed pages (that may already be in memory). When the system is I/O-bound, the algorithm prefers to evict the uncompressed copy of a page rather than both copies, to make more room for other disk pages to become memory resident. When the system is CPU-bound, MySQL prefers to evict both the compressed and uncompressed page, so that more memory can be used for “hot” pages and reducing the need to uncompress data in memory only in compressed form.
Compression and the InnoDB Redo Log Files
Before a compressed page is written to a
data file, MySQL writes a
copy of the page to the redo log (if it has been recompressed
since the last time it was written to the database). This is
done to ensure that redo logs are usable for
crash recovery, even
in the unlikely case that the zlib library is
upgraded and that change introduces a compatibility problem with
the compressed data. Therefore, some increase in the size of
log files, or a need for
more frequent
checkpoints, can be
expected when using compression. The amount of increase in the
log file size or checkpoint frequency depends on the number of
times compressed pages are modified in a way that requires
reorganization and recompression.
To create a compressed table in a file-per-table tablespace,
innodb_file_per_table must be
enabled. There is no dependence on the
innodb_file_per_table setting
when creating a compressed table in a general tablespace. For
more information, see Section 15.6.3.3, “General Tablespaces”.
Traditionally, the InnoDB
compression feature was
recommended primarily for read-only or read-mostly
workloads, such as in a
data warehouse
configuration. The rise of SSD
storage devices, which are fast but relatively small and
expensive, makes compression attractive also for
OLTP workloads: high-traffic, interactive
websites can reduce their storage requirements and their I/O
operations per second (IOPS) by
using compressed tables with applications that do frequent
INSERT,
UPDATE, and
DELETE operations.
These configuration options let you adjust the way compression works for a particular MySQL instance, with an emphasis on performance and scalability for write-intensive operations:
innodb_compression_levellets you turn the degree of compression up or down. A higher value lets you fit more data onto a storage device, at the expense of more CPU overhead during compression. A lower value lets you reduce CPU overhead when storage space is not critical, or you expect the data is not especially compressible.innodb_compression_failure_threshold_pctspecifies a cutoff point for compression failures during updates to a compressed table. When this threshold is passed, MySQL begins to leave additional free space within each new compressed page, dynamically adjusting the amount of free space up to the percentage of page size specified byinnodb_compression_pad_pct_maxinnodb_compression_pad_pct_maxlets you adjust the maximum amount of space reserved within each page to record changes to compressed rows, without needing to compress the entire page again. The higher the value, the more changes can be recorded without recompressing the page. MySQL uses a variable amount of free space for the pages within each compressed table, only when a designated percentage of compression operations “fail” at runtime, requiring an expensive operation to split the compressed page.innodb_log_compressed_pageslets you disable writing of images of re-compressed pages to the redo log. Re-compression may occur when changes are made to compressed data. This option is enabled by default to prevent corruption that could occur if a different version of thezlibcompression algorithm is used during recovery. If you are certain that thezlibversion is not subject to change, disableinnodb_log_compressed_pagesto reduce redo log generation for workloads that modify compressed data.
Because working with compressed data sometimes involves keeping
both compressed and uncompressed versions of a page in memory at
the same time, when using compression with an OLTP-style
workload, be prepared to increase the value of the
innodb_buffer_pool_size
configuration option.
This section describes syntax warnings and errors that you may encounter when using the table compression feature with file-per-table tablespaces and general tablespaces.
SQL Compression Syntax Warnings and Errors for File-Per-Table Tablespaces
When innodb_strict_mode is
enabled (the default), specifying
ROW_FORMAT=COMPRESSED or
KEY_BLOCK_SIZE in CREATE
TABLE or ALTER TABLE
statements produces the following error if
innodb_file_per_table is
disabled.
ERROR 1031 (HY000): Table storage engine for 't1' doesn't have this option
The table is not created if the current configuration does not permit using compressed tables.
When innodb_strict_mode is
disabled, specifying ROW_FORMAT=COMPRESSED or
KEY_BLOCK_SIZE in CREATE
TABLE or ALTER TABLE
statements produces the following warnings if
innodb_file_per_table is
disabled.
mysql> SHOW WARNINGS;
+---------+------+---------------------------------------------------------------+
| Level | Code | Message |
+---------+------+---------------------------------------------------------------+
| Warning | 1478 | InnoDB: KEY_BLOCK_SIZE requires innodb_file_per_table. |
| Warning | 1478 | InnoDB: ignoring KEY_BLOCK_SIZE=4. |
| Warning | 1478 | InnoDB: ROW_FORMAT=COMPRESSED requires innodb_file_per_table. |
| Warning | 1478 | InnoDB: assuming ROW_FORMAT=DYNAMIC. |
+---------+------+---------------------------------------------------------------+
These messages are only warnings, not errors, and the table is created without compression, as if the options were not specified.
The “non-strict” behavior lets you import a
mysqldump file into a database that does not
support compressed tables, even if the source database contained
compressed tables. In that case, MySQL creates the table in
ROW_FORMAT=DYNAMIC instead of preventing the
operation.
To import the dump file into a new database, and have the tables
re-created as they exist in the original database, ensure the
server has the proper setting for the
innodb_file_per_table
configuration parameter.
The attribute KEY_BLOCK_SIZE is permitted
only when ROW_FORMAT is specified as
COMPRESSED or is omitted. Specifying a
KEY_BLOCK_SIZE with any other
ROW_FORMAT generates a warning that you can
view with SHOW WARNINGS. However, the table
is non-compressed; the specified
KEY_BLOCK_SIZE is ignored).
| Level | Code | Message |
|---|---|---|
| Warning | 1478 | InnoDB: ignoring KEY_BLOCK_SIZE= |
If you are running with
innodb_strict_mode enabled, the
combination of a KEY_BLOCK_SIZE with any
ROW_FORMAT other than
COMPRESSED generates an error, not a warning,
and the table is not created.
Table 15.12, “ROW_FORMAT and KEY_BLOCK_SIZE Options”
provides an overview the ROW_FORMAT and
KEY_BLOCK_SIZE options that are used with
CREATE TABLE or
ALTER TABLE.
Table 15.12 ROW_FORMAT and KEY_BLOCK_SIZE Options
| Option | Usage Notes | Description |
|---|---|---|
ROW_FORMAT=REDUNDANT |
Storage format used prior to MySQL 5.0.3 | Less efficient than ROW_FORMAT=COMPACT; for backward
compatibility |
ROW_FORMAT=COMPACT |
Default storage format since MySQL 5.0.3 | Stores a prefix of 768 bytes of long column values in the clustered index page, with the remaining bytes stored in an overflow page |
ROW_FORMAT=DYNAMIC |
Store values within the clustered index page if they fit; if not, stores only a 20-byte pointer to an overflow page (no prefix) | |
ROW_FORMAT=COMPRESSED |
Compresses the table and indexes using zlib | |
KEY_BLOCK_SIZE= |
Specifies compressed page size of 1, 2, 4, 8 or 16 kilobytes; implies
ROW_FORMAT=COMPRESSED. For general
tablespaces, a KEY_BLOCK_SIZE value
equal to the InnoDB page size is not
permitted. |
Table 15.13, “CREATE/ALTER TABLE Warnings and Errors when InnoDB Strict Mode is OFF”
summarizes error conditions that occur with certain combinations
of configuration parameters and options on the
CREATE TABLE or
ALTER TABLE statements, and how
the options appear in the output of SHOW TABLE
STATUS.
When innodb_strict_mode is
OFF, MySQL creates or alters the table, but
ignores certain settings as shown below. You can see the warning
messages in the MySQL error log. When
innodb_strict_mode is
ON, these specified combinations of options
generate errors, and the table is not created or altered. To see
the full description of the error condition, issue the
SHOW ERRORS statement: example:
mysql>CREATE TABLE x (id INT PRIMARY KEY, c INT)->ENGINE=INNODB KEY_BLOCK_SIZE=33333;ERROR 1005 (HY000): Can't create table 'test.x' (errno: 1478) mysql>SHOW ERRORS;+-------+------+-------------------------------------------+ | Level | Code | Message | +-------+------+-------------------------------------------+ | Error | 1478 | InnoDB: invalid KEY_BLOCK_SIZE=33333. | | Error | 1005 | Can't create table 'test.x' (errno: 1478) | +-------+------+-------------------------------------------+
Table 15.13 CREATE/ALTER TABLE Warnings and Errors when InnoDB Strict Mode is OFF
| Syntax | Warning or Error Condition | Resulting ROW_FORMAT, as shown in SHOW TABLE
STATUS |
|---|---|---|
ROW_FORMAT=REDUNDANT |
None | REDUNDANT |
ROW_FORMAT=COMPACT |
None | COMPACT |
ROW_FORMAT=COMPRESSED or
ROW_FORMAT=DYNAMIC or
KEY_BLOCK_SIZE is specified |
Ignored for file-per-table tablespaces unless
innodb_file_per_table is
enabled. General tablespaces support all row formats. See
Section 15.6.3.3, “General Tablespaces”. |
the default row format for file-per-table tablespaces; the
specified row format for general tablespaces |
Invalid KEY_BLOCK_SIZE is specified (not 1, 2, 4, 8
or 16) |
KEY_BLOCK_SIZE is ignored |
the specified row format, or the default row format |
ROW_FORMAT=COMPRESSED and valid
KEY_BLOCK_SIZE are specified |
None; KEY_BLOCK_SIZE specified is used |
COMPRESSED |
KEY_BLOCK_SIZE is specified with
REDUNDANT, COMPACT
or DYNAMIC row format |
KEY_BLOCK_SIZE is ignored |
REDUNDANT, COMPACT or
DYNAMIC |
ROW_FORMAT is not one of
REDUNDANT, COMPACT,
DYNAMIC or
COMPRESSED |
Ignored if recognized by the MySQL parser. Otherwise, an error is issued. | the default row format or N/A |
When innodb_strict_mode is
ON, MySQL rejects invalid
ROW_FORMAT or
KEY_BLOCK_SIZE parameters and issues errors.
Strict mode is ON by default. When
innodb_strict_mode is OFF,
MySQL issues warnings instead of errors for ignored invalid
parameters.
It is not possible to see the chosen
KEY_BLOCK_SIZE using SHOW TABLE
STATUS. The statement SHOW CREATE
TABLE displays the KEY_BLOCK_SIZE
(even if it was ignored when creating the table). The real
compressed page size of the table cannot be displayed by MySQL.
SQL Compression Syntax Warnings and Errors for General Tablespaces
If
FILE_BLOCK_SIZEwas not defined for the general tablespace when the tablespace was created, the tablespace cannot contain compressed tables. If you attempt to add a compressed table, an error is returned, as shown in the following example:mysql>
CREATE TABLESPACE `ts1` ADD DATAFILE 'ts1.ibd' Engine=InnoDB;mysql>CREATE TABLE t1 (c1 INT PRIMARY KEY) TABLESPACE ts1 ROW_FORMAT=COMPRESSEDKEY_BLOCK_SIZE=8;ERROR 1478 (HY000): InnoDB: Tablespace `ts1` cannot contain a COMPRESSED tableAttempting to add a table with an invalid
KEY_BLOCK_SIZEto a general tablespace returns an error, as shown in the following example:mysql>
CREATE TABLESPACE `ts2` ADD DATAFILE 'ts2.ibd' FILE_BLOCK_SIZE = 8192 Engine=InnoDB;mysql>CREATE TABLE t2 (c1 INT PRIMARY KEY) TABLESPACE ts2 ROW_FORMAT=COMPRESSEDKEY_BLOCK_SIZE=4;ERROR 1478 (HY000): InnoDB: Tablespace `ts2` uses block size 8192 and cannot contain a table with physical page size 4096For general tablespaces, the
KEY_BLOCK_SIZEof the table must be equal to theFILE_BLOCK_SIZEof the tablespace divided by 1024. For example, if theFILE_BLOCK_SIZEof the tablespace is 8192, theKEY_BLOCK_SIZEof the table must be 8.Attempting to add a table with an uncompressed row format to a general tablespace configured to store compressed tables returns an error, as shown in the following example:
mysql>
CREATE TABLESPACE `ts3` ADD DATAFILE 'ts3.ibd' FILE_BLOCK_SIZE = 8192 Engine=InnoDB;mysql>CREATE TABLE t3 (c1 INT PRIMARY KEY) TABLESPACE ts3 ROW_FORMAT=COMPACT;ERROR 1478 (HY000): InnoDB: Tablespace `ts3` uses block size 8192 and cannot contain a table with physical page size 16384
innodb_strict_mode is not
applicable to general tablespaces. Tablespace management rules
for general tablespaces are strictly enforced independently of
innodb_strict_mode. For more
information, see Section 13.1.21, “CREATE TABLESPACE Statement”.
For more information about using compressed tables with general tablespaces, see Section 15.6.3.3, “General Tablespaces”.
InnoDB supports page-level compression for
tables that reside in
file-per-table
tablespaces. This feature is referred to as Transparent
Page Compression. Page compression is enabled by
specifying the COMPRESSION attribute with
CREATE TABLE or
ALTER TABLE. Supported compression
algorithms include Zlib and
LZ4.
Supported Platforms
Page compression requires sparse file and hole punching support. Page compression is supported on Windows with NTFS, and on the following subset of MySQL-supported Linux platforms where the kernel level provides hole punching support:
RHEL 7 and derived distributions that use kernel version 3.10.0-123 or higher
OEL 5.10 (UEK2) kernel version 2.6.39 or higher
OEL 6.5 (UEK3) kernel version 3.8.13 or higher
OEL 7.0 kernel version 3.8.13 or higher
SLE11 kernel version 3.0-x
SLE12 kernel version 3.12-x
OES11 kernel version 3.0-x
Ubuntu 14.0.4 LTS kernel version 3.13 or higher
Ubuntu 12.0.4 LTS kernel version 3.2 or higher
Debian 7 kernel version 3.2 or higher
All of the available file systems for a given Linux distribution may not support hole punching.
How Page Compression Works
When a page is written, it is compressed using the specified compression algorithm. The compressed data is written to disk, where the hole punching mechanism releases empty blocks from the end of the page. If compression fails, data is written out as-is.
Hole Punch Size on Linux
On Linux systems, the file system block size is the unit size used
for hole punching. Therefore, page compression only works if page
data can be compressed to a size that is less than or equal to the
InnoDB page size minus the file system block
size. For example, if
innodb_page_size=16K and the file
system block size is 4K, page data must compress to less than or
equal to 12K to make hole punching possible.
Hole Punch Size on Windows
On Windows systems, the underlying infrastructure for sparse files is based on NTFS compression. Hole punching size is the NTFS compression unit, which is 16 times the NTFS cluster size. Cluster sizes and their compression units are shown in the following table:
Table 15.14 Windows NTFS Cluster Size and Compression Units
| Cluster Size | Compression Unit |
|---|---|
| 512 Bytes | 8 KB |
| 1 KB | 16 KB |
| 2 KB | 32 KB |
| 4 KB | 64 KB |
Page compression on Windows systems only works if page data can be
compressed to a size that is less than or equal to the
InnoDB page size minus the compression unit
size.
The default NTFS cluster size is 4KB, for which the compression
unit size is 64KB. This means that page compression has no benefit
for an out-of-the box Windows NTFS configuration, as the maximum
innodb_page_size is also 64KB.
For page compression to work on Windows, the file system must be
created with a cluster size smaller than 4K, and the
innodb_page_size must be at least
twice the size of the compression unit. For example, for page
compression to work on Windows, you could build the file system
with a cluster size of 512 Bytes (which has a compression unit of
8KB) and initialize InnoDB with an
innodb_page_size value of 16K or
greater.
Enabling Page Compression
To enable page compression, specify the
COMPRESSION attribute in the
CREATE TABLE statement. For
example:
CREATE TABLE t1 (c1 INT) COMPRESSION="zlib";
You can also enable page compression in an
ALTER TABLE statement. However,
ALTER TABLE ...
COMPRESSION only updates the tablespace compression
attribute. Writes to the tablespace that occur after setting the
new compression algorithm use the new setting, but to apply the
new compression algorithm to existing pages, you must rebuild the
table using OPTIMIZE TABLE.
ALTER TABLE t1 COMPRESSION="zlib"; OPTIMIZE TABLE t1;
Disabling Page Compression
To disable page compression, set
COMPRESSION=None using
ALTER TABLE. Writes to the
tablespace that occur after setting
COMPRESSION=None no longer use page
compression. To uncompress existing pages, you must rebuild the
table using OPTIMIZE TABLE after
setting COMPRESSION=None.
ALTER TABLE t1 COMPRESSION="None"; OPTIMIZE TABLE t1;
Page Compression Metadata
Page compression metadata is found in the
INFORMATION_SCHEMA.INNODB_TABLESPACES
table, in the following columns:
FS_BLOCK_SIZE: The file system block size, which is the unit size used for hole punching.FILE_SIZE: The apparent size of the file, which represents the maximum size of the file, uncompressed.ALLOCATED_SIZE: The actual size of the file, which is the amount of space allocated on disk.
On Unix-like systems, ls -l
shows
the apparent file size (equivalent to
tablespace_name.ibdFILE_SIZE) in bytes. To view the actual
amount of space allocated on disk (equivalent to
ALLOCATED_SIZE), use du
--block-size=1
. The
tablespace_name.ibd--block-size=1 option prints the allocated
space in bytes instead of blocks, so that it can be compared to
ls -l output.
Use SHOW CREATE TABLE to view the
current page compression setting (Zlib,
Lz4, or None). A table may
contain a mix of pages with different compression settings.
In the following example, page compression metadata for the
employees table is retrieved from the
INFORMATION_SCHEMA.INNODB_TABLESPACES
table.
# Create the employees table with Zlib page compression
CREATE TABLE employees (
emp_no INT NOT NULL,
birth_date DATE NOT NULL,
first_name VARCHAR(14) NOT NULL,
last_name VARCHAR(16) NOT NULL,
gender ENUM ('M','F') NOT NULL,
hire_date DATE NOT NULL,
PRIMARY KEY (emp_no)
) COMPRESSION="zlib";
# Insert data (not shown)
# Query page compression metadata in INFORMATION_SCHEMA.INNODB_TABLESPACES
mysql> SELECT SPACE, NAME, FS_BLOCK_SIZE, FILE_SIZE, ALLOCATED_SIZE FROM
INFORMATION_SCHEMA.INNODB_TABLESPACES WHERE NAME='employees/employees'\G
*************************** 1. row ***************************
SPACE: 45
NAME: employees/employees
FS_BLOCK_SIZE: 4096
FILE_SIZE: 23068672
ALLOCATED_SIZE: 19415040
Page compression metadata for the employees table shows that the apparent file size is 23068672 bytes while the actual file size (with page compression) is 19415040 bytes. The file system block size is 4096 bytes, which is the block size used for hole punching.
Identifying Tables Using Page Compression
To identify tables for which page compression is enabled, you can
query the INFORMATION_SCHEMA.TABLES
CREATE_OPTIONS column for tables defined with
the COMPRESSION attribute:
mysql>SELECT TABLE_NAME, TABLE_SCHEMA, CREATE_OPTIONS FROM INFORMATION_SCHEMA.TABLESWHERE CREATE_OPTIONS LIKE '%COMPRESSION=%';+------------+--------------+--------------------+ | TABLE_NAME | TABLE_SCHEMA | CREATE_OPTIONS | +------------+--------------+--------------------+ | employees | test | COMPRESSION="zlib" | +------------+--------------+--------------------+
SHOW CREATE TABLE also shows the
COMPRESSION attribute, if used.
Page Compression Limitations and Usage Notes
Page compression is disabled if the file system block size (or compression unit size on Windows) * 2 >
innodb_page_size.Page compression is not supported for tables that reside in shared tablespaces, which include the system tablespace, temporary tablespaces, and general tablespaces.
Page compression is not supported for undo log tablespaces.
Page compression is not supported for redo log pages.
R-tree pages, which are used for spatial indexes, are not compressed.
Pages that belong to compressed tables (
ROW_FORMAT=COMPRESSED) are left as-is.During recovery, updated pages are written out in an uncompressed form.
Loading a page-compressed tablespace on a server that does not support the compression algorithm that was used causes an I/O error.
Before downgrading to an earlier version of MySQL that does not support page compression, uncompress the tables that use the page compression feature. To uncompress a table, run
ALTER TABLE ... COMPRESSION=NoneandOPTIMIZE TABLE.Page-compressed tablespaces can be copied between Linux and Windows servers if the compression algorithm that was used is available on both servers.
Preserving page compression when moving a page-compressed tablespace file from one host to another requires a utility that preserves sparse files.
Better page compression may be achieved on Fusion-io hardware with NVMFS than on other platforms, as NVMFS is designed to take advantage of punch hole functionality.
Using the page compression feature with a large
InnoDBpage size and relatively small file system block size could result in write amplification. For example, a maximumInnoDBpage size of 64KB with a 4KB file system block size may improve compression but may also increase demand on the buffer pool, leading to increased I/O and potential write amplification.
The row format of a table determines how its rows are physically stored, which in turn can affect the performance of queries and DML operations. As more rows fit into a single disk page, queries and index lookups can work faster, less cache memory is required in the buffer pool, and less I/O is required to write out updated values.
The data in each table is divided into pages. The pages that make up each table are arranged in a tree data structure called a B-tree index. Table data and secondary indexes both use this type of structure. The B-tree index that represents an entire table is known as the clustered index, which is organized according to the primary key columns. The nodes of a clustered index data structure contain the values of all columns in the row. The nodes of a secondary index structure contain the values of index columns and primary key columns.
Variable-length columns are an exception to the rule that column values are stored in B-tree index nodes. Variable-length columns that are too long to fit on a B-tree page are stored on separately allocated disk pages called overflow pages. Such columns are referred to as off-page columns. The values of off-page columns are stored in singly-linked lists of overflow pages, with each such column having its own list of one or more overflow pages. Depending on column length, all or a prefix of variable-length column values are stored in the B-tree to avoid wasting storage and having to read a separate page.
The InnoDB storage engine supports four row
formats: REDUNDANT, COMPACT,
DYNAMIC, and COMPRESSED.
Table 15.15 InnoDB Row Format Overview
| Row Format | Compact Storage Characteristics | Enhanced Variable-Length Column Storage | Large Index Key Prefix Support | Compression Support | Supported Tablespace Types |
|---|---|---|---|---|---|
REDUNDANT |
No | No | No | No | system, file-per-table, general |
COMPACT |
Yes | No | No | No | system, file-per-table, general |
DYNAMIC |
Yes | Yes | Yes | No | system, file-per-table, general |
COMPRESSED |
Yes | Yes | Yes | Yes | file-per-table, general |
The topics that follow describe row format storage characteristics and how to define and determine the row format of a table.
The REDUNDANT format provides compatibility
with older versions of MySQL.
Tables that use the REDUNDANT row format store
the first 768 bytes of variable-length column values
(VARCHAR,
VARBINARY, and
BLOB and
TEXT types) in the index record
within the B-tree node, with the remainder stored on overflow
pages. Fixed-length columns greater than or equal to 768 bytes are
encoded as variable-length columns, which can be stored off-page.
For example, a CHAR(255) column can exceed 768
bytes if the maximum byte length of the character set is greater
than 3, as it is with utf8mb4.
If the value of a column is 768 bytes or less, an overflow page is
not used, and some savings in I/O may result, since the value is
stored entirely in the B-tree node. This works well for relatively
short BLOB column values, but may cause B-tree
nodes to fill with data rather than key values, reducing their
efficiency. Tables with many BLOB columns could
cause B-tree nodes to become too full, and contain too few rows,
making the entire index less efficient than if rows were shorter
or column values were stored off-page.
REDUNDANT Row Format Storage Characteristics
The REDUNDANT row format has the following
storage characteristics:
Each index record contains a 6-byte header. The header is used to link together consecutive records, and for row-level locking.
Records in the clustered index contain fields for all user-defined columns. In addition, there is a 6-byte transaction ID field and a 7-byte roll pointer field.
If no primary key is defined for a table, each clustered index record also contains a 6-byte row ID field.
Each secondary index record contains all the primary key columns defined for the clustered index key that are not in the secondary index.
A record contains a pointer to each field of the record. If the total length of the fields in a record is less than 128 bytes, the pointer is one byte; otherwise, two bytes. The array of pointers is called the record directory. The area where the pointers point is the data part of the record.
Internally, fixed-length character columns such as
CHAR(10)in stored in fixed-length format. Trailing spaces are not truncated fromVARCHARcolumns.Fixed-length columns greater than or equal to 768 bytes are encoded as variable-length columns, which can be stored off-page. For example, a
CHAR(255)column can exceed 768 bytes if the maximum byte length of the character set is greater than 3, as it is withutf8mb4.An SQL
NULLvalue reserves one or two bytes in the record directory. An SQLNULLvalue reserves zero bytes in the data part of the record if stored in a variable-length column. For a fixed-length column, the fixed length of the column is reserved in the data part of the record. Reserving fixed space forNULLvalues permits columns to be updated in place fromNULLto non-NULLvalues without causing index page fragmentation.
The COMPACT row format reduces row storage
space by about 20% compared to the REDUNDANT
row format, at the cost of increasing CPU use for some operations.
If your workload is a typical one that is limited by cache hit
rates and disk speed, COMPACT format is likely
to be faster. If the workload is limited by CPU speed, compact
format might be slower.
Tables that use the COMPACT row format store
the first 768 bytes of variable-length column values
(VARCHAR,
VARBINARY, and
BLOB and
TEXT types) in the index record
within the B-tree node, with
the remainder stored on overflow pages. Fixed-length columns
greater than or equal to 768 bytes are encoded as variable-length
columns, which can be stored off-page. For example, a
CHAR(255) column can exceed 768 bytes if the
maximum byte length of the character set is greater than 3, as it
is with utf8mb4.
If the value of a column is 768 bytes or less, an overflow page is
not used, and some savings in I/O may result, since the value is
stored entirely in the B-tree node. This works well for relatively
short BLOB column values, but may cause B-tree
nodes to fill with data rather than key values, reducing their
efficiency. Tables with many BLOB columns could
cause B-tree nodes to become too full, and contain too few rows,
making the entire index less efficient than if rows were shorter
or column values were stored off-page.
COMPACT Row Format Storage Characteristics
The COMPACT row format has the following
storage characteristics:
Each index record contains a 5-byte header that may be preceded by a variable-length header. The header is used to link together consecutive records, and for row-level locking.
The variable-length part of the record header contains a bit vector for indicating
NULLcolumns. If the number of columns in the index that can beNULLisN, the bit vector occupiesCEILING(bytes. (For example, if there are anywhere from 9 to 16 columns that can beN/8)NULL, the bit vector uses two bytes.) Columns that areNULLdo not occupy space other than the bit in this vector. The variable-length part of the header also contains the lengths of variable-length columns. Each length takes one or two bytes, depending on the maximum length of the column. If all columns in the index areNOT NULLand have a fixed length, the record header has no variable-length part.For each non-
NULLvariable-length field, the record header contains the length of the column in one or two bytes. Two bytes are only needed if part of the column is stored externally in overflow pages or the maximum length exceeds 255 bytes and the actual length exceeds 127 bytes. For an externally stored column, the 2-byte length indicates the length of the internally stored part plus the 20-byte pointer to the externally stored part. The internal part is 768 bytes, so the length is 768+20. The 20-byte pointer stores the true length of the column.The record header is followed by the data contents of non-
NULLcolumns.Records in the clustered index contain fields for all user-defined columns. In addition, there is a 6-byte transaction ID field and a 7-byte roll pointer field.
If no primary key is defined for a table, each clustered index record also contains a 6-byte row ID field.
Each secondary index record contains all the primary key columns defined for the clustered index key that are not in the secondary index. If any of the primary key columns are variable length, the record header for each secondary index has a variable-length part to record their lengths, even if the secondary index is defined on fixed-length columns.
Internally, for nonvariable-length character sets, fixed-length character columns such as
CHAR(10)are stored in a fixed-length format.Trailing spaces are not truncated from
VARCHARcolumns.Internally, for variable-length character sets such as
utf8mb3andutf8mb4,InnoDBattempts to storeCHAR(inN)Nbytes by trimming trailing spaces. If the byte length of aCHAR(column value exceedsN)Nbytes, trailing spaces are trimmed to a minimum of the column value byte length. The maximum length of aCHAR(column is the maximum character byte length ×N)N.A minimum of
Nbytes is reserved forCHAR(. Reserving the minimum spaceN)Nin many cases enables column updates to be done in place without causing index page fragmentation. By comparison,CHAR(columns occupy the maximum character byte length ×N)Nwhen using theREDUNDANTrow format.Fixed-length columns greater than or equal to 768 bytes are encoded as variable-length fields, which can be stored off-page. For example, a
CHAR(255)column can exceed 768 bytes if the maximum byte length of the character set is greater than 3, as it is withutf8mb4.
The DYNAMIC row format offers the same storage
characteristics as the COMPACT row format but
adds enhanced storage capabilities for long variable-length
columns and supports large index key prefixes.
When a table is created with
ROW_FORMAT=DYNAMIC, InnoDB
can store long variable-length column values (for
VARCHAR,
VARBINARY, and
BLOB and
TEXT types) fully off-page, with
the clustered index record containing only a 20-byte pointer to
the overflow page. Fixed-length fields greater than or equal to
768 bytes are encoded as variable-length fields. For example, a
CHAR(255) column can exceed 768 bytes if the
maximum byte length of the character set is greater than 3, as it
is with utf8mb4.
Whether columns are stored off-page depends on the page size and
the total size of the row. When a row is too long, the longest
columns are chosen for off-page storage until the clustered index
record fits on the B-tree page.
TEXT and
BLOB columns that are less than or
equal to 40 bytes are stored in line.
The DYNAMIC row format maintains the efficiency
of storing the entire row in the index node if it fits (as do the
COMPACT and REDUNDANT
formats), but the DYNAMIC row format avoids the
problem of filling B-tree nodes with a large number of data bytes
of long columns. The DYNAMIC row format is
based on the idea that if a portion of a long data value is stored
off-page, it is usually most efficient to store the entire value
off-page. With DYNAMIC format, shorter columns
are likely to remain in the B-tree node, minimizing the number of
overflow pages required for a given row.
The DYNAMIC row format supports index key
prefixes up to 3072 bytes.
Tables that use the DYNAMIC row format can be
stored in the system tablespace, file-per-table tablespaces, and
general tablespaces. To store DYNAMIC tables in
the system tablespace, either disable
innodb_file_per_table and use a
regular CREATE TABLE or ALTER
TABLE statement, or use the TABLESPACE [=]
innodb_system table option with CREATE
TABLE or ALTER TABLE. The
innodb_file_per_table variable is
not applicable to general tablespaces, nor is it applicable when
using the TABLESPACE [=] innodb_system table
option to store DYNAMIC tables in the system
tablespace.
DYNAMIC Row Format Storage Characteristics
The DYNAMIC row format is a variation of the
COMPACT row format. For storage
characteristics, see
COMPACT Row Format Storage Characteristics.
The COMPRESSED row format offers the same
storage characteristics and capabilities as the
DYNAMIC row format but adds support for table
and index data compression.
The COMPRESSED row format uses similar internal
details for off-page storage as the DYNAMIC row
format, with additional storage and performance considerations
from the table and index data being compressed and using smaller
page sizes. With the COMPRESSED row format, the
KEY_BLOCK_SIZE option controls how much column
data is stored in the clustered index, and how much is placed on
overflow pages. For more information about the
COMPRESSED row format, see
Section 15.9, “InnoDB Table and Page Compression”.
The COMPRESSED row format supports index key
prefixes up to 3072 bytes.
Tables that use the COMPRESSED row format can
be created in file-per-table tablespaces or general tablespaces.
The system tablespace does not support the
COMPRESSED row format. To store a
COMPRESSED table in a file-per-table
tablespace, the
innodb_file_per_table variable
must be enabled. The
innodb_file_per_table variable is
not applicable to general tablespaces. General tablespaces support
all row formats with the caveat that compressed and uncompressed
tables cannot coexist in the same general tablespace due to
different physical page sizes. For more information, see
Section 15.6.3.3, “General Tablespaces”.
Compressed Row Format Storage Characteristics
The COMPRESSED row format is a variation of the
COMPACT row format. For storage
characteristics, see
COMPACT Row Format Storage Characteristics.
The default row format for InnoDB tables is
defined by
innodb_default_row_format
variable, which has a default value of DYNAMIC.
The default row format is used when the
ROW_FORMAT table option is not defined
explicitly or when ROW_FORMAT=DEFAULT is
specified.
The row format of a table can be defined explicitly using the
ROW_FORMAT table option in a
CREATE TABLE or
ALTER TABLE statement. For example:
CREATE TABLE t1 (c1 INT) ROW_FORMAT=DYNAMIC;
An explicitly defined ROW_FORMAT setting
overrides the default row format. Specifying
ROW_FORMAT=DEFAULT is equivalent to using the
implicit default.
The innodb_default_row_format
variable can be set dynamically:
mysql> SET GLOBAL innodb_default_row_format=DYNAMIC;
Valid innodb_default_row_format
options include DYNAMIC,
COMPACT, and REDUNDANT. The
COMPRESSED row format, which is not supported
for use in the system tablespace, cannot be defined as the
default. It can only be specified explicitly in a
CREATE TABLE or
ALTER TABLE statement. Attempting
to set the
innodb_default_row_format
variable to COMPRESSED returns an error:
mysql> SET GLOBAL innodb_default_row_format=COMPRESSED;
ERROR 1231 (42000): Variable 'innodb_default_row_format'
can't be set to the value of 'COMPRESSED'
Newly created tables use the row format defined by the
innodb_default_row_format
variable when a ROW_FORMAT option is not
specified explicitly, or when
ROW_FORMAT=DEFAULT is used. For example, the
following CREATE TABLE statements
use the row format defined by the
innodb_default_row_format
variable.
CREATE TABLE t1 (c1 INT);
CREATE TABLE t2 (c1 INT) ROW_FORMAT=DEFAULT;
When a ROW_FORMAT option is not specified
explicitly, or when ROW_FORMAT=DEFAULT is used,
an operation that rebuilds a table silently changes the row format
of the table to the format defined by the
innodb_default_row_format
variable.
Table-rebuilding operations include ALTER
TABLE operations that use
ALGORITHM=COPY or
ALGORITHM=INPLACE where table rebuilding is
required. See Section 15.12.1, “Online DDL Operations” for
more information. OPTIMIZE TABLE is
also a table-rebuilding operation.
The following example demonstrates a table-rebuilding operation that silently changes the row format of a table created without an explicitly defined row format.
mysql>SELECT @@innodb_default_row_format;+-----------------------------+ | @@innodb_default_row_format | +-----------------------------+ | dynamic | +-----------------------------+ mysql>CREATE TABLE t1 (c1 INT);mysql>SELECT * FROM INFORMATION_SCHEMA.INNODB_TABLES WHERE NAME LIKE 'test/t1' \G*************************** 1. row *************************** TABLE_ID: 54 NAME: test/t1 FLAG: 33 N_COLS: 4 SPACE: 35 ROW_FORMAT: Dynamic ZIP_PAGE_SIZE: 0 SPACE_TYPE: Single mysql>SET GLOBAL innodb_default_row_format=COMPACT;mysql>ALTER TABLE t1 ADD COLUMN (c2 INT);mysql>SELECT * FROM INFORMATION_SCHEMA.INNODB_TABLES WHERE NAME LIKE 'test/t1' \G*************************** 1. row *************************** TABLE_ID: 55 NAME: test/t1 FLAG: 1 N_COLS: 5 SPACE: 36 ROW_FORMAT: Compact ZIP_PAGE_SIZE: 0 SPACE_TYPE: Single
Consider the following potential issues before changing the row
format of existing tables from REDUNDANT or
COMPACT to DYNAMIC.
The
REDUNDANTandCOMPACTrow formats support a maximum index key prefix length of 767 bytes whereasDYNAMICandCOMPRESSEDrow formats support an index key prefix length of 3072 bytes. In a replication environment, if theinnodb_default_row_formatvariable is set toDYNAMICon the source, and set toCOMPACTon the replica, the following DDL statement, which does not explicitly define a row format, succeeds on the source but fails on the replica:CREATE TABLE t1 (c1 INT PRIMARY KEY, c2 VARCHAR(5000), KEY i1(c2(3070)));
For related information, see Section 15.22, “InnoDB Limits”.
Importing a table that does not explicitly define a row format results in a schema mismatch error if the
innodb_default_row_formatsetting on the source server differs from the setting on the destination server. For more information, see Section 15.6.1.3, “Importing InnoDB Tables”.
To determine the row format of a table, use
SHOW TABLE STATUS:
mysql> SHOW TABLE STATUS IN test1\G
*************************** 1. row ***************************
Name: t1
Engine: InnoDB
Version: 10
Row_format: Dynamic
Rows: 0
Avg_row_length: 0
Data_length: 16384
Max_data_length: 0
Index_length: 16384
Data_free: 0
Auto_increment: 1
Create_time: 2016-09-14 16:29:38
Update_time: NULL
Check_time: NULL
Collation: utf8mb4_0900_ai_ci
Checksum: NULL
Create_options:
Comment:
Alternatively, query the
INFORMATION_SCHEMA.INNODB_TABLES
table:
mysql> SELECT NAME, ROW_FORMAT FROM INFORMATION_SCHEMA.INNODB_TABLES WHERE NAME='test1/t1';
+----------+------------+
| NAME | ROW_FORMAT |
+----------+------------+
| test1/t1 | Dynamic |
+----------+------------+
As a DBA, you must manage disk I/O to keep the I/O subsystem from
becoming saturated, and manage disk space to avoid filling up
storage devices. The ACID design
model requires a certain amount of I/O that might seem redundant,
but helps to ensure data reliability. Within these constraints,
InnoDB tries to optimize the database work and
the organization of disk files to minimize the amount of disk I/O.
Sometimes, I/O is postponed until the database is not busy, or until
everything needs to be brought to a consistent state, such as during
a database restart after a fast
shutdown.
This section discusses the main considerations for I/O and disk
space with the default kind of MySQL tables (also known as
InnoDB tables):
Controlling the amount of background I/O used to improve query performance.
Enabling or disabling features that provide extra durability at the expense of additional I/O.
Organizing tables into many small files, a few larger files, or a combination of both.
Balancing the size of redo log files against the I/O activity that occurs when the log files become full.
How to reorganize a table for optimal query performance.
InnoDB uses asynchronous disk I/O where
possible, by creating a number of threads to handle I/O
operations, while permitting other database operations to proceed
while the I/O is still in progress. On Linux and Windows
platforms, InnoDB uses the available OS and
library functions to perform “native” asynchronous
I/O. On other platforms, InnoDB still uses I/O
threads, but the threads may actually wait for I/O requests to
complete; this technique is known as “simulated”
asynchronous I/O.
If InnoDB can determine there is a high
probability that data might be needed soon, it performs
read-ahead operations to bring that data into the buffer pool so
that it is available in memory. Making a few large read requests
for contiguous data can be more efficient than making several
small, spread-out requests. There are two read-ahead heuristics
in InnoDB:
In sequential read-ahead, if
InnoDBnotices that the access pattern to a segment in the tablespace is sequential, it posts in advance a batch of reads of database pages to the I/O system.In random read-ahead, if
InnoDBnotices that some area in a tablespace seems to be in the process of being fully read into the buffer pool, it posts the remaining reads to the I/O system.
For information about configuring read-ahead heuristics, see Section 15.8.3.4, “Configuring InnoDB Buffer Pool Prefetching (Read-Ahead)”.
InnoDB uses a novel file flush technique
involving a structure called the
doublewrite
buffer, which is enabled by default in most cases
(innodb_doublewrite=ON). It
adds safety to recovery following an unexpected exit or power
outage, and improves performance on most varieties of Unix by
reducing the need for fsync() operations.
Before writing pages to a data file, InnoDB
first writes them to a storage area called the doublewrite
buffer. Only after the write and the flush to the doublewrite
buffer has completed does InnoDB write the
pages to their proper positions in the data file. If there is an
operating system, storage subsystem, or unexpected
mysqld process exit in the middle of a page
write (causing a torn page
condition), InnoDB can later find a good copy
of the page from the doublewrite buffer during recovery.
For more information about the doublewrite buffer, see Section 15.6.4, “Doublewrite Buffer”.
The data files that you define in the configuration file using the
innodb_data_file_path
configuration option form the InnoDB
system tablespace.
The files are logically concatenated to form the system
tablespace. There is no striping in use. You cannot define where
within the system tablespace your tables are allocated. In a newly
created system tablespace, InnoDB allocates
space starting from the first data file.
To avoid the issues that come with storing all tables and indexes
inside the system tablespace, you can enable the
innodb_file_per_table
configuration option (the default), which stores each newly
created table in a separate tablespace file (with extension
.ibd). For tables stored this way, there is
less fragmentation within the disk file, and when the table is
truncated, the space is returned to the operating system rather
than still being reserved by InnoDB within the system tablespace.
For more information, see
Section 15.6.3.2, “File-Per-Table Tablespaces”.
You can also store tables in
general
tablespaces. General tablespaces are shared tablespaces
created using CREATE TABLESPACE
syntax. They can be created outside of the MySQL data directory,
are capable of holding multiple tables, and support tables of all
row formats. For more information, see
Section 15.6.3.3, “General Tablespaces”.
Pages, Extents, Segments, and Tablespaces
Each tablespace consists of database
pages. Every tablespace in a
MySQL instance has the same page
size. By default, all tablespaces have a page size of 16KB;
you can reduce the page size to 8KB or 4KB by specifying the
innodb_page_size option when you
create the MySQL instance. You can also increase the page size to
32KB or 64KB. For more information, refer to the
innodb_page_size documentation.
The pages are grouped into
extents of size 1MB for pages
up to 16KB in size (64 consecutive 16KB pages, or 128 8KB pages,
or 256 4KB pages). For a page size of 32KB, extent size is 2MB.
For page size of 64KB, extent size is 4MB. The
“files” inside a tablespace are called
segments in
InnoDB. (These segments are different from the
rollback segment,
which actually contains many tablespace segments.)
When a segment grows inside the tablespace,
InnoDB allocates the first 32 pages to it one
at a time. After that, InnoDB starts to
allocate whole extents to the segment. InnoDB
can add up to 4 extents at a time to a large segment to ensure
good sequentiality of data.
Two segments are allocated for each index in
InnoDB. One is for nonleaf nodes of the
B-tree, the other is for the
leaf nodes. Keeping the leaf nodes contiguous on disk enables
better sequential I/O operations, because these leaf nodes contain
the actual table data.
Some pages in the tablespace contain bitmaps of other pages, and
therefore a few extents in an InnoDB tablespace
cannot be allocated to segments as a whole, but only as individual
pages.
When you ask for available free space in the tablespace by issuing
a SHOW TABLE STATUS statement,
InnoDB reports the extents that are definitely
free in the tablespace. InnoDB always reserves
some extents for cleanup and other internal purposes; these
reserved extents are not included in the free space.
When you delete data from a table, InnoDB
contracts the corresponding B-tree indexes. Whether the freed
space becomes available for other users depends on whether the
pattern of deletes frees individual pages or extents to the
tablespace. Dropping a table or deleting all rows from it is
guaranteed to release the space to other users, but remember that
deleted rows are physically removed only by the
purge operation, which happens
automatically some time after they are no longer needed for
transaction rollbacks or consistent reads. (See
Section 15.3, “InnoDB Multi-Versioning”.)
How Pages Relate to Table Rows
The maximum row length is slightly less than half a database page
for 4KB, 8KB, 16KB, and 32KB
innodb_page_size settings. For
example, the maximum row length is slightly less than 8KB for the
default 16KB InnoDB page size. For 64KB pages,
the maximum row length is slightly less than 16KB.
If a row does not exceed the maximum row length, all of it is stored locally within the page. If a row exceeds the maximum row length, variable-length columns are chosen for external off-page storage until the row fits within the maximum row length limit. External off-page storage for variable-length columns differs by row format:
COMPACT and REDUNDANT Row Formats
When a variable-length column is chosen for external off-page storage,
InnoDBstores the first 768 bytes locally in the row, and the rest externally into overflow pages. Each such column has its own list of overflow pages. The 768-byte prefix is accompanied by a 20-byte value that stores the true length of the column and points into the overflow list where the rest of the value is stored. See Section 15.10, “InnoDB Row Formats”.DYNAMIC and COMPRESSED Row Formats
When a variable-length column is chosen for external off-page storage,
InnoDBstores a 20-byte pointer locally in the row, and the rest externally into overflow pages. See Section 15.10, “InnoDB Row Formats”.
LONGBLOB and
LONGTEXT columns
must be less than 4GB, and the total row length, including
BLOB and
TEXT columns, must be less than
4GB.
Making your log files very large may reduce disk I/O during checkpointing. It often makes sense to set the total size of the log files as large as the buffer pool or even larger.
How Checkpoint Processing Works
InnoDB implements a
checkpoint mechanism known
as fuzzy
checkpointing. InnoDB flushes modified
database pages from the buffer pool in small batches. There is no
need to flush the buffer pool in one single batch, which would
disrupt processing of user SQL statements during the checkpointing
process.
During crash recovery,
InnoDB looks for a checkpoint label written to
the log files. It knows that all modifications to the database
before the label are present in the disk image of the database.
Then InnoDB scans the log files forward from
the checkpoint, applying the logged modifications to the database.
Random insertions into or deletions from a secondary index can cause the index to become fragmented. Fragmentation means that the physical ordering of the index pages on the disk is not close to the index ordering of the records on the pages, or that there are many unused pages in the 64-page blocks that were allocated to the index.
One symptom of fragmentation is that a table takes more space than
it “should” take. How much that is exactly, is
difficult to determine. All InnoDB data and
indexes are stored in B-trees,
and their fill factor may
vary from 50% to 100%. Another symptom of fragmentation is that a
table scan such as this takes more time than it
“should” take:
SELECT COUNT(*) FROM t WHERE non_indexed_column <> 12345;
The preceding query requires MySQL to perform a full table scan, the slowest type of query for a large table.
To speed up index scans, you can periodically perform a
“null” ALTER TABLE
operation, which causes MySQL to rebuild the table:
ALTER TABLE tbl_name ENGINE=INNODB
You can also use
ALTER TABLE
to perform a
“null” alter operation that rebuilds the table.
tbl_name FORCE
Both ALTER TABLE
and
tbl_name ENGINE=INNODBALTER TABLE
use
online DDL. For more
information, see Section 15.12, “InnoDB and Online DDL”.
tbl_name FORCE
Another way to perform a defragmentation operation is to use mysqldump to dump the table to a text file, drop the table, and reload it from the dump file.
If the insertions into an index are always ascending and records
are deleted only from the end, the InnoDB
filespace management algorithm guarantees that fragmentation in
the index does not occur.
To reclaim operating system disk space when
truncating an
InnoDB table, the table must be stored in its
own .ibd file. For a table to
be stored in its own .ibd
file, innodb_file_per_table must
enabled when the table is created. Additionally, there cannot be a
foreign key constraint
between the table being truncated and other tables, otherwise the
TRUNCATE TABLE operation fails. A foreign key
constraint between two columns in the same table, however, is
permitted.
When a table is truncated, it is dropped and re-created in a new
.ibd file, and the freed space is returned to
the operating system. This is in contrast to truncating
InnoDB tables that are stored within the
InnoDB
system tablespace
(tables created when innodb_file_per_table=OFF)
and tables stored in shared
general
tablespaces, where only InnoDB can use
the freed space after the table is truncated.
The ability to truncate tables and return disk space to the
operating system also means that
physical backups can
be smaller. Truncating tables that are stored in the system
tablespace (tables created when
innodb_file_per_table=OFF) or in a general
tablespace leaves blocks of unused space in the tablespace.
The online DDL feature provides support for instant and in-place table alterations and concurrent DML. Benefits of this feature include:
Improved responsiveness and availability in busy production environments, where making a table unavailable for minutes or hours is not practical.
For in-place operations, the ability to adjust the balance between performance and concurrency during DDL operations using the
LOCKclause. See The LOCK clause.Less disk space usage and I/O overhead than the table-copy method.
ALGORITHM=INSTANT support is available for
ADD COLUMN and other operations in MySQL
8.0.12.
Typically, you do not need to do anything special to enable online DDL. By default, MySQL performs the operation instantly or in place, as permitted, with as little locking as possible.
You can control aspects of a DDL operation using the
ALGORITHM and LOCK clauses of
the ALTER TABLE statement. These
clauses are placed at the end of the statement, separated from the
table and column specifications by commas. For example:
ALTER TABLEtbl_nameADD PRIMARY KEY (column), ALGORITHM=INPLACE, LOCK=NONE;
The LOCK clause may be used for operations that
are performed in place and is useful for fine-tuning the degree of
concurrent access to the table during operations. Only
LOCK=DEFAULT is supported for operations that are
performed instantly. The ALGORITHM clause is
primarily intended for performance comparisons and as a fallback to
the older table-copying behavior in case you encounter any issues.
For example:
To avoid accidentally making the table unavailable for reads, writes, or both, during an in-place
ALTER TABLEoperation, specify a clause on theALTER TABLEstatement such asLOCK=NONE(permit reads and writes) orLOCK=SHARED(permit reads). The operation halts immediately if the requested level of concurrency is not available.To compare performance between algorithms, run a statement with
ALGORITHM=INSTANT,ALGORITHM=INPLACEandALGORITHM=COPY. You can also run a statement with theold_alter_tableconfiguration option enabled to force the use ofALGORITHM=COPY.To avoid tying up the server with an
ALTER TABLEoperation that copies the table, includeALGORITHM=INSTANTorALGORITHM=INPLACE. The statement halts immediately if it cannot use the specified algorithm.
Online support details, syntax examples, and usage notes for DDL operations are provided under the following topics in this section.
The following table provides an overview of online DDL support for index operations. An asterisk indicates additional information, an exception, or a dependency. For details, see Syntax and Usage Notes.
Table 15.16 Online DDL Support for Index Operations
| Operation | Instant | In Place | Rebuilds Table | Permits Concurrent DML | Only Modifies Metadata |
|---|---|---|---|---|---|
| Creating or adding a secondary index | No | Yes | No | Yes | No |
| Dropping an index | No | Yes | No | Yes | Yes |
| Renaming an index | No | Yes | No | Yes | Yes |
Adding a FULLTEXT index |
No | Yes* | No* | No | No |
Adding a SPATIAL index |
No | Yes | No | No | No |
| Changing the index type | Yes | Yes | No | Yes | Yes |
Syntax and Usage Notes
Creating or adding a secondary index
CREATE INDEX
nameONtable(col_list);ALTER TABLE
tbl_nameADD INDEXname(col_list);The table remains available for read and write operations while the index is being created. The
CREATE INDEXstatement only finishes after all transactions that are accessing the table are completed, so that the initial state of the index reflects the most recent contents of the table.Online DDL support for adding secondary indexes means that you can generally speed the overall process of creating and loading a table and associated indexes by creating the table without secondary indexes, then adding secondary indexes after the data is loaded.
A newly created secondary index contains only the committed data in the table at the time the
CREATE INDEXorALTER TABLEstatement finishes executing. It does not contain any uncommitted values, old versions of values, or values marked for deletion but not yet removed from the old index.Some factors affect the performance, space usage, and semantics of this operation. For details, see Section 15.12.6, “Online DDL Limitations”.
Dropping an index
DROP INDEX
nameONtable;ALTER TABLE
tbl_nameDROP INDEXname;The table remains available for read and write operations while the index is being dropped. The
DROP INDEXstatement only finishes after all transactions that are accessing the table are completed, so that the initial state of the index reflects the most recent contents of the table.Renaming an index
ALTER TABLE
tbl_nameRENAME INDEXold_index_nameTOnew_index_name, ALGORITHM=INPLACE, LOCK=NONE;Adding a
FULLTEXTindexCREATE FULLTEXT INDEX
nameON table(column);Adding the first
FULLTEXTindex rebuilds the table if there is no user-definedFTS_DOC_IDcolumn. AdditionalFULLTEXTindexes may be added without rebuilding the table.Adding a
SPATIALindexCREATE TABLE geom (g GEOMETRY NOT NULL); ALTER TABLE geom ADD SPATIAL INDEX(g), ALGORITHM=INPLACE, LOCK=SHARED;
Changing the index type (
USING {BTREE | HASH})ALTER TABLE
tbl_nameDROP INDEX i1, ADD INDEX i1(key_part,...) USING BTREE, ALGORITHM=INSTANT;
The following table provides an overview of online DDL support for primary key operations. An asterisk indicates additional information, an exception, or a dependency. See Syntax and Usage Notes.
Table 15.17 Online DDL Support for Primary Key Operations
| Operation | Instant | In Place | Rebuilds Table | Permits Concurrent DML | Only Modifies Metadata |
|---|---|---|---|---|---|
| Adding a primary key | No | Yes* | Yes* | Yes | No |
| Dropping a primary key | No | No | Yes | No | No |
| Dropping a primary key and adding another | No | Yes | Yes | Yes | No |
Syntax and Usage Notes
Adding a primary key
ALTER TABLE
tbl_nameADD PRIMARY KEY (column), ALGORITHM=INPLACE, LOCK=NONE;Rebuilds the table in place. Data is reorganized substantially, making it an expensive operation.
ALGORITHM=INPLACEis not permitted under certain conditions if columns have to be converted toNOT NULL.Restructuring the clustered index always requires copying of table data. Thus, it is best to define the primary key when you create a table, rather than issuing
ALTER TABLE ... ADD PRIMARY KEYlater.When you create a
UNIQUEorPRIMARY KEYindex, MySQL must do some extra work. ForUNIQUEindexes, MySQL checks that the table contains no duplicate values for the key. For aPRIMARY KEYindex, MySQL also checks that none of thePRIMARY KEYcolumns contains aNULL.When you add a primary key using the
ALGORITHM=COPYclause, MySQL convertsNULLvalues in the associated columns to default values: 0 for numbers, an empty string for character-based columns and BLOBs, and 0000-00-00 00:00:00 forDATETIME. This is a non-standard behavior that Oracle recommends you not rely on. Adding a primary key usingALGORITHM=INPLACEis only permitted when theSQL_MODEsetting includes thestrict_trans_tablesorstrict_all_tablesflags; when theSQL_MODEsetting is strict,ALGORITHM=INPLACEis permitted, but the statement can still fail if the requested primary key columns containNULLvalues. TheALGORITHM=INPLACEbehavior is more standard-compliant.If you create a table without a primary key,
InnoDBchooses one for you, which can be the firstUNIQUEkey defined onNOT NULLcolumns, or a system-generated key. To avoid uncertainty and the potential space requirement for an extra hidden column, specify thePRIMARY KEYclause as part of theCREATE TABLEstatement.MySQL creates a new clustered index by copying the existing data from the original table to a temporary table that has the desired index structure. Once the data is completely copied to the temporary table, the original table is renamed with a different temporary table name. The temporary table comprising the new clustered index is renamed with the name of the original table, and the original table is dropped from the database.
The online performance enhancements that apply to operations on secondary indexes do not apply to the primary key index. The rows of an InnoDB table are stored in a clustered index organized based on the primary key, forming what some database systems call an “index-organized table”. Because the table structure is closely tied to the primary key, redefining the primary key still requires copying the data.
When an operation on the primary key uses
ALGORITHM=INPLACE, even though the data is still copied, it is more efficient than usingALGORITHM=COPYbecause:No undo logging or associated redo logging is required for
ALGORITHM=INPLACE. These operations add overhead to DDL statements that useALGORITHM=COPY.The secondary index entries are pre-sorted, and so can be loaded in order.
The change buffer is not used, because there are no random-access inserts into the secondary indexes.
Dropping a primary key
ALTER TABLE
tbl_nameDROP PRIMARY KEY, ALGORITHM=COPY;Only
ALGORITHM=COPYsupports dropping a primary key without adding a new one in the sameALTER TABLEstatement.Dropping a primary key and adding another
ALTER TABLE
tbl_nameDROP PRIMARY KEY, ADD PRIMARY KEY (column), ALGORITHM=INPLACE, LOCK=NONE;Data is reorganized substantially, making it an expensive operation.
The following table provides an overview of online DDL support for column operations. An asterisk indicates additional information, an exception, or a dependency. For details, see Syntax and Usage Notes.
Table 15.18 Online DDL Support for Column Operations
| Operation | Instant | In Place | Rebuilds Table | Permits Concurrent DML | Only Modifies Metadata |
|---|---|---|---|---|---|
| Adding a column | Yes* | Yes | No* | Yes* | No |
| Dropping a column | No | Yes | Yes | Yes | No |
| Renaming a column | No | Yes | No | Yes* | Yes |
| Reordering columns | No | Yes | Yes | Yes | No |
| Setting a column default value | Yes | Yes | No | Yes | Yes |
| Changing the column data type | No | No | Yes | No | No |
Extending VARCHAR column size |
No | Yes | No | Yes | Yes |
| Dropping the column default value | Yes | Yes | No | Yes | Yes |
| Changing the auto-increment value | No | Yes | No | Yes | No* |
Making a column NULL |
No | Yes | Yes* | Yes | No |
Making a column NOT NULL |
No | Yes* | Yes* | Yes | No |
Modifying the definition of an ENUM or
SET column |
Yes | Yes | No | Yes | Yes |
Syntax and Usage Notes
Adding a column
ALTER TABLE
tbl_nameADD COLUMNcolumn_namecolumn_definition, ALGORITHM=INSTANT;The following limitations apply when the
INSTANTalgorithm is used to add a column:Adding a column cannot be combined in the same statement with other
ALTER TABLEactions that do not supportALGORITHM=INSTANT.A column can only be added as the last column of the table. Adding a column to any other position among other columns is not supported.
Columns cannot be added to tables that use
ROW_FORMAT=COMPRESSED.Columns cannot be added to tables that include a
FULLTEXTindex.Columns cannot be added to temporary tables. Temporary tables only support
ALGORITHM=COPY.Columns cannot be added to tables that reside in the data dictionary tablespace.
Row size limits are not evaluated when adding a column. However, row size limits are checked during DML operations that insert and update rows in the table.
Multiple columns may be added in the same
ALTER TABLEstatement. For example:ALTER TABLE t1 ADD COLUMN c2 INT, ADD COLUMN c3 INT, ALGORITHM=INSTANT;
INFORMATION_SCHEMA.INNODB_TABLESandINFORMATION_SCHEMA.INNODB_COLUMNSprovide metadata for instantly added columns.INFORMATION_SCHEMA.INNODB_TABLES.INSTANT_COLSshows number of columns in the table prior to adding the first instant column.INFORMATION_SCHEMA.INNODB_COLUMNS.HAS_DEFAULTandDEFAULT_VALUEprovide metadata about default values for instantly added columns.Concurrent DML is not permitted when adding an auto-increment column. Data is reorganized substantially, making it an expensive operation. At a minimum,
ALGORITHM=INPLACE, LOCK=SHAREDis required.The table is rebuilt if
ALGORITHM=INPLACEis used to add a column.Dropping a column
ALTER TABLE
tbl_nameDROP COLUMNcolumn_name, ALGORITHM=INPLACE, LOCK=NONE;Data is reorganized substantially, making it an expensive operation.
Renaming a column
ALTER TABLE
tblCHANGEold_col_namenew_col_namedata_type, ALGORITHM=INPLACE, LOCK=NONE;To permit concurrent DML, keep the same data type and only change the column name.
When you keep the same data type and
[NOT] NULLattribute, only changing the column name, the operation can always be performed online.You can also rename a column that is part of a foreign key constraint. The foreign key definition is automatically updated to use the new column name. Renaming a column participating in a foreign key only works with
ALGORITHM=INPLACE. If you use theALGORITHM=COPYclause, or some other condition causes the command to useALGORITHM=COPYbehind the scenes, theALTER TABLEstatement fails.ALGORITHM=INPLACEis not supported for renaming a generated column.Reordering columns
To reorder columns, use
FIRSTorAFTERinCHANGEorMODIFYoperations.ALTER TABLE
tbl_nameMODIFY COLUMNcol_namecolumn_definitionFIRST, ALGORITHM=INPLACE, LOCK=NONE;Data is reorganized substantially, making it an expensive operation.
Changing the column data type
ALTER TABLE
tbl_nameCHANGE c1 c1 BIGINT, ALGORITHM=COPY;Changing the column data type is only supported with
ALGORITHM=COPY.Extending
VARCHARcolumn sizeALTER TABLE
tbl_nameCHANGE COLUMN c1 c1 VARCHAR(255), ALGORITHM=INPLACE, LOCK=NONE;The number of length bytes required by a
VARCHARcolumn must remain the same. ForVARCHARcolumns of 0 to 255 bytes in size, one length byte is required to encode the value. ForVARCHARcolumns of 256 bytes in size or more, two length bytes are required. As a result, in-placeALTER TABLEonly supports increasingVARCHARcolumn size from 0 to 255 bytes, or from 256 bytes to a greater size. In-placeALTER TABLEdoes not support increasing the size of aVARCHARcolumn from less than 256 bytes to a size equal to or greater than 256 bytes. In this case, the number of required length bytes changes from 1 to 2, which is only supported by a table copy (ALGORITHM=COPY). For example, attempting to changeVARCHARcolumn size for a single byte character set from VARCHAR(255) to VARCHAR(256) using in-placeALTER TABLEreturns this error:ALTER TABLE
tbl_nameALGORITHM=INPLACE, CHANGE COLUMN c1 c1 VARCHAR(256); ERROR 0A000: ALGORITHM=INPLACE is not supported. Reason: Cannot change column type INPLACE. Try ALGORITHM=COPY.NoteThe byte length of a
VARCHARcolumn is dependant on the byte length of the character set.Decreasing
VARCHARsize using in-placeALTER TABLEis not supported. DecreasingVARCHARsize requires a table copy (ALGORITHM=COPY).Setting a column default value
ALTER TABLE
tbl_nameALTER COLUMNcolSET DEFAULTliteral, ALGORITHM=INSTANT;Only modifies table metadata. Default column values are stored in the data dictionary.
Dropping a column default value
ALTER TABLE
tblALTER COLUMNcolDROP DEFAULT, ALGORITHM=INSTANT;Changing the auto-increment value
ALTER TABLE
tableAUTO_INCREMENT=next_value, ALGORITHM=INPLACE, LOCK=NONE;Modifies a value stored in memory, not the data file.
In a distributed system using replication or sharding, you sometimes reset the auto-increment counter for a table to a specific value. The next row inserted into the table uses the specified value for its auto-increment column. You might also use this technique in a data warehousing environment where you periodically empty all the tables and reload them, and restart the auto-increment sequence from 1.
Making a column
NULLALTER TABLE tbl_name MODIFY COLUMN
column_namedata_typeNULL, ALGORITHM=INPLACE, LOCK=NONE;Rebuilds the table in place. Data is reorganized substantially, making it an expensive operation.
Making a column
NOT NULLALTER TABLE
tbl_nameMODIFY COLUMNcolumn_namedata_typeNOT NULL, ALGORITHM=INPLACE, LOCK=NONE;Rebuilds the table in place.
STRICT_ALL_TABLESorSTRICT_TRANS_TABLESSQL_MODEis required for the operation to succeed. The operation fails if the column contains NULL values. The server prohibits changes to foreign key columns that have the potential to cause loss of referential integrity. See Section 13.1.9, “ALTER TABLE Statement”. Data is reorganized substantially, making it an expensive operation.Modifying the definition of an
ENUMorSETcolumnCREATE TABLE t1 (c1 ENUM('a', 'b', 'c')); ALTER TABLE t1 MODIFY COLUMN c1 ENUM('a', 'b', 'c', 'd'), ALGORITHM=INSTANT;Modifying the definition of an
ENUMorSETcolumn by adding new enumeration or set members to the end of the list of valid member values may be performed instantly or in place, as long as the storage size of the data type does not change. For example, adding a member to aSETcolumn that has 8 members changes the required storage per value from 1 byte to 2 bytes; this requires a table copy. Adding members in the middle of the list causes renumbering of existing members, which requires a table copy.
The following table provides an overview of online DDL support for generated column operations. For details, see Syntax and Usage Notes.
Table 15.19 Online DDL Support for Generated Column Operations
| Operation | Instant | In Place | Rebuilds Table | Permits Concurrent DML | Only Modifies Metadata |
|---|---|---|---|---|---|
Adding a STORED column |
No | No | Yes | No | No |
Modifying STORED column order |
No | No | Yes | No | No |
Dropping a STORED column |
No | Yes | Yes | Yes | No |
Adding a VIRTUAL column |
Yes | Yes | No | Yes | Yes |
Modifying VIRTUAL column order |
No | No | Yes | No | No |
Dropping a VIRTUAL column |
Yes | Yes | No | Yes | Yes |
Syntax and Usage Notes
Adding a
STOREDcolumnALTER TABLE t1 ADD COLUMN (c2 INT GENERATED ALWAYS AS (c1 + 1) STORED), ALGORITHM=COPY;
ADD COLUMNis not an in-place operation for stored columns (done without using a temporary table) because the expression must be evaluated by the server.Modifying
STOREDcolumn orderALTER TABLE t1 MODIFY COLUMN c2 INT GENERATED ALWAYS AS (c1 + 1) STORED FIRST, ALGORITHM=COPY;
Rebuilds the table in place.
Dropping a
STOREDcolumnALTER TABLE t1 DROP COLUMN c2, ALGORITHM=INPLACE, LOCK=NONE;
Rebuilds the table in place.
Adding a
VIRTUALcolumnALTER TABLE t1 ADD COLUMN (c2 INT GENERATED ALWAYS AS (c1 + 1) VIRTUAL), ALGORITHM=INSTANT;
Adding a virtual column can be performed instantly or in place for non-partitioned tables.
Adding a
VIRTUALis not an in-place operation for partitioned tables.Modifying
VIRTUALcolumn orderALTER TABLE t1 MODIFY COLUMN c2 INT GENERATED ALWAYS AS (c1 + 1) VIRTUAL FIRST, ALGORITHM=COPY;
Dropping a
VIRTUALcolumnALTER TABLE t1 DROP COLUMN c2, ALGORITHM=INSTANT;
Dropping a
VIRTUALcolumn can be performed instantly or in place for non-partitioned tables.
The following table provides an overview of online DDL support for foreign key operations. An asterisk indicates additional information, an exception, or a dependency. For details, see Syntax and Usage Notes.
Table 15.20 Online DDL Support for Foreign Key Operations
| Operation | Instant | In Place | Rebuilds Table | Permits Concurrent DML | Only Modifies Metadata |
|---|---|---|---|---|---|
| Adding a foreign key constraint | No | Yes* | No | Yes | Yes |
| Dropping a foreign key constraint | No | Yes | No | Yes | Yes |
Syntax and Usage Notes
Adding a foreign key constraint
The
INPLACEalgorithm is supported whenforeign_key_checksis disabled. Otherwise, only theCOPYalgorithm is supported.ALTER TABLE
tbl1ADD CONSTRAINTfk_nameFOREIGN KEYindex(col1) REFERENCEStbl2(col2)referential_actions;Dropping a foreign key constraint
ALTER TABLE
tblDROP FOREIGN KEYfk_name;Dropping a foreign key can be performed online with the
foreign_key_checksoption enabled or disabled.If you do not know the names of the foreign key constraints on a particular table, issue the following statement and find the constraint name in the
CONSTRAINTclause for each foreign key:SHOW CREATE TABLE
table\GOr, query the
INFORMATION_SCHEMA.TABLE_CONSTRAINTStable and use theCONSTRAINT_NAMEandCONSTRAINT_TYPEcolumns to identify the foreign key names.You can also drop a foreign key and its associated index in a single statement:
ALTER TABLE
tableDROP FOREIGN KEYconstraint, DROP INDEXindex;
If foreign keys are
already present in the table being altered (that is, it is a
child table containing
a FOREIGN KEY ... REFERENCE clause),
additional restrictions apply to online DDL operations, even
those not directly involving the foreign key columns:
An
ALTER TABLEon the child table could wait for another transaction to commit, if a change to the parent table causes associated changes in the child table through anON UPDATEorON DELETEclause using theCASCADEorSET NULLparameters.In the same way, if a table is the parent table in a foreign key relationship, even though it does not contain any
FOREIGN KEYclauses, it could wait for theALTER TABLEto complete if anINSERT,UPDATE, orDELETEstatement causes anON UPDATEorON DELETEaction in the child table.
The following table provides an overview of online DDL support for table operations. An asterisk indicates additional information, an exception, or a dependency. For details, see Syntax and Usage Notes.
Table 15.21 Online DDL Support for Table Operations
| Operation | Instant | In Place | Rebuilds Table | Permits Concurrent DML | Only Modifies Metadata |
|---|---|---|---|---|---|
Changing the ROW_FORMAT |
No | Yes | Yes | Yes | No |
Changing the KEY_BLOCK_SIZE |
No | Yes | Yes | Yes | No |
| Setting persistent table statistics | No | Yes | No | Yes | Yes |
| Specifying a character set | No | Yes | Yes* | No | No |
| Converting a character set | No | No | Yes* | No | No |
| Optimizing a table | No | Yes* | Yes | Yes | No |
Rebuilding with the FORCE option |
No | Yes* | Yes | Yes | No |
| Performing a null rebuild | No | Yes* | Yes | Yes | No |
| Renaming a table | Yes | Yes | No | Yes | Yes |
Syntax and Usage Notes
Changing the
ROW_FORMATALTER TABLE
tbl_nameROW_FORMAT =row_format, ALGORITHM=INPLACE, LOCK=NONE;Data is reorganized substantially, making it an expensive operation.
For additional information about the
ROW_FORMAToption, see Table Options.Changing the
KEY_BLOCK_SIZEALTER TABLE
tbl_nameKEY_BLOCK_SIZE =value, ALGORITHM=INPLACE, LOCK=NONE;Data is reorganized substantially, making it an expensive operation.
For additional information about the
KEY_BLOCK_SIZEoption, see Table Options.Setting persistent table statistics options
ALTER TABLE
tbl_nameSTATS_PERSISTENT=0, STATS_SAMPLE_PAGES=20, STATS_AUTO_RECALC=1, ALGORITHM=INPLACE, LOCK=NONE;Only modifies table metadata.
Persistent statistics include
STATS_PERSISTENT,STATS_AUTO_RECALC, andSTATS_SAMPLE_PAGES. For more information, see Section 15.8.10.1, “Configuring Persistent Optimizer Statistics Parameters”.Specifying a character set
ALTER TABLE
tbl_nameCHARACTER SET =charset_name, ALGORITHM=INPLACE, LOCK=NONE;Rebuilds the table if the new character encoding is different.
Converting a character set
ALTER TABLE
tbl_nameCONVERT TO CHARACTER SETcharset_name, ALGORITHM=COPY;Rebuilds the table if the new character encoding is different.
Optimizing a table
OPTIMIZE TABLE
tbl_name;In-place operation is not supported for tables with
FULLTEXTindexes. The operation uses theINPLACEalgorithm, butALGORITHMandLOCKsyntax is not permitted.Rebuilding a table with the
FORCEoptionALTER TABLE
tbl_nameFORCE, ALGORITHM=INPLACE, LOCK=NONE;Uses
ALGORITHM=INPLACEas of MySQL 5.6.17.ALGORITHM=INPLACEis not supported for tables withFULLTEXTindexes.Performing a "null" rebuild
ALTER TABLE
tbl_nameENGINE=InnoDB, ALGORITHM=INPLACE, LOCK=NONE;Uses
ALGORITHM=INPLACEas of MySQL 5.6.17.ALGORITHM=INPLACEis not supported for tables withFULLTEXTindexes.Renaming a table
ALTER TABLE
old_tbl_nameRENAME TOnew_tbl_name, ALGORITHM=INSTANT;Renaming a table can be performed instantly or in place. MySQL renames files that correspond to the table
tbl_namewithout making a copy. (You can also use theRENAME TABLEstatement to rename tables. See Section 13.1.36, “RENAME TABLE Statement”.) Privileges granted specifically for the renamed table are not migrated to the new name. They must be changed manually.
The following table provides an overview of online DDL support for tablespace operations. For details, see Syntax and Usage Notes.
Table 15.22 Online DDL Support for Tablespace Operations
| Operation | Instant | In Place | Rebuilds Table | Permits Concurrent DML | Only Modifies Metadata |
|---|---|---|---|---|---|
| Renaming a general tablespace | No | Yes | No | Yes | Yes |
| Enabling or disabling general tablespace encryption | No | Yes | No | Yes | No |
| Enabling or disabling file-per-table tablespace encryption | No | No | Yes | No | No |
Syntax and Usage Notes
Renaming a general tablespace
ALTER TABLESPACE
tablespace_nameRENAME TOnew_tablespace_name;ALTER TABLESPACE ... RENAME TOuses theINPLACEalgorithm but does not support theALGORITHMclause.Enabling or disabling general tablespace encryption
ALTER TABLESPACE
tablespace_nameENCRYPTION='Y';ALTER TABLESPACE ... ENCRYPTIONuses theINPLACEalgorithm but does not support theALGORITHMclause.For related information, see Section 15.13, “InnoDB Data-at-Rest Encryption”.
Enabling or disabling file-per-table tablespace encryption
ALTER TABLE
tbl_nameENCRYPTION='Y', ALGORITHM=COPY;For related information, see Section 15.13, “InnoDB Data-at-Rest Encryption”.
With the exception of some ALTER
TABLE partitioning clauses, online DDL operations for
partitioned InnoDB tables follow the same
rules that apply to regular InnoDB tables.
Some ALTER TABLE partitioning
clauses do not go through the same internal online DDL API as
regular non-partitioned InnoDB tables. As a
result, online support for ALTER
TABLE partitioning clauses varies.
The following table shows the online status for each
ALTER TABLE partitioning statement.
Regardless of the online DDL API that is used, MySQL attempts to
minimize data copying and locking where possible.
ALTER TABLE partitioning options
that use ALGORITHM=COPY or that only permit
“ALGORITHM=DEFAULT,
LOCK=DEFAULT”, repartition the table using the
COPY algorithm. In other words, a new
partitioned table is created with the new partitioning scheme.
The newly created table includes any changes applied by the
ALTER TABLE statement, and table
data is copied into the new table structure.
Table 15.23 Online DDL Support for Partitioning Operations
| Partitioning Clause | Instant | In Place | Permits DML | Notes |
|---|---|---|---|---|
PARTITION BY |
No | No | No | Permits ALGORITHM=COPY,
LOCK={DEFAULT|SHARED|EXCLUSIVE} |
ADD PARTITION |
No | Yes* | Yes* | ALGORITHM=INPLACE,
LOCK={DEFAULT|NONE|SHARED|EXCLUSISVE} is
supported for RANGE and
LIST partitions,
ALGORITHM=INPLACE,
LOCK={DEFAULT|SHARED|EXCLUSISVE} for
HASH and KEY
partitions, and ALGORITHM=COPY,
LOCK={SHARED|EXCLUSIVE} for all partition types.
Does not copy existing data for tables partitioned by
RANGE or LIST.
Concurrent queries are permitted with
ALGORITHM=COPY for tables partitioned
by HASH or LIST, as
MySQL copies the data while holding a shared lock. |
DROP PARTITION |
No | Yes* | Yes* |
|
DISCARD PARTITION |
No | No | No | Only permits ALGORITHM=DEFAULT,
LOCK=DEFAULT |
IMPORT PARTITION |
No | No | No | Only permits ALGORITHM=DEFAULT,
LOCK=DEFAULT |
TRUNCATE
PARTITION |
No | Yes | Yes | Does not copy existing data. It merely deletes rows; it does not alter the definition of the table itself, or of any of its partitions. |
COALESCE
PARTITION |
No | Yes* | No | ALGORITHM=INPLACE, LOCK={DEFAULT|SHARED|EXCLUSIVE} is
supported. |
REORGANIZE
PARTITION |
No | Yes* | No | ALGORITHM=INPLACE, LOCK={DEFAULT|SHARED|EXCLUSIVE} is
supported. |
EXCHANGE
PARTITION |
No | Yes | Yes | |
ANALYZE PARTITION |
No | Yes | Yes | |
CHECK PARTITION |
No | Yes | Yes | |
OPTIMIZE
PARTITION |
No | No | No | ALGORITHM and LOCK clauses are
ignored. Rebuilds the entire table. See
Section 24.3.4, “Maintenance of Partitions”. |
REBUILD PARTITION |
No | Yes* | No | ALGORITHM=INPLACE, LOCK={DEFAULT|SHARED|EXCLUSIVE} is
supported. |
REPAIR PARTITION |
No | Yes | Yes | |
REMOVE
PARTITIONING |
No | No | No | Permits ALGORITHM=COPY,
LOCK={DEFAULT|SHARED|EXCLUSIVE} |
Non-partitioning online ALTER
TABLE operations on partitioned tables follow the same
rules that apply to regular tables. However,
ALTER TABLE performs online
operations on each table partition, which causes increased
demand on system resources due to operations being performed on
multiple partitions.
For additional information about ALTER
TABLE partitioning clauses, see
Partitioning Options, and
Section 13.1.9.1, “ALTER TABLE Partition Operations”. For
information about partitioning in general, see
Chapter 24, Partitioning.
Online DDL improves several aspects of MySQL operation:
Applications that access the table are more responsive because queries and DML operations on the table can proceed while the DDL operation is in progress. Reduced locking and waiting for MySQL server resources leads to greater scalability, even for operations that are not involved in the DDL operation.
Instant operations only modify metadata in the data dictionary. No metadata locks are taken on the table, and table data is unaffected, making operations instantaneous. Concurrent DML is unaffected.
Online operations avoid the disk I/O and CPU cycles associated with the table-copy method, which minimizes overall load on the database. Minimizing load helps maintain good performance and high throughput during the DDL operation.
Online operations read less data into the buffer pool than table-copy operations, which reduces purging of frequently accessed data from memory. Purging of frequently accessed data can cause a temporary performance dip after a DDL operation.
By default, MySQL uses as little locking as possible during a
DDL operation. The LOCK clause can be
specified for in-place operations and some copy operations to
enforce more restrictive locking, if required. If the
LOCK clause specifies a less restrictive
level of locking than is permitted for a particular DDL
operation, the statement fails with an error.
LOCK clauses are described below, in order of
least to most restrictive:
LOCK=NONE:Permits concurrent queries and DML.
For example, use this clause for tables involving customer signups or purchases, to avoid making the tables unavailable during lengthy DDL operations.
LOCK=SHARED:Permits concurrent queries but blocks DML.
For example, use this clause on data warehouse tables, where you can delay data load operations until the DDL operation is finished, but queries cannot be delayed for long periods.
LOCK=DEFAULT:Permits as much concurrency as possible (concurrent queries, DML, or both). Omitting the
LOCKclause is the same as specifyingLOCK=DEFAULT.Use this clause when you do not expect the default locking level of the DDL statement to cause any availability problems for the table.
LOCK=EXCLUSIVE:Blocks concurrent queries and DML.
Use this clause if the primary concern is finishing the DDL operation in the shortest amount of time possible, and concurrent query and DML access is not necessary. You might also use this clause if the server is supposed to be idle, to avoid unexpected table accesses.
Online DDL operations can be viewed as having three phases:
Phase 1: Initialization
In the initialization phase, the server determines how much concurrency is permitted during the operation, taking into account storage engine capabilities, operations specified in the statement, and user-specified
ALGORITHMandLOCKoptions. During this phase, a shared upgradeable metadata lock is taken to protect the current table definition.Phase 2: Execution
In this phase, the statement is prepared and executed. Whether the metadata lock is upgraded to exclusive depends on the factors assessed in the initialization phase. If an exclusive metadata lock is required, it is only taken briefly during statement preparation.
Phase 3: Commit Table Definition
In the commit table definition phase, the metadata lock is upgraded to exclusive to evict the old table definition and commit the new one. Once granted, the duration of the exclusive metadata lock is brief.
Due to the exclusive metadata lock requirements outlined above, an online DDL operation may have to wait for concurrent transactions that hold metadata locks on the table to commit or rollback. Transactions started before or during the DDL operation can hold metadata locks on the table being altered. In the case of a long running or inactive transaction, an online DDL operation can time out waiting for an exclusive metadata lock. Additionally, a pending exclusive metadata lock requested by an online DDL operation blocks subsequent transactions on the table.
The following example demonstrates an online DDL operation waiting for an exclusive metadata lock, and how a pending metadata lock blocks subsequent transactions on the table.
Session 1:
mysql> CREATE TABLE t1 (c1 INT) ENGINE=InnoDB; mysql> START TRANSACTION; mysql> SELECT * FROM t1;
The session 1 SELECT statement
takes a shared metadata lock on table t1.
Session 2:
mysql> ALTER TABLE t1 ADD COLUMN x INT, ALGORITHM=INPLACE, LOCK=NONE;
The online DDL operation in session 2, which requires an exclusive metadata lock on table t1 to commit table definition changes, must wait for the session 1 transaction to commit or roll back.
Session 3:
mysql> SELECT * FROM t1;
The SELECT statement issued in
session 3 is blocked waiting for the exclusive metadata lock
requested by the ALTER TABLE
operation in session 2 to be granted.
You can use
SHOW FULL
PROCESSLIST to determine if transactions are waiting
for a metadata lock.
mysql> SHOW FULL PROCESSLIST\G
...
*************************** 2. row ***************************
Id: 5
User: root
Host: localhost
db: test
Command: Query
Time: 44
State: Waiting for table metadata lock
Info: ALTER TABLE t1 ADD COLUMN x INT, ALGORITHM=INPLACE, LOCK=NONE
...
*************************** 4. row ***************************
Id: 7
User: root
Host: localhost
db: test
Command: Query
Time: 5
State: Waiting for table metadata lock
Info: SELECT * FROM t1
4 rows in set (0.00 sec)
Metadata lock information is also exposed through the
Performance Schema metadata_locks
table, which provides information about metadata lock
dependencies between sessions, the metadata lock a session is
waiting for, and the session that currently holds the metadata
lock. For more information, see
Section 27.12.13.3, “The metadata_locks Table”.
The performance of a DDL operation is largely determined by whether the operation is performed instantly, in place, and whether it rebuilds the table.
To assess the relative performance of a DDL operation, you can
compare results using ALGORITHM=INSTANT,
ALGORITHM=INPLACE, and
ALGORITHM=COPY. A statement can also be run
with old_alter_table enabled to
force the use of ALGORITHM=COPY.
For DDL operations that modify table data, you can determine whether a DDL operation performs changes in place or performs a table copy by looking at the “rows affected” value displayed after the command finishes. For example:
Changing the default value of a column (fast, does not affect the table data):
Query OK, 0 rows affected (0.07 sec)
Adding an index (takes time, but
0 rows affectedshows that the table is not copied):Query OK, 0 rows affected (21.42 sec)
Changing the data type of a column (takes substantial time and requires rebuilding all the rows of the table):
Query OK, 1671168 rows affected (1 min 35.54 sec)
Before running a DDL operation on a large table, check whether the operation is fast or slow as follows:
Clone the table structure.
Populate the cloned table with a small amount of data.
Run the DDL operation on the cloned table.
Check whether the “rows affected” value is zero or not. A nonzero value means the operation copies table data, which might require special planning. For example, you might do the DDL operation during a period of scheduled downtime, or on each replica server one at a time.
For a greater understanding of the MySQL processing associated
with a DDL operation, examine Performance Schema and
INFORMATION_SCHEMA tables related to
InnoDB before and after DDL operations to
see the number of physical reads, writes, memory allocations,
and so on.
Performance Schema stage events can be used to monitor
ALTER TABLE progress. See
Section 15.16.1, “Monitoring ALTER TABLE Progress for InnoDB Tables Using Performance
Schema”.
Because there is some processing work involved with recording the changes made by concurrent DML operations, then applying those changes at the end, an online DDL operation could take longer overall than the table-copy mechanism that blocks table access from other sessions. The reduction in raw performance is balanced against better responsiveness for applications that use the table. When evaluating the techniques for changing table structure, consider end-user perception of performance, based on factors such as load times for web pages.
Space requirements for in-place online DDL operations are outlined below. Space requirements do not apply to operations that are performed instantly.
Space for temporary log files
A temporary log file records concurrent DML when an online DDL operation creates an index or alters a table. The temporary log file is extended as required by the value of
innodb_sort_buffer_sizeup to a maximum specified byinnodb_online_alter_log_max_size. If a temporary log file exceeds the size limit, the online DDL operation fails, and uncommitted concurrent DML operations are rolled back. A largeinnodb_online_alter_log_max_sizesetting permits more DML during an online DDL operation, but it also extends the period of time at the end of the DDL operation when the table is locked to apply logged DML.If the operation takes a long time and concurrent DML modifies the table so much that the size of the temporary log file exceeds the value of
innodb_online_alter_log_max_size, the online DDL operation fails with aDB_ONLINE_LOG_TOO_BIGerror.Space for temporary sort files
Online DDL operations that rebuild the table write temporary sort files to the MySQL temporary directory (
$TMPDIRon Unix,%TEMP%on Windows, or the directory specified by--tmpdir) during index creation. Temporary sort files are not created in the directory that contains the original table. Each temporary sort file is large enough to hold one column of data, and each sort file is removed when its data is merged into the final table or index. Operations involving temporary sort files may require temporary space equal to the amount of data in the table plus indexes. An error is reported if online DDL operation uses all of the available disk space on the file system where the data directory resides.If the MySQL temporary directory is not large enough to hold the sort files, set
tmpdirto a different directory. Alternatively, define a separate temporary directory for online DDL operations usinginnodb_tmpdir. This option was introduced to help avoid temporary directory overflows that could occur as a result of large temporary sort files.Space for an intermediate table file
Some online DDL operations that rebuild the table create a temporary intermediate table file in the same directory as the original table. An intermediate table file may require space equal to the size of the original table. Intermediate table file names begin with
#sql-ibprefix and only appear briefly during the online DDL operation.The
innodb_tmpdiroption is not applicable to intermediate table files.
Before the introduction of online
DDL, it was common practice to combine many DDL operations
into a single ALTER TABLE
statement. Because each ALTER TABLE
statement involved copying and rebuilding the table, it was more
efficient to make several changes to the same table at once, since
those changes could all be done with a single rebuild operation
for the table. The downside was that SQL code involving DDL
operations was harder to maintain and to reuse in different
scripts. If the specific changes were different each time, you
might have to construct a new complex ALTER
TABLE for each slightly different scenario.
For DDL operations that can be done online, you can separate them
into individual ALTER TABLE
statements for easier scripting and maintenance, without
sacrificing efficiency. For example, you might take a complicated
statement such as:
ALTER TABLE t1 ADD INDEX i1(c1), ADD UNIQUE INDEX i2(c2), CHANGE c4_old_name c4_new_name INTEGER UNSIGNED;
and break it down into simpler parts that can be tested and performed independently, such as:
ALTER TABLE t1 ADD INDEX i1(c1); ALTER TABLE t1 ADD UNIQUE INDEX i2(c2); ALTER TABLE t1 CHANGE c4_old_name c4_new_name INTEGER UNSIGNED NOT NULL;
You might still use multi-part ALTER
TABLE statements for:
Operations that must be performed in a specific sequence, such as creating an index followed by a foreign key constraint that uses that index.
Operations all using the same specific
LOCKclause, that you want to either succeed or fail as a group.Operations that cannot be performed online, that is, that still use the table-copy method.
Operations for which you specify
ALGORITHM=COPYorold_alter_table=1, to force the table-copying behavior if needed for precise backward-compatibility in specialized scenarios.
The failure of an online DDL operation is typically due to one of the following conditions:
An
ALGORITHMclause specifies an algorithm that is not compatible with the particular type of DDL operation or storage engine.A
LOCKclause specifies a low degree of locking (SHAREDorNONE) that is not compatible with the particular type of DDL operation.A timeout occurs while waiting for an exclusive lock on the table, which may be needed briefly during the initial and final phases of the DDL operation.
The
tmpdirorinnodb_tmpdirfile system runs out of disk space, while MySQL writes temporary sort files on disk during index creation. For more information, see Section 15.12.3, “Online DDL Space Requirements”.The operation takes a long time and concurrent DML modifies the table so much that the size of the temporary online log exceeds the value of the
innodb_online_alter_log_max_sizeconfiguration option. This condition causes aDB_ONLINE_LOG_TOO_BIGerror.Concurrent DML makes changes to the table that are allowed with the original table definition, but not with the new one. The operation only fails at the very end, when MySQL tries to apply all the changes from concurrent DML statements. For example, you might insert duplicate values into a column while a unique index is being created, or you might insert
NULLvalues into a column while creating a primary key index on that column. The changes made by the concurrent DML take precedence, and theALTER TABLEoperation is effectively rolled back.
The following limitations apply to online DDL operations:
The table is copied when creating an index on a
TEMPORARY TABLE.The
ALTER TABLEclauseLOCK=NONEis not permitted if there areON...CASCADEorON...SET NULLconstraints on the table.Before an in-place online DDL operation can finish, it must wait for transactions that hold metadata locks on the table to commit or roll back. An online DDL operation may briefly require an exclusive metadata lock on the table during its execution phase, and always requires one in the final phase of the operation when updating the table definition. Consequently, transactions holding metadata locks on the table can cause an online DDL operation to block. The transactions that hold metadata locks on the table may have been started before or during the online DDL operation. A long running or inactive transaction that holds a metadata lock on the table can cause an online DDL operation to timeout.
When running an in-place online DDL operation, the thread that runs the
ALTER TABLEstatement applies an online log of DML operations that were run concurrently on the same table from other connection threads. When the DML operations are applied, it is possible to encounter a duplicate key entry error (ERROR 1062 (23000): Duplicate entry), even if the duplicate entry is only temporary and would be reverted by a later entry in the online log. This is similar to the idea of a foreign key constraint check inInnoDBin which constraints must hold during a transaction.OPTIMIZE TABLEfor anInnoDBtable is mapped to anALTER TABLEoperation to rebuild the table and update index statistics and free unused space in the clustered index. Secondary indexes are not created as efficiently because keys are inserted in the order they appeared in the primary key.OPTIMIZE TABLEis supported with the addition of online DDL support for rebuilding regular and partitionedInnoDBtables.Tables created before MySQL 5.6 that include temporal columns (
DATE,DATETIMEorTIMESTAMP) and have not been rebuilt usingALGORITHM=COPYdo not supportALGORITHM=INPLACE. In this case, anALTER TABLE ... ALGORITHM=INPLACEoperation returns the following error:ERROR 1846 (0A000): ALGORITHM=INPLACE is not supported. Reason: Cannot change column type INPLACE. Try ALGORITHM=COPY.
The following limitations are generally applicable to online DDL operations on large tables that involve rebuilding the table:
There is no mechanism to pause an online DDL operation or to throttle I/O or CPU usage for an online DDL operation.
Rollback of an online DDL operation can be expensive should the operation fail.
Long running online DDL operations can cause replication lag. An online DDL operation must finish running on the source before it is run on the replica. Also, DML that was processed concurrently on the source is only processed on the replica after the DDL operation on the replica is completed.
For additional information related to running online DDL operations on large tables, see Section 15.12.2, “Online DDL Performance and Concurrency”.
InnoDB supports data-at-rest encryption for
file-per-table
tablespaces, general
tablespaces, the mysql system tablespace, redo
logs, and undo logs.
As of MySQL 8.0.16, setting an encryption default for schemas and general tablespaces is also supported, which permits DBAs to control whether tables created in those schemas and tablespaces are encrypted.
InnoDB data-at-rest encryption features and
capabilities are described under the following topics in this
section.
InnoDB uses a two tier encryption key
architecture, consisting of a master encryption key and tablespace
keys. When a tablespace is encrypted, a tablespace key is
encrypted and stored in the tablespace header. When an application
or authenticated user wants to access encrypted tablespace data,
InnoDB uses a master encryption key to decrypt
the tablespace key. The decrypted version of a tablespace key
never changes, but the master encryption key can be changed as
required. This action is referred to as master key
rotation.
The data-at-rest encryption feature relies on a keyring plugin for master encryption key management.
All MySQL editions provide a keyring_file
plugin, which stores keyring data in a file local to the server
host.
MySQL Enterprise Edition offers additional keyring plugins:
keyring_encrypted_filestores keyring data in an encrypted file local to the server host.keyring_okvincludes a KMIP client (KMIP 1.1) that uses a KMIP-compatible product as a back end for keyring storage. Supported KMIP-compatible products include centralized key management solutions such as Oracle Key Vault, Gemalto KeySecure, Thales Vormetric key management server, and Fornetix Key Orchestration.keyring_awscommunicates with the Amazon Web Services Key Management Service (AWS KMS) as a back end for key generation and uses a local file for key storage.keyring_hashicorpcommunicates with HashiCorp Vault for back end storage.
The keyring_file and
keyring_encrypted file plugins are not
intended as regulatory compliance solutions. Security standards
such as PCI, FIPS, and others require use of key management
systems to secure, manage, and protect encryption keys in key
vaults or hardware security modules (HSMs).
A secure and robust encryption key management solution is critical for security and for compliance with various security standards. When the data-at-rest encryption feature uses a centralized key management solution, the feature is referred to as “MySQL Enterprise Transparent Data Encryption (TDE)”.
The data-at-rest encryption feature supports the Advanced Encryption Standard (AES) block-based encryption algorithm. It uses Electronic Codebook (ECB) block encryption mode for tablespace key encryption and Cipher Block Chaining (CBC) block encryption mode for data encryption.
For frequently asked questions about the data-at-rest encryption feature, see Section A.17, “MySQL 8.0 FAQ: InnoDB Data-at-Rest Encryption”.
A keyring plugin must be installed and configured. Keyring plugin installation is performed at startup using the
early-plugin-loadoption. Early loading ensures that the plugin is available prior to initialization of theInnoDBstorage engine. For keyring plugin installation and configuration instructions, see Section 6.4.4, “The MySQL Keyring”.Only one keyring plugin can be enabled at a time. Enabling multiple keyring plugins is not supported.
ImportantOnce encrypted tablespaces are created in a MySQL instance, the keyring plugin that was loaded when creating the encrypted tablespace must continue to be loaded at startup using the
early-plugin-loadoption. Failing to do so results in errors when starting the server and duringInnoDBrecovery.To verify that a keyring plugin is active, use the
SHOW PLUGINSstatement or query theINFORMATION_SCHEMA.PLUGINStable. For example:mysql>
SELECT PLUGIN_NAME, PLUGIN_STATUSFROM INFORMATION_SCHEMA.PLUGINSWHERE PLUGIN_NAME LIKE 'keyring%';+--------------+---------------+ | PLUGIN_NAME | PLUGIN_STATUS | +--------------+---------------+ | keyring_file | ACTIVE | +--------------+---------------+When encrypting production data, ensure that you take steps to prevent loss of the master encryption key. If the master encryption key is lost, data stored in encrypted tablespace files is unrecoverable. If you use the
keyring_fileorkeyring_encrypted_fileplugin, create a backup of the keyring data file immediately after creating the first encrypted tablespace, before master key rotation, and after master key rotation. Thekeyring_file_dataconfiguration option defines the keyring data file location for thekeyring_fileplugin. Thekeyring_encrypted_file_dataconfiguration option defines the keyring data file location for thekeyring_encrypted_fileplugin. If you use thekeyring_okvorkeyring_awsplugin, ensure that you have performed the necessary configuration. For instructions, see Section 6.4.4, “The MySQL Keyring”.
As of MySQL 8.0.16, the
default_table_encryption system
variable defines the default encryption setting for schemas and
general tablespaces. CREATE
TABLESPACE and
CREATE
SCHEMA operations apply the
default_table_encryption setting
when an ENCRYPTION clause is not specified
explicitly.
ALTER
SCHEMA and ALTER
TABLESPACE operations do not apply the
default_table_encryption setting.
An ENCRYPTION clause must be specified
explicitly to alter the encryption of an existing schema or
general tablespace.
The default_table_encryption
variable can be set for an individual client connection or
globally using
SET
syntax. For example, the following statement enables default
schema and tablespace encryption globally:
mysql> SET GLOBAL default_table_encryption=ON;
The default encryption setting for a schema can also be defined
using the DEFAULT ENCRYPTION clause when
creating or altering a schema, as in this example:
mysql> CREATE SCHEMA test DEFAULT ENCRYPTION = 'Y';
If the DEFAULT ENCRYPTION clause is not
specified when creating a schema, the
default_table_encryption setting
is applied. The DEFAULT ENCRYPTION clause must
be specified to alter the default encryption of an existing
schema. Otherwise, the schema retains its current encryption
setting.
By default, a table inherits the encryption setting of the schema or general tablespace it is created in. For example, a table created in an encryption-enabled schema is encrypted by default. This behavior enables a DBA to control table encryption usage by defining and enforcing schema and general tablespace encryption defaults.
Encryption defaults are enforced by enabling the
table_encryption_privilege_check
system variable. When
table_encryption_privilege_check
is enabled, a privilege check occurs when creating or altering a
schema or general tablespace with an encryption setting that
differs from the
default_table_encryption setting,
or when creating or altering a table with an encryption setting
that differs from the default schema encryption. When
table_encryption_privilege_check
is disabled (the default), the privilege check does not occur and
the previously mentioned operations are permitted to proceed with
a warning.
The TABLE_ENCRYPTION_ADMIN
privilege is required to override default encryption settings when
table_encryption_privilege_check
is enabled. A DBA can grant this privilege to enable a user to
deviate from the
default_table_encryption setting
when creating or altering a schema or general tablespace, or to
deviate from the default schema encryption when creating or
altering a table. This privilege does not permit deviating from
the encryption of a general tablespace when creating or altering a
table. A table must have the same encryption setting as the
general tablespace it resides in.
As of MySQL 8.0.16, a file-per-table tablespace inherits the
default encryption of the schema in which the table is created
unless an ENCRYPTION clause is specified
explcitly in the CREATE TABLE
statement. Prior to MySQL 8.0.16, the
ENCRYPTION clause must be specified to enable
encryption.
mysql> CREATE TABLE t1 (c1 INT) ENCRYPTION = 'Y';
To alter the encryption of an existing file-per-table tablespace,
an ENCRYPTION clause must be specified.
mysql> ALTER TABLE t1 ENCRYPTION = 'Y';
As of MySQL 8.0.16, if the
table_encryption_privilege_check
variable is enabled, specifying an ENCRYPTION
clause with a setting that differs from the default schema
encryption requires the
TABLE_ENCRYPTION_ADMIN privilege.
See Defining an Encryption Default for Schemas and General Tablespaces.
As of MySQL 8.0.16, the
default_table_encryption variable
determines the encryption of a newly created general tablespace
unless an ENCRYPTION clause is specified
explicitly in the CREATE TABLESPACE
statement. Prior to MySQL 8.0.16, an ENCRYPTION
clause must be specified to enable encryption.
mysql> CREATE TABLESPACE `ts1` ADD DATAFILE 'ts1.ibd' ENCRYPTION = 'Y' Engine=InnoDB;
To alter the encryption of an existing general tablespace, an
ENCRYPTION clause must be specified.
mysql> ALTER TABLESPACE ts1 ENCRYPTION = 'Y';
As of MySQL 8.0.16, if the
table_encryption_privilege_check
variable is enabled, specifying an ENCRYPTION
clause with a setting that differs from the
default_table_encryption setting
requires the TABLE_ENCRYPTION_ADMIN
privilege. See
Defining an Encryption Default for Schemas and General Tablespaces.
Encryption support for doublewrite files is available as of MySQL
8.0.23. InnoDB automatically encrypts
doublewrite file pages that belong to encrypted tablespaces. No
action is required. Doublewrite file pages are encrypted using the
encryption key of the associated tablespace. The same encrypted
page written to a tablespace data file is also written to a
doublewrite file. Doublewrite file pages that belong to an
unencrypted tablespace remain unencrypted.
During recovery, encrypted doublewrite file pages are unencrypted and checked for corruption.
Encryption support for the mysql system
tablespace is available as of MySQL 8.0.16.
The mysql system tablespace contains the
mysql system database and MySQL data dictionary
tables. It is unencrypted by default. To enable encryption for the
mysql system tablespace, specify the tablespace
name and the ENCRYPTION option in an
ALTER TABLESPACE statement.
mysql> ALTER TABLESPACE mysql ENCRYPTION = 'Y';
To disable encryption for the mysql system
tablespace, set ENCRYPTION = 'N' using an
ALTER TABLESPACE statement.
mysql> ALTER TABLESPACE mysql ENCRYPTION = 'N';
Enabling or disabling encryption for the mysql
system tablespace requires the CREATE
TABLESPACE privilege on all tables in the instance
(CREATE TABLESPACE on *.*).
Redo log data encryption is enabled using the
innodb_redo_log_encrypt
configuration option. Redo log encryption is disabled by default.
As with tablespace data, redo log data encryption occurs when redo log data is written to disk, and decryption occurs when redo log data is read from disk. Once redo log data is read into memory, it is in unencrypted form. Redo log data is encrypted and decrypted using the tablespace encryption key.
When innodb_redo_log_encrypt is
enabled, unencrypted redo log pages that are present on disk
remain unencrypted, and new redo log pages are written to disk in
encrypted form. Likewise, when
innodb_redo_log_encrypt is
disabled, encrypted redo log pages that are present on disk remain
encrypted, and new redo log pages are written to disk in
unencrypted form.
Redo log encryption metadata, including the tablespace encryption
key, is stored in the header of the first redo log file
(ib_logfile0). If this file is removed, redo
log encryption is disabled.
Once redo log encryption is enabled, a normal restart without the
keyring plugin or without the encryption key is not possible, as
InnoDB must be able to scan redo pages during
startup, which is not possible if redo log pages are encrypted.
Without the keyring plugin or the encryption key, only a forced
startup without the redo logs
(SRV_FORCE_NO_LOG_REDO) is possible. See
Section 15.21.2, “Forcing InnoDB Recovery”.
Undo log data encryption is enabled using the
innodb_undo_log_encrypt
configuration option. Undo log encryption applies to undo logs
that reside in undo
tablespaces. See Section 15.6.3.4, “Undo Tablespaces”.
Undo log data encryption is disabled by default.
As with tablespace data, undo log data encryption occurs when undo log data is written to disk, and decryption occurs when undo log data is read from disk. Once undo log data is read into memory, it is in unencrypted form. Undo log data is encrypted and decrypted using the tablespace encryption key.
When innodb_undo_log_encrypt is
enabled, unencrypted undo log pages that are present on disk
remain unencrypted, and new undo log pages are written to disk in
encrypted form. Likewise, when
innodb_undo_log_encrypt is
disabled, encrypted undo log pages that are present on disk remain
encrypted, and new undo log pages are written to disk in
unencrypted form.
Undo log encryption metadata, including the tablespace encryption key, is stored in the header of the undo log file.
When undo log encryption is disabled, the server continues to require the keyring plugin that was used to encrypt undo log data until the undo tablespaces that contained the encrypted undo log data are truncated. (An encryption header is only removed from an undo tablespace when the undo tablespace is truncated.) For information about truncating undo tablespaces, see Truncating Undo Tablespaces.
The master encryption key should be rotated periodically and whenever you suspect that the key has been compromised.
Master key rotation is an atomic, instance-level operation. Each
time the master encryption key is rotated, all tablespace keys in
the MySQL instance are re-encrypted and saved back to their
respective tablespace headers. As an atomic operation,
re-encryption must succeed for all tablespace keys once a rotation
operation is initiated. If master key rotation is interrupted by a
server failure, InnoDB rolls the operation
forward on server restart. For more information, see
Encryption and Recovery.
Rotating the master encryption key only changes the master encryption key and re-encrypts tablespace keys. It does not decrypt or re-encrypt associated tablespace data.
Rotating the master encryption key requires the
ENCRYPTION_KEY_ADMIN privilege (or
the deprecated SUPER privilege).
To rotate the master encryption key, run:
mysql> ALTER INSTANCE ROTATE INNODB MASTER KEY;
ALTER INSTANCE ROTATE INNODB MASTER
KEY supports concurrent DML. However, it cannot be run
concurrently with tablespace encryption operations, and locks are
taken to prevent conflicts that could arise from concurrent
execution. If an ALTER INSTANCE ROTATE INNODB
MASTER KEY operation is running, it must finish before a
tablespace encryption operation can proceed, and vice versa.
If a server failure occurs during an encryption operation, the operation is rolled forward when the server is restarted. For general tablespaces, the encryption operation is resumed in a background thread from the last processed page.
If a server failure occurs during master key rotation,
InnoDB continues the operation on server
restart.
The keyring plugin must be loaded prior to storage engine
initialization so that the information necessary to decrypt
tablespace data pages can be retrieved from tablespace headers
before InnoDB initialization and recovery
activities access tablespace data. (See
Encryption Prerequisites.)
When InnoDB initialization and recovery begin,
the master key rotation operation resumes. Due to the server
failure, some tablespace keys may already be encrypted using the
new master encryption key. InnoDB reads the
encryption data from each tablespace header, and if the data
indicates that the tablespace key is encrypted using the old
master encryption key, InnoDB retrieves the old
key from the keyring and uses it to decrypt the tablespace key.
InnoDB then re-encrypts the tablespace key
using the new master encryption key and saves the re-encrypted
tablespace key back to the tablespace header.
Tablespace export is only supported for file-per-table tablespaces.
When an encrypted tablespace is exported,
InnoDB generates a transfer
key that is used to encrypt the tablespace key. The
encrypted tablespace key and transfer key are stored in a
tablespace_name.cfpInnoDB uses the transfer key to decrypt the
tablespace key in the
tablespace_name.cfp
The
ALTER INSTANCE ROTATE INNODB MASTER KEYstatement is only supported in replication environments where the source and replica run a version of MySQL that supports tablespace encryption.Successful
ALTER INSTANCE ROTATE INNODB MASTER KEYstatements are written to the binary log for replication on replicas.If an
ALTER INSTANCE ROTATE INNODB MASTER KEYstatement fails, it is not logged to the binary log and is not replicated on replicas.Replication of an
ALTER INSTANCE ROTATE INNODB MASTER KEYoperation fails if the keyring plugin is installed on the source but not on the replica.If the
keyring_fileorkeyring_encrypted_fileplugin is installed on both the source and a replica but the replica does not have a keyring data file, the replicatedALTER INSTANCE ROTATE INNODB MASTER KEYstatement creates the keyring data file on the replica, assuming the keyring file data is not cached in memory.ALTER INSTANCE ROTATE INNODB MASTER KEYuses keyring file data that is cached in memory, if available.
The
INFORMATION_SCHEMA.INNODB_TABLESPACES
table, introduced in MySQL 8.0.13, includes an
ENCRYPTION column that can be used to identify
encrypted tablespaces.
mysql>SELECT SPACE, NAME, SPACE_TYPE, ENCRYPTION FROM INFORMATION_SCHEMA.INNODB_TABLESPACESWHERE ENCRYPTION='Y'\G*************************** 1. row *************************** SPACE: 4294967294 NAME: mysql SPACE_TYPE: General ENCRYPTION: Y *************************** 2. row *************************** SPACE: 2 NAME: test/t1 SPACE_TYPE: Single ENCRYPTION: Y *************************** 3. row *************************** SPACE: 3 NAME: ts1 SPACE_TYPE: General ENCRYPTION: Y
When the ENCRYPTION option is specified in a
CREATE TABLE or
ALTER TABLE statement, it is
recorded in the CREATE_OPTIONS column of
INFORMATION_SCHEMA.TABLES. This
column can be queried to identify tables that reside in encrypted
file-per-table tablespaces.
mysql>SELECT TABLE_SCHEMA, TABLE_NAME, CREATE_OPTIONS FROM INFORMATION_SCHEMA.TABLESWHERE CREATE_OPTIONS LIKE '%ENCRYPTION%';+--------------+------------+----------------+ | TABLE_SCHEMA | TABLE_NAME | CREATE_OPTIONS | +--------------+------------+----------------+ | test | t1 | ENCRYPTION="Y" | +--------------+------------+----------------+
Query
INFORMATION_SCHEMA.INNODB_TABLESPACES
to retrieve information about the tablespace associated with a
particular schema and table.
mysql> SELECT SPACE, NAME, SPACE_TYPE FROM INFORMATION_SCHEMA.INNODB_TABLESPACES WHERE NAME='test/t1';
+-------+---------+------------+
| SPACE | NAME | SPACE_TYPE |
+-------+---------+------------+
| 3 | test/t1 | Single |
+-------+---------+------------+
You can identify encryption-enabled schemas by querying the
INFORMATION_SCHEMA.SCHEMATA table.
mysql>SELECT SCHEMA_NAME, DEFAULT_ENCRYPTION FROM INFORMATION_SCHEMA.SCHEMATAWHERE DEFAULT_ENCRYPTION='YES';+-------------+--------------------+ | SCHEMA_NAME | DEFAULT_ENCRYPTION | +-------------+--------------------+ | test | YES | +-------------+--------------------+
SHOW CREATE
SCHEMA also shows the DEFAULT
ENCRYPTION clause.
You can monitor general tablespace and mysql
system tablespace encryption progress using
Performance Schema.
The stage/innodb/alter tablespace (encryption)
stage event instrument reports WORK_ESTIMATED
and WORK_COMPLETED information for general
tablespace encryption operations.
The following example demonstrates how to enable the
stage/innodb/alter tablespace (encryption)
stage event instrument and related consumer tables to monitor
general tablespace or mysql system tablespace
encryption progress. For information about Performance Schema
stage event instruments and related consumers, see
Section 27.12.5, “Performance Schema Stage Event Tables”.
Enable the
stage/innodb/alter tablespace (encryption)instrument:mysql>
USE performance_schema;mysql>UPDATE setup_instruments SET ENABLED = 'YES'WHERE NAME LIKE 'stage/innodb/alter tablespace (encryption)';Enable the stage event consumer tables, which include
events_stages_current,events_stages_history, andevents_stages_history_long.mysql>
UPDATE setup_consumers SET ENABLED = 'YES' WHERE NAME LIKE '%stages%';Run a tablespace encryption operation. In this example, a general tablespace named
ts1is encrypted.mysql>
ALTER TABLESPACE ts1 ENCRYPTION = 'Y';Check the progress of the encryption operation by querying the Performance Schema
events_stages_currenttable.WORK_ESTIMATEDreports the total number of pages in the tablespace.WORK_COMPLETEDreports the number of pages processed.mysql>
SELECT EVENT_NAME, WORK_ESTIMATED, WORK_COMPLETED FROM events_stages_current;+--------------------------------------------+----------------+----------------+ | EVENT_NAME | WORK_COMPLETED | WORK_ESTIMATED | +--------------------------------------------+----------------+----------------+ | stage/innodb/alter tablespace (encryption) | 1056 | 1407 | +--------------------------------------------+----------------+----------------+The
events_stages_currenttable returns an empty set if the encryption operation has completed. In this case, you can check theevents_stages_historytable to view event data for the completed operation. For example:mysql>
SELECT EVENT_NAME, WORK_COMPLETED, WORK_ESTIMATED FROM events_stages_history;+--------------------------------------------+----------------+----------------+ | EVENT_NAME | WORK_COMPLETED | WORK_ESTIMATED | +--------------------------------------------+----------------+----------------+ | stage/innodb/alter tablespace (encryption) | 1407 | 1407 | +--------------------------------------------+----------------+----------------+
Plan appropriately when altering an existing file-per-table tablespace with the
ENCRYPTIONoption. Tables residing in file-per-table tablespaces are rebuilt using theCOPYalgorithm. TheINPLACEalgorithm is used when altering theENCRYPTIONattribute of a general tablespace or themysqlsystem tablespace. TheINPLACEalgorithm permits concurrent DML on tables that reside in the general tablespace. Concurrent DDL is blocked.When a general tablespace or the
mysqlsystem tablespace is encrypted, all tables residing in the tablespace are encrypted. Likewise, a table created in an encrypted tablespace is encrypted.If the server exits or is stopped during normal operation, it is recommended to restart the server using the same encryption settings that were configured previously.
The first master encryption key is generated when the first new or existing tablespace is encrypted.
Master key rotation re-encrypts tablespaces keys but does not change the tablespace key itself. To change a tablespace key, you must disable and re-enable encryption. For file-per-table tablespaces, re-encrypting the tablespace is an
ALGORITHM=COPYoperation that rebuilds the table. For general tablespaces and themysqlsystem tablespace, it is anALGORITHM=INPLACEoperation, which does not require rebuilding tables that reside in the tablespace.If a table is created with both the
COMPRESSIONandENCRYPTIONoptions, compression is performed before tablespace data is encrypted.If a keyring data file (the file named by
keyring_file_dataorkeyring_encrypted_file_data) is empty or missing, the first execution ofALTER INSTANCE ROTATE INNODB MASTER KEYcreates a master encryption key.Uninstalling the
keyring_fileorkeyring_encrypted_fileplugin does not remove an existing keyring data file.It is recommended that you not place a keyring data file under the same directory as tablespace data files.
Modifying the
keyring_file_dataorkeyring_encrypted_file_datasetting at runtime or when restarting the server can cause previously encrypted tablespaces to become inaccessible, resulting in lost data.Encryption is supported for the
InnoDBFULLTEXTindex tables that are created implicitly when adding aFULLTEXTindex, but only if theFULLTEXTindex is created on a table that resides in an encrypted general tablespace. In this case, theFULLTEXTindex tables are created in the same encrypted general tablespace. For related information, see InnoDB Full-Text Index Tables.
Advanced Encryption Standard (AES) is the only supported encryption algorithm.
InnoDBtablespace encryption uses Electronic Codebook (ECB) block encryption mode for tablespace key encryption and Cipher Block Chaining (CBC) block encryption mode for data encryption. Padding is not used with CBC block encryption mode. Instead,InnoDBensures that the text to be encrypted is a multiple of the block size.Encryption is only supported for file-per-table tablespaces, general tablespaces, and the
mysqlsystem tablespace. Encryption support for general tablespaces was introduced in MySQL 8.0.13. Encryption support for themysqlsystem tablespace is available as of MySQL 8.0.16. Encryption is not supported for other tablespace types including theInnoDBsystem tablespace.You cannot move or copy a table from an encrypted file-per-table tablespace, general tablespace, or the
mysqlsystem tablespace to a tablespace type that does not support encryption.You cannot move or copy a table from an encrypted tablespace to an unencrypted tablespace. However, moving a table from an unencrypted tablespace to an encrypted one is permitted. For example, you can move or copy a table from a unencrypted file-per-table or general tablespace to an encrypted general tablespace.
By default, tablespace encryption only applies to data in the tablespace. Redo log and undo log data can be encrypted by enabling
innodb_redo_log_encryptandinnodb_undo_log_encrypt. See Redo Log Encryption, and Undo Log Encryption. For information about binary log file and relay log file encryption, see Section 17.3.2, “Encrypting Binary Log Files and Relay Log Files”.It is not permitted to change the storage engine of a table that resides in, or previously resided in, an encrypted tablespace.
System variables that are true or false can be enabled at server startup by naming them, or disabled by using a
--skip-prefix. For example, to enable or disable theInnoDBadaptive hash index, you can use--innodb-adaptive-hash-indexor--skip-innodb-adaptive-hash-indexon the command line, orinnodb_adaptive_hash_indexorskip_innodb_adaptive_hash_indexin an option file.System variables that take a numeric value can be specified as
--on the command line or asvar_name=valuevar_name=valueMany system variables can be changed at runtime (see Section 5.1.9.2, “Dynamic System Variables”).
For information about
GLOBALandSESSIONvariable scope modifiers, refer to theSETstatement documentation.Certain options control the locations and layout of the
InnoDBdata files. Section 15.8.1, “InnoDB Startup Configuration” explains how to use these options.Some options, which you might not use initially, help tune
InnoDBperformance characteristics based on machine capacity and your database workload.For more information on specifying options and system variables, see Section 4.2.2, “Specifying Program Options”.
Table 15.24 InnoDB Option and Variable Reference
InnoDB Command Options
-
Command-Line Format --innodb[=value]Deprecated Yes Type Enumeration Default Value ONValid Values OFFONFORCEControls loading of the
InnoDBstorage engine, if the server was compiled withInnoDBsupport. This option has a tristate format, with possible values ofOFF,ON, orFORCE. See Section 5.6.1, “Installing and Uninstalling Plugins”.To disable
InnoDB, use--innodb=OFFor--skip-innodb. In this case, because the default storage engine isInnoDB, the server does not start unless you also use--default-storage-engineand--default-tmp-storage-engineto set the default to some other engine for both permanent andTEMPORARYtables.The
InnoDBstorage engine can no longer be disabled, and the--innodb=OFFand--skip-innodboptions are deprecated and have no effect. Their use results in a warning. Expect these options to be removed in a future MySQL release. -
Command-Line Format --innodb-status-file[={OFF|ON}]Type Boolean Default Value OFFThe
--innodb-status-filestartup option controls whetherInnoDBcreates a file namedinnodb_status.in the data directory and writespidSHOW ENGINE INNODB STATUSoutput to it every 15 seconds, approximately.The
innodb_status.file is not created by default. To create it, start mysqld with thepid--innodb-status-fileoption.InnoDBremoves the file when the server is shut down normally. If an abnormal shutdown occurs, the status file may have to be removed manually.The
--innodb-status-fileoption is intended for temporary use, asSHOW ENGINE INNODB STATUSoutput generation can affect performance, and theinnodb_status.file can become quite large over time.pidFor related information, see Section 15.17.2, “Enabling InnoDB Monitors”.
Disable the
InnoDBstorage engine. See the description of--innodb.
InnoDB System Variables
daemon_memcached_enable_binlogCommand-Line Format --daemon-memcached-enable-binlog[={OFF|ON}]System Variable daemon_memcached_enable_binlogScope Global Dynamic No SET_VARHint AppliesNo Type Boolean Default Value OFFEnable this option on the source server to use the
InnoDBmemcached plugin (daemon_memcached) with the MySQL binary log. This option can only be set at server startup. You must also enable the MySQL binary log on the source server using the--log-binoption.For more information, see Section 15.20.7, “The InnoDB memcached Plugin and Replication”.
daemon_memcached_engine_lib_nameCommand-Line Format --daemon-memcached-engine-lib-name=file_nameSystem Variable daemon_memcached_engine_lib_nameScope Global Dynamic No SET_VARHint AppliesNo Type File name Default Value innodb_engine.soSpecifies the shared library that implements the
InnoDBmemcached plugin.For more information, see Section 15.20.3, “Setting Up the InnoDB memcached Plugin”.
daemon_memcached_engine_lib_pathCommand-Line Format --daemon-memcached-engine-lib-path=dir_nameSystem Variable daemon_memcached_engine_lib_pathScope Global Dynamic No SET_VARHint AppliesNo Type Directory name Default Value NULLThe path of the directory containing the shared library that implements the
InnoDBmemcached plugin. The default value is NULL, representing the MySQL plugin directory. You should not need to modify this parameter unless specifying amemcachedplugin for a different storage engine that is located outside of the MySQL plugin directory.For more information, see Section 15.20.3, “Setting Up the InnoDB memcached Plugin”.
-
Command-Line Format --daemon-memcached-option=optionsSystem Variable daemon_memcached_optionScope Global Dynamic No SET_VARHint AppliesNo Type String Default Value Used to pass space-separated memcached options to the underlying memcached memory object caching daemon on startup. For example, you might change the port that memcached listens on, reduce the maximum number of simultaneous connections, change the maximum memory size for a key-value pair, or enable debugging messages for the error log.
See Section 15.20.3, “Setting Up the InnoDB memcached Plugin” for usage details. For information about memcached options, refer to the memcached man page.
-
Command-Line Format --daemon-memcached-r-batch-size=#System Variable daemon_memcached_r_batch_sizeScope Global Dynamic No SET_VARHint AppliesNo Type Integer Default Value 1Specifies how many memcached read operations (
getoperations) to perform before doing aCOMMITto start a new transaction. Counterpart ofdaemon_memcached_w_batch_size.This value is set to 1 by default, so that any changes made to the table through SQL statements are immediately visible to memcached operations. You might increase it to reduce the overhead from frequent commits on a system where the underlying table is only being accessed through the memcached interface. If you set the value too large, the amount of undo or redo data could impose some storage overhead, as with any long-running transaction.
For more information, see Section 15.20.3, “Setting Up the InnoDB memcached Plugin”.
-
Command-Line Format --daemon-memcached-w-batch-size=#System Variable daemon_memcached_w_batch_sizeScope Global Dynamic No SET_VARHint AppliesNo Type Integer Default Value 1Specifies how many memcached write operations, such as
add,set, andincr, to perform before doing aCOMMITto start a new transaction. Counterpart ofdaemon_memcached_r_batch_size.This value is set to 1 by default, on the assumption that data being stored is important to preserve in case of an outage and should immediately be committed. When storing non-critical data, you might increase this value to reduce the overhead from frequent commits; but then the last
N-1 uncommitted write operations could be lost if an unexpected exit occurs.For more information, see Section 15.20.3, “Setting Up the InnoDB memcached Plugin”.
-
Command-Line Format --innodb-adaptive-flushing[={OFF|ON}]System Variable innodb_adaptive_flushingScope Global Dynamic Yes SET_VARHint AppliesNo Type Boolean Default Value ONSpecifies whether to dynamically adjust the rate of flushing dirty pages in the
InnoDBbuffer pool based on the workload. Adjusting the flush rate dynamically is intended to avoid bursts of I/O activity. This setting is enabled by default. See Section 15.8.3.5, “Configuring Buffer Pool Flushing” for more information. For general I/O tuning advice, see Section 8.5.8, “Optimizing InnoDB Disk I/O”. -
Command-Line Format --innodb-adaptive-flushing-lwm=#System Variable innodb_adaptive_flushing_lwmScope Global Dynamic Yes SET_VARHint AppliesNo Type Integer Default Value 10Minimum Value 0Maximum Value 70Defines the low water mark representing percentage of redo log capacity at which adaptive flushing is enabled. For more information, see Section 15.8.3.5, “Configuring Buffer Pool Flushing”.
-
Command-Line Format --innodb-adaptive-hash-index[={OFF|ON}]System Variable innodb_adaptive_hash_indexScope Global Dynamic Yes SET_VARHint AppliesNo Type Boolean Default Value ONWhether the
InnoDBadaptive hash index is enabled or disabled. It may be desirable, depending on your workload, to dynamically enable or disable adaptive hash indexing to improve query performance. Because the adaptive hash index may not be useful for all workloads, conduct benchmarks with it both enabled and disabled, using realistic workloads. See Section 15.5.3, “Adaptive Hash Index” for details.This variable is enabled by default. You can modify this parameter using the
SET GLOBALstatement, without restarting the server. Changing the setting at runtime requires privileges sufficient to set global system variables. See Section 5.1.9.1, “System Variable Privileges”. You can also use--skip-innodb-adaptive-hash-indexat server startup to disable it.Disabling the adaptive hash index empties the hash table immediately. Normal operations can continue while the hash table is emptied, and executing queries that were using the hash table access the index B-trees directly instead. When the adaptive hash index is re-enabled, the hash table is populated again during normal operation.
innodb_adaptive_hash_index_partsCommand-Line Format --innodb-adaptive-hash-index-parts=#System Variable innodb_adaptive_hash_index_partsScope Global Dynamic No SET_VARHint AppliesNo Type Numeric Default Value 8Minimum Value 1Maximum Value 512Partitions the adaptive hash index search system. Each index is bound to a specific partition, with each partition protected by a separate latch.
The adaptive hash index search system is partitioned into 8 parts by default. The maximum setting is 512.
For related information, see Section 15.5.3, “Adaptive Hash Index”.
innodb_adaptive_max_sleep_delayCommand-Line Format --innodb-adaptive-max-sleep-delay=#System Variable innodb_adaptive_max_sleep_delayScope Global Dynamic Yes SET_VARHint AppliesNo Type Integer Default Value 150000Minimum Value 0Maximum Value 1000000Permits
InnoDBto automatically adjust the value ofinnodb_thread_sleep_delayup or down according to the current workload. Any nonzero value enables automated, dynamic adjustment of theinnodb_thread_sleep_delayvalue, up to the maximum value specified in theinnodb_adaptive_max_sleep_delayoption. The value represents the number of microseconds. This option can be useful in busy systems, with greater than 16InnoDBthreads. (In practice, it is most valuable for MySQL systems with hundreds or thousands of simultaneous connections.)For more information, see Section 15.8.4, “Configuring Thread Concurrency for InnoDB”.
-
Command-Line Format --innodb-api-bk-commit-interval=#System Variable innodb_api_bk_commit_intervalScope Global Dynamic Yes SET_VARHint AppliesNo Type Integer Default Value 5Minimum Value 1Maximum Value 1073741824How often to auto-commit idle connections that use the
InnoDBmemcached interface, in seconds. For more information, see Section 15.20.6.4, “Controlling Transactional Behavior of the InnoDB memcached Plugin”. -
Command-Line Format --innodb-api-disable-rowlock[={OFF|ON}]System Variable innodb_api_disable_rowlockScope Global Dynamic No SET_VARHint AppliesNo Type Boolean Default Value OFFUse this option to disable row locks when
InnoDBmemcached performs DML operations. By default,innodb_api_disable_rowlockis disabled, which means that memcached requests row locks forgetandsetoperations. Wheninnodb_api_disable_rowlockis enabled, memcached requests a table lock instead of row locks.innodb_api_disable_rowlockis not dynamic. It must be specified on the mysqld command line or entered in the MySQL configuration file. Configuration takes effect when the plugin is installed, which occurs when the MySQL server is started.For more information, see Section 15.20.6.4, “Controlling Transactional Behavior of the InnoDB memcached Plugin”.
-
Command-Line Format --innodb-api-enable-binlog[={OFF|ON}]System Variable innodb_api_enable_binlogScope Global Dynamic No SET_VARHint AppliesNo Type Boolean Default Value OFFLets you use the
InnoDBmemcached plugin with the MySQL binary log. For more information, see Enabling the InnoDB memcached Binary Log. -
Command-Line Format --innodb-api-enable-mdl[={OFF|ON}]System Variable innodb_api_enable_mdlScope Global Dynamic No SET_VARHint AppliesNo Type Boolean Default Value OFFLocks the table used by the
InnoDBmemcached plugin, so that it cannot be dropped or altered by DDL through the SQL interface. For more information, see Section 15.20.6.4, “Controlling Transactional Behavior of the InnoDB memcached Plugin”. -
Command-Line Format --innodb-api-trx-level=#System Variable innodb_api_trx_levelScope Global Dynamic Yes SET_VARHint AppliesNo Type Integer Default Value 0Controls the transaction isolation level on queries processed by the memcached interface. The constants corresponding to the familiar names are:
0 =
READ UNCOMMITTED1 =
READ COMMITTED2 =
REPEATABLE READ3 =
SERIALIZABLE
For more information, see Section 15.20.6.4, “Controlling Transactional Behavior of the InnoDB memcached Plugin”.
-
Command-Line Format --innodb-autoextend-increment=#System Variable innodb_autoextend_incrementScope Global Dynamic Yes SET_VARHint AppliesNo Type Integer Default Value 64Minimum Value 1Maximum Value 1000The increment size (in megabytes) for extending the size of an auto-extending
InnoDBsystem tablespace file when it becomes full. The default value is 64. For related information, see System Tablespace Data File Configuration, and Resizing the System Tablespace.The
innodb_autoextend_incrementsetting does not affect file-per-table tablespace files or general tablespace files. These files are auto-extending regardless of theinnodb_autoextend_incrementsetting. The initial extensions are by small amounts, after which extensions occur in increments of 4MB. -
Command-Line Format --innodb-autoinc-lock-mode=#System Variable innodb_autoinc_lock_modeScope Global Dynamic No SET_VARHint AppliesNo Type Integer Default Value 2Valid Values 012The lock mode to use for generating auto-increment values. Permissible values are 0, 1, or 2, for traditional, consecutive, or interleaved, respectively.
The default setting is 2 (interleaved) as of MySQL 8.0, and 1 (consecutive) before that. The change to interleaved lock mode as the default setting reflects the change from statement-based to row-based replication as the default replication type, which occurred in MySQL 5.7. Statement-based replication requires the consecutive auto-increment lock mode to ensure that auto-increment values are assigned in a predictable and repeatable order for a given sequence of SQL statements, whereas row-based replication is not sensitive to the execution order of SQL statements.
For the characteristics of each lock mode, see InnoDB AUTO_INCREMENT Lock Modes.
innodb_background_drop_list_emptyCommand-Line Format --innodb-background-drop-list-empty[={OFF|ON}]System Variable innodb_background_drop_list_emptyScope Global Dynamic Yes SET_VARHint AppliesNo Type Boolean Default Value OFFEnabling the
innodb_background_drop_list_emptydebug option helps avoid test case failures by delaying table creation until the background drop list is empty. For example, if test case A places tablet1on the background drop list, test case B waits until the background drop list is empty before creating tablet1.-
Command-Line Format --innodb-buffer-pool-chunk-size=#System Variable innodb_buffer_pool_chunk_sizeScope Global Dynamic No SET_VARHint AppliesNo Type Integer Default Value 134217728Minimum Value 1048576Maximum Value innodb_buffer_pool_size / innodb_buffer_pool_instancesinnodb_buffer_pool_chunk_sizedefines the chunk size forInnoDBbuffer pool resizing operations.To avoid copying all buffer pool pages during resizing operations, the operation is performed in “chunks”. By default,
innodb_buffer_pool_chunk_sizeis 128MB (134217728 bytes). The number of pages contained in a chunk depends on the value ofinnodb_page_size.innodb_buffer_pool_chunk_sizecan be increased or decreased in units of 1MB (1048576 bytes).The following conditions apply when altering the
innodb_buffer_pool_chunk_sizevalue:If
innodb_buffer_pool_chunk_size*innodb_buffer_pool_instancesis larger than the current buffer pool size when the buffer pool is initialized,innodb_buffer_pool_chunk_sizeis truncated toinnodb_buffer_pool_size/innodb_buffer_pool_instances.Buffer pool size must always be equal to or a multiple of
innodb_buffer_pool_chunk_size*innodb_buffer_pool_instances. If you alterinnodb_buffer_pool_chunk_size,innodb_buffer_pool_sizeis automatically rounded to a value that is equal to or a multiple ofinnodb_buffer_pool_chunk_size*innodb_buffer_pool_instances. The adjustment occurs when the buffer pool is initialized.
ImportantCare should be taken when changing
innodb_buffer_pool_chunk_size, as changing this value can automatically increase the size of the buffer pool. Before changinginnodb_buffer_pool_chunk_size, calculate its effect oninnodb_buffer_pool_sizeto ensure that the resulting buffer pool size is acceptable.To avoid potential performance issues, the number of chunks (
innodb_buffer_pool_size/innodb_buffer_pool_chunk_size) should not exceed 1000.The
innodb_buffer_pool_sizevariable is dynamic, which permits resizing the buffer pool while the server is online. However, the buffer pool size must be equal to or a multiple ofinnodb_buffer_pool_chunk_size*innodb_buffer_pool_instances, and changing either of those variable settings requires restarting the server.See Section 15.8.3.1, “Configuring InnoDB Buffer Pool Size” for more information.
-
Command-Line Format --innodb-buffer-pool-debug[={OFF|ON}]System Variable innodb_buffer_pool_debugScope Global Dynamic No SET_VARHint AppliesNo Type Boolean Default Value OFFEnabling this option permits multiple buffer pool instances when the buffer pool is less than 1GB in size, ignoring the 1GB minimum buffer pool size constraint imposed on
innodb_buffer_pool_instances. Theinnodb_buffer_pool_debugoption is only available if debugging support is compiled in using theWITH_DEBUGCMake option. innodb_buffer_pool_dump_at_shutdownCommand-Line Format --innodb-buffer-pool-dump-at-shutdown[={OFF|ON}]System Variable innodb_buffer_pool_dump_at_shutdownScope Global Dynamic Yes SET_VARHint AppliesNo Type Boolean Default Value ONSpecifies whether to record the pages cached in the
InnoDBbuffer pool when the MySQL server is shut down, to shorten the warmup process at the next restart. Typically used in combination withinnodb_buffer_pool_load_at_startup. Theinnodb_buffer_pool_dump_pctoption defines the percentage of most recently used buffer pool pages to dump.Both
innodb_buffer_pool_dump_at_shutdownandinnodb_buffer_pool_load_at_startupare enabled by default.For more information, see Section 15.8.3.6, “Saving and Restoring the Buffer Pool State”.
-
Command-Line Format --innodb-buffer-pool-dump-now[={OFF|ON}]System Variable innodb_buffer_pool_dump_nowScope Global Dynamic Yes SET_VARHint AppliesNo Type Boolean Default Value OFFImmediately records the pages cached in the
InnoDBbuffer pool. Typically used in combination withinnodb_buffer_pool_load_now.For more information, see Section 15.8.3.6, “Saving and Restoring the Buffer Pool State”.
-
Command-Line Format --innodb-buffer-pool-dump-pct=#System Variable innodb_buffer_pool_dump_pctScope Global Dynamic Yes SET_VARHint AppliesNo Type Integer Default Value 25Minimum Value 1Maximum Value 100Specifies the percentage of the most recently used pages for each buffer pool to read out and dump. The range is 1 to 100. The default value is 25. For example, if there are 4 buffer pools with 100 pages each, and
innodb_buffer_pool_dump_pctis set to 25, the 25 most recently used pages from each buffer pool are dumped. -
Command-Line Format --innodb-buffer-pool-filename=file_nameSystem Variable innodb_buffer_pool_filenameScope Global Dynamic Yes SET_VARHint AppliesNo Type File name Default Value ib_buffer_poolSpecifies the name of the file that holds the list of tablespace IDs and page IDs produced by
innodb_buffer_pool_dump_at_shutdownorinnodb_buffer_pool_dump_now. Tablespace IDs and page IDs are saved in the following format:space, page_id. By default, the file is namedib_buffer_pooland is located in theInnoDBdata directory. A non-default location must be specified relative to the data directory.A file name can be specified at runtime, using a
SETstatement:SET GLOBAL innodb_buffer_pool_filename=
'file_name';You can also specify a file name at startup, in a startup string or MySQL configuration file. When specifying a file name at startup, the file must exist or
InnoDBreturns a startup error indicating that there is no such file or directory.For more information, see Section 15.8.3.6, “Saving and Restoring the Buffer Pool State”.
innodb_buffer_pool_in_core_fileCommand-Line Format --innodb-buffer-pool-in-core-file[={OFF|ON}]Introduced 8.0.14 System Variable innodb_buffer_pool_in_core_fileScope Global Dynamic Yes SET_VARHint AppliesNo Type Boolean Default Value ONDisabling the
innodb_buffer_pool_in_core_filevariable reduces the size of core files by excludingInnoDBbuffer pool pages. To use this variable, thecore_filevariable must be enabled and the operating system must support theMADV_DONTDUMPnon-POSIX extension tomadvise(), which is supported in Linux 3.4 and later. For more information, see Section 15.8.3.7, “Excluding Buffer Pool Pages from Core Files”.-
Command-Line Format --innodb-buffer-pool-instances=#System Variable innodb_buffer_pool_instancesScope Global Dynamic No SET_VARHint AppliesNo Type Integer Default Value (Other) 8 (or 1 if innodb_buffer_pool_size < 1GBDefault Value (Windows, 32-bit platforms) (autosized)Minimum Value 1Maximum Value 64The number of regions that the
InnoDBbuffer pool is divided into. For systems with buffer pools in the multi-gigabyte range, dividing the buffer pool into separate instances can improve concurrency, by reducing contention as different threads read and write to cached pages. Each page that is stored in or read from the buffer pool is assigned to one of the buffer pool instances randomly, using a hashing function. Each buffer pool manages its own free lists, flush lists, LRUs, and all other data structures connected to a buffer pool, and is protected by its own buffer pool mutex.This option only takes effect when setting
innodb_buffer_pool_sizeto 1GB or more. The total buffer pool size is divided among all the buffer pools. For best efficiency, specify a combination ofinnodb_buffer_pool_instancesandinnodb_buffer_pool_sizeso that each buffer pool instance is at least 1GB.The default value on 32-bit Windows systems depends on the value of
innodb_buffer_pool_size, as described below:If
innodb_buffer_pool_sizeis greater than 1.3GB, the default forinnodb_buffer_pool_instancesisinnodb_buffer_pool_size/128MB, with individual memory allocation requests for each chunk. 1.3GB was chosen as the boundary at which there is significant risk for 32-bit Windows to be unable to allocate the contiguous address space needed for a single buffer pool.Otherwise, the default is 1.
On all other platforms, the default value is 8 when
innodb_buffer_pool_sizeis greater than or equal to 1GB. Otherwise, the default is 1.For related information, see Section 15.8.3.1, “Configuring InnoDB Buffer Pool Size”.
-
Command-Line Format --innodb-buffer-pool-load-abort[={OFF|ON}]System Variable innodb_buffer_pool_load_abortScope Global Dynamic Yes SET_VARHint AppliesNo Type Boolean Default Value OFFInterrupts the process of restoring
InnoDBbuffer pool contents triggered byinnodb_buffer_pool_load_at_startuporinnodb_buffer_pool_load_now.For more information, see Section 15.8.3.6, “Saving and Restoring the Buffer Pool State”.
innodb_buffer_pool_load_at_startupCommand-Line Format --innodb-buffer-pool-load-at-startup[={OFF|ON}]System Variable innodb_buffer_pool_load_at_startupScope Global Dynamic No SET_VARHint AppliesNo Type Boolean Default Value ONSpecifies that, on MySQL server startup, the
InnoDBbuffer pool is automatically warmed up by loading the same pages it held at an earlier time. Typically used in combination withinnodb_buffer_pool_dump_at_shutdown.Both
innodb_buffer_pool_dump_at_shutdownandinnodb_buffer_pool_load_at_startupare enabled by default.For more information, see Section 15.8.3.6, “Saving and Restoring the Buffer Pool State”.
-
Command-Line Format --innodb-buffer-pool-load-now[={OFF|ON}]System Variable innodb_buffer_pool_load_nowScope Global Dynamic Yes SET_VARHint AppliesNo Type Boolean Default Value OFFImmediately warms up the
InnoDBbuffer pool by loading a set of data pages, without waiting for a server restart. Can be useful to bring cache memory back to a known state during benchmarking, or to ready the MySQL server to resume its normal workload after running queries for reports or maintenance.For more information, see Section 15.8.3.6, “Saving and Restoring the Buffer Pool State”.
-
Command-Line Format --innodb-buffer-pool-size=#System Variable innodb_buffer_pool_sizeScope Global Dynamic Yes SET_VARHint AppliesNo Type Integer Default Value 134217728Minimum Value 5242880Maximum Value (64-bit platforms) 2**64-1Maximum Value (32-bit platforms) 2**32-1The size in bytes of the buffer pool, the memory area where
InnoDBcaches table and index data. The default value is 134217728 bytes (128MB). The maximum value depends on the CPU architecture; the maximum is 4294967295 (232-1) on 32-bit systems and 18446744073709551615 (264-1) on 64-bit systems. On 32-bit systems, the CPU architecture and operating system may impose a lower practical maximum size than the stated maximum. When the size of the buffer pool is greater than 1GB, settinginnodb_buffer_pool_instancesto a value greater than 1 can improve the scalability on a busy server.A larger buffer pool requires less disk I/O to access the same table data more than once. On a dedicated database server, you might set the buffer pool size to 80% of the machine's physical memory size. Be aware of the following potential issues when configuring buffer pool size, and be prepared to scale back the size of the buffer pool if necessary.
Competition for physical memory can cause paging in the operating system.
InnoDBreserves additional memory for buffers and control structures, so that the total allocated space is approximately 10% greater than the specified buffer pool size.Address space for the buffer pool must be contiguous, which can be an issue on Windows systems with DLLs that load at specific addresses.
The time to initialize the buffer pool is roughly proportional to its size. On instances with large buffer pools, initialization time might be significant. To reduce the initialization period, you can save the buffer pool state at server shutdown and restore it at server startup. See Section 15.8.3.6, “Saving and Restoring the Buffer Pool State”.
When you increase or decrease buffer pool size, the operation is performed in chunks. Chunk size is defined by the
innodb_buffer_pool_chunk_sizevariable, which has a default of 128 MB.Buffer pool size must always be equal to or a multiple of
innodb_buffer_pool_chunk_size*innodb_buffer_pool_instances. If you alter the buffer pool size to a value that is not equal to or a multiple ofinnodb_buffer_pool_chunk_size*innodb_buffer_pool_instances, buffer pool size is automatically adjusted to a value that is equal to or a multiple ofinnodb_buffer_pool_chunk_size*innodb_buffer_pool_instances.innodb_buffer_pool_sizecan be set dynamically, which allows you to resize the buffer pool without restarting the server. TheInnodb_buffer_pool_resize_statusstatus variable reports the status of online buffer pool resizing operations. See Section 15.8.3.1, “Configuring InnoDB Buffer Pool Size” for more information.If
innodb_dedicated_serveris enabled, theinnodb_buffer_pool_sizevalue is automatically configured if it is not explicitly defined. For more information, see Section 15.8.12, “Enabling Automatic Configuration for a Dedicated MySQL Server”. -
Command-Line Format --innodb-change-buffer-max-size=#System Variable innodb_change_buffer_max_sizeScope Global Dynamic Yes SET_VARHint AppliesNo Type Integer Default Value 25Minimum Value 0Maximum Value 50Maximum size for the
InnoDBchange buffer, as a percentage of the total size of the buffer pool. You might increase this value for a MySQL server with heavy insert, update, and delete activity, or decrease it for a MySQL server with unchanging data used for reporting. For more information, see Section 15.5.2, “Change Buffer”. For general I/O tuning advice, see Section 8.5.8, “Optimizing InnoDB Disk I/O”. -
Command-Line Format --innodb-change-buffering=valueSystem Variable innodb_change_bufferingScope Global Dynamic Yes SET_VARHint AppliesNo Type Enumeration Default Value allValid Values noneinsertsdeleteschangespurgesallWhether
InnoDBperforms change buffering, an optimization that delays write operations to secondary indexes so that the I/O operations can be performed sequentially. Permitted values are described in the following table. Values may also be specified numerically.Table 15.25 Permitted Values for innodb_change_buffering
Value Numeric Value Description none0Do not buffer any operations. inserts1Buffer insert operations. deletes2Buffer delete marking operations; strictly speaking, the writes that mark index records for later deletion during a purge operation. changes3Buffer inserts and delete-marking operations. purges4Buffer the physical deletion operations that happen in the background. all5The default. Buffer inserts, delete-marking operations, and purges. For more information, see Section 15.5.2, “Change Buffer”. For general I/O tuning advice, see Section 8.5.8, “Optimizing InnoDB Disk I/O”.
-
Command-Line Format --innodb-change-buffering-debug=#System Variable innodb_change_buffering_debugScope Global Dynamic Yes SET_VARHint AppliesNo Type Integer Default Value 0Maximum Value 2Sets a debug flag for
InnoDBchange buffering. A value of 1 forces all changes to the change buffer. A value of 2 causes an unexpected exit at merge. A default value of 0 indicates that the change buffering debug flag is not set. This option is only available when debugging support is compiled in using theWITH_DEBUGCMake option. -
Command-Line Format --innodb-checkpoint-disabled[={OFF|ON}]System Variable innodb_checkpoint_disabledScope Global Dynamic Yes SET_VARHint AppliesNo Type Boolean Default Value OFFThis is a debug option that is only intended for expert debugging use. It disables checkpoints so that a deliberate server exit always initiates
InnoDBrecovery. It should only be enabled for a short interval, typically before running DML operations that write redo log entries that would require recovery following a server exit. This option is only available if debugging support is compiled in using theWITH_DEBUGCMake option. -
Command-Line Format --innodb-checksum-algorithm=valueSystem Variable innodb_checksum_algorithmScope Global Dynamic Yes SET_VARHint AppliesNo Type Enumeration Default Value crc32Valid Values innodbcrc32nonestrict_innodbstrict_crc32strict_noneSpecifies how to generate and verify the checksum stored in the disk blocks of
InnoDBtablespaces. The default value forinnodb_checksum_algorithmiscrc32.Versions of MySQL Enterprise Backup up to 3.8.0 do not support backing up tablespaces that use CRC32 checksums. MySQL Enterprise Backup adds CRC32 checksum support in 3.8.1, with some limitations. Refer to the MySQL Enterprise Backup 3.8.1 Change History for more information.
The value
innodbis backward-compatible with earlier versions of MySQL. The valuecrc32uses an algorithm that is faster to compute the checksum for every modified block, and to check the checksums for each disk read. It scans blocks 32 bits at a time, which is faster than theinnodbchecksum algorithm, which scans blocks 8 bits at a time. The valuenonewrites a constant value in the checksum field rather than computing a value based on the block data. The blocks in a tablespace can use a mix of old, new, and no checksum values, being updated gradually as the data is modified; once blocks in a tablespace are modified to use thecrc32algorithm, the associated tables cannot be read by earlier versions of MySQL.The strict form of a checksum algorithm reports an error if it encounters a valid but non-matching checksum value in a tablespace. It is recommended that you only use strict settings in a new instance, to set up tablespaces for the first time. Strict settings are somewhat faster, because they do not need to compute all checksum values during disk reads.
The following table shows the difference between the
none,innodb, andcrc32option values, and their strict counterparts.none,innodb, andcrc32write the specified type of checksum value into each data block, but for compatibility accept other checksum values when verifying a block during a read operation. Strict settings also accept valid checksum values but print an error message when a valid non-matching checksum value is encountered. Using the strict form can make verification faster if allInnoDBdata files in an instance are created under an identicalinnodb_checksum_algorithmvalue.Table 15.26 Permitted innodb_checksum_algorithm Values
Value Generated checksum (when writing) Permitted checksums (when reading) none A constant number. Any of the checksums generated by none,innodb, orcrc32.innodb A checksum calculated in software, using the original algorithm from InnoDB.Any of the checksums generated by none,innodb, orcrc32.crc32 A checksum calculated using the crc32algorithm, possibly done with a hardware assist.Any of the checksums generated by none,innodb, orcrc32.strict_none A constant number Any of the checksums generated by none,innodb, orcrc32.InnoDBprints an error message if a valid but non-matching checksum is encountered.strict_innodb A checksum calculated in software, using the original algorithm from InnoDB.Any of the checksums generated by none,innodb, orcrc32.InnoDBprints an error message if a valid but non-matching checksum is encountered.strict_crc32 A checksum calculated using the crc32algorithm, possibly done with a hardware assist.Any of the checksums generated by none,innodb, orcrc32.InnoDBprints an error message if a valid but non-matching checksum is encountered. -
Command-Line Format --innodb-cmp-per-index-enabled[={OFF|ON}]System Variable innodb_cmp_per_index_enabledScope Global Dynamic Yes SET_VARHint AppliesNo Type Boolean Default Value OFFEnables per-index compression-related statistics in the
INFORMATION_SCHEMA.INNODB_CMP_PER_INDEXtable. Because these statistics can be expensive to gather, only enable this option on development, test, or replica instances during performance tuning related toInnoDBcompressed tables.For more information, see Section 26.51.7, “The INFORMATION_SCHEMA INNODB_CMP_PER_INDEX and INNODB_CMP_PER_INDEX_RESET Tables”, and Section 15.9.1.4, “Monitoring InnoDB Table Compression at Runtime”.
-
Command-Line Format --innodb-commit-concurrency=#System Variable innodb_commit_concurrencyScope Global Dynamic Yes SET_VARHint AppliesNo Type Integer Default Value 0Minimum Value 0Maximum Value 1000The number of threads that can commit at the same time. A value of 0 (the default) permits any number of transactions to commit simultaneously.
The value of
innodb_commit_concurrencycannot be changed at runtime from zero to nonzero or vice versa. The value can be changed from one nonzero value to another. -
Command-Line Format --innodb-compress-debug=valueSystem Variable innodb_compress_debugScope Global Dynamic Yes SET_VARHint AppliesNo Type Enumeration Default Value noneValid Values nonezliblz4lz4hcCompresses all tables using a specified compression algorithm without having to define a
COMPRESSIONattribute for each table. This option is only available if debugging support is compiled in using theWITH_DEBUGCMake option.For related information, see Section 15.9.2, “InnoDB Page Compression”.
innodb_compression_failure_threshold_pctCommand-Line Format --innodb-compression-failure-threshold-pct=#System Variable innodb_compression_failure_threshold_pctScope Global Dynamic Yes SET_VARHint AppliesNo Type Integer Default Value 5Minimum Value 0Maximum Value 100Defines the compression failure rate threshold for a table, as a percentage, at which point MySQL begins adding padding within compressed pages to avoid expensive compression failures. When this threshold is passed, MySQL begins to leave additional free space within each new compressed page, dynamically adjusting the amount of free space up to the percentage of page size specified by
innodb_compression_pad_pct_max. A value of zero disables the mechanism that monitors compression efficiency and dynamically adjusts the padding amount.For more information, see Section 15.9.1.6, “Compression for OLTP Workloads”.
-
Command-Line Format --innodb-compression-level=#System Variable innodb_compression_levelScope Global Dynamic Yes SET_VARHint AppliesNo Type Integer Default Value 6Minimum Value 0Maximum Value 9Specifies the level of zlib compression to use for
InnoDBcompressed tables and indexes. A higher value lets you fit more data onto a storage device, at the expense of more CPU overhead during compression. A lower value lets you reduce CPU overhead when storage space is not critical, or you expect the data is not especially compressible.For more information, see Section 15.9.1.6, “Compression for OLTP Workloads”.
innodb_compression_pad_pct_maxCommand-Line Format --innodb-compression-pad-pct-max=#System Variable innodb_compression_pad_pct_maxScope Global Dynamic Yes SET_VARHint AppliesNo Type Integer Default Value 50Minimum Value 0Maximum Value 75Specifies the maximum percentage that can be reserved as free space within each compressed page, allowing room to reorganize the data and modification log within the page when a compressed table or index is updated and the data might be recompressed. Only applies when
innodb_compression_failure_threshold_pctis set to a nonzero value, and the rate of compression failures passes the cutoff point.For more information, see Section 15.9.1.6, “Compression for OLTP Workloads”.
-
Command-Line Format --innodb-concurrency-tickets=#System Variable innodb_concurrency_ticketsScope Global Dynamic Yes SET_VARHint AppliesNo Type Integer Default Value 5000Minimum Value 1Maximum Value 4294967295Determines the number of threads that can enter
InnoDBconcurrently. A thread is placed in a queue when it tries to enterInnoDBif the number of threads has already reached the concurrency limit. When a thread is permitted to enterInnoDB, it is given a number of “ tickets” equal to the value ofinnodb_concurrency_tickets, and the thread can enter and leaveInnoDBfreely until it has used up its tickets. After that point, the thread again becomes subject to the concurrency check (and possible queuing) the next time it tries to enterInnoDB. The default value is 5000.With a small
innodb_concurrency_ticketsvalue, small transactions that only need to process a few rows compete fairly with larger transactions that process many rows. The disadvantage of a smallinnodb_concurrency_ticketsvalue is that large transactions must loop through the queue many times before they can complete, which extends the amount of time required to complete their task.With a large
innodb_concurrency_ticketsvalue, large transactions spend less time waiting for a position at the end of the queue (controlled byinnodb_thread_concurrency) and more time retrieving rows. Large transactions also require fewer trips through the queue to complete their task. The disadvantage of a largeinnodb_concurrency_ticketsvalue is that too many large transactions running at the same time can starve smaller transactions by making them wait a longer time before executing.With a nonzero
innodb_thread_concurrencyvalue, you may need to adjust theinnodb_concurrency_ticketsvalue up or down to find the optimal balance between larger and smaller transactions. TheSHOW ENGINE INNODB STATUSreport shows the number of tickets remaining for an executing transaction in its current pass through the queue. This data may also be obtained from theTRX_CONCURRENCY_TICKETScolumn of theINFORMATION_SCHEMA.INNODB_TRXtable.For more information, see Section 15.8.4, “Configuring Thread Concurrency for InnoDB”.
-
Command-Line Format --innodb-data-file-path=file_nameSystem Variable innodb_data_file_pathScope Global Dynamic No SET_VARHint AppliesNo Type String Default Value ibdata1:12M:autoextendDefines the name, size, and attributes of
InnoDBsystem tablespace data files. If you do not specify a value forinnodb_data_file_path, the default behavior is to create a single auto-extending data file, slightly larger than 12MB, namedibdata1.The full syntax for a data file specification includes the file name, file size,
autoextendattribute, andmaxattribute:file_name:file_size[:autoextend[:max:max_file_size]]File sizes are specified in kilobytes, megabytes, or gigabytes by appending
K,MorGto the size value. If specifying the data file size in kilobytes, do so in multiples of 1024. Otherwise, KB values are rounded to nearest megabyte (MB) boundary. The sum of file sizes must be, at a minimum, slightly larger than 12MB.For additional configuration information, see System Tablespace Data File Configuration. For resizing instructions, see Resizing the System Tablespace.
-
Command-Line Format --innodb-data-home-dir=dir_nameSystem Variable innodb_data_home_dirScope Global Dynamic No SET_VARHint AppliesNo Type Directory name The common part of the directory path for
InnoDBsystem tablespace data files. The default value is the MySQLdatadirectory. The setting is concatenated with theinnodb_data_file_pathsetting, unless that setting is defined with an absolute path.A trailing slash is required when specifying a value for
innodb_data_home_dir. For example:[mysqld] innodb_data_home_dir = /path/to/myibdata/
This setting does not affect the location of file-per-table tablespaces.
For related information, see Section 15.8.1, “InnoDB Startup Configuration”.
innodb_ddl_log_crash_reset_debugCommand-Line Format --innodb-ddl-log-crash-reset-debug[={OFF|ON}]System Variable innodb_ddl_log_crash_reset_debugScope Global Dynamic Yes SET_VARHint AppliesNo Type Boolean Default Value OFFEnable this debug option to reset DDL log crash injection counters to 1. This option is only available when debugging support is compiled in using the
WITH_DEBUGCMake option.-
Command-Line Format --innodb-deadlock-detect[={OFF|ON}]System Variable innodb_deadlock_detectScope Global Dynamic Yes SET_VARHint AppliesNo Type Boolean Default Value ONThis option is used to disable deadlock detection. On high concurrency systems, deadlock detection can cause a slowdown when numerous threads wait for the same lock. At times, it may be more efficient to disable deadlock detection and rely on the
innodb_lock_wait_timeoutsetting for transaction rollback when a deadlock occurs.For related information, see Section 15.7.5.2, “Deadlock Detection”.
-
Command-Line Format --innodb-dedicated-server[={OFF|ON}]System Variable innodb_dedicated_serverScope Global Dynamic No SET_VARHint AppliesNo Type Boolean Default Value OFFWhen
innodb_dedicated_serveris enabled,InnoDBautomatically configures the following variables:innodb_log_files_in_group(as of MySQL 8.0.14)
Only consider enabling
innodb_dedicated_serverif the MySQL instance resides on a dedicated server where it can use all available system resources. Enablinginnodb_dedicated_serveris not recommended if the MySQL instance shares system resources with other applications.For more information, see Section 15.8.12, “Enabling Automatic Configuration for a Dedicated MySQL Server”.
-
Command-Line Format --innodb-default-row-format=valueSystem Variable innodb_default_row_formatScope Global Dynamic Yes SET_VARHint AppliesNo Type Enumeration Default Value DYNAMICValid Values DYNAMICCOMPACTREDUNDANTThe
innodb_default_row_formatoption defines the default row format forInnoDBtables and user-created temporary tables. The default setting isDYNAMIC. Other permitted values areCOMPACTandREDUNDANT. TheCOMPRESSEDrow format, which is not supported for use in the system tablespace, cannot be defined as the default.Newly created tables use the row format defined by
innodb_default_row_formatwhen aROW_FORMAToption is not specified explicitly or whenROW_FORMAT=DEFAULTis used.When a
ROW_FORMAToption is not specified explicitly or whenROW_FORMAT=DEFAULTis used, any operation that rebuilds a table also silently changes the row format of the table to the format defined byinnodb_default_row_format. For more information, see Defining the Row Format of a Table.Internal
InnoDBtemporary tables created by the server to process queries use theDYNAMICrow format, regardless of theinnodb_default_row_formatsetting. -
Command-Line Format --innodb-directories=dir_nameSystem Variable innodb_directoriesScope Global Dynamic No SET_VARHint AppliesNo Type Directory name Defines directories to scan at startup for tablespace files. This option is used when moving or restoring tablespace files to a new location while the server is offline. It is also used to specify directories of tablespace files created using an absolute path or that reside outside of the data directory.
Tablespace discovery during crash recovery relies on the
innodb_directoriessetting to identify tablespaces referenced in the redo logs. For more information, see Tablespace Discovery During Crash Recovery.Directories defined by
innodb_data_home_dir,innodb_undo_directory, anddatadirare automatically appended to theinnodb_directoriesargument value when building a list of directories to scan at startup, regardless of whether theinnodb_directoriesoption is specified explicitly.innodb_directoriesmay be specified as an option in a startup command or in a MySQL option file. Quotes are used around the argument value because otherwise a semicolon (;) is interpreted as a special character by some command interpreters. (Unix shells treat it as a command terminator, for example.)Startup command:
mysqld --innodb-directories="
directory_path_1;directory_path_2"MySQL option file:
[mysqld] innodb_directories="
directory_path_1;directory_path_2"Wildcard expressions cannot be used to specify directories.
The
innodb_directoriesscan also traverses the subdirectories of specified directories. Duplicate directories and subdirectories are discarded from the list of directories to be scanned.For more information, see Section 15.6.3.6, “Moving Tablespace Files While the Server is Offline”.
innodb_disable_sort_file_cacheCommand-Line Format --innodb-disable-sort-file-cache[={OFF|ON}]System Variable innodb_disable_sort_file_cacheScope Global Dynamic Yes SET_VARHint AppliesNo Type Boolean Default Value OFFDisables the operating system file system cache for merge-sort temporary files. The effect is to open such files with the equivalent of
O_DIRECT.-
Command-Line Format --innodb-doublewrite[={OFF|ON}]System Variable innodb_doublewriteScope Global Dynamic No SET_VARHint AppliesNo Type Boolean Default Value ONThe
innodb_doublewritevariable controls whether the doublwrite buffer is enabled. It is enabled by default in most cases. To disable the doublewrite buffer, setinnodb_doublewriteto 0 or start the server with--skip-innodb-doublewrite. You might consider disabling the doublewrite buffer if you are more concerned with performance than data integrity, as may be the case when performing benchmarks, for example.If the doublewrite buffer is located on a Fusion-io device that supports atomic writes, the doublewrite buffer is automatically disabled and data file writes are performed using Fusion-io atomic writes instead. However, be aware that the
innodb_doublewritesetting is global. When the doublewrite buffer is disabled, it is disabled for all data files including those that do not reside on Fusion-io hardware. This feature is only supported on Fusion-io hardware and is only enabled for Fusion-io NVMFS on Linux. To take full advantage of this feature, aninnodb_flush_methodsetting ofO_DIRECTis recommended.For related information, see Section 15.6.4, “Doublewrite Buffer”.
-
Command-Line Format --innodb-doublewrite-batch-size=#Introduced 8.0.20 System Variable innodb_doublewrite_batch_sizeScope Global Dynamic No SET_VARHint AppliesNo Type Integer Default Value 0Minimum Value 0Maximum Value 256Defines the number of doublewrite pages to write in a batch.
For more information, see Section 15.6.4, “Doublewrite Buffer”.
-
Command-Line Format --innodb-doublewrite-dir=dir_nameIntroduced 8.0.20 System Variable innodb_doublewrite_dirScope Global Dynamic No SET_VARHint AppliesNo Type Directory name Defines the directory for doublewrite files. If no directory is specified, doublewrite files are created in the
innodb_data_home_dirdirectory, which defaults to the data directory if unspecified.For more information, see Section 15.6.4, “Doublewrite Buffer”.
-
Command-Line Format --innodb-doublewrite-files=#Introduced 8.0.20 System Variable innodb_doublewrite_filesScope Global Dynamic No SET_VARHint AppliesNo Type Integer Default Value innodb_buffer_pool_instances * 2Minimum Value 2Maximum Value 256Defines the number of doublewrite files. By default, two doublewrite files are created for each buffer pool instance.
At a minimum, there are two doublewrite files. The maximum number of doublewrite files is two times the number of buffer pool instances. (The number of buffer pool instances is controlled by the
innodb_buffer_pool_instancesvariable.)For more information, see Section 15.6.4, “Doublewrite Buffer”.
-
Command-Line Format --innodb-doublewrite-pages=#Introduced 8.0.20 System Variable innodb_doublewrite_pagesScope Global Dynamic No SET_VARHint AppliesNo Type Integer Default Value innodb_write_io_threads valueMinimum Value innodb_write_io_threads valueMaximum Value 512Defines the maximum number of doublewrite pages per thread for a batch write. If no value is specified,
innodb_doublewrite_pagesis set to theinnodb_write_io_threadsvalue.For more information, see Section 15.6.4, “Doublewrite Buffer”.
-
Command-Line Format --innodb=extend-and-initialize[={OFF|ON}]Introduced 8.0.22 System Variable innodb_extend_and_initializeScope Global Dynamic Yes SET_VARHint AppliesNo Type Boolean Default Value ONControls how space is allocated to file-per-table and general tablespaces on Linux systems.
When enabled,
InnoDBwrites NULLs to newly allocated pages. When disabled, space is allocated usingposix_fallocate()calls, which reserve space without physically writing NULLs.For more information, see Section 15.6.3.8, “Optimizing Tablespace Space Allocation on Linux”.
-
Command-Line Format --innodb-fast-shutdown=#System Variable innodb_fast_shutdownScope Global Dynamic Yes SET_VARHint AppliesNo Type Integer Default Value 1Valid Values 012The
InnoDBshutdown mode. If the value is 0,InnoDBdoes a slow shutdown, a full purge and a change buffer merge before shutting down. If the value is 1 (the default),InnoDBskips these operations at shutdown, a process known as a fast shutdown. If the value is 2,InnoDBflushes its logs and shuts down cold, as if MySQL had crashed; no committed transactions are lost, but the crash recovery operation makes the next startup take longer.The slow shutdown can take minutes, or even hours in extreme cases where substantial amounts of data are still buffered. Use the slow shutdown technique before upgrading or downgrading between MySQL major releases, so that all data files are fully prepared in case the upgrade process updates the file format.
Use
innodb_fast_shutdown=2in emergency or troubleshooting situations, to get the absolute fastest shutdown if data is at risk of corruption. innodb_fil_make_page_dirty_debugCommand-Line Format --innodb-fil-make-page-dirty-debug=#System Variable innodb_fil_make_page_dirty_debugScope Global Dynamic Yes SET_VARHint AppliesNo Type Integer Default Value 0Maximum Value 2**32-1By default, setting
innodb_fil_make_page_dirty_debugto the ID of a tablespace immediately dirties the first page of the tablespace. Ifinnodb_saved_page_number_debugis set to a non-default value, settinginnodb_fil_make_page_dirty_debugdirties the specified page. Theinnodb_fil_make_page_dirty_debugoption is only available if debugging support is compiled in using theWITH_DEBUGCMake option.-
Command-Line Format --innodb-file-per-table[={OFF|ON}]System Variable innodb_file_per_tableScope Global Dynamic Yes SET_VARHint AppliesNo Type Boolean Default Value ONWhen
innodb_file_per_tableis enabled, tables are created in file-per-table tablespaces by default. When disabled, tables are created in the system tablespace by default. For information about file-per-table tablespaces, see Section 15.6.3.2, “File-Per-Table Tablespaces”. For information about theInnoDBsystem tablespace, see Section 15.6.3.1, “The System Tablespace”.The
innodb_file_per_tablevariable can be configured at runtime using aSET GLOBALstatement, specified on the command line at startup, or specified in an option file. Configuration at runtime requires privileges sufficient to set global system variables (see Section 5.1.9.1, “System Variable Privileges”) and immediately affects the operation of all connections.When a table that resides in a file-per-table tablespace is truncated or dropped, the freed space is returned to the operating system. Truncating or dropping a table that resides in the system tablespace only frees space in the system tablespace. Freed space in the system tablespace can be used again for
InnoDBdata but is not returned to the operating system, as system tablespace data files never shrink.The
innodb_file_per-tablesetting does not affect the creation of temporary tables. As of MySQL 8.0.14, temporary tables are created in session temporary tablespaces, and in the global temporary tablespace before that. See Section 15.6.3.5, “Temporary Tablespaces”. -
Command-Line Format --innodb-fill-factor=#System Variable innodb_fill_factorScope Global Dynamic Yes SET_VARHint AppliesNo Type Integer Default Value 100Minimum Value 10Maximum Value 100InnoDBperforms a bulk load when creating or rebuilding indexes. This method of index creation is known as a “sorted index build”.innodb_fill_factordefines the percentage of space on each B-tree page that is filled during a sorted index build, with the remaining space reserved for future index growth. For example, settinginnodb_fill_factorto 80 reserves 20 percent of the space on each B-tree page for future index growth. Actual percentages may vary. Theinnodb_fill_factorsetting is interpreted as a hint rather than a hard limit.An
innodb_fill_factorsetting of 100 leaves 1/16 of the space in clustered index pages free for future index growth.innodb_fill_factorapplies to both B-tree leaf and non-leaf pages. It does not apply to external pages used forTEXTorBLOBentries.For more information, see Section 15.6.2.3, “Sorted Index Builds”.
-
Command-Line Format --innodb-flush-log-at-timeout=#System Variable innodb_flush_log_at_timeoutScope Global Dynamic Yes SET_VARHint AppliesNo Type Integer Default Value 1Minimum Value 1Maximum Value 2700Write and flush the logs every
Nseconds.innodb_flush_log_at_timeoutallows the timeout period between flushes to be increased in order to reduce flushing and avoid impacting performance of binary log group commit. The default setting forinnodb_flush_log_at_timeoutis once per second. innodb_flush_log_at_trx_commitCommand-Line Format --innodb-flush-log-at-trx-commit=#System Variable innodb_flush_log_at_trx_commitScope Global Dynamic Yes SET_VARHint AppliesNo Type Enumeration Default Value 1Valid Values 012Controls the balance between strict ACID compliance for commit operations and higher performance that is possible when commit-related I/O operations are rearranged and done in batches. You can achieve better performance by changing the default value but then you can lose transactions in a crash.
The default setting of 1 is required for full ACID compliance. Logs are written and flushed to disk at each transaction commit.
With a setting of 0, logs are written and flushed to disk once per second. Transactions for which logs have not been flushed can be lost in a crash.
With a setting of 2, logs are written after each transaction commit and flushed to disk once per second. Transactions for which logs have not been flushed can be lost in a crash.
For settings 0 and 2, once-per-second flushing is not 100% guaranteed. Flushing may occur more frequently due to DDL changes and other internal
InnoDBactivities that cause logs to be flushed independently of theinnodb_flush_log_at_trx_commitsetting, and sometimes less frequently due to scheduling issues. If logs are flushed once per second, up to one second of transactions can be lost in a crash. If logs are flushed more or less frequently than once per second, the amount of transactions that can be lost varies accordingly.Log flushing frequency is controlled by
innodb_flush_log_at_timeout, which allows you to set log flushing frequency toNseconds (whereNis1 ... 2700, with a default value of 1). However, any unexpected mysqld process exit can erase up toNseconds of transactions.DDL changes and other internal
InnoDBactivities flush the log independently of theinnodb_flush_log_at_trx_commitsetting.InnoDBcrash recovery works regardless of theinnodb_flush_log_at_trx_commitsetting. Transactions are either applied entirely or erased entirely.
For durability and consistency in a replication setup that uses
InnoDBwith transactions:If binary logging is enabled, set
sync_binlog=1.Always set
innodb_flush_log_at_trx_commit=1.
For information on the combination of settings on a replica that is most resilient to unexpected halts, see Section 17.4.2, “Handling an Unexpected Halt of a Replica”.
CautionMany operating systems and some disk hardware fool the flush-to-disk operation. They may tell mysqld that the flush has taken place, even though it has not. In this case, the durability of transactions is not guaranteed even with the recommended settings, and in the worst case, a power outage can corrupt
InnoDBdata. Using a battery-backed disk cache in the SCSI disk controller or in the disk itself speeds up file flushes, and makes the operation safer. You can also try to disable the caching of disk writes in hardware caches.-
Command-Line Format --innodb-flush-method=valueSystem Variable innodb_flush_methodScope Global Dynamic No SET_VARHint AppliesNo Type String Default Value (Windows) unbufferedDefault Value (Unix) fsyncValid Values (Windows) unbufferednormalValid Values (Unix) fsyncO_DSYNClittlesyncnosyncO_DIRECTO_DIRECT_NO_FSYNCDefines the method used to flush data to
InnoDBdata files and log files, which can affect I/O throughput.On Unix-like systems, the default value is
fsync. On Windows, the default value isunbuffered.NoteIn MySQL 8.0,
innodb_flush_methodoptions may be specified numerically.The
innodb_flush_methodoptions for Unix-like systems include:fsyncor0:InnoDBuses thefsync()system call to flush both the data and log files.fsyncis the default setting.O_DSYNCor1:InnoDBusesO_SYNCto open and flush the log files, andfsync()to flush the data files.InnoDBdoes not useO_DSYNCdirectly because there have been problems with it on many varieties of Unix.littlesyncor2: This option is used for internal performance testing and is currently unsupported. Use at your own risk.nosyncor3: This option is used for internal performance testing and is currently unsupported. Use at your own risk.O_DIRECTor4:InnoDBusesO_DIRECT(ordirectio()on Solaris) to open the data files, and usesfsync()to flush both the data and log files. This option is available on some GNU/Linux versions, FreeBSD, and Solaris.O_DIRECT_NO_FSYNC:InnoDBusesO_DIRECTduring flushing I/O, but skips thefsync()system call after each write operation.Prior to MySQL 8.0.14, this setting is not suitable for file systems such as XFS and EXT4, which require an
fsync()system call to synchronize file system metadata changes. If you are not sure whether your file system requires anfsync()system call to synchronize file system metadata changes, useO_DIRECTinstead.As of MySQL 8.0.14,
fsync()is called after creating a new file, after increasing file size, and after closing a file, to ensure that file system metadata changes are synchronized. Thefsync()system call is still skipped after each write operation.Data loss is possible if redo log files and data files reside on different storage devices, and an unexpected exit occurs before data file writes are flushed from a device cache that is not battery-backed. If you use or intend to use different storage devices for redo log files and data files, and your data files reside on a device with a cache that is not battery-backed, use
O_DIRECTinstead.
The
innodb_flush_methodoptions for Windows systems include:unbufferedor0:InnoDBuses simulated asynchronous I/O and non-buffered I/O.normalor1:InnoDBuses simulated asynchronous I/O and buffered I/O.
How each setting affects performance depends on hardware configuration and workload. Benchmark your particular configuration to decide which setting to use, or whether to keep the default setting. Examine the
Innodb_data_fsyncsstatus variable to see the overall number offsync()calls for each setting. The mix of read and write operations in your workload can affect how a setting performs. For example, on a system with a hardware RAID controller and battery-backed write cache,O_DIRECTcan help to avoid double buffering between theInnoDBbuffer pool and the operating system file system cache. On some systems whereInnoDBdata and log files are located on a SAN, the default value orO_DSYNCmight be faster for a read-heavy workload with mostlySELECTstatements. Always test this parameter with hardware and workload that reflect your production environment. For general I/O tuning advice, see Section 8.5.8, “Optimizing InnoDB Disk I/O”.If
innodb_dedicated_serveris enabled, theinnodb_flush_methodvalue is automatically configured if it is not explicitly defined. For more information, see Section 15.8.12, “Enabling Automatic Configuration for a Dedicated MySQL Server”. -
Command-Line Format --innodb-flush-neighbors=#System Variable innodb_flush_neighborsScope Global Dynamic Yes SET_VARHint AppliesNo Type Enumeration Default Value 0Valid Values 012Specifies whether flushing a page from the
InnoDBbuffer pool also flushes other dirty pages in the same extent.A setting of 0 disables
innodb_flush_neighbors. Dirty pages in the same extent are not flushed.A setting of 1 flushes contiguous dirty pages in the same extent.
A setting of 2 flushes dirty pages in the same extent.
When the table data is stored on a traditional HDD storage device, flushing such neighbor pages in one operation reduces I/O overhead (primarily for disk seek operations) compared to flushing individual pages at different times. For table data stored on SSD, seek time is not a significant factor and you can set this option to 0 to spread out write operations. For related information, see Section 15.8.3.5, “Configuring Buffer Pool Flushing”.
-
Command-Line Format --innodb-flush-sync[={OFF|ON}]System Variable innodb_flush_syncScope Global Dynamic Yes SET_VARHint AppliesNo Type Boolean Default Value ONThe
innodb_flush_syncvariable, which is enabled by default, causes theinnodb_io_capacitysetting to be ignored during bursts of I/O activity that occur at checkpoints. To adhere to the I/O rate defined by theinnodb_io_capacitysetting, disableinnodb_flush_sync.For information about configuring the
innodb_flush_syncvariable, see Section 15.8.7, “Configuring InnoDB I/O Capacity”. -
Command-Line Format --innodb-flushing-avg-loops=#System Variable innodb_flushing_avg_loopsScope Global Dynamic Yes SET_VARHint AppliesNo Type Integer Default Value 30Minimum Value 1Maximum Value 1000Number of iterations for which
InnoDBkeeps the previously calculated snapshot of the flushing state, controlling how quickly adaptive flushing responds to changing workloads. Increasing the value makes the rate of flush operations change smoothly and gradually as the workload changes. Decreasing the value makes adaptive flushing adjust quickly to workload changes, which can cause spikes in flushing activity if the workload increases and decreases suddenly.For related information, see Section 15.8.3.5, “Configuring Buffer Pool Flushing”.
-
Command-Line Format --innodb-force-load-corrupted[={OFF|ON}]System Variable innodb_force_load_corruptedScope Global Dynamic No SET_VARHint AppliesNo Type Boolean Default Value OFFPermits
InnoDBto load tables at startup that are marked as corrupted. Use only during troubleshooting, to recover data that is otherwise inaccessible. When troubleshooting is complete, disable this setting and restart the server. -
Command-Line Format --innodb-force-recovery=#System Variable innodb_force_recoveryScope Global Dynamic No SET_VARHint AppliesNo Type Integer Default Value 0Minimum Value 0Maximum Value 6The crash recovery mode, typically only changed in serious troubleshooting situations. Possible values are from 0 to 6. For the meanings of these values and important information about
innodb_force_recovery, see Section 15.21.2, “Forcing InnoDB Recovery”.WarningOnly set this variable to a value greater than 0 in an emergency situation so that you can start
InnoDBand dump your tables. As a safety measure,InnoDBpreventsINSERT,UPDATE, orDELETEoperations wheninnodb_force_recoveryis greater than 0. Aninnodb_force_recoverysetting of 4 or greater placesInnoDBinto read-only mode.These restrictions may cause replication administration commands to fail with an error, as replication stores the replica status logs in
InnoDBtables. -
Command-Line Format --innodb-fsync-threshold=#Introduced 8.0.13 System Variable innodb_fsync_thresholdScope Global Dynamic Yes SET_VARHint AppliesNo Type Integer Default Value 0Minimum Value 0Maximum Value 2**64-1By default, when
InnoDBcreates a new data file, such as a new log file or tablespace file, the file is fully written to the operating system cache before it is flushed to disk, which can cause a large amount of disk write activity to occur at once. To force smaller, periodic flushes of data from the operating system cache, you can use theinnodb_fsync_thresholdvariable to define a threshold value, in bytes. When the byte threshold is reached, the contents of the operating system cache are flushed to disk. The default value of 0 forces the default behavior, which is to flush data to disk only after a file is fully written to the cache.Specifying a threshold to force smaller, periodic flushes may be beneficial in cases where multiple MySQL instances use the same storage devices. For example, creating a new MySQL instance and its associated data files could cause large surges of disk write activity, impeding the performance of other MySQL instances that use the same storage devices. Configuring a threshold helps avoid such surges in write activity.
-
System Variable innodb_ft_aux_tableScope Global Dynamic Yes SET_VARHint AppliesNo Type String Specifies the qualified name of an
InnoDBtable containing aFULLTEXTindex. This variable is intended for diagnostic purposes and can only be set at runtime. For example:SET GLOBAL innodb_ft_aux_table = 'test/t1';
After you set this variable to a name in the format
db_name/table_nameINFORMATION_SCHEMAtablesINNODB_FT_INDEX_TABLE,INNODB_FT_INDEX_CACHE,INNODB_FT_CONFIG,INNODB_FT_DELETED, andINNODB_FT_BEING_DELETEDshow information about the search index for the specified table.For more information, see Section 15.15.4, “InnoDB INFORMATION_SCHEMA FULLTEXT Index Tables”.
-
Command-Line Format --innodb-ft-cache-size=#System Variable innodb_ft_cache_sizeScope Global Dynamic No SET_VARHint AppliesNo Type Integer Default Value 8000000Minimum Value 1600000Maximum Value 80000000The memory allocated, in bytes, for the
InnoDBFULLTEXTsearch index cache, which holds a parsed document in memory while creating anInnoDBFULLTEXTindex. Index inserts and updates are only committed to disk when theinnodb_ft_cache_sizesize limit is reached.innodb_ft_cache_sizedefines the cache size on a per table basis. To set a global limit for all tables, seeinnodb_ft_total_cache_size.For more information, see InnoDB Full-Text Index Cache.
-
Command-Line Format --innodb-ft-enable-diag-print[={OFF|ON}]System Variable innodb_ft_enable_diag_printScope Global Dynamic Yes SET_VARHint AppliesNo Type Boolean Default Value OFFWhether to enable additional full-text search (FTS) diagnostic output. This option is primarily intended for advanced FTS debugging and is not of interest to most users. Output is printed to the error log and includes information such as:
FTS index sync progress (when the FTS cache limit is reached). For example:
FTS SYNC for table test, deleted count: 100 size: 10000 bytes SYNC words: 100
FTS optimize progress. For example:
FTS start optimize test FTS_OPTIMIZE: optimize "mysql" FTS_OPTIMIZE: processed "mysql"
FTS index build progress. For example:
Number of doc processed: 1000
For FTS queries, the query parsing tree, word weight, query processing time, and memory usage are printed. For example:
FTS Search Processing time: 1 secs: 100 millisec: row(s) 10000 Full Search Memory: 245666 (bytes), Row: 10000
-
Command-Line Format --innodb-ft-enable-stopword[={OFF|ON}]System Variable innodb_ft_enable_stopwordScope Global, Session Dynamic Yes SET_VARHint AppliesNo Type Boolean Default Value ONSpecifies that a set of stopwords is associated with an
InnoDBFULLTEXTindex at the time the index is created. If theinnodb_ft_user_stopword_tableoption is set, the stopwords are taken from that table. Else, if theinnodb_ft_server_stopword_tableoption is set, the stopwords are taken from that table. Otherwise, a built-in set of default stopwords is used.For more information, see Section 12.10.4, “Full-Text Stopwords”.
-
Command-Line Format --innodb-ft-max-token-size=#System Variable innodb_ft_max_token_sizeScope Global Dynamic No SET_VARHint AppliesNo Type Integer Default Value 84Minimum Value 10Maximum Value 84Maximum character length of words that are stored in an
InnoDBFULLTEXTindex. Setting a limit on this value reduces the size of the index, thus speeding up queries, by omitting long keywords or arbitrary collections of letters that are not real words and are not likely to be search terms.For more information, see Section 12.10.6, “Fine-Tuning MySQL Full-Text Search”.
-
Command-Line Format --innodb-ft-min-token-size=#System Variable innodb_ft_min_token_sizeScope Global Dynamic No SET_VARHint AppliesNo Type Integer Default Value 3Minimum Value 0Maximum Value 16Minimum length of words that are stored in an
InnoDBFULLTEXTindex. Increasing this value reduces the size of the index, thus speeding up queries, by omitting common words that are unlikely to be significant in a search context, such as the English words “a” and “to”. For content using a CJK (Chinese, Japanese, Korean) character set, specify a value of 1.For more information, see Section 12.10.6, “Fine-Tuning MySQL Full-Text Search”.
-
Command-Line Format --innodb-ft-num-word-optimize=#System Variable innodb_ft_num_word_optimizeScope Global Dynamic Yes SET_VARHint AppliesNo Type Integer Default Value 2000Minimum Value 1000Maximum Value 10000Number of words to process during each
OPTIMIZE TABLEoperation on anInnoDBFULLTEXTindex. Because a bulk insert or update operation to a table containing a full-text search index could require substantial index maintenance to incorporate all changes, you might do a series ofOPTIMIZE TABLEstatements, each picking up where the last left off.For more information, see Section 12.10.6, “Fine-Tuning MySQL Full-Text Search”.
-
Command-Line Format --innodb-ft-result-cache-limit=#System Variable innodb_ft_result_cache_limitScope Global Dynamic Yes SET_VARHint AppliesNo Type Integer Default Value 2000000000Minimum Value 1000000Maximum Value 2**32-1The
InnoDBfull-text search query result cache limit (defined in bytes) per full-text search query or per thread. Intermediate and finalInnoDBfull-text search query results are handled in memory. Useinnodb_ft_result_cache_limitto place a size limit on the full-text search query result cache to avoid excessive memory consumption in case of very largeInnoDBfull-text search query results (millions or hundreds of millions of rows, for example). Memory is allocated as required when a full-text search query is processed. If the result cache size limit is reached, an error is returned indicating that the query exceeds the maximum allowed memory.The maximum value of
innodb_ft_result_cache_limitfor all platform types and bit sizes is 2**32-1. innodb_ft_server_stopword_tableCommand-Line Format --innodb-ft-server-stopword-table=db_name/table_nameSystem Variable innodb_ft_server_stopword_tableScope Global Dynamic Yes SET_VARHint AppliesNo Type String Default Value NULLThis option is used to specify your own
InnoDBFULLTEXTindex stopword list for allInnoDBtables. To configure your own stopword list for a specificInnoDBtable, useinnodb_ft_user_stopword_table.Set
innodb_ft_server_stopword_tableto the name of the table containing a list of stopwords, in the formatdb_name/table_nameThe stopword table must exist before you configure
innodb_ft_server_stopword_table.innodb_ft_enable_stopwordmust be enabled andinnodb_ft_server_stopword_tableoption must be configured before you create theFULLTEXTindex.The stopword table must be an
InnoDBtable, containing a singleVARCHARcolumn namedvalue.For more information, see Section 12.10.4, “Full-Text Stopwords”.
-
Command-Line Format --innodb-ft-sort-pll-degree=#System Variable innodb_ft_sort_pll_degreeScope Global Dynamic No SET_VARHint AppliesNo Type Integer Default Value 2Minimum Value 1Maximum Value 32Number of threads used in parallel to index and tokenize text in an
InnoDBFULLTEXTindex when building a search index.For related information, see Section 15.6.2.4, “InnoDB FULLTEXT Indexes”, and
innodb_sort_buffer_size. -
Command-Line Format --innodb-ft-total-cache-size=#System Variable innodb_ft_total_cache_sizeScope Global Dynamic No SET_VARHint AppliesNo Type Integer Default Value 640000000Minimum Value 32000000Maximum Value 1600000000The total memory allocated, in bytes, for the
InnoDBfull-text search index cache for all tables. Creating numerous tables, each with aFULLTEXTsearch index, could consume a significant portion of available memory.innodb_ft_total_cache_sizedefines a global memory limit for all full-text search indexes to help avoid excessive memory consumption. If the global limit is reached by an index operation, a forced sync is triggered.For more information, see InnoDB Full-Text Index Cache.
-
Command-Line Format --innodb-ft-user-stopword-table=db_name/table_nameSystem Variable innodb_ft_user_stopword_tableScope Global, Session Dynamic Yes SET_VARHint AppliesNo Type String Default Value NULLThis option is used to specify your own
InnoDBFULLTEXTindex stopword list on a specific table. To configure your own stopword list for allInnoDBtables, useinnodb_ft_server_stopword_table.Set
innodb_ft_user_stopword_tableto the name of the table containing a list of stopwords, in the formatdb_name/table_nameThe stopword table must exist before you configure
innodb_ft_user_stopword_table.innodb_ft_enable_stopwordmust be enabled andinnodb_ft_user_stopword_tablemust be configured before you create theFULLTEXTindex.The stopword table must be an
InnoDBtable, containing a singleVARCHARcolumn namedvalue.For more information, see Section 12.10.4, “Full-Text Stopwords”.
-
Command-Line Format --innodb-idle-flush-pct=#Introduced 8.0.18 System Variable innodb_idle_flush_pctScope Global Dynamic Yes SET_VARHint AppliesNo Type Integer Default Value 100Minimum Value 0Maximum Value 100Limits page flushing when
InnoDBis idle. Theinnodb_idle_flush_pctvalue is a percentage of theinnodb_io_capacitysetting, which defines the number of I/O operations per second available toInnoDB. For more information, see Limiting Buffer Flushing During Idle Periods. -
Command-Line Format --innodb-io-capacity=#System Variable innodb_io_capacityScope Global Dynamic Yes SET_VARHint AppliesNo Type Integer Default Value 200Minimum Value 100Maximum Value (64-bit platforms) 2**64-1Maximum Value (32-bit platforms) 2**32-1The
innodb_io_capacityvariable defines the number of I/O operations per second (IOPS) available toInnoDBbackground tasks, such as flushing pages from the buffer pool and merging data from the change buffer.For information about configuring the
innodb_io_capacityvariable, see Section 15.8.7, “Configuring InnoDB I/O Capacity”. -
Command-Line Format --innodb-io-capacity-max=#System Variable innodb_io_capacity_maxScope Global Dynamic Yes SET_VARHint AppliesNo Type Integer Default Value see descriptionMinimum Value 100Maximum Value (Windows, 64-bit platforms) 2**32-1Maximum Value (Unix, 64-bit platforms) 2**64-1Maximum Value (32-bit platforms) 2**32-1If flushing activity falls behind,
InnoDBcan flush more aggressively, at a higher rate of I/O operations per second (IOPS) than defined by theinnodb_io_capacityvariable. Theinnodb_io_capacity_maxvariable defines a maximum number of IOPS performed byInnoDBbackground tasks in such situations.For information about configuring the
innodb_io_capacity_maxvariable, see Section 15.8.7, “Configuring InnoDB I/O Capacity”. innodb_limit_optimistic_insert_debugCommand-Line Format --innodb-limit-optimistic-insert-debug=#System Variable innodb_limit_optimistic_insert_debugScope Global Dynamic Yes SET_VARHint AppliesNo Type Integer Default Value 0Minimum Value 0Maximum Value 2**32-1Limits the number of records per B-tree page. A default value of 0 means that no limit is imposed. This option is only available if debugging support is compiled in using the
WITH_DEBUGCMake option.-
Command-Line Format --innodb-lock-wait-timeout=#System Variable innodb_lock_wait_timeoutScope Global, Session Dynamic Yes SET_VARHint AppliesNo Type Integer Default Value 50Minimum Value 1Maximum Value 1073741824The length of time in seconds an
InnoDBtransaction waits for a row lock before giving up. The default value is 50 seconds. A transaction that tries to access a row that is locked by anotherInnoDBtransaction waits at most this many seconds for write access to the row before issuing the following error:ERROR 1205 (HY000): Lock wait timeout exceeded; try restarting transaction
When a lock wait timeout occurs, the current statement is rolled back (not the entire transaction). To have the entire transaction roll back, start the server with the
--innodb-rollback-on-timeoutoption. See also Section 15.21.4, “InnoDB Error Handling”.You might decrease this value for highly interactive applications or OLTP systems, to display user feedback quickly or put the update into a queue for processing later. You might increase this value for long-running back-end operations, such as a transform step in a data warehouse that waits for other large insert or update operations to finish.
innodb_lock_wait_timeoutapplies toInnoDBrow locks. A MySQL table lock does not happen insideInnoDBand this timeout does not apply to waits for table locks.The lock wait timeout value does not apply to deadlocks when
innodb_deadlock_detectis enabled (the default) becauseInnoDBdetects deadlocks immediately and rolls back one of the deadlocked transactions. Wheninnodb_deadlock_detectis disabled,InnoDBrelies oninnodb_lock_wait_timeoutfor transaction rollback when a deadlock occurs. See Section 15.7.5.2, “Deadlock Detection”.innodb_lock_wait_timeoutcan be set at runtime with theSET GLOBALorSET SESSIONstatement. Changing theGLOBALsetting requires privileges sufficient to set global system variables (see Section 5.1.9.1, “System Variable Privileges”) and affects the operation of all clients that subsequently connect. Any client can change theSESSIONsetting forinnodb_lock_wait_timeout, which affects only that client. -
Command-Line Format --innodb-log-buffer-size=#System Variable innodb_log_buffer_sizeScope Global Dynamic Yes SET_VARHint AppliesNo Type Integer Default Value 16777216Minimum Value 1048576Maximum Value 4294967295The size in bytes of the buffer that
InnoDBuses to write to the log files on disk. The default is 16MB. A large log buffer enables large transactions to run without the need to write the log to disk before the transactions commit. Thus, if you have transactions that update, insert, or delete many rows, making the log buffer larger saves disk I/O. For related information, see Memory Configuration, and Section 8.5.4, “Optimizing InnoDB Redo Logging”. For general I/O tuning advice, see Section 8.5.8, “Optimizing InnoDB Disk I/O”. innodb_log_checkpoint_fuzzy_nowCommand-Line Format --innodb-log-checkpoint-fuzzy-now[={OFF|ON}]Introduced 8.0.13 System Variable innodb_log_checkpoint_fuzzy_nowScope Global Dynamic Yes SET_VARHint AppliesNo Type Boolean Default Value OFFEnable this debug option to force
InnoDBto write a fuzzy checkpoint. This option is only available if debugging support is compiled in using theWITH_DEBUGCMake option.-
Command-Line Format --innodb-log-checkpoint-now[={OFF|ON}]System Variable innodb_log_checkpoint_nowScope Global Dynamic Yes SET_VARHint AppliesNo Type Boolean Default Value OFFEnable this debug option to force
InnoDBto write a checkpoint. This option is only available if debugging support is compiled in using theWITH_DEBUGCMake option. -
Command-Line Format --innodb-log-checksums[={OFF|ON}]System Variable innodb_log_checksumsScope Global Dynamic Yes SET_VARHint AppliesNo Type Boolean Default Value ONEnables or disables checksums for redo log pages.
innodb_log_checksums=ONenables theCRC-32Cchecksum algorithm for redo log pages. Wheninnodb_log_checksumsis disabled, the contents of the redo log page checksum field are ignored.Checksums on the redo log header page and redo log checkpoint pages are never disabled.
-
Command-Line Format --innodb-log-compressed-pages[={OFF|ON}]System Variable innodb_log_compressed_pagesScope Global Dynamic Yes SET_VARHint AppliesNo Type Boolean Default Value ONSpecifies whether images of re-compressed pages are written to the redo log. Re-compression may occur when changes are made to compressed data.
innodb_log_compressed_pagesis enabled by default to prevent corruption that could occur if a different version of thezlibcompression algorithm is used during recovery. If you are certain that thezlibversion is not subject to change, you can disableinnodb_log_compressed_pagesto reduce redo log generation for workloads that modify compressed data.To measure the effect of enabling or disabling
innodb_log_compressed_pages, compare redo log generation for both settings under the same workload. Options for measuring redo log generation include observing theLog sequence number(LSN) in theLOGsection ofSHOW ENGINE INNODB STATUSoutput, or monitoringInnodb_os_log_writtenstatus for the number of bytes written to the redo log files.For related information, see Section 15.9.1.6, “Compression for OLTP Workloads”.
-
Command-Line Format --innodb-log-file-size=#System Variable innodb_log_file_sizeScope Global Dynamic No SET_VARHint AppliesNo Type Integer Default Value 50331648Minimum Value 4194304Maximum Value 512GB / innodb_log_files_in_groupThe size in bytes of each log file in a log group. The combined size of log files (
innodb_log_file_size*innodb_log_files_in_group) cannot exceed a maximum value that is slightly less than 512GB. A pair of 255 GB log files, for example, approaches the limit but does not exceed it. The default value is 48MB.Generally, the combined size of the log files should be large enough that the server can smooth out peaks and troughs in workload activity, which often means that there is enough redo log space to handle more than an hour of write activity. The larger the value, the less checkpoint flush activity is required in the buffer pool, saving disk I/O. Larger log files also make crash recovery slower.
The minimum
innodb_log_file_sizeis 4MB.For related information, see Redo Log File Configuration. For general I/O tuning advice, see Section 8.5.8, “Optimizing InnoDB Disk I/O”.
If
innodb_dedicated_serveris enabled, theinnodb_log_file_sizevalue is automatically configured if it is not explicitly defined. For more information, see Section 15.8.12, “Enabling Automatic Configuration for a Dedicated MySQL Server”. -
Command-Line Format --innodb-log-files-in-group=#System Variable innodb_log_files_in_groupScope Global Dynamic No SET_VARHint AppliesNo Type Integer Default Value 2Minimum Value 2Maximum Value 100The number of log files in the log group.
InnoDBwrites to the files in a circular fashion. The default (and recommended) value is 2. The location of the files is specified byinnodb_log_group_home_dir. The combined size of log files (innodb_log_file_size*innodb_log_files_in_group) can be up to 512GB.For related information, see Redo Log File Configuration.
-
Command-Line Format --innodb-log-group-home-dir=dir_nameSystem Variable innodb_log_group_home_dirScope Global Dynamic No SET_VARHint AppliesNo Type Directory name The directory path to the
InnoDBredo log files, whose number is specified byinnodb_log_files_in_group. If you do not specify anyInnoDBlog variables, the default is to create two files namedib_logfile0andib_logfile1in the MySQL data directory. Log file size is given by theinnodb_log_file_sizesystem variable.For related information, see Redo Log File Configuration.
-
Command-Line Format --innodb-log-spin-cpu-abs-lwm=#System Variable innodb_log_spin_cpu_abs_lwmScope Global Dynamic Yes SET_VARHint AppliesNo Type Integer Default Value 80Minimum Value 0Maximum Value 4294967295Defines the minimum amount of CPU usage below which user threads no longer spin while waiting for flushed redo. The value is expressed as a sum of CPU core usage. For example, The default value of 80 is 80% of a single CPU core. On a system with a multi-core processor, a value of 150 represents 100% usage of one CPU core plus 50% usage of a second CPU core.
For related information, see Section 8.5.4, “Optimizing InnoDB Redo Logging”.
-
Command-Line Format --innodb-log-spin-cpu-pct-hwm=#System Variable innodb_log_spin_cpu_pct_hwmScope Global Dynamic Yes SET_VARHint AppliesNo Type Integer Default Value 50Minimum Value 0Maximum Value 100Defines the maximum amount of CPU usage above which user threads no longer spin while waiting for flushed redo. The value is expressed as a percentage of the combined total processing power of all CPU cores. The default value is 50%. For example, 100% usage of two CPU cores is 50% of the combined CPU processing power on a server with four CPU cores.
The
innodb_log_spin_cpu_pct_hwmvariable respects processor affinity. For example, if a server has 48 cores but the mysqld process is pinned to only four CPU cores, the other 44 CPU cores are ignored.For related information, see Section 8.5.4, “Optimizing InnoDB Redo Logging”.
innodb_log_wait_for_flush_spin_hwmCommand-Line Format --innodb-log-wait-for-flush-spin-hwm=#System Variable innodb_log_wait_for_flush_spin_hwmScope Global Dynamic Yes SET_VARHint AppliesNo Type Integer Default Value 400Minimum Value 0Maximum Value (64-bit platforms) 2**64-1Maximum Value (32-bit platforms) 2**32-1Defines the maximum average log flush time beyond which user threads no longer spin while waiting for flushed redo. The default value is 400 microseconds.
For related information, see Section 8.5.4, “Optimizing InnoDB Redo Logging”.
-
Command-Line Format --innodb-log-write-ahead-size=#System Variable innodb_log_write_ahead_sizeScope Global Dynamic Yes SET_VARHint AppliesNo Type Integer Default Value 8192Minimum Value 512 (log file block size)Maximum Value Equal to innodb_page_sizeDefines the write-ahead block size for the redo log, in bytes. To avoid “read-on-write”, set
innodb_log_write_ahead_sizeto match the operating system or file system cache block size. The default setting is 8192 bytes. Read-on-write occurs when redo log blocks are not entirely cached to the operating system or file system due to a mismatch between write-ahead block size for the redo log and operating system or file system cache block size.Valid values for
innodb_log_write_ahead_sizeare multiples of theInnoDBlog file block size (2n). The minimum value is theInnoDBlog file block size (512). Write-ahead does not occur when the minimum value is specified. The maximum value is equal to theinnodb_page_sizevalue. If you specify a value forinnodb_log_write_ahead_sizethat is larger than theinnodb_page_sizevalue, theinnodb_log_write_ahead_sizesetting is truncated to theinnodb_page_sizevalue.Setting the
innodb_log_write_ahead_sizevalue too low in relation to the operating system or file system cache block size results in “read-on-write”. Setting the value too high may have a slight impact onfsyncperformance for log file writes due to several blocks being written at once.For related information, see Section 8.5.4, “Optimizing InnoDB Redo Logging”.
-
Command-Line Format --innodb-log-writer-threads[={OFF|ON}]Introduced 8.0.22 System Variable innodb_log_writer_threadsScope Global Dynamic Yes SET_VARHint AppliesNo Type Boolean Default Value ONEnables dedicated log writer threads for writing redo log records from the log buffer to the system buffers and flushing the system buffers to the redo log files. Dedicated log writer threads can improve performance on high-concurrency systems, but for low-concurrency systems, disabling dedicated log writer threads provides better performance.
For more information, see Section 8.5.4, “Optimizing InnoDB Redo Logging”.
-
Command-Line Format --innodb-lru-scan-depth=#System Variable innodb_lru_scan_depthScope Global Dynamic Yes SET_VARHint AppliesNo Type Integer Default Value 1024Minimum Value 100Maximum Value (64-bit platforms) 2**64-1Maximum Value (32-bit platforms) 2**32-1A parameter that influences the algorithms and heuristics for the flush operation for the
InnoDBbuffer pool. Primarily of interest to performance experts tuning I/O-intensive workloads. It specifies, per buffer pool instance, how far down the buffer pool LRU page list the page cleaner thread scans looking for dirty pages to flush. This is a background operation performed once per second.A setting smaller than the default is generally suitable for most workloads. A value that is much higher than necessary may impact performance. Only consider increasing the value if you have spare I/O capacity under a typical workload. Conversely, if a write-intensive workload saturates your I/O capacity, decrease the value, especially in the case of a large buffer pool.
When tuning
innodb_lru_scan_depth, start with a low value and configure the setting upward with the goal of rarely seeing zero free pages. Also, consider adjustinginnodb_lru_scan_depthwhen changing the number of buffer pool instances, sinceinnodb_lru_scan_depth*innodb_buffer_pool_instancesdefines the amount of work performed by the page cleaner thread each second.For related information, see Section 15.8.3.5, “Configuring Buffer Pool Flushing”. For general I/O tuning advice, see Section 8.5.8, “Optimizing InnoDB Disk I/O”.
-
Command-Line Format --innodb-max-dirty-pages-pct=#System Variable innodb_max_dirty_pages_pctScope Global Dynamic Yes SET_VARHint AppliesNo Type Numeric Default Value 90Minimum Value 0Maximum Value 99.99InnoDBtries to flush data from the buffer pool so that the percentage of dirty pages does not exceed this value.The
innodb_max_dirty_pages_pctsetting establishes a target for flushing activity. It does not affect the rate of flushing. For information about managing the rate of flushing, see Section 15.8.3.5, “Configuring Buffer Pool Flushing”.For related information, see Section 15.8.3.5, “Configuring Buffer Pool Flushing”. For general I/O tuning advice, see Section 8.5.8, “Optimizing InnoDB Disk I/O”.
innodb_max_dirty_pages_pct_lwmCommand-Line Format --innodb-max-dirty-pages-pct-lwm=#System Variable innodb_max_dirty_pages_pct_lwmScope Global Dynamic Yes SET_VARHint AppliesNo Type Numeric Default Value 10Minimum Value 0Maximum Value 99.99Defines a low water mark representing the percentage of dirty pages at which preflushing is enabled to control the dirty page ratio. A value of 0 disables the pre-flushing behavior entirely. For more information, see Section 15.8.3.5, “Configuring Buffer Pool Flushing”.
-
Command-Line Format --innodb-max-purge-lag=#System Variable innodb_max_purge_lagScope Global Dynamic Yes SET_VARHint AppliesNo Type Integer Default Value 0Minimum Value 0Maximum Value 4294967295Defines the desired maximum purge lag. If this value is exceeded, a delay is imposed on
INSERT,UPDATE, andDELETEoperations to allow time for purge to catch up. The default value is 0, which means there is no maximum purge lag and no delay.For more information, see Section 15.8.9, “Purge Configuration”.
-
Command-Line Format --innodb-max-purge-lag-delay=#System Variable innodb_max_purge_lag_delayScope Global Dynamic Yes SET_VARHint AppliesNo Type Integer Default Value 0Minimum Value 0Maximum Value 10000000Specifies the maximum delay in microseconds for the delay imposed when the
innodb_max_purge_lagthreshold is exceeded. The specifiedinnodb_max_purge_lag_delayvalue is an upper limit on the delay period calculated by theinnodb_max_purge_lagformula.For more information, see Section 15.8.9, “Purge Configuration”.
-
Command-Line Format --innodb-max-undo-log-size=#System Variable innodb_max_undo_log_sizeScope Global Dynamic Yes SET_VARHint AppliesNo Type Integer Default Value 1073741824Minimum Value 10485760Maximum Value 2**64-1Defines a threshold size for undo tablespaces. If an undo tablespace exceeds the threshold, it can be marked for truncation when
innodb_undo_log_truncateis enabled. The default value is 1073741824 bytes (1024 MiB).For more information, see Truncating Undo Tablespaces.
innodb_merge_threshold_set_all_debugCommand-Line Format --innodb-merge-threshold-set-all-debug=#System Variable innodb_merge_threshold_set_all_debugScope Global Dynamic Yes SET_VARHint AppliesNo Type Integer Default Value 50Minimum Value 1Maximum Value 50Defines a page-full percentage value for index pages that overrides the current
MERGE_THRESHOLDsetting for all indexes that are currently in the dictionary cache. This option is only available if debugging support is compiled in using theWITH_DEBUGCMake option. For related information, see Section 15.8.11, “Configuring the Merge Threshold for Index Pages”.-
Command-Line Format --innodb-monitor-disable={counter|module|pattern|all}System Variable innodb_monitor_disableScope Global Dynamic Yes SET_VARHint AppliesNo Type String Disables
InnoDBmetrics counters. Counter data may be queried using theINFORMATION_SCHEMA.INNODB_METRICStable. For usage information, see Section 15.15.6, “InnoDB INFORMATION_SCHEMA Metrics Table”.innodb_monitor_disable='latch'disables statistics collection forSHOW ENGINE INNODB MUTEX. For more information, see Section 13.7.7.15, “SHOW ENGINE Statement”. -
Command-Line Format --innodb-monitor-enable={counter|module|pattern|all}System Variable innodb_monitor_enableScope Global Dynamic Yes SET_VARHint AppliesNo Type String Enables
InnoDBmetrics counters. Counter data may be queried using theINFORMATION_SCHEMA.INNODB_METRICStable. For usage information, see Section 15.15.6, “InnoDB INFORMATION_SCHEMA Metrics Table”.innodb_monitor_enable='latch'enables statistics collection forSHOW ENGINE INNODB MUTEX. For more information, see Section 13.7.7.15, “SHOW ENGINE Statement”. -
Command-Line Format --innodb-monitor-reset={counter|module|pattern|all}System Variable innodb_monitor_resetScope Global Dynamic Yes SET_VARHint AppliesNo Type Enumeration Default Value empty stringValid Values countermodulepatternallResets the count value for
InnoDBmetrics counters to zero. Counter data may be queried using theINFORMATION_SCHEMA.INNODB_METRICStable. For usage information, see Section 15.15.6, “InnoDB INFORMATION_SCHEMA Metrics Table”.innodb_monitor_reset='latch'resets statistics reported bySHOW ENGINE INNODB MUTEX. For more information, see Section 13.7.7.15, “SHOW ENGINE Statement”. -
Command-Line Format --innodb-monitor-reset-all={counter|module|pattern|all}System Variable innodb_monitor_reset_allScope Global Dynamic Yes SET_VARHint AppliesNo Type Enumeration Default Value empty stringValid Values countermodulepatternallResets all values (minimum, maximum, and so on) for
InnoDBmetrics counters. Counter data may be queried using theINFORMATION_SCHEMA.INNODB_METRICStable. For usage information, see Section 15.15.6, “InnoDB INFORMATION_SCHEMA Metrics Table”. -
Command-Line Format --innodb-numa-interleave[={OFF|ON}]System Variable innodb_numa_interleaveScope Global Dynamic No SET_VARHint AppliesNo Type Boolean Default Value OFFEnables the NUMA interleave memory policy for allocation of the
InnoDBbuffer pool. Wheninnodb_numa_interleaveis enabled, the NUMA memory policy is set toMPOL_INTERLEAVEfor the mysqld process. After theInnoDBbuffer pool is allocated, the NUMA memory policy is set back toMPOL_DEFAULT. For theinnodb_numa_interleaveoption to be available, MySQL must be compiled on a NUMA-enabled Linux system.CMake sets the default
WITH_NUMAvalue based on whether the current platform hasNUMAsupport. For more information, see Section 2.9.7, “MySQL Source-Configuration Options”. -
Command-Line Format --innodb-old-blocks-pct=#System Variable innodb_old_blocks_pctScope Global Dynamic Yes SET_VARHint AppliesNo Type Integer Default Value 37Minimum Value 5Maximum Value 95Specifies the approximate percentage of the
InnoDBbuffer pool used for the old block sublist. The range of values is 5 to 95. The default value is 37 (that is, 3/8 of the pool). Often used in combination withinnodb_old_blocks_time.For more information, see Section 15.8.3.3, “Making the Buffer Pool Scan Resistant”. For information about buffer pool management, the LRU algorithm, and eviction policies, see Section 15.5.1, “Buffer Pool”.
-
Command-Line Format --innodb-old-blocks-time=#System Variable innodb_old_blocks_timeScope Global Dynamic Yes SET_VARHint AppliesNo Type Integer Default Value 1000Minimum Value 0Maximum Value 2**32-1Non-zero values protect against the buffer pool being filled by data that is referenced only for a brief period, such as during a full table scan. Increasing this value offers more protection against full table scans interfering with data cached in the buffer pool.
Specifies how long in milliseconds a block inserted into the old sublist must stay there after its first access before it can be moved to the new sublist. If the value is 0, a block inserted into the old sublist moves immediately to the new sublist the first time it is accessed, no matter how soon after insertion the access occurs. If the value is greater than 0, blocks remain in the old sublist until an access occurs at least that many milliseconds after the first access. For example, a value of 1000 causes blocks to stay in the old sublist for 1 second after the first access before they become eligible to move to the new sublist.
The default value is 1000.
This variable is often used in combination with
innodb_old_blocks_pct. For more information, see Section 15.8.3.3, “Making the Buffer Pool Scan Resistant”. For information about buffer pool management, the LRU algorithm, and eviction policies, see Section 15.5.1, “Buffer Pool”. innodb_online_alter_log_max_sizeCommand-Line Format --innodb-online-alter-log-max-size=#System Variable innodb_online_alter_log_max_sizeScope Global Dynamic Yes SET_VARHint AppliesNo Type Integer Default Value 134217728Minimum Value 65536Maximum Value 2**64-1Specifies an upper limit in bytes on the size of the temporary log files used during online DDL operations for
InnoDBtables. There is one such log file for each index being created or table being altered. This log file stores data inserted, updated, or deleted in the table during the DDL operation. The temporary log file is extended when needed by the value ofinnodb_sort_buffer_size, up to the maximum specified byinnodb_online_alter_log_max_size. If a temporary log file exceeds the upper size limit, theALTER TABLEoperation fails and all uncommitted concurrent DML operations are rolled back. Thus, a large value for this option allows more DML to happen during an online DDL operation, but also extends the period of time at the end of the DDL operation when the table is locked to apply the data from the log.-
Command-Line Format --innodb-open-files=#System Variable innodb_open_filesScope Global Dynamic No SET_VARHint AppliesNo Type Integer Default Value -1(signifies autosizing; do not assign this literal value)Minimum Value 10Maximum Value 4294967295This variable is only relevant if you use multiple
InnoDBtablespaces. It specifies the maximum number of.ibdfiles that MySQL can keep open at one time. The minimum value is 10. The default value is 300 ifinnodb_file_per_tableis not enabled, and the higher of 300 andtable_open_cacheotherwise.The file descriptors used for
.ibdfiles are forInnoDBtables only. They are independent of those specified by theopen_files_limitsystem variable, and do not affect the operation of the table cache. For general I/O tuning advice, see Section 8.5.8, “Optimizing InnoDB Disk I/O”. -
Command-Line Format --innodb-optimize-fulltext-only[={OFF|ON}]System Variable innodb_optimize_fulltext_onlyScope Global Dynamic Yes SET_VARHint AppliesNo Type Boolean Default Value OFFChanges the way
OPTIMIZE TABLEoperates onInnoDBtables. Intended to be enabled temporarily, during maintenance operations forInnoDBtables withFULLTEXTindexes.By default,
OPTIMIZE TABLEreorganizes data in the clustered index of the table. When this option is enabled,OPTIMIZE TABLEskips the reorganization of table data, and instead processes newly added, deleted, and updated token data forInnoDBFULLTEXTindexes. For more information, see Optimizing InnoDB Full-Text Indexes. -
Command-Line Format --innodb-page-cleaners=#System Variable innodb_page_cleanersScope Global Dynamic No SET_VARHint AppliesNo Type Integer Default Value 4Minimum Value 1Maximum Value 64The number of page cleaner threads that flush dirty pages from buffer pool instances. Page cleaner threads perform flush list and LRU flushing. When there are multiple page cleaner threads, buffer pool flushing tasks for each buffer pool instance are dispatched to idle page cleaner threads. The
innodb_page_cleanersdefault value is 4. If the number of page cleaner threads exceeds the number of buffer pool instances,innodb_page_cleanersis automatically set to the same value asinnodb_buffer_pool_instances.If your workload is write-IO bound when flushing dirty pages from buffer pool instances to data files, and if your system hardware has available capacity, increasing the number of page cleaner threads may help improve write-IO throughput.
Multithreaded page cleaner support extends to shutdown and recovery phases.
The
setpriority()system call is used on Linux platforms where it is supported, and where the mysqld execution user is authorized to givepage_cleanerthreads priority over other MySQL andInnoDBthreads to help page flushing keep pace with the current workload.setpriority()support is indicated by thisInnoDBstartup message:[Note] InnoDB: If the mysqld execution user is authorized, page cleaner thread priority can be changed. See the man page of setpriority().
For systems where server startup and shutdown is not managed by systemd, mysqld execution user authorization can be configured in
/etc/security/limits.conf. For example, if mysqld is run under themysqluser, you can authorize themysqluser by adding these lines to/etc/security/limits.conf:mysql hard nice -20 mysql soft nice -20
For systemd managed systems, the same can be achieved by specifying
LimitNICE=-20in a localized systemd configuration file. For example, create a file namedoverride.confin/etc/systemd/system/mysqld.service.d/override.confand add this entry:[Service] LimitNICE=-20
After creating or changing
override.conf, reload the systemd configuration, then tell systemd to restart the MySQL service:systemctl daemon-reload systemctl restart mysqld # RPM platforms systemctl restart mysql # Debian platforms
For more information about using a localized systemd configuration file, see Configuring systemd for MySQL.
After authorizing the mysqld execution user, use the cat command to verify the configured
Nicelimits for the mysqld process:shell> cat /proc/
mysqld_pid/limits | grep nice Max nice priority 18446744073709551596 18446744073709551596 -
Command-Line Format --innodb-page-size=#System Variable innodb_page_sizeScope Global Dynamic No SET_VARHint AppliesNo Type Enumeration Default Value 16384Valid Values 40968192163843276865536Specifies the page size for
InnoDBtablespaces. Values can be specified in bytes or kilobytes. For example, a 16 kilobyte page size value can be specified as 16384, 16KB, or 16k.innodb_page_sizecan only be configured prior to initializing the MySQL instance and cannot be changed afterward. If no value is specified, the instance is initialized using the default page size. See Section 15.8.1, “InnoDB Startup Configuration”.For both 32KB and 64KB page sizes, the maximum row length is approximately 16000 bytes.
ROW_FORMAT=COMPRESSEDis not supported wheninnodb_page_sizeis set to 32KB or 64KB. Forinnodb_page_size=32KB, extent size is 2MB. Forinnodb_page_size=64KB, extent size is 4MB.innodb_log_buffer_sizeshould be set to at least 16M (the default) when using 32KB or 64KB page sizes.The default 16KB page size or larger is appropriate for a wide range of workloads, particularly for queries involving table scans and DML operations involving bulk updates. Smaller page sizes might be more efficient for OLTP workloads involving many small writes, where contention can be an issue when single pages contain many rows. Smaller pages might also be efficient with SSD storage devices, which typically use small block sizes. Keeping the
InnoDBpage size close to the storage device block size minimizes the amount of unchanged data that is rewritten to disk.The minimum file size for the first system tablespace data file (
ibdata1) differs depending on theinnodb_page_sizevalue. See theinnodb_data_file_pathoption description for more information.For general I/O tuning advice, see Section 8.5.8, “Optimizing InnoDB Disk I/O”.
-
Command-Line Format --innodb-parallel-read-threads=#Introduced 8.0.14 System Variable innodb_parallel_read_threadsScope Session Dynamic Yes SET_VARHint AppliesNo Type Integer Default Value 4Minimum Value 1Maximum Value 256Defines the number of threads that can be used for parallel clustered index reads. Parallel scanning of partitions is supported as of MySQL 8.0.17. Parallel read threads can improve
CHECK TABLEperformance.InnoDBreads the clustered index twice during aCHECK TABLEoperation. The second read can be performed in parallel. This feature does not apply to secondary index scans. Theinnodb_parallel_read_threadssession variable must be set to a value greater than 1 for parallel clustered index reads to occur. The actual number of threads used to perform a parallel clustered index read is determined by theinnodb_parallel_read_threadssetting or the number of index subtrees to scan, whichever is smaller. The pages read into the buffer pool during the scan are kept at the tail of the buffer pool LRU list so that they can be discarded quickly when free buffer pool pages are required.As of MySQL 8.0.17, the maximum number of parallel read threads (256) is the total number of threads for all client connections. If the thread limit is reached, connections fall back to using a single thread.
-
Command-Line Format --innodb-print-all-deadlocks[={OFF|ON}]System Variable innodb_print_all_deadlocksScope Global Dynamic Yes SET_VARHint AppliesNo Type Boolean Default Value OFFWhen this option is enabled, information about all deadlocks in
InnoDBuser transactions is recorded in themysqlderror log. Otherwise, you see information about only the last deadlock, using theSHOW ENGINE INNODB STATUScommand. An occasionalInnoDBdeadlock is not necessarily an issue, becauseInnoDBdetects the condition immediately and rolls back one of the transactions automatically. You might use this option to troubleshoot why deadlocks are occurring if an application does not have appropriate error-handling logic to detect the rollback and retry its operation. A large number of deadlocks might indicate the need to restructure transactions that issue DML orSELECT ... FOR UPDATEstatements for multiple tables, so that each transaction accesses the tables in the same order, thus avoiding the deadlock condition.For related information, see Section 15.7.5, “Deadlocks in InnoDB”.
-
Command-Line Format --innodb-print-ddl-logs[={OFF|ON}]System Variable innodb_print_ddl_logsScope Global Dynamic Yes SET_VARHint AppliesNo Type Boolean Default Value OFFEnabling this option causes MySQL to write DDL logs to
stderr. For more information, see Viewing DDL Logs. -
Command-Line Format --innodb-purge-batch-size=#System Variable innodb_purge_batch_sizeScope Global Dynamic Yes SET_VARHint AppliesNo Type Integer Default Value 300Minimum Value 1Maximum Value 5000Defines the number of undo log pages that purge parses and processes in one batch from the history list. In a multithreaded purge configuration, the coordinator purge thread divides
innodb_purge_batch_sizebyinnodb_purge_threadsand assigns that number of pages to each purge thread. Theinnodb_purge_batch_sizevariable also defines the number of undo log pages that purge frees after every 128 iterations through the undo logs.The
innodb_purge_batch_sizeoption is intended for advanced performance tuning in combination with theinnodb_purge_threadssetting. Most users need not changeinnodb_purge_batch_sizefrom its default value.For related information, see Section 15.8.9, “Purge Configuration”.
-
Command-Line Format --innodb-purge-threads=#System Variable innodb_purge_threadsScope Global Dynamic No SET_VARHint AppliesNo Type Integer Default Value 4Minimum Value 1Maximum Value 32The number of background threads devoted to the
InnoDBpurge operation. Increasing the value creates additional purge threads, which can improve efficiency on systems where DML operations are performed on multiple tables.For related information, see Section 15.8.9, “Purge Configuration”.
innodb_purge_rseg_truncate_frequencyCommand-Line Format --innodb-purge-rseg-truncate-frequency=#System Variable innodb_purge_rseg_truncate_frequencyScope Global Dynamic Yes SET_VARHint AppliesNo Type Integer Default Value 128Minimum Value 1Maximum Value 128Defines the frequency with which the purge system frees rollback segments in terms of the number of times that purge is invoked. An undo tablespace cannot be truncated until its rollback segments are freed. Normally, the purge system frees rollback segments once every 128 times that purge is invoked. The default value is 128. Reducing this value increases the frequency with which the purge thread frees rollback segments.
innodb_purge_rseg_truncate_frequencyis intended for use withinnodb_undo_log_truncate. For more information, see Truncating Undo Tablespaces.-
Command-Line Format --innodb-random-read-ahead[={OFF|ON}]System Variable innodb_random_read_aheadScope Global Dynamic Yes SET_VARHint AppliesNo Type Boolean Default Value OFFEnables the random read-ahead technique for optimizing
InnoDBI/O.For details about performance considerations for different types of read-ahead requests, see Section 15.8.3.4, “Configuring InnoDB Buffer Pool Prefetching (Read-Ahead)”. For general I/O tuning advice, see Section 8.5.8, “Optimizing InnoDB Disk I/O”.
-
Command-Line Format --innodb-read-ahead-threshold=#System Variable innodb_read_ahead_thresholdScope Global Dynamic Yes SET_VARHint AppliesNo Type Integer Default Value 56Minimum Value 0Maximum Value 64Controls the sensitivity of linear read-ahead that
InnoDBuses to prefetch pages into the buffer pool. IfInnoDBreads at leastinnodb_read_ahead_thresholdpages sequentially from an extent (64 pages), it initiates an asynchronous read for the entire following extent. The permissible range of values is 0 to 64. A value of 0 disables read-ahead. For the default of 56,InnoDBmust read at least 56 pages sequentially from an extent to initiate an asynchronous read for the following extent.Knowing how many pages are read through the read-ahead mechanism, and how many of these pages are evicted from the buffer pool without ever being accessed, can be useful when fine-tuning the
innodb_read_ahead_thresholdsetting.SHOW ENGINE INNODB STATUSoutput displays counter information from theInnodb_buffer_pool_read_aheadandInnodb_buffer_pool_read_ahead_evictedglobal status variables, which report the number of pages brought into the buffer pool by read-ahead requests, and the number of such pages evicted from the buffer pool without ever being accessed, respectively. The status variables report global values since the last server restart.SHOW ENGINE INNODB STATUSalso shows the rate at which the read-ahead pages are read and the rate at which such pages are evicted without being accessed. The per-second averages are based on the statistics collected since the last invocation ofSHOW ENGINE INNODB STATUSand are displayed in theBUFFER POOL AND MEMORYsection of theSHOW ENGINE INNODB STATUSoutput.For more information, see Section 15.8.3.4, “Configuring InnoDB Buffer Pool Prefetching (Read-Ahead)”. For general I/O tuning advice, see Section 8.5.8, “Optimizing InnoDB Disk I/O”.
-
Command-Line Format --innodb-read-io-threads=#System Variable innodb_read_io_threadsScope Global Dynamic No SET_VARHint AppliesNo Type Integer Default Value 4Minimum Value 1Maximum Value 64The number of I/O threads for read operations in
InnoDB. Its counterpart for write threads isinnodb_write_io_threads. For more information, see Section 15.8.5, “Configuring the Number of Background InnoDB I/O Threads”. For general I/O tuning advice, see Section 8.5.8, “Optimizing InnoDB Disk I/O”.NoteOn Linux systems, running multiple MySQL servers (typically more than 12) with default settings for
innodb_read_io_threads,innodb_write_io_threads, and the Linuxaio-max-nrsetting can exceed system limits. Ideally, increase theaio-max-nrsetting; as a workaround, you might reduce the settings for one or both of the MySQL variables. -
Command-Line Format --innodb-read-only[={OFF|ON}]System Variable innodb_read_onlyScope Global Dynamic No SET_VARHint AppliesNo Type Boolean Default Value OFFStarts
InnoDBin read-only mode. For distributing database applications or data sets on read-only media. Can also be used in data warehouses to share the same data directory between multiple instances. For more information, see Section 15.8.2, “Configuring InnoDB for Read-Only Operation”.Previously, enabling the
innodb_read_onlysystem variable prevented creating and dropping tables only for theInnoDBstorage engine. As of MySQL 8.0, enablinginnodb_read_onlyprevents these operations for all storage engines. Table creation and drop operations for any storage engine modify data dictionary tables in themysqlsystem database, but those tables use theInnoDBstorage engine and cannot be modified wheninnodb_read_onlyis enabled. The same principle applies to other table operations that require modifying data dictionary tables. Examples:If the
innodb_read_onlysystem variable is enabled,ANALYZE TABLEmay fail because it cannot update statistics tables in the data dictionary, which useInnoDB. ForANALYZE TABLEoperations that update the key distribution, failure may occur even if the operation updates the table itself (for example, if it is aMyISAMtable). To obtain the updated distribution statistics, setinformation_schema_stats_expiry=0.ALTER TABLEfails because it updates the storage engine designation, which is stored in the data dictionary.tbl_nameENGINE=engine_name
In addition, other tables in the
mysqlsystem database use theInnoDBstorage engine in MySQL 8.0. Making those tables read only results in restrictions on operations that modify them. Examples:Account-management statements such as
CREATE USERandGRANTfail because the grant tables useInnoDB.The
INSTALL PLUGINandUNINSTALL PLUGINplugin-management statements fail because themysql.pluginsystem table usesInnoDB.The
CREATE FUNCTIONandDROP FUNCTIONUDF-management statements fail because themysql.funcsystem table usesInnoDB.
-
Command-Line Format --innodb-redo-log-archive-dirsIntroduced 8.0.17 System Variable innodb_redo_log_archive_dirsScope Global Dynamic Yes SET_VARHint AppliesNo Type String Default Value NULLDefines labeled directories where redo log archive files can be created. You can define multiple labeled directories in a semicolon-separated list. For example:
innodb_redo_log_archive_dirs='label1:/backups1;label2:/backups2'
A label can be any string of characters, with the exception of colons (:), which are not permitted. An empty label is also permitted, but the colon (:) is still required in this case.
A path must be specified, and the directory must exist. The path can contain colons (':'), but semicolons (;) are not permitted.
-
Command-Line Format --innodb-redo-log-encrypt[={OFF|ON}]System Variable innodb_redo_log_encryptScope Global Dynamic Yes SET_VARHint AppliesNo Type Boolean Default Value OFFControls encryption of redo log data for tables encrypted using the
InnoDBdata-at-rest encryption feature. Encryption of redo log data is disabled by default. For more information, see Redo Log Encryption. -
Command-Line Format --innodb-replication-delay=#System Variable innodb_replication_delayScope Global Dynamic Yes SET_VARHint AppliesNo Type Integer Default Value 0Minimum Value 0Maximum Value 4294967295The replication thread delay in milliseconds on a replica server if
innodb_thread_concurrencyis reached. -
Command-Line Format --innodb-rollback-on-timeout[={OFF|ON}]System Variable innodb_rollback_on_timeoutScope Global Dynamic No SET_VARHint AppliesNo Type Boolean Default Value OFFInnoDBrolls back only the last statement on a transaction timeout by default. If--innodb-rollback-on-timeoutis specified, a transaction timeout causesInnoDBto abort and roll back the entire transaction.For more information, see Section 15.21.4, “InnoDB Error Handling”.
-
Command-Line Format --innodb-rollback-segments=#System Variable innodb_rollback_segmentsScope Global Dynamic Yes SET_VARHint AppliesNo Type Integer Default Value 128Minimum Value 1Maximum Value 128innodb_rollback_segmentsdefines the number of rollback segments allocated to each undo tablespace and the global temporary tablespace for transactions that generate undo records. The number of transactions that each rollback segment supports depends on theInnoDBpage size and the number of undo logs assigned to each transaction. For more information, see Section 15.6.6, “Undo Logs”.For related information, see Section 15.3, “InnoDB Multi-Versioning”. For information about undo tablespaces, see Section 15.6.3.4, “Undo Tablespaces”.
innodb_saved_page_number_debugCommand-Line Format --innodb-saved-page-number-debug=#System Variable innodb_saved_page_number_debugScope Global Dynamic Yes SET_VARHint AppliesNo Type Integer Default Value 0Maximum Value 2**23-1Saves a page number. Setting the
innodb_fil_make_page_dirty_debugoption dirties the page defined byinnodb_saved_page_number_debug. Theinnodb_saved_page_number_debugoption is only available if debugging support is compiled in using theWITH_DEBUGCMake option.-
Command-Line Format --innodb-sort-buffer-size=#System Variable innodb_sort_buffer_sizeScope Global Dynamic No SET_VARHint AppliesNo Type Integer Default Value 1048576Minimum Value 65536Maximum Value 67108864Specifies the size of sort buffers used to sort data during creation of an
InnoDBindex. The specified size defines the amount of data that is read into memory for internal sorting and then written out to disk. This process is referred to as a “run”. During the merge phase, pairs of buffers of the specified size are read and merged. The larger the setting, the fewer runs and merges there are.This sort area is only used for merge sorts during index creation, not during later index maintenance operations. Buffers are deallocated when index creation completes.
The value of this option also controls the amount by which the temporary log file is extended to record concurrent DML during online DDL operations.
Before this setting was made configurable, the size was hardcoded to 1048576 bytes (1MB), which remains the default.
During an
ALTER TABLEorCREATE TABLEstatement that creates an index, 3 buffers are allocated, each with a size defined by this option. Additionally, auxiliary pointers are allocated to rows in the sort buffer so that the sort can run on pointers (as opposed to moving rows during the sort operation).For a typical sort operation, a formula such as this one can be used to estimate memory consumption:
(6 /*FTS_NUM_AUX_INDEX*/ * (3*@@GLOBAL.innodb_sort_buffer_size) + 2 * number_of_partitions * number_of_secondary_indexes_created * (@@GLOBAL.innodb_sort_buffer_size/dict_index_get_min_size(index)*/) * 8 /*64-bit sizeof *buf->tuples*/")
@@GLOBAL.innodb_sort_buffer_size/dict_index_get_min_size(index)indicates the maximum tuples held.2 * (@@GLOBAL.innodb_sort_buffer_size/*dict_index_get_min_size(index)*/) * 8 /*64-bit size of *buf->tuples*/indicates auxiliary pointers allocated.NoteFor 32-bit, multiply by 4 instead of 8.
For parallel sorts on a full-text index, multiply by the
innodb_ft_sort_pll_degreesetting:(6 /*FTS_NUM_AUX_INDEX*/ * @@GLOBAL.innodb_ft_sort_pll_degree)
-
Command-Line Format --innodb-spin-wait-delay=#System Variable innodb_spin_wait_delayScope Global Dynamic Yes SET_VARHint AppliesNo Type Integer Default Value 6Minimum Value 0Maximum Value (64-bit platforms, ≤ 8.0.13) 2**64-1Maximum Value (32-bit platforms, ≤ 8.0.13) 2**32-1Maximum Value (≥ 8.0.14) 1000The maximum delay between polls for a spin lock. The low-level implementation of this mechanism varies depending on the combination of hardware and operating system, so the delay does not correspond to a fixed time interval.
Can be used in combination with the
innodb_spin_wait_pause_multipliervariable for greater control over the duration of spin-lock polling delays.For more information, see Section 15.8.8, “Configuring Spin Lock Polling”.
innodb_spin_wait_pause_multiplierCommand-Line Format --innodb-spin-wait-pause-multiplier=#Introduced 8.0.16 System Variable innodb_spin_wait_pause_multiplierScope Global Dynamic Yes SET_VARHint AppliesNo Type Integer Default Value 50Minimum Value 1Maximum Value 100Defines a multiplier value used to determine the number of PAUSE instructions in spin-wait loops that occur when a thread waits to acquire a mutex or rw-lock.
For more information, see Section 15.8.8, “Configuring Spin Lock Polling”.
-
Command-Line Format --innodb-stats-auto-recalc[={OFF|ON}]System Variable innodb_stats_auto_recalcScope Global Dynamic Yes SET_VARHint AppliesNo Type Boolean Default Value ONCauses
InnoDBto automatically recalculate persistent statistics after the data in a table is changed substantially. The threshold value is 10% of the rows in the table. This setting applies to tables created when theinnodb_stats_persistentoption is enabled. Automatic statistics recalculation may also be configured by specifyingSTATS_PERSISTENT=1in aCREATE TABLEorALTER TABLEstatement. The amount of data sampled to produce the statistics is controlled by theinnodb_stats_persistent_sample_pagesvariable.For more information, see Section 15.8.10.1, “Configuring Persistent Optimizer Statistics Parameters”.
innodb_stats_include_delete_markedCommand-Line Format --innodb-stats-include-delete-marked[={OFF|ON}]System Variable innodb_stats_include_delete_markedScope Global Dynamic Yes SET_VARHint AppliesNo Type Boolean Default Value OFFBy default,
InnoDBreads uncommitted data when calculating statistics. In the case of an uncommitted transaction that deletes rows from a table,InnoDBexcludes records that are delete-marked when calculating row estimates and index statistics, which can lead to non-optimal execution plans for other transactions that are operating on the table concurrently using a transaction isolation level other thanREAD UNCOMMITTED. To avoid this scenario,innodb_stats_include_delete_markedcan be enabled to ensure thatInnoDBincludes delete-marked records when calculating persistent optimizer statistics.When
innodb_stats_include_delete_markedis enabled,ANALYZE TABLEconsiders delete-marked records when recalculating statistics.innodb_stats_include_delete_markedis a global setting that affects allInnoDBtables. It is only applicable to persistent optimizer statistics.For related information, see Section 15.8.10.1, “Configuring Persistent Optimizer Statistics Parameters”.
-
Command-Line Format --innodb-stats-method=valueSystem Variable innodb_stats_methodScope Global Dynamic Yes SET_VARHint AppliesNo Type Enumeration Default Value nulls_equalValid Values nulls_equalnulls_unequalnulls_ignoredHow the server treats
NULLvalues when collecting statistics about the distribution of index values forInnoDBtables. Permitted values arenulls_equal,nulls_unequal, andnulls_ignored. Fornulls_equal, allNULLindex values are considered equal and form a single value group with a size equal to the number ofNULLvalues. Fornulls_unequal,NULLvalues are considered unequal, and eachNULLforms a distinct value group of size 1. Fornulls_ignored,NULLvalues are ignored.The method used to generate table statistics influences how the optimizer chooses indexes for query execution, as described in Section 8.3.8, “InnoDB and MyISAM Index Statistics Collection”.
-
Command-Line Format --innodb-stats-on-metadata[={OFF|ON}]System Variable innodb_stats_on_metadataScope Global Dynamic Yes SET_VARHint AppliesNo Type Boolean Default Value OFFThis option only applies when optimizer statistics are configured to be non-persistent. Optimizer statistics are not persisted to disk when
innodb_stats_persistentis disabled or when individual tables are created or altered withSTATS_PERSISTENT=0. For more information, see Section 15.8.10.2, “Configuring Non-Persistent Optimizer Statistics Parameters”.When
innodb_stats_on_metadatais enabled,InnoDBupdates non-persistent statistics when metadata statements such asSHOW TABLE STATUSor when accessing theINFORMATION_SCHEMA.TABLESorINFORMATION_SCHEMA.STATISTICStables. (These updates are similar to what happens forANALYZE TABLE.) When disabled,InnoDBdoes not update statistics during these operations. Leaving the setting disabled can improve access speed for schemas that have a large number of tables or indexes. It can also improve the stability of execution plans for queries that involveInnoDBtables.To change the setting, issue the statement
SET GLOBAL innodb_stats_on_metadata=, wheremodemodeONorOFF(or1or0). Changing the setting requires privileges sufficient to set global system variables (see Section 5.1.9.1, “System Variable Privileges”) and immediately affects the operation of all connections. -
Command-Line Format --innodb-stats-persistent[={OFF|ON}]System Variable innodb_stats_persistentScope Global Dynamic Yes SET_VARHint AppliesNo Type Boolean Default Value ONSpecifies whether
InnoDBindex statistics are persisted to disk. Otherwise, statistics may be recalculated frequently which can lead to variations in query execution plans. This setting is stored with each table when the table is created. You can setinnodb_stats_persistentat the global level before creating a table, or use theSTATS_PERSISTENTclause of theCREATE TABLEandALTER TABLEstatements to override the system-wide setting and configure persistent statistics for individual tables.For more information, see Section 15.8.10.1, “Configuring Persistent Optimizer Statistics Parameters”.
innodb_stats_persistent_sample_pagesCommand-Line Format --innodb-stats-persistent-sample-pages=#System Variable innodb_stats_persistent_sample_pagesScope Global Dynamic Yes SET_VARHint AppliesNo Type Integer Default Value 20The number of index pages to sample when estimating cardinality and other statistics for an indexed column, such as those calculated by
ANALYZE TABLE. Increasing the value improves the accuracy of index statistics, which can improve the query execution plan, at the expense of increased I/O during the execution ofANALYZE TABLEfor anInnoDBtable. For more information, see Section 15.8.10.1, “Configuring Persistent Optimizer Statistics Parameters”.NoteSetting a high value for
innodb_stats_persistent_sample_pagescould result in lengthyANALYZE TABLEexecution time. To estimate the number of database pages accessed byANALYZE TABLE, see Section 15.8.10.3, “Estimating ANALYZE TABLE Complexity for InnoDB Tables”.innodb_stats_persistent_sample_pagesonly applies wheninnodb_stats_persistentis enabled for a table; wheninnodb_stats_persistentis disabled,innodb_stats_transient_sample_pagesapplies instead.innodb_stats_transient_sample_pagesCommand-Line Format --innodb-stats-transient-sample-pages=#System Variable innodb_stats_transient_sample_pagesScope Global Dynamic Yes SET_VARHint AppliesNo Type Integer Default Value 8The number of index pages to sample when estimating cardinality and other statistics for an indexed column, such as those calculated by
ANALYZE TABLE. The default value is 8. Increasing the value improves the accuracy of index statistics, which can improve the query execution plan, at the expense of increased I/O when opening anInnoDBtable or recalculating statistics. For more information, see Section 15.8.10.2, “Configuring Non-Persistent Optimizer Statistics Parameters”.NoteSetting a high value for
innodb_stats_transient_sample_pagescould result in lengthyANALYZE TABLEexecution time. To estimate the number of database pages accessed byANALYZE TABLE, see Section 15.8.10.3, “Estimating ANALYZE TABLE Complexity for InnoDB Tables”.innodb_stats_transient_sample_pagesonly applies wheninnodb_stats_persistentis disabled for a table; wheninnodb_stats_persistentis enabled,innodb_stats_persistent_sample_pagesapplies instead. Takes the place ofinnodb_stats_sample_pages. For more information, see Section 15.8.10.2, “Configuring Non-Persistent Optimizer Statistics Parameters”.-
Command-Line Format --innodb-status-output[={OFF|ON}]System Variable innodb_status_outputScope Global Dynamic Yes SET_VARHint AppliesNo Type Boolean Default Value OFFEnables or disables periodic output for the standard
InnoDBMonitor. Also used in combination withinnodb_status_output_locksto enable or disable periodic output for theInnoDBLock Monitor. For more information, see Section 15.17.2, “Enabling InnoDB Monitors”. -
Command-Line Format --innodb-status-output-locks[={OFF|ON}]System Variable innodb_status_output_locksScope Global Dynamic Yes SET_VARHint AppliesNo Type Boolean Default Value OFFEnables or disables the
InnoDBLock Monitor. When enabled, theInnoDBLock Monitor prints additional information about locks inSHOW ENGINE INNODB STATUSoutput and in periodic output printed to the MySQL error log. Periodic output for theInnoDBLock Monitor is printed as part of the standardInnoDBMonitor output. The standardInnoDBMonitor must therefore be enabled for theInnoDBLock Monitor to print data to the MySQL error log periodically. For more information, see Section 15.17.2, “Enabling InnoDB Monitors”. -
Command-Line Format --innodb-strict-mode[={OFF|ON}]System Variable innodb_strict_modeScope Global, Session Dynamic Yes SET_VARHint AppliesNo Type Boolean Default Value ONWhen
innodb_strict_modeis enabled,InnoDBreturns errors rather than warnings for certain conditions.Strict mode helps guard against ignored typos and syntax errors in SQL, or other unintended consequences of various combinations of operational modes and SQL statements. When
innodb_strict_modeis enabled,InnoDBraises error conditions in certain cases, rather than issuing a warning and processing the specified statement (perhaps with unintended behavior). This is analogous tosql_modein MySQL, which controls what SQL syntax MySQL accepts, and determines whether it silently ignores errors, or validates input syntax and data values.The
innodb_strict_modesetting affects the handling of syntax errors forCREATE TABLE,ALTER TABLE,CREATE INDEX, andOPTIMIZE TABLEstatements.innodb_strict_modealso enables a record size check, so that anINSERTorUPDATEnever fails due to the record being too large for the selected page size.Oracle recommends enabling
innodb_strict_modewhen usingROW_FORMATandKEY_BLOCK_SIZEclauses inCREATE TABLE,ALTER TABLE, andCREATE INDEXstatements. Wheninnodb_strict_modeis disabled,InnoDBignores conflicting clauses and creates the table or index with only a warning in the message log. The resulting table might have different characteristics than intended, such as lack of compression support when attempting to create a compressed table. Wheninnodb_strict_modeis enabled, such problems generate an immediate error and the table or index is not created.You can enable or disable
innodb_strict_modeon the command line when startingmysqld, or in a MySQL configuration file. You can also enable or disableinnodb_strict_modeat runtime with the statementSET [GLOBAL|SESSION] innodb_strict_mode=, wheremodemodeONorOFF. Changing theGLOBALsetting requires privileges sufficient to set global system variables (see Section 5.1.9.1, “System Variable Privileges”) and affects the operation of all clients that subsequently connect. Any client can change theSESSIONsetting forinnodb_strict_mode, and the setting affects only that client.innodb_strict_modeis not applicable to general tablespaces. Tablespace management rules for general tablespaces are strictly enforced independently ofinnodb_strict_mode. For more information, see Section 13.1.21, “CREATE TABLESPACE Statement”. -
Command-Line Format --innodb-sync-array-size=#System Variable innodb_sync_array_sizeScope Global Dynamic No SET_VARHint AppliesNo Type Integer Default Value 1Minimum Value 1Maximum Value 1024Defines the size of the mutex/lock wait array. Increasing the value splits the internal data structure used to coordinate threads, for higher concurrency in workloads with large numbers of waiting threads. This setting must be configured when the MySQL instance is starting up, and cannot be changed afterward. Increasing the value is recommended for workloads that frequently produce a large number of waiting threads, typically greater than 768.
-
Command-Line Format --innodb-sync-spin-loops=#System Variable innodb_sync_spin_loopsScope Global Dynamic Yes SET_VARHint AppliesNo Type Integer Default Value 30Minimum Value 0Maximum Value 4294967295The number of times a thread waits for an
InnoDBmutex to be freed before the thread is suspended. -
Command-Line Format --innodb-sync-debug[={OFF|ON}]System Variable innodb_sync_debugScope Global Dynamic No SET_VARHint AppliesNo Type Boolean Default Value OFFEnables sync debug checking for the
InnoDBstorage engine. This option is only available if debugging support is compiled in using theWITH_DEBUGCMake option. -
Command-Line Format --innodb-table-locks[={OFF|ON}]System Variable innodb_table_locksScope Global, Session Dynamic Yes SET_VARHint AppliesNo Type Boolean Default Value ONIf
autocommit = 0,InnoDBhonorsLOCK TABLES; MySQL does not return fromLOCK TABLES ... WRITEuntil all other threads have released all their locks to the table. The default value ofinnodb_table_locksis 1, which means thatLOCK TABLEScauses InnoDB to lock a table internally ifautocommit = 0.innodb_table_locks = 0has no effect for tables locked explicitly withLOCK TABLES ... WRITE. It does have an effect for tables locked for read or write byLOCK TABLES ... WRITEimplicitly (for example, through triggers) or byLOCK TABLES ... READ.For related information, see Section 15.7, “InnoDB Locking and Transaction Model”.
-
Command-Line Format --innodb-temp-data-file-path=file_nameSystem Variable innodb_temp_data_file_pathScope Global Dynamic No SET_VARHint AppliesNo Type String Default Value ibtmp1:12M:autoextendDefines the relative path, name, size, and attributes of global temporary tablespace data files. The global temporary tablespace stores rollback segments for changes made to user-created temporary tables.
If no value is specified for
innodb_temp_data_file_path, the default behavior is to create a single auto-extending data file namedibtmp1in theinnodb_data_home_dirdirectory. The initial file size is slightly larger than 12MB.The syntax for a global temporary tablespace data file specification includes the file name, file size, and
autoextendandmaxattributes:file_name:file_size[:autoextend[:max:max_file_size]]The global temporary tablespace data file cannot have the same name as another
InnoDBdata file. Any inability or error creating the global temporary tablespace data file is treated as fatal and server startup is refused.File sizes are specified in KB, MB, or GB by appending
K,MorGto the size value. The sum of file sizes must be slightly larger than 12MB.The size limit of individual files is determined by the operating system. File size can be more than 4GB on operating systems that support large files. Use of raw disk partitions for global temporary tablespace data files is not supported.
The
autoextendandmaxattributes can be used only for the data file specified last in theinnodb_temp_data_file_pathsetting. For example:[mysqld] innodb_temp_data_file_path=ibtmp1:50M;ibtmp2:12M:autoextend:max:500MB
The
autoextendoption causes the data file to automatically increase in size when it runs out of free space. Theautoextendincrement is 64MB by default. To modify the increment, change theinnodb_autoextend_incrementvariable setting.The directory path for global temporary tablespace data files is formed by concatenating the paths defined by
innodb_data_home_dirandinnodb_temp_data_file_path.Before running
InnoDBin read-only mode, setinnodb_temp_data_file_pathto a location outside of the data directory. The path must be relative to the data directory. For example:--innodb-temp-data-file-path=../../../tmp/ibtmp1:12M:autoextend
For more information, see Global Temporary Tablespace.
-
Command-Line Format --innodb-temp-tablespaces-dir=dir_nameIntroduced 8.0.13 System Variable innodb_temp_tablespaces_dirScope Global Dynamic No SET_VARHint AppliesNo Type Directory name Default Value #innodb_tempDefines the location where
InnoDBcreates a pool of session temporary tablespaces at startup. The default location is the#innodb_tempdirectory in the data directory. A fully qualified path or path relative to the data directory is permitted.As of MySQL 8.0.16, session temporary tablespaces always store user-created temporary tables and internal temporary tables created by the optimizer using
InnoDB. (Previously, the on-disk storage engine for internal temporary tables was determined by theinternal_tmp_disk_storage_enginesystem variable, which is no longer supported. See Storage Engine for On-Disk Internal Temporary Tables.)For more information, see Session Temporary Tablespaces.
-
Command-Line Format --innodb-thread-concurrency=#System Variable innodb_thread_concurrencyScope Global Dynamic Yes SET_VARHint AppliesNo Type Integer Default Value 0Minimum Value 0Maximum Value 1000Defines the maximum number of threads permitted inside of
InnoDB. A value of 0 (the default) is interpreted as infinite concurrency (no limit). This variable is intended for performance tuning on high concurrency systems.InnoDBtries to keep the number of threads insideInnoDBless than or equal to theinnodb_thread_concurrencylimit. Once the limit is reached, additional threads are placed into a “First In, First Out” (FIFO) queue for waiting threads. Threads waiting for locks are not counted in the number of concurrently executing threads.The correct setting depends on workload and computing environment. Consider setting this variable if your MySQL instance shares CPU resources with other applications or if your workload or number of concurrent users is growing. Test a range of values to determine the setting that provides the best performance.
innodb_thread_concurrencyis a dynamic variable, which permits experimenting with different settings on a live test system. If a particular setting performs poorly, you can quickly setinnodb_thread_concurrencyback to 0.Use the following guidelines to help find and maintain an appropriate setting:
If the number of concurrent user threads for a workload is consistently small and does not affect performance, set
innodb_thread_concurrency=0(no limit).If your workload is consistently heavy or occasionally spikes, set an
innodb_thread_concurrencyvalue and adjust it until you find the number of threads that provides the best performance. For example, suppose that your system typically has 40 to 50 users, but periodically the number increases to 60, 70, or more. Through testing, you find that performance remains largely stable with a limit of 80 concurrent users. In this case, setinnodb_thread_concurrencyto 80.If you do not want
InnoDBto use more than a certain number of virtual CPUs for user threads (20 virtual CPUs, for example), setinnodb_thread_concurrencyto this number (or possibly lower, depending on performance testing). If your goal is to isolate MySQL from other applications, consider binding themysqldprocess exclusively to the virtual CPUs. Be aware, however, that exclusive binding can result in non-optimal hardware usage if themysqldprocess is not consistently busy. In this case, you can bind themysqldprocess to the virtual CPUs but allow other applications to use some or all of the virtual CPUs.NoteFrom an operating system perspective, using a resource management solution to manage how CPU time is shared among applications may be preferable to binding the
mysqldprocess. For example, you could assign 90% of virtual CPU time to a given application while other critical processes are not running, and scale that value back to 40% when other critical processes are running.In some cases, the optimal
innodb_thread_concurrencysetting can be smaller than the number of virtual CPUs.An
innodb_thread_concurrencyvalue that is too high can cause performance regression due to increased contention on system internals and resources.Monitor and analyze your system regularly. Changes to workload, number of users, or computing environment may require that you adjust the
innodb_thread_concurrencysetting.
A value of 0 disables the
queries inside InnoDBandqueries in queuecounters in theROW OPERATIONSsection ofSHOW ENGINE INNODB STATUSoutput.For related information, see Section 15.8.4, “Configuring Thread Concurrency for InnoDB”.
-
Command-Line Format --innodb-thread-sleep-delay=#System Variable innodb_thread_sleep_delayScope Global Dynamic Yes SET_VARHint AppliesNo Type Integer Default Value 10000Minimum Value 0Maximum Value 1000000How long
InnoDBthreads sleep before joining theInnoDBqueue, in microseconds. The default value is 10000. A value of 0 disables sleep. You can setinnodb_adaptive_max_sleep_delayto the highest value you would allow forinnodb_thread_sleep_delay, andInnoDBautomatically adjustsinnodb_thread_sleep_delayup or down depending on current thread-scheduling activity. This dynamic adjustment helps the thread scheduling mechanism to work smoothly during times when the system is lightly loaded or when it is operating near full capacity.For more information, see Section 15.8.4, “Configuring Thread Concurrency for InnoDB”.
-
Command-Line Format --innodb-tmpdir=dir_nameSystem Variable innodb_tmpdirScope Global, Session Dynamic Yes SET_VARHint AppliesNo Type Directory name Default Value NULLUsed to define an alternate directory for temporary sort files created during online
ALTER TABLEoperations that rebuild the table.Online
ALTER TABLEoperations that rebuild the table also create an intermediate table file in the same directory as the original table. Theinnodb_tmpdiroption is not applicable to intermediate table files.A valid value is any directory path other than the MySQL data directory path. If the value is NULL (the default), temporary files are created MySQL temporary directory (
$TMPDIRon Unix,%TEMP%on Windows, or the directory specified by the--tmpdirconfiguration option). If a directory is specified, existence of the directory and permissions are only checked wheninnodb_tmpdiris configured using aSETstatement. If a symlink is provided in a directory string, the symlink is resolved and stored as an absolute path. The path should not exceed 512 bytes. An onlineALTER TABLEoperation reports an error ifinnodb_tmpdiris set to an invalid directory.innodb_tmpdiroverrides the MySQLtmpdirsetting but only for onlineALTER TABLEoperations.The
FILEprivilege is required to configureinnodb_tmpdir.The
innodb_tmpdiroption was introduced to help avoid overflowing a temporary file directory located on atmpfsfile system. Such overflows could occur as a result of large temporary sort files created during onlineALTER TABLEoperations that rebuild the table.In replication environments, only consider replicating the
innodb_tmpdirsetting if all servers have the same operating system environment. Otherwise, replicating theinnodb_tmpdirsetting could result in a replication failure when running onlineALTER TABLEoperations that rebuild the table. If server operating environments differ, it is recommended that you configureinnodb_tmpdiron each server individually.For more information, see Section 15.12.3, “Online DDL Space Requirements”. For information about online
ALTER TABLEoperations, see Section 15.12, “InnoDB and Online DDL”. innodb_trx_purge_view_update_only_debugCommand-Line Format --innodb-trx-purge-view-update-only-debug[={OFF|ON}]System Variable innodb_trx_purge_view_update_only_debugScope Global Dynamic Yes SET_VARHint AppliesNo Type Boolean Default Value OFFPauses purging of delete-marked records while allowing the purge view to be updated. This option artificially creates a situation in which the purge view is updated but purges have not yet been performed. This option is only available if debugging support is compiled in using the
WITH_DEBUGCMake option.-
Command-Line Format --innodb-trx-rseg-n-slots-debug=#System Variable innodb_trx_rseg_n_slots_debugScope Global Dynamic Yes SET_VARHint AppliesNo Type Integer Default Value 0Maximum Value 1024Sets a debug flag that limits
TRX_RSEG_N_SLOTSto a given value for thetrx_rsegf_undo_find_freefunction that looks for free slots for undo log segments. This option is only available if debugging support is compiled in using theWITH_DEBUGCMake option. -
Command-Line Format --innodb-undo-directory=dir_nameSystem Variable innodb_undo_directoryScope Global Dynamic No SET_VARHint AppliesNo Type Directory name The path where
InnoDBcreates undo tablespaces. Typically used to place undo tablespaces on a different storage device.There is no default value (it is NULL). If the
innodb_undo_directoryvariable is undefined, undo tablespaces are created in the data directory.The default undo tablespaces (
innodb_undo_001andinnodb_undo_002) created when the MySQL instance is initialized always reside in the directory defined by theinnodb_undo_directoryvariable.Undo tablespaces created using
CREATE UNDO TABLESPACEsyntax are created in the directory defined by theinnodb_undo_directoryvariable if a different path is not specified.For more information, see Section 15.6.3.4, “Undo Tablespaces”.
-
Command-Line Format --innodb-undo-log-encrypt[={OFF|ON}]System Variable innodb_undo_log_encryptScope Global Dynamic Yes SET_VARHint AppliesNo Type Boolean Default Value OFFControls encryption of undo log data for tables encrypted using the
InnoDBdata-at-rest encryption feature. Only applies to undo logs that reside in separate undo tablespaces. See Section 15.6.3.4, “Undo Tablespaces”. Encryption is not supported for undo log data that resides in the system tablespace. For more information, see Undo Log Encryption. -
Command-Line Format --innodb-undo-log-truncate[={OFF|ON}]System Variable innodb_undo_log_truncateScope Global Dynamic Yes SET_VARHint AppliesNo Type Boolean Default Value ONWhen enabled, undo tablespaces that exceed the threshold value defined by
innodb_max_undo_log_sizeare marked for truncation. Only undo tablespaces can be truncated. Truncating undo logs that reside in the system tablespace is not supported. For truncation to occur, there must be at least two undo tablespaces.The
innodb_purge_rseg_truncate_frequencyvariable can be used to expedite truncation of undo tablespaces.For more information, see Truncating Undo Tablespaces.
-
Command-Line Format --innodb-undo-tablespaces=#Deprecated Yes System Variable innodb_undo_tablespacesScope Global Dynamic Yes SET_VARHint AppliesNo Type Integer Default Value 2Minimum Value 2Maximum Value 127Defines the number of undo tablespaces used by
InnoDB. The default and minimum value is 2.NoteThe
innodb_undo_tablespacesvariable is deprecated and is no longer configurable as of MySQL 8.0.14. Expect it to be removed in a future release.For more information, see Section 15.6.3.4, “Undo Tablespaces”.
-
Command-Line Format --innodb-use-native-aio[={OFF|ON}]System Variable innodb_use_native_aioScope Global Dynamic No SET_VARHint AppliesNo Type Boolean Default Value ONSpecifies whether to use the Linux asynchronous I/O subsystem. This variable applies to Linux systems only, and cannot be changed while the server is running. Normally, you do not need to configure this option, because it is enabled by default.
The asynchronous I/O capability that
InnoDBhas on Windows systems is available on Linux systems. (Other Unix-like systems continue to use synchronous I/O calls.) This feature improves the scalability of heavily I/O-bound systems, which typically show many pending reads/writes inSHOW ENGINE INNODB STATUS\Goutput.Running with a large number of
InnoDBI/O threads, and especially running multiple such instances on the same server machine, can exceed capacity limits on Linux systems. In this case, you may receive the following error:EAGAIN: The specified maxevents exceeds the user's limit of available events.
You can typically address this error by writing a higher limit to
/proc/sys/fs/aio-max-nr.However, if a problem with the asynchronous I/O subsystem in the OS prevents
InnoDBfrom starting, you can start the server withinnodb_use_native_aio=0. This option may also be disabled automatically during startup ifInnoDBdetects a potential problem such as a combination oftmpdirlocation,tmpfsfile system, and Linux kernel that does not support AIO ontmpfs.For more information, see Section 15.8.6, “Using Asynchronous I/O on Linux”.
innodb_validate_tablespace_pathsCommand-Line Format --innodb-validate-tablespace-paths[={OFF|ON}]Introduced 8.0.21 System Variable innodb_validate_tablespace_pathsScope Global Dynamic No SET_VARHint AppliesNo Type Boolean Default Value ONControls tablespace file path validation. At startup,
InnoDBvalidates the paths of known tablespace files against tablespace file paths stored in the data dictionary in case tablespace files have been moved to a different location. Theinnodb_validate_tablespace_pathsvariable permits disabling tablespace path validation. This feature is intended for environments where tablespaces files are not moved. Disabling path validation improves startup time on systems with a large number of tablespace files.WarningStarting the server with tablespace path validation disabled after moving tablespace files can lead to undefined behavior.
For more information, see Section 15.6.3.7, “Disabling Tablespace Path Validation”.
The
InnoDBversion number. In MySQL 8.0, separate version numbering forInnoDBdoes not apply and this value is the same theversionnumber of the server.-
Command-Line Format --innodb-write-io-threads=#System Variable innodb_write_io_threadsScope Global Dynamic No SET_VARHint AppliesNo Type Integer Default Value 4Minimum Value 1Maximum Value 64The number of I/O threads for write operations in
InnoDB. The default value is 4. Its counterpart for read threads isinnodb_read_io_threads. For more information, see Section 15.8.5, “Configuring the Number of Background InnoDB I/O Threads”. For general I/O tuning advice, see Section 8.5.8, “Optimizing InnoDB Disk I/O”.NoteOn Linux systems, running multiple MySQL servers (typically more than 12) with default settings for
innodb_read_io_threads,innodb_write_io_threads, and the Linuxaio-max-nrsetting can exceed system limits. Ideally, increase theaio-max-nrsetting; as a workaround, you might reduce the settings for one or both of the MySQL variables.Also take into consideration the value of
sync_binlog, which controls synchronization of the binary log to disk.For general I/O tuning advice, see Section 8.5.8, “Optimizing InnoDB Disk I/O”.
- 15.15.1 InnoDB INFORMATION_SCHEMA Tables about Compression
- 15.15.2 InnoDB INFORMATION_SCHEMA Transaction and Locking Information
- 15.15.3 InnoDB INFORMATION_SCHEMA Schema Object Tables
- 15.15.4 InnoDB INFORMATION_SCHEMA FULLTEXT Index Tables
- 15.15.5 InnoDB INFORMATION_SCHEMA Buffer Pool Tables
- 15.15.6 InnoDB INFORMATION_SCHEMA Metrics Table
- 15.15.7 InnoDB INFORMATION_SCHEMA Temporary Table Info Table
- 15.15.8 Retrieving InnoDB Tablespace Metadata from INFORMATION_SCHEMA.FILES
This section provides information and usage examples for
InnoDB
INFORMATION_SCHEMA tables.
InnoDB INFORMATION_SCHEMA
tables provide metadata, status information, and statistics about
various aspects of the InnoDB storage engine. You
can view a list of InnoDB
INFORMATION_SCHEMA tables by issuing a
SHOW TABLES statement on the
INFORMATION_SCHEMA database:
mysql> SHOW TABLES FROM INFORMATION_SCHEMA LIKE 'INNODB%';
For table definitions, see
Section 26.51, “INFORMATION_SCHEMA InnoDB Tables”. For general
information regarding the MySQL
INFORMATION_SCHEMA database, see
Chapter 26, INFORMATION_SCHEMA Tables.
There are two pairs of InnoDB
INFORMATION_SCHEMA tables about compression
that can provide insight into how well compression is working
overall:
INNODB_CMPandINNODB_CMP_RESETprovide information about the number of compression operations and the amount of time spent performing compression.INNODB_CMPMEMandINNODB_CMPMEM_RESETprovide information about the way memory is allocated for compression.
The INNODB_CMP and
INNODB_CMP_RESET tables provide
status information about operations related to compressed
tables, which are described in
Section 15.9, “InnoDB Table and Page Compression”. The
PAGE_SIZE column reports the compressed
page size.
These two tables have identical contents, but reading from
INNODB_CMP_RESET resets the
statistics on compression and uncompression operations. For
example, if you archive the output of
INNODB_CMP_RESET every 60 minutes,
you see the statistics for each hourly period. If you monitor
the output of INNODB_CMP (making
sure never to read
INNODB_CMP_RESET), you see the
cumulative statistics since InnoDB was started.
For the table definition, see Section 26.51.5, “The INFORMATION_SCHEMA INNODB_CMP and INNODB_CMP_RESET Tables”.
The INNODB_CMPMEM and
INNODB_CMPMEM_RESET tables provide
status information about compressed pages that reside in the
buffer pool. Please consult Section 15.9, “InnoDB Table and Page Compression”
for further information on compressed tables and the use of the
buffer pool. The INNODB_CMP and
INNODB_CMP_RESET tables should
provide more useful statistics on compression.
Internal Details
InnoDB uses a
buddy allocator
system to manage memory allocated to
pages of various sizes,
from 1KB to 16KB. Each row of the two tables described here
corresponds to a single page size.
The INNODB_CMPMEM and
INNODB_CMPMEM_RESET tables have
identical contents, but reading from
INNODB_CMPMEM_RESET resets the
statistics on relocation operations. For example, if every 60
minutes you archived the output of
INNODB_CMPMEM_RESET, it would show
the hourly statistics. If you never read
INNODB_CMPMEM_RESET and monitored
the output of INNODB_CMPMEM
instead, it would show the cumulative statistics since
InnoDB was started.
For the table definition, see Section 26.51.6, “The INFORMATION_SCHEMA INNODB_CMPMEM and INNODB_CMPMEM_RESET Tables”.
Example 15.1 Using the Compression Information Schema Tables
The following is sample output from a database that contains
compressed tables (see Section 15.9, “InnoDB Table and Page Compression”,
INNODB_CMP,
INNODB_CMP_PER_INDEX, and
INNODB_CMPMEM).
The following table shows the contents of
INFORMATION_SCHEMA.INNODB_CMP
under a light workload.
The only compressed page size that the buffer pool contains is
8K. Compressing or uncompressing pages has consumed less than
a second since the time the statistics were reset, because the
columns COMPRESS_TIME and
UNCOMPRESS_TIME are zero.
| page size | compress ops | compress ops ok | compress time | uncompress ops | uncompress time |
|---|---|---|---|---|---|
| 1024 | 0 | 0 | 0 | 0 | 0 |
| 2048 | 0 | 0 | 0 | 0 | 0 |
| 4096 | 0 | 0 | 0 | 0 | 0 |
| 8192 | 1048 | 921 | 0 | 61 | 0 |
| 16384 | 0 | 0 | 0 | 0 | 0 |
According to INNODB_CMPMEM, there
are 6169 compressed 8KB pages in the
buffer pool. The only
other allocated block size is 64 bytes. The smallest
PAGE_SIZE in
INNODB_CMPMEM is used for block
descriptors of those compressed pages for which no
uncompressed page exists in the buffer pool. We see that there
are 5910 such pages. Indirectly, we see that 259 (6169-5910)
compressed pages also exist in the buffer pool in uncompressed
form.
The following table shows the contents of
INFORMATION_SCHEMA.INNODB_CMPMEM
under a light workload.
Some memory is unusable due to fragmentation of the memory
allocator for compressed pages:
SUM(PAGE_SIZE*PAGES_FREE)=6784. This is
because small memory allocation requests are fulfilled by
splitting bigger blocks, starting from the 16K blocks that are
allocated from the main buffer pool, using the buddy
allocation system. The fragmentation is this low because some
allocated blocks have been relocated (copied) to form bigger
adjacent free blocks. This copying of
SUM(PAGE_SIZE*RELOCATION_OPS) bytes has
consumed less than a second
(SUM(RELOCATION_TIME)=0).
This section describes locking information as exposed by the
Performance Schema data_locks and
data_lock_waits tables, which
supersede the INFORMATION_SCHEMA
INNODB_LOCKS and
INNODB_LOCK_WAITS tables in MySQL
8.0. For similar discussion written in terms of the
older INFORMATION_SCHEMA tables, see
InnoDB INFORMATION_SCHEMA Transaction and Locking Information,
in MySQL 5.7 Reference Manual.
One INFORMATION_SCHEMA table and two
Performance Schema tables enable you to monitor
InnoDB transactions and diagnose potential
locking problems:
INNODB_TRX: ThisINFORMATION_SCHEMAtable provides information about every transaction currently executing insideInnoDB, including the transaction state (for example, whether it is running or waiting for a lock), when the transaction started, and the particular SQL statement the transaction is executing.data_locks: This Performance Schema table contains a row for each hold lock and each lock request that is blocked waiting for a held lock to be released:There is one row for each held lock, whatever the state of the transaction that holds the lock (
INNODB_TRX.TRX_STATEisRUNNING,LOCK WAIT,ROLLING BACKorCOMMITTING).Each transaction in InnoDB that is waiting for another transaction to release a lock (
INNODB_TRX.TRX_STATEisLOCK WAIT) is blocked by exactly one blocking lock request. That blocking lock request is for a row or table lock held by another transaction in an incompatible mode. A lock request always has a mode that is incompatible with the mode of the held lock that blocks the request (read vs. write, shared vs. exclusive).The blocked transaction cannot proceed until the other transaction commits or rolls back, thereby releasing the requested lock. For every blocked transaction,
data_lockscontains one row that describes each lock the transaction has requested, and for which it is waiting.
data_lock_waits: This Performance Schema table indicates which transactions are waiting for a given lock, or for which lock a given transaction is waiting. This table contains one or more rows for each blocked transaction, indicating the lock it has requested and any locks that are blocking that request. TheREQUESTING_ENGINE_LOCK_IDvalue refers to the lock requested by a transaction, and theBLOCKING_ENGINE_LOCK_IDvalue refers to the lock (held by another transaction) that prevents the first transaction from proceeding. For any given blocked transaction, all rows indata_lock_waitshave the same value forREQUESTING_ENGINE_LOCK_IDand different values forBLOCKING_ENGINE_LOCK_ID.
For more information about the preceding tables, see Section 26.51.29, “The INFORMATION_SCHEMA INNODB_TRX Table”, Section 27.12.13.1, “The data_locks Table”, and Section 27.12.13.2, “The data_lock_waits Table”.
This section describes locking information as exposed by the
Performance Schema data_locks and
data_lock_waits tables, which
supersede the INFORMATION_SCHEMA
INNODB_LOCKS and
INNODB_LOCK_WAITS tables in MySQL
8.0. For similar discussion written in terms of
the older INFORMATION_SCHEMA tables, see
Using InnoDB Transaction and Locking Information,
in MySQL 5.7 Reference Manual.
It is sometimes helpful to identify which transaction blocks
another. The tables that contain information about
InnoDB transactions and data locks enable
you to determine which transaction is waiting for another, and
which resource is being requested. (For descriptions of these
tables, see
Section 15.15.2, “InnoDB INFORMATION_SCHEMA Transaction and Locking Information”.)
Suppose that three sessions are running concurrently. Each session corresponds to a MySQL thread, and executes one transaction after another. Consider the state of the system when these sessions have issued the following statements, but none has yet committed its transaction:
Session A:
BEGIN; SELECT a FROM t FOR UPDATE; SELECT SLEEP(100);
Session B:
SELECT b FROM t FOR UPDATE;
Session C:
SELECT c FROM t FOR UPDATE;
In this scenario, use the following query to see which transactions are waiting and which transactions are blocking them:
SELECT r.trx_id waiting_trx_id, r.trx_mysql_thread_id waiting_thread, r.trx_query waiting_query, b.trx_id blocking_trx_id, b.trx_mysql_thread_id blocking_thread, b.trx_query blocking_query FROM performance_schema.data_lock_waits w INNER JOIN information_schema.innodb_trx b ON b.trx_id = w.blocking_engine_transaction_id INNER JOIN information_schema.innodb_trx r ON r.trx_id = w.requesting_engine_transaction_id;
Or, more simply, use the sys schema
innodb_lock_waits view:
SELECT waiting_trx_id, waiting_pid, waiting_query, blocking_trx_id, blocking_pid, blocking_query FROM sys.innodb_lock_waits;
If a NULL value is reported for the blocking query, see Identifying a Blocking Query After the Issuing Session Becomes Idle.
| waiting trx id | waiting thread | waiting query | blocking trx id | blocking thread | blocking query |
|---|---|---|---|---|---|
A4 |
6 |
SELECT b FROM t FOR UPDATE |
A3 |
5 |
SELECT SLEEP(100) |
A5 |
7 |
SELECT c FROM t FOR UPDATE |
A3 |
5 |
SELECT SLEEP(100) |
A5 |
7 |
SELECT c FROM t FOR UPDATE |
A4 |
6 |
SELECT b FROM t FOR UPDATE |
In the preceding table, you can identify sessions by the “waiting query” or “blocking query” columns. As you can see:
Session B (trx id
A4, thread6) and Session C (trx idA5, thread7) are both waiting for Session A (trx idA3, thread5).Session C is waiting for Session B as well as Session A.
You can see the underlying data in the
INFORMATION_SCHEMA
INNODB_TRX table and Performance
Schema data_locks and
data_lock_waits tables.
The following table shows some sample contents of the
INNODB_TRX table.
| trx id | trx state | trx started | trx requested lock id | trx wait started | trx weight | trx mysql thread id | trx query |
|---|---|---|---|---|---|---|---|
A3 |
RUNNING |
2008-01-15 16:44:54 |
NULL |
NULL |
2 |
5 |
SELECT SLEEP(100) |
A4 |
LOCK WAIT |
2008-01-15 16:45:09 |
A4:1:3:2 |
2008-01-15 16:45:09 |
2 |
6 |
SELECT b FROM t FOR UPDATE |
A5 |
LOCK WAIT |
2008-01-15 16:45:14 |
A5:1:3:2 |
2008-01-15 16:45:14 |
2 |
7 |
SELECT c FROM t FOR UPDATE |
The following table shows some sample contents of the
data_locks table.
| lock id | lock trx id | lock mode | lock type | lock schema | lock table | lock index | lock data |
|---|---|---|---|---|---|---|---|
A3:1:3:2 |
A3 |
X |
RECORD |
test |
t |
PRIMARY |
0x0200 |
A4:1:3:2 |
A4 |
X |
RECORD |
test |
t |
PRIMARY |
0x0200 |
A5:1:3:2 |
A5 |
X |
RECORD |
test |
t |
PRIMARY |
0x0200 |
The following table shows some sample contents of the
data_lock_waits table.
When identifying blocking transactions, a NULL value is reported for the blocking query if the session that issued the query has become idle. In this case, use the following steps to determine the blocking query:
Identify the processlist ID of the blocking transaction. In the
sys.innodb_lock_waitstable, the processlist ID of the blocking transaction is theblocking_pidvalue.Using the
blocking_pid, query the MySQL Performance Schemathreadstable to determine theTHREAD_IDof the blocking transaction. For example, if theblocking_pidis 6, issue this query:SELECT THREAD_ID FROM performance_schema.threads WHERE PROCESSLIST_ID = 6;
Using the
THREAD_ID, query the Performance Schemaevents_statements_currenttable to determine the last query executed by the thread. For example, if theTHREAD_IDis 28, issue this query:SELECT THREAD_ID, SQL_TEXT FROM performance_schema.events_statements_current WHERE THREAD_ID = 28\G
If the last query executed by the thread is not enough information to determine why a lock is held, you can query the Performance Schema
events_statements_historytable to view the last 10 statements executed by the thread.SELECT THREAD_ID, SQL_TEXT FROM performance_schema.events_statements_history WHERE THREAD_ID = 28 ORDER BY EVENT_ID;
Sometimes it is useful to correlate internal
InnoDB locking information with the
session-level information maintained by MySQL. For example,
you might like to know, for a given InnoDB
transaction ID, the corresponding MySQL session ID and name of
the session that may be holding a lock, and thus blocking
other transactions.
The following output from the
INFORMATION_SCHEMA
INNODB_TRX table and Performance
Schema data_locks and
data_lock_waits tables is taken
from a somewhat loaded system. As can be seen, there are
several transactions running.
The following data_locks and
data_lock_waits tables show that:
Transaction
77F(executing anINSERT) is waiting for transactions77E,77D, and77Bto commit.Transaction
77E(executing anINSERT) is waiting for transactions77Dand77Bto commit.Transaction
77D(executing anINSERT) is waiting for transaction77Bto commit.Transaction
77B(executing anINSERT) is waiting for transaction77Ato commit.Transaction
77Ais running, currently executingSELECT.Transaction
E56(executing anINSERT) is waiting for transactionE55to commit.Transaction
E55(executing anINSERT) is waiting for transaction19Cto commit.Transaction
19Cis running, currently executing anINSERT.
There may be inconsistencies between queries shown in the
INFORMATION_SCHEMA
PROCESSLIST and
INNODB_TRX tables. For an
explanation, see
Section 15.15.2.3, “Persistence and Consistency of InnoDB Transaction and Locking
Information”.
The following table shows the contents of the
PROCESSLIST table for a system
running a heavy workload.
| ID | USER | HOST | DB | COMMAND | TIME | STATE | INFO |
|---|---|---|---|---|---|---|---|
384 |
root |
localhost |
test |
Query |
10 |
update |
INSERT INTO t2 VALUES … |
257 |
root |
localhost |
test |
Query |
3 |
update |
INSERT INTO t2 VALUES … |
130 |
root |
localhost |
test |
Query |
0 |
update |
INSERT INTO t2 VALUES … |
61 |
root |
localhost |
test |
Query |
1 |
update |
INSERT INTO t2 VALUES … |
8 |
root |
localhost |
test |
Query |
1 |
update |
INSERT INTO t2 VALUES … |
4 |
root |
localhost |
test |
Query |
0 |
preparing |
SELECT * FROM PROCESSLIST |
2 |
root |
localhost |
test |
Sleep |
566 |
|
NULL |
The following table shows the contents of the
INNODB_TRX table for a system
running a heavy workload.
| trx id | trx state | trx started | trx requested lock id | trx wait started | trx weight | trx mysql thread id | trx query |
|---|---|---|---|---|---|---|---|
77F |
LOCK WAIT |
2008-01-15 13:10:16 |
77F |
2008-01-15 13:10:16 |
1 |
876 |
INSERT INTO t09 (D, B, C) VALUES … |
77E |
LOCK WAIT |
2008-01-15 13:10:16 |
77E |
2008-01-15 13:10:16 |
1 |
875 |
INSERT INTO t09 (D, B, C) VALUES … |
77D |
LOCK WAIT |
2008-01-15 13:10:16 |
77D |
2008-01-15 13:10:16 |
1 |
874 |
INSERT INTO t09 (D, B, C) VALUES … |
77B |
LOCK WAIT |
2008-01-15 13:10:16 |
77B:733:12:1 |
2008-01-15 13:10:16 |
4 |
873 |
INSERT INTO t09 (D, B, C) VALUES … |
77A |
RUNNING |
2008-01-15 13:10:16 |
NULL |
NULL |
4 |
872 |
SELECT b, c FROM t09 WHERE … |
E56 |
LOCK WAIT |
2008-01-15 13:10:06 |
E56:743:6:2 |
2008-01-15 13:10:06 |
5 |
384 |
INSERT INTO t2 VALUES … |
E55 |
LOCK WAIT |
2008-01-15 13:10:06 |
E55:743:38:2 |
2008-01-15 13:10:13 |
965 |
257 |
INSERT INTO t2 VALUES … |
19C |
RUNNING |
2008-01-15 13:09:10 |
NULL |
NULL |
2900 |
130 |
INSERT INTO t2 VALUES … |
E15 |
RUNNING |
2008-01-15 13:08:59 |
NULL |
NULL |
5395 |
61 |
INSERT INTO t2 VALUES … |
51D |
RUNNING |
2008-01-15 13:08:47 |
NULL |
NULL |
9807 |
8 |
INSERT INTO t2 VALUES … |
The following table shows the contents of the
data_lock_waits table for a
system running a heavy
workload.
| requesting trx id | requested lock id | blocking trx id | blocking lock id |
|---|---|---|---|
77F |
77F:806 |
77E |
77E:806 |
77F |
77F:806 |
77D |
77D:806 |
77F |
77F:806 |
77B |
77B:806 |
77E |
77E:806 |
77D |
77D:806 |
77E |
77E:806 |
77B |
77B:806 |
77D |
77D:806 |
77B |
77B:806 |
77B |
77B:733:12:1 |
77A |
77A:733:12:1 |
E56 |
E56:743:6:2 |
E55 |
E55:743:6:2 |
E55 |
E55:743:38:2 |
19C |
19C:743:38:2 |
The following table shows the contents of the
data_locks table for a system
running a heavy workload.
| lock id | lock trx id | lock mode | lock type | lock schema | lock table | lock index | lock data |
|---|---|---|---|---|---|---|---|
77F:806 |
77F |
AUTO_INC |
TABLE |
test |
t09 |
NULL |
NULL |
77E:806 |
77E |
AUTO_INC |
TABLE |
test |
t09 |
NULL |
NULL |
77D:806 |
77D |
AUTO_INC |
TABLE |
test |
t09 |
NULL |
NULL |
77B:806 |
77B |
AUTO_INC |
TABLE |
test |
t09 |
NULL |
NULL |
77B:733:12:1 |
77B |
X |
RECORD |
test |
t09 |
PRIMARY |
supremum pseudo-record |
77A:733:12:1 |
77A |
X |
RECORD |
test |
t09 |
PRIMARY |
supremum pseudo-record |
E56:743:6:2 |
E56 |
S |
RECORD |
test |
t2 |
PRIMARY |
0, 0 |
E55:743:6:2 |
E55 |
X |
RECORD |
test |
t2 |
PRIMARY |
0, 0 |
E55:743:38:2 |
E55 |
S |
RECORD |
test |
t2 |
PRIMARY |
1922, 1922 |
19C:743:38:2 |
19C |
X |
RECORD |
test |
t2 |
PRIMARY |
1922, 1922 |
This section describes locking information as exposed by the
Performance Schema data_locks and
data_lock_waits tables, which
supersede the INFORMATION_SCHEMA
INNODB_LOCKS and
INNODB_LOCK_WAITS tables in MySQL
8.0. For similar discussion written in terms of
the older INFORMATION_SCHEMA tables, see
InnoDB Lock and Lock-Wait Information,
in MySQL 5.7 Reference Manual.
When a transaction updates a row in a table, or locks it with
SELECT FOR UPDATE, InnoDB
establishes a list or queue of locks on that row. Similarly,
InnoDB maintains a list of locks on a table
for table-level locks. If a second transaction wants to update a
row or lock a table already locked by a prior transaction in an
incompatible mode, InnoDB adds a lock request
for the row to the corresponding queue. For a lock to be
acquired by a transaction, all incompatible lock requests
previously entered into the lock queue for that row or table
must be removed (which occurs when the transactions holding or
requesting those locks either commit or roll back).
A transaction may have any number of lock requests for different
rows or tables. At any given time, a transaction may request a
lock that is held by another transaction, in which case it is
blocked by that other transaction. The requesting transaction
must wait for the transaction that holds the blocking lock to
commit or roll back. If a transaction is not waiting for a lock,
it is in a RUNNING state. If a transaction is
waiting for a lock, it is in a LOCK WAIT
state. (The INFORMATION_SCHEMA
INNODB_TRX table indicates
transaction state values.)
The Performance Schema data_locks
table holds one or more rows for each LOCK
WAIT transaction, indicating any lock requests that
prevent its progress. This table also contains one row
describing each lock in a queue of locks pending for a given row
or table. The Performance Schema
data_lock_waits table shows which
locks already held by a transaction are blocking locks requested
by other transactions.
This section describes locking information as exposed by the
Performance Schema data_locks and
data_lock_waits tables, which
supersede the INFORMATION_SCHEMA
INNODB_LOCKS and
INNODB_LOCK_WAITS tables in MySQL
8.0. For similar discussion written in terms of
the older INFORMATION_SCHEMA tables, see
Persistence and Consistency of InnoDB Transaction and Locking Information,
in MySQL 5.7 Reference Manual.
The data exposed by the transaction and locking tables
(INFORMATION_SCHEMA
INNODB_TRX table, Performance
Schema data_locks and
data_lock_waits tables) represents
a glimpse into fast-changing data. This is not like user tables,
where the data changes only when application-initiated updates
occur. The underlying data is internal system-managed data, and
can change very quickly:
Data might not be consistent between the
INNODB_TRX,data_locks, anddata_lock_waitstables.The
data_locksanddata_lock_waitstables expose live data from theInnoDBstorage engine, to provide lock inormation about the transactions in theINNODB_TRXtable. Data retrieved from the lock tables exists when theSELECTis executed, but might be gone or changed by the time the query result is consumed by the client.Joining
data_lockswithdata_lock_waitscan show rows indata_lock_waitsthat identify a parent row indata_locksthat no longer exists or does not exist yet.Data in the transaction and locking tables might not be consistent with data in the
INFORMATION_SCHEMAPROCESSLISTtable or Performance Schemathreadstable.For example, you should be careful when comparing data in the
InnoDBtransaction and locking tables with data in thePROCESSLISTtable. Even if you issue a singleSELECT(joiningINNODB_TRXandPROCESSLIST, for example), the content of those tables is generally not consistent. It is possible forINNODB_TRXto reference rows that are not present inPROCESSLISTor for the currently executing SQL query of a transaction shown inINNODB_TRX.TRX_QUERYto differ from the one inPROCESSLIST.INFO.
You can extract metadata about schema objects managed by
InnoDB using InnoDB
INFORMATION_SCHEMA tables. This information
comes from the data dictionary. Traditionally, you would get this
type of information using the techniques from
Section 15.17, “InnoDB Monitors”, setting up
InnoDB monitors and parsing the output from the
SHOW ENGINE INNODB
STATUS statement. The InnoDB
INFORMATION_SCHEMA table interface allows you
to query this data using SQL.
InnoDB INFORMATION_SCHEMA
schema object tables include the tables listed below.
INNODB_DATAFILES INNODB_TABLESTATS INNODB_FOREIGN INNODB_COLUMNS INNODB_INDEXES INNODB_FIELDS INNODB_TABLESPACES INNODB_TABLESPACES_BRIEF INNODB_FOREIGN_COLS INNODB_TABLES
The table names are indicative of the type of data provided:
INNODB_TABLESprovides metadata aboutInnoDBtables.INNODB_COLUMNSprovides metadata aboutInnoDBtable columns.INNODB_INDEXESprovides metadata aboutInnoDBindexes.INNODB_FIELDSprovides metadata about the key columns (fields) ofInnoDBindexes.INNODB_TABLESTATSprovides a view of low-level status information aboutInnoDBtables that is derived from in-memory data structures.INNODB_DATAFILESprovides data file path information forInnoDBfile-per-table and general tablespaces.INNODB_TABLESPACESprovides metadata aboutInnoDBfile-per-table, general, and undo tablespaces.INNODB_TABLESPACES_BRIEFprovides a subset of metadata aboutInnoDBtablespaces.INNODB_FOREIGNprovides metadata about foreign keys defined onInnoDBtables.INNODB_FOREIGN_COLSprovides metadata about the columns of foreign keys that are defined onInnoDBtables.
InnoDB INFORMATION_SCHEMA
schema object tables can be joined together through fields such as
TABLE_ID, INDEX_ID, and
SPACE, allowing you to easily retrieve all
available data for an object you want to study or monitor.
Refer to the InnoDB
INFORMATION_SCHEMA
documentation for information about the columns of each table.
Example 15.2 InnoDB INFORMATION_SCHEMA Schema Object Tables
This example uses a simple table (t1) with a
single index (i1) to demonstrate the type of
metadata found in the InnoDB
INFORMATION_SCHEMA schema object tables.
Create a test database and table
t1:mysql>
CREATE DATABASE test;mysql>USE test;mysql>CREATE TABLE t1 (col1 INT,col2 CHAR(10),col3 VARCHAR(10))ENGINE = InnoDB;mysql>CREATE INDEX i1 ON t1(col1);After creating the table
t1, queryINNODB_TABLESto locate the metadata fortest/t1:mysql>
SELECT * FROM INFORMATION_SCHEMA.INNODB_TABLES WHERE NAME='test/t1' \G*************************** 1. row *************************** TABLE_ID: 71 NAME: test/t1 FLAG: 1 N_COLS: 6 SPACE: 57 ROW_FORMAT: Compact ZIP_PAGE_SIZE: 0 INSTANT_COLS: 0Table
t1has aTABLE_IDof 71. TheFLAGfield provides bit level information about table format and storage characteristics. There are six columns, three of which are hidden columns created byInnoDB(DB_ROW_ID,DB_TRX_ID, andDB_ROLL_PTR). The ID of the table'sSPACEis 57 (a value of 0 would indicate that the table resides in the system tablespace). TheROW_FORMATis Compact.ZIP_PAGE_SIZEonly applies to tables with aCompressedrow format.INSTANT_COLSshows number of columns in the table prior to adding the first instant column usingALTER TABLE ... ADD COLUMNwithALGORITHM=INSTANT.Using the
TABLE_IDinformation fromINNODB_TABLES, query theINNODB_COLUMNStable for information about the table's columns.mysql>
SELECT * FROM INFORMATION_SCHEMA.INNODB_COLUMNS where TABLE_ID = 71\G*************************** 1. row *************************** TABLE_ID: 71 NAME: col1 POS: 0 MTYPE: 6 PRTYPE: 1027 LEN: 4 HAS_DEFAULT: 0 DEFAULT_VALUE: NULL *************************** 2. row *************************** TABLE_ID: 71 NAME: col2 POS: 1 MTYPE: 2 PRTYPE: 524542 LEN: 10 HAS_DEFAULT: 0 DEFAULT_VALUE: NULL *************************** 3. row *************************** TABLE_ID: 71 NAME: col3 POS: 2 MTYPE: 1 PRTYPE: 524303 LEN: 10 HAS_DEFAULT: 0 DEFAULT_VALUE: NULLIn addition to the
TABLE_IDand columnNAME,INNODB_COLUMNSprovides the ordinal position (POS) of each column (starting from 0 and incrementing sequentially), the columnMTYPEor “main type” (6 = INT, 2 = CHAR, 1 = VARCHAR), thePRTYPEor “precise type” (a binary value with bits that represent the MySQL data type, character set code, and nullability), and the column length (LEN). TheHAS_DEFAULTandDEFAULT_VALUEcolumns only apply to columns added instantly usingALTER TABLE ... ADD COLUMNwithALGORITHM=INSTANT.Using the
TABLE_IDinformation fromINNODB_TABLESonce again, queryINNODB_INDEXESfor information about the indexes associated with tablet1.mysql>
SELECT * FROM INFORMATION_SCHEMA.INNODB_INDEXES WHERE TABLE_ID = 71 \G*************************** 1. row *************************** INDEX_ID: 111 NAME: GEN_CLUST_INDEX TABLE_ID: 71 TYPE: 1 N_FIELDS: 0 PAGE_NO: 3 SPACE: 57 MERGE_THRESHOLD: 50 *************************** 2. row *************************** INDEX_ID: 112 NAME: i1 TABLE_ID: 71 TYPE: 0 N_FIELDS: 1 PAGE_NO: 4 SPACE: 57 MERGE_THRESHOLD: 50INNODB_INDEXESreturns data for two indexes. The first index isGEN_CLUST_INDEX, which is a clustered index created byInnoDBif the table does not have a user-defined clustered index. The second index (i1) is the user-defined secondary index.The
INDEX_IDis an identifier for the index that is unique across all databases in an instance. TheTABLE_IDidentifies the table that the index is associated with. The indexTYPEvalue indicates the type of index (1 = Clustered Index, 0 = Secondary index). TheN_FILEDSvalue is the number of fields that comprise the index.PAGE_NOis the root page number of the index B-tree, andSPACEis the ID of the tablespace where the index resides. A nonzero value indicates that the index does not reside in the system tablespace.MERGE_THRESHOLDdefines a percentage threshold value for the amount of data in an index page. If the amount of data in an index page falls below the this value (the default is 50%) when a row is deleted or when a row is shortened by an update operation,InnoDBattempts to merge the index page with a neighboring index page.Using the
INDEX_IDinformation fromINNODB_INDEXES, queryINNODB_FIELDSfor information about the fields of indexi1.mysql>
SELECT * FROM INFORMATION_SCHEMA.INNODB_FIELDS where INDEX_ID = 112 \G*************************** 1. row *************************** INDEX_ID: 112 NAME: col1 POS: 0INNODB_FIELDSprovides theNAMEof the indexed field and its ordinal position within the index. If the index (i1) had been defined on multiple fields,INNODB_FIELDSwould provide metadata for each of the indexed fields.Using the
SPACEinformation fromINNODB_TABLES, queryINNODB_TABLESPACEStable for information about the table's tablespace.mysql>
SELECT * FROM INFORMATION_SCHEMA.INNODB_TABLESPACES WHERE SPACE = 57 \G*************************** 1. row *************************** SPACE: 57 NAME: test/t1 FLAG: 16417 ROW_FORMAT: Dynamic PAGE_SIZE: 16384 ZIP_PAGE_SIZE: 0 SPACE_TYPE: Single FS_BLOCK_SIZE: 4096 FILE_SIZE: 114688 ALLOCATED_SIZE: 98304 AUTOEXTEND_SIZE: 0 SERVER_VERSION: 8.0.23 SPACE_VERSION: 1 ENCRYPTION: N STATE: normalIn addition to the
SPACEID of the tablespace and theNAMEof the associated table,INNODB_TABLESPACESprovides tablespaceFLAGdata, which is bit level information about tablespace format and storage characteristics. Also provided are tablespaceROW_FORMAT,PAGE_SIZE, and several other tablespace metadata items.Using the
SPACEinformation fromINNODB_TABLESonce again, queryINNODB_DATAFILESfor the location of the tablespace data file.mysql>
SELECT * FROM INFORMATION_SCHEMA.INNODB_DATAFILES WHERE SPACE = 57 \G*************************** 1. row *************************** SPACE: 57 PATH: ./test/t1.ibdThe datafile is located in the
testdirectory under MySQL'sdatadirectory. If a file-per-table tablespace were created in a location outside the MySQL data directory using theDATA DIRECTORYclause of theCREATE TABLEstatement, the tablespacePATHwould be a fully qualified directory path.As a final step, insert a row into table
t1(TABLE_ID = 71) and view the data in theINNODB_TABLESTATStable. The data in this table is used by the MySQL optimizer to calculate which index to use when querying anInnoDBtable. This information is derived from in-memory data structures.mysql>
INSERT INTO t1 VALUES(5, 'abc', 'def');Query OK, 1 row affected (0.06 sec) mysql>SELECT * FROM INFORMATION_SCHEMA.INNODB_TABLESTATS where TABLE_ID = 71 \G*************************** 1. row *************************** TABLE_ID: 71 NAME: test/t1 STATS_INITIALIZED: Initialized NUM_ROWS: 1 CLUST_INDEX_SIZE: 1 OTHER_INDEX_SIZE: 0 MODIFIED_COUNTER: 1 AUTOINC: 0 REF_COUNT: 1The
STATS_INITIALIZEDfield indicates whether or not statistics have been collected for the table.NUM_ROWSis the current estimated number of rows in the table. TheCLUST_INDEX_SIZEandOTHER_INDEX_SIZEfields report the number of pages on disk that store clustered and secondary indexes for the table, respectively. TheMODIFIED_COUNTERvalue shows the number of rows modified by DML operations and cascade operations from foreign keys. TheAUTOINCvalue is the next number to be issued for any autoincrement-based operation. There are no autoincrement columns defined on tablet1, so the value is 0. TheREF_COUNTvalue is a counter. When the counter reaches 0, it signifies that the table metadata can be evicted from the table cache.
Example 15.3 Foreign Key INFORMATION_SCHEMA Schema Object Tables
The INNODB_FOREIGN and
INNODB_FOREIGN_COLS tables provide
data about foreign key relationships. This example uses a parent
table and child table with a foreign key relationship to
demonstrate the data found in the
INNODB_FOREIGN and
INNODB_FOREIGN_COLS tables.
Create the test database with parent and child tables:
mysql>
CREATE DATABASE test;mysql>USE test;mysql>CREATE TABLE parent (id INT NOT NULL,PRIMARY KEY (id)) ENGINE=INNODB;mysql>CREATE TABLE child (id INT, parent_id INT,INDEX par_ind (parent_id),CONSTRAINT fk1FOREIGN KEY (parent_id) REFERENCES parent(id)ON DELETE CASCADE) ENGINE=INNODB;After the parent and child tables are created, query
INNODB_FOREIGNand locate the foreign key data for thetest/childandtest/parentforeign key relationship:mysql>
SELECT * FROM INFORMATION_SCHEMA.INNODB_FOREIGN \G*************************** 1. row *************************** ID: test/fk1 FOR_NAME: test/child REF_NAME: test/parent N_COLS: 1 TYPE: 1Metadata includes the foreign key
ID(fk1), which is named for theCONSTRAINTthat was defined on the child table. TheFOR_NAMEis the name of the child table where the foreign key is defined.REF_NAMEis the name of the parent table (the “referenced” table).N_COLSis the number of columns in the foreign key index.TYPEis a numerical value representing bit flags that provide additional information about the foreign key column. In this case, theTYPEvalue is 1, which indicates that theON DELETE CASCADEoption was specified for the foreign key. See theINNODB_FOREIGNtable definition for more information aboutTYPEvalues.Using the foreign key
ID, queryINNODB_FOREIGN_COLSto view data about the columns of the foreign key.mysql>
SELECT * FROM INFORMATION_SCHEMA.INNODB_FOREIGN_COLS WHERE ID = 'test/fk1' \G*************************** 1. row *************************** ID: test/fk1 FOR_COL_NAME: parent_id REF_COL_NAME: id POS: 0FOR_COL_NAMEis the name of the foreign key column in the child table, andREF_COL_NAMEis the name of the referenced column in the parent table. ThePOSvalue is the ordinal position of the key field within the foreign key index, starting at zero.
Example 15.4 Joining InnoDB INFORMATION_SCHEMA Schema Object Tables
This example demonstrates joining three
InnoDB INFORMATION_SCHEMA
schema object tables
(INNODB_TABLES,
INNODB_TABLESPACES, and
INNODB_TABLESTATS) to gather file
format, row format, page size, and index size information about
tables in the employees sample database.
The following table name aliases are used to shorten the query string:
An IF() control flow function is
used to account for compressed tables. If a table is compressed,
the index size is calculated using
ZIP_PAGE_SIZE rather than
PAGE_SIZE.
CLUST_INDEX_SIZE and
OTHER_INDEX_SIZE, which are reported in
bytes, are divided by 1024*1024 to provide
index sizes in megabytes (MBs). MB values are rounded to zero
decimal spaces using the ROUND()
function.
mysql>SELECT a.NAME, a.ROW_FORMAT,@page_size :=IF(a.ROW_FORMAT='Compressed',b.ZIP_PAGE_SIZE, b.PAGE_SIZE)AS page_size,ROUND((@page_size * c.CLUST_INDEX_SIZE)/(1024*1024)) AS pk_mb,ROUND((@page_size * c.OTHER_INDEX_SIZE)/(1024*1024)) AS secidx_mbFROM INFORMATION_SCHEMA.INNODB_TABLES aINNER JOIN INFORMATION_SCHEMA.INNODB_TABLESPACES b on a.NAME = b.NAMEINNER JOIN INFORMATION_SCHEMA.INNODB_TABLESTATS c on b.NAME = c.NAMEWHERE a.NAME LIKE 'employees/%'ORDER BY a.NAME DESC;+------------------------+------------+-----------+-------+-----------+ | NAME | ROW_FORMAT | page_size | pk_mb | secidx_mb | +------------------------+------------+-----------+-------+-----------+ | employees/titles | Dynamic | 16384 | 20 | 11 | | employees/salaries | Dynamic | 16384 | 93 | 34 | | employees/employees | Dynamic | 16384 | 15 | 0 | | employees/dept_manager | Dynamic | 16384 | 0 | 0 | | employees/dept_emp | Dynamic | 16384 | 12 | 10 | | employees/departments | Dynamic | 16384 | 0 | 0 | +------------------------+------------+-----------+-------+-----------+
The following tables provide metadata for
FULLTEXT indexes:
mysql> SHOW TABLES FROM INFORMATION_SCHEMA LIKE 'INNODB_FT%';
+-------------------------------------------+
| Tables_in_INFORMATION_SCHEMA (INNODB_FT%) |
+-------------------------------------------+
| INNODB_FT_CONFIG |
| INNODB_FT_BEING_DELETED |
| INNODB_FT_DELETED |
| INNODB_FT_DEFAULT_STOPWORD |
| INNODB_FT_INDEX_TABLE |
| INNODB_FT_INDEX_CACHE |
+-------------------------------------------+
Table Overview
INNODB_FT_CONFIG: Provides metadata about theFULLTEXTindex and associated processing for anInnoDBtable.INNODB_FT_BEING_DELETED: Provides a snapshot of theINNODB_FT_DELETEDtable; it is used only during anOPTIMIZE TABLEmaintenance operation. WhenOPTIMIZE TABLEis run, theINNODB_FT_BEING_DELETEDtable is emptied, andDOC_IDvalues are removed from theINNODB_FT_DELETEDtable. Because the contents ofINNODB_FT_BEING_DELETEDtypically have a short lifetime, this table has limited utility for monitoring or debugging. For information about runningOPTIMIZE TABLEon tables withFULLTEXTindexes, see Section 12.10.6, “Fine-Tuning MySQL Full-Text Search”.INNODB_FT_DELETED: Stores rows that are deleted from theFULLTEXTindex for anInnoDBtable. To avoid expensive index reorganization during DML operations for anInnoDBFULLTEXTindex, the information about newly deleted words is stored separately, filtered out of search results when you do a text search, and removed from the main search index only when you issue anOPTIMIZE TABLEstatement for theInnoDBtable.INNODB_FT_DEFAULT_STOPWORD: Holds a list of stopwords that are used by default when creating aFULLTEXTindex onInnoDBtables.For information about the
INNODB_FT_DEFAULT_STOPWORDtable, see Section 12.10.4, “Full-Text Stopwords”.INNODB_FT_INDEX_TABLE: Provides information about the inverted index used to process text searches against theFULLTEXTindex of anInnoDBtable.INNODB_FT_INDEX_CACHE: Provides token information about newly inserted rows in aFULLTEXTindex. To avoid expensive index reorganization during DML operations, the information about newly indexed words is stored separately, and combined with the main search index only whenOPTIMIZE TABLEis run, when the server is shut down, or when the cache size exceeds a limit defined by theinnodb_ft_cache_sizeorinnodb_ft_total_cache_sizesystem variable.
With the exception of the
INNODB_FT_DEFAULT_STOPWORD table,
these tables are empty initially. Before querying any of them,
set the value of the
innodb_ft_aux_table system
variable to the name (including the database name) of the table
that contains the FULLTEXT index (for
example, test/articles).
Example 15.5 InnoDB FULLTEXT Index INFORMATION_SCHEMA Tables
This example uses a table with a FULLTEXT
index to demonstrate the data contained in the
FULLTEXT index
INFORMATION_SCHEMA tables.
Create a table with a
FULLTEXTindex and insert some data:mysql>
CREATE TABLE articles (id INT UNSIGNED AUTO_INCREMENT NOT NULL PRIMARY KEY,title VARCHAR(200),body TEXT,FULLTEXT (title,body)) ENGINE=InnoDB;mysql>INSERT INTO articles (title,body) VALUES('MySQL Tutorial','DBMS stands for DataBase ...'),('How To Use MySQL Well','After you went through a ...'),('Optimizing MySQL','In this tutorial we show ...'),('1001 MySQL Tricks','1. Never run mysqld as root. 2. ...'),('MySQL vs. YourSQL','In the following database comparison ...'),('MySQL Security','When configured properly, MySQL ...');Set the
innodb_ft_aux_tablevariable to the name of the table with theFULLTEXTindex. If this variable is not set, theInnoDBFULLTEXTINFORMATION_SCHEMAtables are empty, with the exception ofINNODB_FT_DEFAULT_STOPWORD.mysql>
SET GLOBAL innodb_ft_aux_table = 'test/articles';Query the
INNODB_FT_INDEX_CACHEtable, which shows information about newly inserted rows in aFULLTEXTindex. To avoid expensive index reorganization during DML operations, data for newly inserted rows remains in theFULLTEXTindex cache untilOPTIMIZE TABLEis run (or until the server is shut down or cache limits are exceeded).mysql>
SELECT * FROM INFORMATION_SCHEMA.INNODB_FT_INDEX_CACHE LIMIT 5;+------------+--------------+-------------+-----------+--------+----------+ | WORD | FIRST_DOC_ID | LAST_DOC_ID | DOC_COUNT | DOC_ID | POSITION | +------------+--------------+-------------+-----------+--------+----------+ | 1001 | 5 | 5 | 1 | 5 | 0 | | after | 3 | 3 | 1 | 3 | 22 | | comparison | 6 | 6 | 1 | 6 | 44 | | configured | 7 | 7 | 1 | 7 | 20 | | database | 2 | 6 | 2 | 2 | 31 | +------------+--------------+-------------+-----------+--------+----------+Enable the
innodb_optimize_fulltext_onlysystem variable and runOPTIMIZE TABLEon the table that contains theFULLTEXTindex. This operation flushes the contents of theFULLTEXTindex cache to the mainFULLTEXTindex.innodb_optimize_fulltext_onlychanges the way theOPTIMIZE TABLEstatement operates onInnoDBtables, and is intended to be enabled temporarily, during maintenance operations onInnoDBtables withFULLTEXTindexes.mysql>
SET GLOBAL innodb_optimize_fulltext_only=ON;mysql>OPTIMIZE TABLE articles;+---------------+----------+----------+----------+ | Table | Op | Msg_type | Msg_text | +---------------+----------+----------+----------+ | test.articles | optimize | status | OK | +---------------+----------+----------+----------+Query the
INNODB_FT_INDEX_TABLEtable to view information about data in the mainFULLTEXTindex, including information about the data that was just flushed from theFULLTEXTindex cache.mysql>
SELECT * FROM INFORMATION_SCHEMA.INNODB_FT_INDEX_TABLE LIMIT 5;+------------+--------------+-------------+-----------+--------+----------+ | WORD | FIRST_DOC_ID | LAST_DOC_ID | DOC_COUNT | DOC_ID | POSITION | +------------+--------------+-------------+-----------+--------+----------+ | 1001 | 5 | 5 | 1 | 5 | 0 | | after | 3 | 3 | 1 | 3 | 22 | | comparison | 6 | 6 | 1 | 6 | 44 | | configured | 7 | 7 | 1 | 7 | 20 | | database | 2 | 6 | 2 | 2 | 31 | +------------+--------------+-------------+-----------+--------+----------+The
INNODB_FT_INDEX_CACHEtable is now empty since theOPTIMIZE TABLEoperation flushed theFULLTEXTindex cache.mysql>
SELECT * FROM INFORMATION_SCHEMA.INNODB_FT_INDEX_CACHE LIMIT 5;Empty set (0.00 sec)Delete some records from the
test/articlestable.mysql>
DELETE FROM test.articles WHERE id < 4;Query the
INNODB_FT_DELETEDtable. This table records rows that are deleted from theFULLTEXTindex. To avoid expensive index reorganization during DML operations, information about newly deleted records is stored separately, filtered out of search results when you do a text search, and removed from the main search index when you runOPTIMIZE TABLE.mysql>
SELECT * FROM INFORMATION_SCHEMA.INNODB_FT_DELETED;+--------+ | DOC_ID | +--------+ | 2 | | 3 | | 4 | +--------+Run
OPTIMIZE TABLEto remove the deleted records.mysql>
OPTIMIZE TABLE articles;+---------------+----------+----------+----------+ | Table | Op | Msg_type | Msg_text | +---------------+----------+----------+----------+ | test.articles | optimize | status | OK | +---------------+----------+----------+----------+The
INNODB_FT_DELETEDtable should now be empty.mysql>
SELECT * FROM INFORMATION_SCHEMA.INNODB_FT_DELETED;Empty set (0.00 sec)Query the
INNODB_FT_CONFIGtable. This table contains metadata about theFULLTEXTindex and related processing:optimize_checkpoint_limit: The number of seconds after which anOPTIMIZE TABLErun stops.synced_doc_id: The nextDOC_IDto be issued.stopword_table_name: Thedatabase/tablename for a user-defined stopword table. TheVALUEcolumn is empty if there is no user-defined stopword table.use_stopword: Indicates whether a stopword table is used, which is defined when theFULLTEXTindex is created.
mysql>
SELECT * FROM INFORMATION_SCHEMA.INNODB_FT_CONFIG;+---------------------------+-------+ | KEY | VALUE | +---------------------------+-------+ | optimize_checkpoint_limit | 180 | | synced_doc_id | 8 | | stopword_table_name | | | use_stopword | 1 | +---------------------------+-------+Disable
innodb_optimize_fulltext_only, since it is intended to be enabled only temporarily:mysql>
SET GLOBAL innodb_optimize_fulltext_only=OFF;
The InnoDB
INFORMATION_SCHEMA buffer pool tables provide
buffer pool status information and metadata about the pages within
the InnoDB buffer pool.
The InnoDB
INFORMATION_SCHEMA buffer pool tables include
those listed below:
mysql> SHOW TABLES FROM INFORMATION_SCHEMA LIKE 'INNODB_BUFFER%';
+-----------------------------------------------+
| Tables_in_INFORMATION_SCHEMA (INNODB_BUFFER%) |
+-----------------------------------------------+
| INNODB_BUFFER_PAGE_LRU |
| INNODB_BUFFER_PAGE |
| INNODB_BUFFER_POOL_STATS |
+-----------------------------------------------+
Table Overview
INNODB_BUFFER_PAGE: Holds information about each page in theInnoDBbuffer pool.INNODB_BUFFER_PAGE_LRU: Holds information about the pages in theInnoDBbuffer pool, in particular how they are ordered in the LRU list that determines which pages to evict from the buffer pool when it becomes full. TheINNODB_BUFFER_PAGE_LRUtable has the same columns as theINNODB_BUFFER_PAGEtable, except that theINNODB_BUFFER_PAGE_LRUtable has anLRU_POSITIONcolumn instead of aBLOCK_IDcolumn.INNODB_BUFFER_POOL_STATS: Provides buffer pool status information. Much of the same information is provided bySHOW ENGINE INNODB STATUSoutput, or may be obtained usingInnoDBbuffer pool server status variables.
Querying the INNODB_BUFFER_PAGE or
INNODB_BUFFER_PAGE_LRU table can
affect performance. Do not query these tables on a production
system unless you are aware of the performance impact and have
determined it to be acceptable. To avoid impacting performance
on a production system, reproduce the issue you want to
investigate and query buffer pool statistics on a test instance.
Example 15.6 Querying System Data in the INNODB_BUFFER_PAGE Table
This query provides an approximate count of pages that contain
system data by excluding pages where the
TABLE_NAME value is either
NULL or includes a slash /
or period . in the table name, which
indicates a user-defined table.
mysql>SELECT COUNT(*) FROM INFORMATION_SCHEMA.INNODB_BUFFER_PAGEWHERE TABLE_NAME IS NULL OR (INSTR(TABLE_NAME, '/') = 0 AND INSTR(TABLE_NAME, '.') = 0);+----------+ | COUNT(*) | +----------+ | 1516 | +----------+
This query returns the approximate number of pages that contain system data, the total number of buffer pool pages, and an approximate percentage of pages that contain system data.
mysql>SELECT(SELECT COUNT(*) FROM INFORMATION_SCHEMA.INNODB_BUFFER_PAGEWHERE TABLE_NAME IS NULL OR (INSTR(TABLE_NAME, '/') = 0 AND INSTR(TABLE_NAME, '.') = 0)) AS system_pages,(SELECT COUNT(*)FROM INFORMATION_SCHEMA.INNODB_BUFFER_PAGE) AS total_pages,(SELECT ROUND((system_pages/total_pages) * 100)) AS system_page_percentage;+--------------+-------------+------------------------+ | system_pages | total_pages | system_page_percentage | +--------------+-------------+------------------------+ | 295 | 8192 | 4 | +--------------+-------------+------------------------+
The type of system data in the buffer pool can be determined by
querying the PAGE_TYPE value. For example,
the following query returns eight distinct
PAGE_TYPE values among the pages that contain
system data:
mysql>SELECT DISTINCT PAGE_TYPE FROM INFORMATION_SCHEMA.INNODB_BUFFER_PAGEWHERE TABLE_NAME IS NULL OR (INSTR(TABLE_NAME, '/') = 0 AND INSTR(TABLE_NAME, '.') = 0);+-------------------+ | PAGE_TYPE | +-------------------+ | SYSTEM | | IBUF_BITMAP | | UNKNOWN | | FILE_SPACE_HEADER | | INODE | | UNDO_LOG | | ALLOCATED | +-------------------+
Example 15.7 Querying User Data in the INNODB_BUFFER_PAGE Table
This query provides an approximate count of pages containing
user data by counting pages where the
TABLE_NAME value is NOT
NULL and NOT LIKE
'%INNODB_TABLES%'.
mysql>SELECT COUNT(*) FROM INFORMATION_SCHEMA.INNODB_BUFFER_PAGEWHERE TABLE_NAME IS NOT NULL AND TABLE_NAME NOT LIKE '%INNODB_TABLES%';+----------+ | COUNT(*) | +----------+ | 7897 | +----------+
This query returns the approximate number of pages that contain user data, the total number of buffer pool pages, and an approximate percentage of pages that contain user data.
mysql>SELECT(SELECT COUNT(*) FROM INFORMATION_SCHEMA.INNODB_BUFFER_PAGEWHERE TABLE_NAME IS NOT NULL AND (INSTR(TABLE_NAME, '/') > 0 OR INSTR(TABLE_NAME, '.') > 0)) AS user_pages,(SELECT COUNT(*)FROM information_schema.INNODB_BUFFER_PAGE) AS total_pages,(SELECT ROUND((user_pages/total_pages) * 100)) AS user_page_percentage;+------------+-------------+----------------------+ | user_pages | total_pages | user_page_percentage | +------------+-------------+----------------------+ | 7897 | 8192 | 96 | +------------+-------------+----------------------+
This query identifies user-defined tables with pages in the buffer pool:
mysql>SELECT DISTINCT TABLE_NAME FROM INFORMATION_SCHEMA.INNODB_BUFFER_PAGEWHERE TABLE_NAME IS NOT NULL AND (INSTR(TABLE_NAME, '/') > 0 OR INSTR(TABLE_NAME, '.') > 0)AND TABLE_NAME NOT LIKE '`mysql`.`innodb_%';+-------------------------+ | TABLE_NAME | +-------------------------+ | `employees`.`salaries` | | `employees`.`employees` | +-------------------------+
Example 15.8 Querying Index Data in the INNODB_BUFFER_PAGE Table
For information about index pages, query the
INDEX_NAME column using the name of the
index. For example, the following query returns the number of
pages and total data size of pages for the
emp_no index that is defined on the
employees.salaries table:
mysql>SELECT INDEX_NAME, COUNT(*) AS Pages,ROUND(SUM(IF(COMPRESSED_SIZE = 0, @@GLOBAL.innodb_page_size, COMPRESSED_SIZE))/1024/1024)AS 'Total Data (MB)'FROM INFORMATION_SCHEMA.INNODB_BUFFER_PAGEWHERE INDEX_NAME='emp_no' AND TABLE_NAME = '`employees`.`salaries`';+------------+-------+-----------------+ | INDEX_NAME | Pages | Total Data (MB) | +------------+-------+-----------------+ | emp_no | 1609 | 25 | +------------+-------+-----------------+
This query returns the number of pages and total data size of
pages for all indexes defined on the
employees.salaries table:
mysql>SELECT INDEX_NAME, COUNT(*) AS Pages,ROUND(SUM(IF(COMPRESSED_SIZE = 0, @@GLOBAL.innodb_page_size, COMPRESSED_SIZE))/1024/1024)AS 'Total Data (MB)'FROM INFORMATION_SCHEMA.INNODB_BUFFER_PAGEWHERE TABLE_NAME = '`employees`.`salaries`'GROUP BY INDEX_NAME;+------------+-------+-----------------+ | INDEX_NAME | Pages | Total Data (MB) | +------------+-------+-----------------+ | emp_no | 1608 | 25 | | PRIMARY | 6086 | 95 | +------------+-------+-----------------+
Example 15.9 Querying LRU_POSITION Data in the INNODB_BUFFER_PAGE_LRU Table
The INNODB_BUFFER_PAGE_LRU table
holds information about the pages in the
InnoDB buffer pool, in particular how they
are ordered that determines which pages to evict from the buffer
pool when it becomes full. The definition for this page is the
same as for INNODB_BUFFER_PAGE,
except this table has an LRU_POSITION column
instead of a BLOCK_ID column.
This query counts the number of positions at a specific location
in the LRU list occupied by pages of the
employees.employees table.
mysql>SELECT COUNT(LRU_POSITION) FROM INFORMATION_SCHEMA.INNODB_BUFFER_PAGE_LRUWHERE TABLE_NAME='`employees`.`employees`' AND LRU_POSITION < 3072;+---------------------+ | COUNT(LRU_POSITION) | +---------------------+ | 548 | +---------------------+
Example 15.10 Querying the INNODB_BUFFER_POOL_STATS Table
The INNODB_BUFFER_POOL_STATS table
provides information similar to
SHOW ENGINE INNODB
STATUS and InnoDB buffer pool
status variables.
mysql> SELECT * FROM information_schema.INNODB_BUFFER_POOL_STATS \G
*************************** 1. row ***************************
POOL_ID: 0
POOL_SIZE: 8192
FREE_BUFFERS: 1
DATABASE_PAGES: 8173
OLD_DATABASE_PAGES: 3014
MODIFIED_DATABASE_PAGES: 0
PENDING_DECOMPRESS: 0
PENDING_READS: 0
PENDING_FLUSH_LRU: 0
PENDING_FLUSH_LIST: 0
PAGES_MADE_YOUNG: 15907
PAGES_NOT_MADE_YOUNG: 3803101
PAGES_MADE_YOUNG_RATE: 0
PAGES_MADE_NOT_YOUNG_RATE: 0
NUMBER_PAGES_READ: 3270
NUMBER_PAGES_CREATED: 13176
NUMBER_PAGES_WRITTEN: 15109
PAGES_READ_RATE: 0
PAGES_CREATE_RATE: 0
PAGES_WRITTEN_RATE: 0
NUMBER_PAGES_GET: 33069332
HIT_RATE: 0
YOUNG_MAKE_PER_THOUSAND_GETS: 0
NOT_YOUNG_MAKE_PER_THOUSAND_GETS: 0
NUMBER_PAGES_READ_AHEAD: 2713
NUMBER_READ_AHEAD_EVICTED: 0
READ_AHEAD_RATE: 0
READ_AHEAD_EVICTED_RATE: 0
LRU_IO_TOTAL: 0
LRU_IO_CURRENT: 0
UNCOMPRESS_TOTAL: 0
UNCOMPRESS_CURRENT: 0
For comparison,
SHOW ENGINE INNODB
STATUS output and InnoDB buffer
pool status variable output is shown below, based on the same
data set.
For more information about
SHOW ENGINE INNODB
STATUS output, see
Section 15.17.3, “InnoDB Standard Monitor and Lock Monitor Output”.
mysql> SHOW ENGINE INNODB STATUS \G
...
----------------------
BUFFER POOL AND MEMORY
----------------------
Total large memory allocated 137428992
Dictionary memory allocated 579084
Buffer pool size 8192
Free buffers 1
Database pages 8173
Old database pages 3014
Modified db pages 0
Pending reads 0
Pending writes: LRU 0, flush list 0, single page 0
Pages made young 15907, not young 3803101
0.00 youngs/s, 0.00 non-youngs/s
Pages read 3270, created 13176, written 15109
0.00 reads/s, 0.00 creates/s, 0.00 writes/s
No buffer pool page gets since the last printout
Pages read ahead 0.00/s, evicted without access 0.00/s, Random read ahead 0.00/s
LRU len: 8173, unzip_LRU len: 0
I/O sum[0]:cur[0], unzip sum[0]:cur[0]
...
For status variable descriptions, see Section 5.1.10, “Server Status Variables”.
mysql> SHOW STATUS LIKE 'Innodb_buffer%';
+---------------------------------------+-------------+
| Variable_name | Value |
+---------------------------------------+-------------+
| Innodb_buffer_pool_dump_status | not started |
| Innodb_buffer_pool_load_status | not started |
| Innodb_buffer_pool_resize_status | not started |
| Innodb_buffer_pool_pages_data | 8173 |
| Innodb_buffer_pool_bytes_data | 133906432 |
| Innodb_buffer_pool_pages_dirty | 0 |
| Innodb_buffer_pool_bytes_dirty | 0 |
| Innodb_buffer_pool_pages_flushed | 15109 |
| Innodb_buffer_pool_pages_free | 1 |
| Innodb_buffer_pool_pages_misc | 18 |
| Innodb_buffer_pool_pages_total | 8192 |
| Innodb_buffer_pool_read_ahead_rnd | 0 |
| Innodb_buffer_pool_read_ahead | 2713 |
| Innodb_buffer_pool_read_ahead_evicted | 0 |
| Innodb_buffer_pool_read_requests | 33069332 |
| Innodb_buffer_pool_reads | 558 |
| Innodb_buffer_pool_wait_free | 0 |
| Innodb_buffer_pool_write_requests | 11985961 |
+---------------------------------------+-------------+
The INNODB_METRICS table provides
information about InnoDB performance and
resource-related counters.
INNODB_METRICS table columns are
shown below. For column descriptions, see
Section 26.51.22, “The INFORMATION_SCHEMA INNODB_METRICS Table”.
mysql> SELECT * FROM INFORMATION_SCHEMA.INNODB_METRICS WHERE NAME="dml_inserts" \G
*************************** 1. row ***************************
NAME: dml_inserts
SUBSYSTEM: dml
COUNT: 46273
MAX_COUNT: 46273
MIN_COUNT: NULL
AVG_COUNT: 492.2659574468085
COUNT_RESET: 46273
MAX_COUNT_RESET: 46273
MIN_COUNT_RESET: NULL
AVG_COUNT_RESET: NULL
TIME_ENABLED: 2014-11-28 16:07:53
TIME_DISABLED: NULL
TIME_ELAPSED: 94
TIME_RESET: NULL
STATUS: enabled
TYPE: status_counter
COMMENT: Number of rows inserted
Enabling, Disabling, and Resetting Counters
You can enable, disable, and reset counters using the following variables:
innodb_monitor_enable: Enables counters.SET GLOBAL innodb_monitor_enable = [counter-name|module_name|pattern|all];
innodb_monitor_disable: Disables counters.SET GLOBAL innodb_monitor_disable = [counter-name|module_name|pattern|all];
innodb_monitor_reset: Resets counter values to zero.SET GLOBAL innodb_monitor_reset = [counter-name|module_name|pattern|all];
innodb_monitor_reset_all: Resets all counter values. A counter must be disabled before usinginnodb_monitor_reset_all.SET GLOBAL innodb_monitor_reset_all = [counter-name|module_name|pattern|all];
Counters and counter modules can also be enabled at startup using
the MySQL server configuration file. For example, to enable the
log module,
metadata_table_handles_opened and
metadata_table_handles_closed counters, enter
the following line in the [mysqld] section of
the MySQL server configuration file.
[mysqld] innodb_monitor_enable = module_recovery,metadata_table_handles_opened,metadata_table_handles_closed
When enabling multiple counters or modules in a configuration
file, specify the
innodb_monitor_enable variable
followed by counter and module names separated by a comma, as
shown above. Only the
innodb_monitor_enable variable
can be used in a configuration file. The
innodb_monitor_disable and
innodb_monitor_reset variables
are supported on the command line only.
Because each counter adds a degree of runtime overhead, use counters conservatively on production servers to diagnose specific issues or monitor specific functionality. A test or development server is recommended for more extensive use of counters.
Counters
The list of available counters is subject to change. Query the
INFORMATION_SCHEMA.INNODB_METRICS
table for counters available in your MySQL server version.
The counters enabled by default correspond to those shown in
SHOW ENGINE INNODB
STATUS output. Counters shown in
SHOW ENGINE INNODB
STATUS output are always enabled at a system level but
can be disable for the INNODB_METRICS
table. Counter status is not persistent. Unless configured
otherwise, counters revert to their default enabled or disabled
status when the server is restarted.
If you run programs that would be affected by the addition or
removal of counters, it is recommended that you review the
releases notes and query the
INNODB_METRICS table to identify
those changes as part of your upgrade process.
mysql> SELECT name, subsystem, status FROM INFORMATION_SCHEMA.INNODB_METRICS ORDER BY NAME;
+------------------------------------------+---------------------+----------+
| name | subsystem | status |
+------------------------------------------+---------------------+----------+
| adaptive_hash_pages_added | adaptive_hash_index | disabled |
| adaptive_hash_pages_removed | adaptive_hash_index | disabled |
| adaptive_hash_rows_added | adaptive_hash_index | disabled |
| adaptive_hash_rows_deleted_no_hash_entry | adaptive_hash_index | disabled |
| adaptive_hash_rows_removed | adaptive_hash_index | disabled |
| adaptive_hash_rows_updated | adaptive_hash_index | disabled |
| adaptive_hash_searches | adaptive_hash_index | enabled |
| adaptive_hash_searches_btree | adaptive_hash_index | enabled |
| buffer_data_reads | buffer | enabled |
| buffer_data_written | buffer | enabled |
| buffer_flush_adaptive | buffer | disabled |
| buffer_flush_adaptive_avg_pass | buffer | disabled |
| buffer_flush_adaptive_avg_time_est | buffer | disabled |
| buffer_flush_adaptive_avg_time_slot | buffer | disabled |
| buffer_flush_adaptive_avg_time_thread | buffer | disabled |
| buffer_flush_adaptive_pages | buffer | disabled |
| buffer_flush_adaptive_total_pages | buffer | disabled |
| buffer_flush_avg_page_rate | buffer | disabled |
| buffer_flush_avg_pass | buffer | disabled |
| buffer_flush_avg_time | buffer | disabled |
| buffer_flush_background | buffer | disabled |
| buffer_flush_background_pages | buffer | disabled |
| buffer_flush_background_total_pages | buffer | disabled |
| buffer_flush_batches | buffer | disabled |
| buffer_flush_batch_num_scan | buffer | disabled |
| buffer_flush_batch_pages | buffer | disabled |
| buffer_flush_batch_scanned | buffer | disabled |
| buffer_flush_batch_scanned_per_call | buffer | disabled |
| buffer_flush_batch_total_pages | buffer | disabled |
| buffer_flush_lsn_avg_rate | buffer | disabled |
| buffer_flush_neighbor | buffer | disabled |
| buffer_flush_neighbor_pages | buffer | disabled |
| buffer_flush_neighbor_total_pages | buffer | disabled |
| buffer_flush_n_to_flush_by_age | buffer | disabled |
| buffer_flush_n_to_flush_requested | buffer | disabled |
| buffer_flush_pct_for_dirty | buffer | disabled |
| buffer_flush_pct_for_lsn | buffer | disabled |
| buffer_flush_sync | buffer | disabled |
| buffer_flush_sync_pages | buffer | disabled |
| buffer_flush_sync_total_pages | buffer | disabled |
| buffer_flush_sync_waits | buffer | disabled |
| buffer_LRU_batches_evict | buffer | disabled |
| buffer_LRU_batches_flush | buffer | disabled |
| buffer_LRU_batch_evict_pages | buffer | disabled |
| buffer_LRU_batch_evict_total_pages | buffer | disabled |
| buffer_LRU_batch_flush_avg_pass | buffer | disabled |
| buffer_LRU_batch_flush_avg_time_est | buffer | disabled |
| buffer_LRU_batch_flush_avg_time_slot | buffer | disabled |
| buffer_LRU_batch_flush_avg_time_thread | buffer | disabled |
| buffer_LRU_batch_flush_pages | buffer | disabled |
| buffer_LRU_batch_flush_total_pages | buffer | disabled |
| buffer_LRU_batch_num_scan | buffer | disabled |
| buffer_LRU_batch_scanned | buffer | disabled |
| buffer_LRU_batch_scanned_per_call | buffer | disabled |
| buffer_LRU_get_free_loops | buffer | disabled |
| buffer_LRU_get_free_search | Buffer | disabled |
| buffer_LRU_get_free_waits | buffer | disabled |
| buffer_LRU_search_num_scan | buffer | disabled |
| buffer_LRU_search_scanned | buffer | disabled |
| buffer_LRU_search_scanned_per_call | buffer | disabled |
| buffer_LRU_single_flush_failure_count | Buffer | disabled |
| buffer_LRU_single_flush_num_scan | buffer | disabled |
| buffer_LRU_single_flush_scanned | buffer | disabled |
| buffer_LRU_single_flush_scanned_per_call | buffer | disabled |
| buffer_LRU_unzip_search_num_scan | buffer | disabled |
| buffer_LRU_unzip_search_scanned | buffer | disabled |
| buffer_LRU_unzip_search_scanned_per_call | buffer | disabled |
| buffer_pages_created | buffer | enabled |
| buffer_pages_read | buffer | enabled |
| buffer_pages_written | buffer | enabled |
| buffer_page_read_blob | buffer_page_io | disabled |
| buffer_page_read_fsp_hdr | buffer_page_io | disabled |
| buffer_page_read_ibuf_bitmap | buffer_page_io | disabled |
| buffer_page_read_ibuf_free_list | buffer_page_io | disabled |
| buffer_page_read_index_ibuf_leaf | buffer_page_io | disabled |
| buffer_page_read_index_ibuf_non_leaf | buffer_page_io | disabled |
| buffer_page_read_index_inode | buffer_page_io | disabled |
| buffer_page_read_index_leaf | buffer_page_io | disabled |
| buffer_page_read_index_non_leaf | buffer_page_io | disabled |
| buffer_page_read_other | buffer_page_io | disabled |
| buffer_page_read_system_page | buffer_page_io | disabled |
| buffer_page_read_trx_system | buffer_page_io | disabled |
| buffer_page_read_undo_log | buffer_page_io | disabled |
| buffer_page_read_xdes | buffer_page_io | disabled |
| buffer_page_read_zblob | buffer_page_io | disabled |
| buffer_page_read_zblob2 | buffer_page_io | disabled |
| buffer_page_written_blob | buffer_page_io | disabled |
| buffer_page_written_fsp_hdr | buffer_page_io | disabled |
| buffer_page_written_ibuf_bitmap | buffer_page_io | disabled |
| buffer_page_written_ibuf_free_list | buffer_page_io | disabled |
| buffer_page_written_index_ibuf_leaf | buffer_page_io | disabled |
| buffer_page_written_index_ibuf_non_leaf | buffer_page_io | disabled |
| buffer_page_written_index_inode | buffer_page_io | disabled |
| buffer_page_written_index_leaf | buffer_page_io | disabled |
| buffer_page_written_index_non_leaf | buffer_page_io | disabled |
| buffer_page_written_other | buffer_page_io | disabled |
| buffer_page_written_system_page | buffer_page_io | disabled |
| buffer_page_written_trx_system | buffer_page_io | disabled |
| buffer_page_written_undo_log | buffer_page_io | disabled |
| buffer_page_written_xdes | buffer_page_io | disabled |
| buffer_page_written_zblob | buffer_page_io | disabled |
| buffer_page_written_zblob2 | buffer_page_io | disabled |
| buffer_pool_bytes_data | buffer | enabled |
| buffer_pool_bytes_dirty | buffer | enabled |
| buffer_pool_pages_data | buffer | enabled |
| buffer_pool_pages_dirty | buffer | enabled |
| buffer_pool_pages_free | buffer | enabled |
| buffer_pool_pages_misc | buffer | enabled |
| buffer_pool_pages_total | buffer | enabled |
| buffer_pool_reads | buffer | enabled |
| buffer_pool_read_ahead | buffer | enabled |
| buffer_pool_read_ahead_evicted | buffer | enabled |
| buffer_pool_read_requests | buffer | enabled |
| buffer_pool_size | server | enabled |
| buffer_pool_wait_free | buffer | enabled |
| buffer_pool_write_requests | buffer | enabled |
| compression_pad_decrements | compression | disabled |
| compression_pad_increments | compression | disabled |
| compress_pages_compressed | compression | disabled |
| compress_pages_decompressed | compression | disabled |
| ddl_background_drop_indexes | ddl | disabled |
| ddl_background_drop_tables | ddl | disabled |
| ddl_log_file_alter_table | ddl | disabled |
| ddl_online_create_index | ddl | disabled |
| ddl_pending_alter_table | ddl | disabled |
| ddl_sort_file_alter_table | ddl | disabled |
| dml_deletes | dml | enabled |
| dml_inserts | dml | enabled |
| dml_reads | dml | disabled |
| dml_updates | dml | enabled |
| file_num_open_files | file_system | enabled |
| ibuf_merges | change_buffer | enabled |
| ibuf_merges_delete | change_buffer | enabled |
| ibuf_merges_delete_mark | change_buffer | enabled |
| ibuf_merges_discard_delete | change_buffer | enabled |
| ibuf_merges_discard_delete_mark | change_buffer | enabled |
| ibuf_merges_discard_insert | change_buffer | enabled |
| ibuf_merges_insert | change_buffer | enabled |
| ibuf_size | change_buffer | enabled |
| icp_attempts | icp | disabled |
| icp_match | icp | disabled |
| icp_no_match | icp | disabled |
| icp_out_of_range | icp | disabled |
| index_page_discards | index | disabled |
| index_page_merge_attempts | index | disabled |
| index_page_merge_successful | index | disabled |
| index_page_reorg_attempts | index | disabled |
| index_page_reorg_successful | index | disabled |
| index_page_splits | index | disabled |
| innodb_activity_count | server | enabled |
| innodb_background_drop_table_usec | server | disabled |
| innodb_checkpoint_usec | server | disabled |
| innodb_dblwr_pages_written | server | enabled |
| innodb_dblwr_writes | server | enabled |
| innodb_dict_lru_count | server | disabled |
| innodb_dict_lru_usec | server | disabled |
| innodb_ibuf_merge_usec | server | disabled |
| innodb_log_flush_usec | server | disabled |
| innodb_master_active_loops | server | disabled |
| innodb_master_idle_loops | server | disabled |
| innodb_master_purge_usec | server | disabled |
| innodb_master_thread_sleeps | server | disabled |
| innodb_mem_validate_usec | server | disabled |
| innodb_page_size | server | enabled |
| innodb_rwlock_sx_os_waits | server | enabled |
| innodb_rwlock_sx_spin_rounds | server | enabled |
| innodb_rwlock_sx_spin_waits | server | enabled |
| innodb_rwlock_s_os_waits | server | enabled |
| innodb_rwlock_s_spin_rounds | server | enabled |
| innodb_rwlock_s_spin_waits | server | enabled |
| innodb_rwlock_x_os_waits | server | enabled |
| innodb_rwlock_x_spin_rounds | server | enabled |
| innodb_rwlock_x_spin_waits | server | enabled |
| lock_deadlocks | lock | enabled |
| lock_rec_locks | lock | disabled |
| lock_rec_lock_created | lock | disabled |
| lock_rec_lock_removed | lock | disabled |
| lock_rec_lock_requests | lock | disabled |
| lock_rec_lock_waits | lock | disabled |
| lock_row_lock_current_waits | lock | enabled |
| lock_row_lock_time | lock | enabled |
| lock_row_lock_time_avg | lock | enabled |
| lock_row_lock_time_max | lock | enabled |
| lock_row_lock_waits | lock | enabled |
| lock_table_locks | lock | disabled |
| lock_table_lock_created | lock | disabled |
| lock_table_lock_removed | lock | disabled |
| lock_table_lock_waits | lock | disabled |
| lock_timeouts | lock | enabled |
| log_checkpoints | recovery | disabled |
| log_lsn_buf_pool_oldest | recovery | disabled |
| log_lsn_checkpoint_age | recovery | disabled |
| log_lsn_current | recovery | disabled |
| log_lsn_last_checkpoint | recovery | disabled |
| log_lsn_last_flush | recovery | disabled |
| log_max_modified_age_async | recovery | disabled |
| log_max_modified_age_sync | recovery | disabled |
| log_num_log_io | recovery | disabled |
| log_padded | recovery | enabled |
| log_pending_checkpoint_writes | recovery | disabled |
| log_pending_log_flushes | recovery | disabled |
| log_waits | recovery | enabled |
| log_writes | recovery | enabled |
| log_write_requests | recovery | enabled |
| metadata_table_handles_closed | metadata | disabled |
| metadata_table_handles_opened | metadata | disabled |
| metadata_table_reference_count | metadata | disabled |
| os_data_fsyncs | os | enabled |
| os_data_reads | os | enabled |
| os_data_writes | os | enabled |
| os_log_bytes_written | os | enabled |
| os_log_fsyncs | os | enabled |
| os_log_pending_fsyncs | os | enabled |
| os_log_pending_writes | os | enabled |
| os_pending_reads | os | disabled |
| os_pending_writes | os | disabled |
| purge_del_mark_records | purge | disabled |
| purge_dml_delay_usec | purge | disabled |
| purge_invoked | purge | disabled |
| purge_resume_count | purge | disabled |
| purge_stop_count | purge | disabled |
| purge_undo_log_pages | purge | disabled |
| purge_upd_exist_or_extern_records | purge | disabled |
| trx_active_transactions | transaction | disabled |
| trx_commits_insert_update | transaction | disabled |
| trx_nl_ro_commits | transaction | disabled |
| trx_rollbacks | transaction | disabled |
| trx_rollbacks_savepoint | transaction | disabled |
| trx_rollback_active | transaction | disabled |
| trx_ro_commits | transaction | disabled |
| trx_rseg_current_size | transaction | disabled |
| trx_rseg_history_len | transaction | enabled |
| trx_rw_commits | transaction | disabled |
| trx_undo_slots_cached | transaction | disabled |
| trx_undo_slots_used | transaction | disabled |
+------------------------------------------+---------------------+----------+
235 rows in set (0.01 sec)
Counter Modules
Each counter is associated with a particular module. Module names
can be used to enable, disable, or reset all counters for a
particular subsystem. For example, use
module_dml to enable all counters associated
with the dml subsystem.
mysql>SET GLOBAL innodb_monitor_enable = module_dml;mysql>SELECT name, subsystem, status FROM INFORMATION_SCHEMA.INNODB_METRICSWHERE subsystem ='dml';+-------------+-----------+---------+ | name | subsystem | status | +-------------+-----------+---------+ | dml_reads | dml | enabled | | dml_inserts | dml | enabled | | dml_deletes | dml | enabled | | dml_updates | dml | enabled | +-------------+-----------+---------+
Module names can be used with
innodb_monitor_enable and related
variables.
Module names and corresponding SUBSYSTEM names
are listed below.
module_adaptive_hash(subsystem =adaptive_hash_index)module_buffer(subsystem =buffer)module_buffer_page(subsystem =buffer_page_io)module_compress(subsystem =compression)module_ddl(subsystem =ddl)module_dml(subsystem =dml)module_file(subsystem =file_system)module_ibuf_system(subsystem =change_buffer)module_icp(subsystem =icp)module_index(subsystem =index)module_innodb(subsystem =innodb)module_lock(subsystem =lock)module_log(subsystem =recovery)module_metadata(subsystem =metadata)module_os(subsystem =os)module_purge(subsystem =purge)module_trx(subsystem =transaction)module_undo(subsystem =undo)
Example 15.11 Working with INNODB_METRICS Table Counters
This example demonstrates enabling, disabling, and resetting a
counter, and querying counter data in the
INNODB_METRICS table.
Create a simple
InnoDBtable:mysql>
USE test;Database changed mysql>CREATE TABLE t1 (c1 INT) ENGINE=INNODB;Query OK, 0 rows affected (0.02 sec)Enable the
dml_insertscounter.mysql>
SET GLOBAL innodb_monitor_enable = dml_inserts;Query OK, 0 rows affected (0.01 sec)A description of the
dml_insertscounter can be found in theCOMMENTcolumn of theINNODB_METRICStable:mysql>
SELECT NAME, COMMENT FROM INFORMATION_SCHEMA.INNODB_METRICS WHERE NAME="dml_inserts";+-------------+-------------------------+ | NAME | COMMENT | +-------------+-------------------------+ | dml_inserts | Number of rows inserted | +-------------+-------------------------+Query the
INNODB_METRICStable for thedml_insertscounter data. Because no DML operations have been performed, the counter values are zero or NULL. TheTIME_ENABLEDandTIME_ELAPSEDvalues indicate when the counter was last enabled and how many seconds have elapsed since that time.mysql>
SELECT * FROM INFORMATION_SCHEMA.INNODB_METRICS WHERE NAME="dml_inserts" \G*************************** 1. row *************************** NAME: dml_inserts SUBSYSTEM: dml COUNT: 0 MAX_COUNT: 0 MIN_COUNT: NULL AVG_COUNT: 0 COUNT_RESET: 0 MAX_COUNT_RESET: 0 MIN_COUNT_RESET: NULL AVG_COUNT_RESET: NULL TIME_ENABLED: 2014-12-04 14:18:28 TIME_DISABLED: NULL TIME_ELAPSED: 28 TIME_RESET: NULL STATUS: enabled TYPE: status_counter COMMENT: Number of rows insertedInsert three rows of data into the table.
mysql>
INSERT INTO t1 values(1);Query OK, 1 row affected (0.00 sec) mysql>INSERT INTO t1 values(2);Query OK, 1 row affected (0.00 sec) mysql>INSERT INTO t1 values(3);Query OK, 1 row affected (0.00 sec)Query the
INNODB_METRICStable again for thedml_insertscounter data. A number of counter values have now incremented includingCOUNT,MAX_COUNT,AVG_COUNT, andCOUNT_RESET. Refer to theINNODB_METRICStable definition for descriptions of these values.mysql>
SELECT * FROM INFORMATION_SCHEMA.INNODB_METRICS WHERE NAME="dml_inserts"\G*************************** 1. row *************************** NAME: dml_inserts SUBSYSTEM: dml COUNT: 3 MAX_COUNT: 3 MIN_COUNT: NULL AVG_COUNT: 0.046153846153846156 COUNT_RESET: 3 MAX_COUNT_RESET: 3 MIN_COUNT_RESET: NULL AVG_COUNT_RESET: NULL TIME_ENABLED: 2014-12-04 14:18:28 TIME_DISABLED: NULL TIME_ELAPSED: 65 TIME_RESET: NULL STATUS: enabled TYPE: status_counter COMMENT: Number of rows insertedReset the
dml_insertscounter and query theINNODB_METRICStable again for thedml_insertscounter data. The%_RESETvalues that were reported previously, such asCOUNT_RESETandMAX_RESET, are set back to zero. Values such asCOUNT,MAX_COUNT, andAVG_COUNT, which cumulatively collect data from the time the counter is enabled, are unaffected by the reset.mysql>
SET GLOBAL innodb_monitor_reset = dml_inserts;Query OK, 0 rows affected (0.00 sec) mysql>SELECT * FROM INFORMATION_SCHEMA.INNODB_METRICS WHERE NAME="dml_inserts"\G*************************** 1. row *************************** NAME: dml_inserts SUBSYSTEM: dml COUNT: 3 MAX_COUNT: 3 MIN_COUNT: NULL AVG_COUNT: 0.03529411764705882 COUNT_RESET: 0 MAX_COUNT_RESET: 0 MIN_COUNT_RESET: NULL AVG_COUNT_RESET: 0 TIME_ENABLED: 2014-12-04 14:18:28 TIME_DISABLED: NULL TIME_ELAPSED: 85 TIME_RESET: 2014-12-04 14:19:44 STATUS: enabled TYPE: status_counter COMMENT: Number of rows insertedTo reset all counter values, you must first disable the counter. Disabling the counter sets the
STATUSvalue todisabled.mysql>
SET GLOBAL innodb_monitor_disable = dml_inserts;Query OK, 0 rows affected (0.00 sec) mysql>SELECT * FROM INFORMATION_SCHEMA.INNODB_METRICS WHERE NAME="dml_inserts"\G*************************** 1. row *************************** NAME: dml_inserts SUBSYSTEM: dml COUNT: 3 MAX_COUNT: 3 MIN_COUNT: NULL AVG_COUNT: 0.030612244897959183 COUNT_RESET: 0 MAX_COUNT_RESET: 0 MIN_COUNT_RESET: NULL AVG_COUNT_RESET: 0 TIME_ENABLED: 2014-12-04 14:18:28 TIME_DISABLED: 2014-12-04 14:20:06 TIME_ELAPSED: 98 TIME_RESET: NULL STATUS: disabled TYPE: status_counter COMMENT: Number of rows insertedNoteWildcard match is supported for counter and module names. For example, instead of specifying the full
dml_insertscounter name, you can specifydml_i%. You can also enable, disable, or reset multiple counters or modules at once using a wildcard match. For example, specifydml_%to enable, disable, or reset all counters that begin withdml_.After the counter is disabled, you can reset all counter values using the
innodb_monitor_reset_alloption. All values are set to zero or NULL.mysql>
SET GLOBAL innodb_monitor_reset_all = dml_inserts;Query OK, 0 rows affected (0.00 sec) mysql>SELECT * FROM INFORMATION_SCHEMA.INNODB_METRICS WHERE NAME="dml_inserts"\G*************************** 1. row *************************** NAME: dml_inserts SUBSYSTEM: dml COUNT: 0 MAX_COUNT: NULL MIN_COUNT: NULL AVG_COUNT: NULL COUNT_RESET: 0 MAX_COUNT_RESET: NULL MIN_COUNT_RESET: NULL AVG_COUNT_RESET: NULL TIME_ENABLED: NULL TIME_DISABLED: NULL TIME_ELAPSED: NULL TIME_RESET: NULL STATUS: disabled TYPE: status_counter COMMENT: Number of rows inserted
INNODB_TEMP_TABLE_INFO provides
information about user-created InnoDB temporary
tables that are active in the InnoDB instance.
It does not provide information about internal
InnoDB temporary tables used by the optimizer.
mysql> SHOW TABLES FROM INFORMATION_SCHEMA LIKE 'INNODB_TEMP%';
+---------------------------------------------+
| Tables_in_INFORMATION_SCHEMA (INNODB_TEMP%) |
+---------------------------------------------+
| INNODB_TEMP_TABLE_INFO |
+---------------------------------------------+
For the table definition, see Section 26.51.28, “The INFORMATION_SCHEMA INNODB_TEMP_TABLE_INFO Table”.
Example 15.12 INNODB_TEMP_TABLE_INFO
This example demonstrates characteristics of the
INNODB_TEMP_TABLE_INFO table.
Create a simple
InnoDBtemporary table:mysql>
CREATE TEMPORARY TABLE t1 (c1 INT PRIMARY KEY) ENGINE=INNODB;Query
INNODB_TEMP_TABLE_INFOto view the temporary table metadata.mysql>
SELECT * FROM INFORMATION_SCHEMA.INNODB_TEMP_TABLE_INFO\G*************************** 1. row *************************** TABLE_ID: 194 NAME: #sql7a79_1_0 N_COLS: 4 SPACE: 182The
TABLE_IDis a unique identifier for the temporary table. TheNAMEcolumn displays the system-generated name for the temporary table, which is prefixed with “#sql”. The number of columns (N_COLS) is 4 rather than 1 becauseInnoDBalways creates three hidden table columns (DB_ROW_ID,DB_TRX_ID, andDB_ROLL_PTR).Restart MySQL and query
INNODB_TEMP_TABLE_INFO.mysql>
SELECT * FROM INFORMATION_SCHEMA.INNODB_TEMP_TABLE_INFO\GAn empty set is returned because
INNODB_TEMP_TABLE_INFOand its data are not persisted to disk when the server is shut down.Create a new temporary table.
mysql>
CREATE TEMPORARY TABLE t1 (c1 INT PRIMARY KEY) ENGINE=INNODB;Query
INNODB_TEMP_TABLE_INFOto view the temporary table metadata.mysql>
SELECT * FROM INFORMATION_SCHEMA.INNODB_TEMP_TABLE_INFO\G*************************** 1. row *************************** TABLE_ID: 196 NAME: #sql7b0e_1_0 N_COLS: 4 SPACE: 184The
SPACEID may be different because it is dynamically generated when the server is started.
The INFORMATION_SCHEMA.FILES table
provides metadata about all InnoDB tablespace
types including file-per-table
tablespaces,
general
tablespaces, the
system tablespace,
temporary table
tablespaces, and undo
tablespaces (if present).
This section provides InnoDB-specific usage
examples. For more information about data provided by the
INFORMATION_SCHEMA.FILES table, see
Section 26.15, “The INFORMATION_SCHEMA FILES Table”.
The INNODB_TABLESPACES and
INNODB_DATAFILES tables also
provide metadata about InnoDB tablespaces,
but data is limited to file-per-table, general, and undo
tablespaces.
This query retrieves metadata about the InnoDB
system tablespace from fields of the
INFORMATION_SCHEMA.FILES table that
are pertinent to InnoDB tablespaces.
INFORMATION_SCHEMA.FILES fields that
are not relevant to InnoDB always return NULL,
and are excluded from the query.
mysql>SELECT FILE_ID, FILE_NAME, FILE_TYPE, TABLESPACE_NAME, FREE_EXTENTS,TOTAL_EXTENTS, EXTENT_SIZE, INITIAL_SIZE, MAXIMUM_SIZE, AUTOEXTEND_SIZE, DATA_FREE, STATUS ENGINEFROM INFORMATION_SCHEMA.FILES WHERE TABLESPACE_NAME LIKE 'innodb_system' \G*************************** 1. row *************************** FILE_ID: 0 FILE_NAME: ./ibdata1 FILE_TYPE: TABLESPACE TABLESPACE_NAME: innodb_system FREE_EXTENTS: 0 TOTAL_EXTENTS: 12 EXTENT_SIZE: 1048576 INITIAL_SIZE: 12582912 MAXIMUM_SIZE: NULL AUTOEXTEND_SIZE: 67108864 DATA_FREE: 4194304 ENGINE: NORMAL
This query retrieves the FILE_ID (equivalent to
the space ID) and the FILE_NAME (which includes
path information) for InnoDB file-per-table and
general tablespaces. File-per-table and general tablespaces have a
.ibd file extension.
mysql>SELECT FILE_ID, FILE_NAME FROM INFORMATION_SCHEMA.FILESWHERE FILE_NAME LIKE '%.ibd%' ORDER BY FILE_ID;+---------+---------------------------------------+ | FILE_ID | FILE_NAME | +---------+---------------------------------------+ | 2 | ./mysql/plugin.ibd | | 3 | ./mysql/servers.ibd | | 4 | ./mysql/help_topic.ibd | | 5 | ./mysql/help_category.ibd | | 6 | ./mysql/help_relation.ibd | | 7 | ./mysql/help_keyword.ibd | | 8 | ./mysql/time_zone_name.ibd | | 9 | ./mysql/time_zone.ibd | | 10 | ./mysql/time_zone_transition.ibd | | 11 | ./mysql/time_zone_transition_type.ibd | | 12 | ./mysql/time_zone_leap_second.ibd | | 13 | ./mysql/innodb_table_stats.ibd | | 14 | ./mysql/innodb_index_stats.ibd | | 15 | ./mysql/slave_relay_log_info.ibd | | 16 | ./mysql/slave_master_info.ibd | | 17 | ./mysql/slave_worker_info.ibd | | 18 | ./mysql/gtid_executed.ibd | | 19 | ./mysql/server_cost.ibd | | 20 | ./mysql/engine_cost.ibd | | 21 | ./sys/sys_config.ibd | | 23 | ./test/t1.ibd | | 26 | /home/user/test/test/t2.ibd | +---------+---------------------------------------+
This query retrieves the FILE_ID and
FILE_NAME for the InnoDB
global temporary tablespace. Global temporary tablespace file
names are prefixed by ibtmp.
mysql>SELECT FILE_ID, FILE_NAME FROM INFORMATION_SCHEMA.FILESWHERE FILE_NAME LIKE '%ibtmp%';+---------+-----------+ | FILE_ID | FILE_NAME | +---------+-----------+ | 22 | ./ibtmp1 | +---------+-----------+
Similarly, InnoDB undo tablespace file names
are prefixed by undo. The following query
returns the FILE_ID and
FILE_NAME for InnoDB undo
tablespaces.
mysql>SELECT FILE_ID, FILE_NAME FROM INFORMATION_SCHEMA.FILESWHERE FILE_NAME LIKE '%undo%';
This section provides a brief introduction to
InnoDB integration with Performance Schema. For
comprehensive Performance Schema documentation, see
Chapter 27, MySQL Performance Schema.
You can profile certain internal InnoDB
operations using the MySQL
Performance Schema
feature. This type of tuning is primarily for expert users
who evaluate optimization strategies to overcome performance
bottlenecks. DBAs can also use this feature for capacity planning,
to see whether their typical workload encounters any performance
bottlenecks with a particular combination of CPU, RAM, and disk
storage; and if so, to judge whether performance can be improved by
increasing the capacity of some part of the system.
To use this feature to examine InnoDB
performance:
You must be generally familiar with how to use the Performance Schema feature. For example, you should know how enable instruments and consumers, and how to query
performance_schematables to retrieve data. For an introductory overview, see Section 27.1, “Performance Schema Quick Start”.You should be familiar with Performance Schema instruments that are available for
InnoDB. To viewInnoDB-related instruments, you can query thesetup_instrumentstable for instrument names that contain 'innodb'.mysql>
SELECT *FROM performance_schema.setup_instrumentsWHERE NAME LIKE '%innodb%';+-------------------------------------------------------+---------+-------+ | NAME | ENABLED | TIMED | +-------------------------------------------------------+---------+-------+ | wait/synch/mutex/innodb/commit_cond_mutex | NO | NO | | wait/synch/mutex/innodb/innobase_share_mutex | NO | NO | | wait/synch/mutex/innodb/autoinc_mutex | NO | NO | | wait/synch/mutex/innodb/buf_pool_mutex | NO | NO | | wait/synch/mutex/innodb/buf_pool_zip_mutex | NO | NO | | wait/synch/mutex/innodb/cache_last_read_mutex | NO | NO | | wait/synch/mutex/innodb/dict_foreign_err_mutex | NO | NO | | wait/synch/mutex/innodb/dict_sys_mutex | NO | NO | | wait/synch/mutex/innodb/recalc_pool_mutex | NO | NO | ... | wait/io/file/innodb/innodb_data_file | YES | YES | | wait/io/file/innodb/innodb_log_file | YES | YES | | wait/io/file/innodb/innodb_temp_file | YES | YES | | stage/innodb/alter table (end) | YES | YES | | stage/innodb/alter table (flush) | YES | YES | | stage/innodb/alter table (insert) | YES | YES | | stage/innodb/alter table (log apply index) | YES | YES | | stage/innodb/alter table (log apply table) | YES | YES | | stage/innodb/alter table (merge sort) | YES | YES | | stage/innodb/alter table (read PK and internal sort) | YES | YES | | stage/innodb/buffer pool load | YES | YES | | memory/innodb/buf_buf_pool | NO | NO | | memory/innodb/dict_stats_bg_recalc_pool_t | NO | NO | | memory/innodb/dict_stats_index_map_t | NO | NO | | memory/innodb/dict_stats_n_diff_on_level | NO | NO | | memory/innodb/other | NO | NO | | memory/innodb/row_log_buf | NO | NO | | memory/innodb/row_merge_sort | NO | NO | | memory/innodb/std | NO | NO | | memory/innodb/sync_debug_latches | NO | NO | | memory/innodb/trx_sys_t::rw_trx_ids | NO | NO | ... +-------------------------------------------------------+---------+-------+ 155 rows in set (0.00 sec)For additional information about the instrumented
InnoDBobjects, you can query Performance Schema instances tables, which provide additional information about instrumented objects. Instance tables relevant toInnoDBinclude:The
mutex_instancestableThe
rwlock_instancestableThe
cond_instancestableThe
file_instancestable
NoteMutexes and RW-locks related to the
InnoDBbuffer pool are not included in this coverage; the same applies to the output of theSHOW ENGINE INNODB MUTEXcommand.For example, to view information about instrumented
InnoDBfile objects seen by the Performance Schema when executing file I/O instrumentation, you might issue the following query:mysql>
SELECT *FROM performance_schema.file_instancesWHERE EVENT_NAME LIKE '%innodb%'\G*************************** 1. row *************************** FILE_NAME: /path/to/mysql-8.0/data/ibdata1 EVENT_NAME: wait/io/file/innodb/innodb_data_file OPEN_COUNT: 3 *************************** 2. row *************************** FILE_NAME: /path/to/mysql-8.0/data/ib_logfile0 EVENT_NAME: wait/io/file/innodb/innodb_log_file OPEN_COUNT: 2 *************************** 3. row *************************** FILE_NAME: /path/to/mysql-8.0/data/ib_logfile1 EVENT_NAME: wait/io/file/innodb/innodb_log_file OPEN_COUNT: 2 *************************** 4. row *************************** FILE_NAME: /path/to/mysql-8.0/data/mysql/engine_cost.ibd EVENT_NAME: wait/io/file/innodb/innodb_data_file OPEN_COUNT: 3 ...You should be familiar with
performance_schematables that storeInnoDBevent data. Tables relevant toInnoDB-related events include:The Wait Event tables, which store wait events.
The Summary tables, which provide aggregated information for terminated events over time. Summary tables include file I/O summary tables, which aggregate information about I/O operations.
Stage Event tables, which store event data for
InnoDBALTER TABLEand buffer pool load operations. For more information, see Section 15.16.1, “Monitoring ALTER TABLE Progress for InnoDB Tables Using Performance Schema”, and Monitoring Buffer Pool Load Progress Using Performance Schema.
If you are only interested in
InnoDB-related objects, use the clauseWHERE EVENT_NAME LIKE '%innodb%'orWHERE NAME LIKE '%innodb%'(as required) when querying these tables.
You can monitor ALTER TABLE
progress for InnoDB tables using
Performance Schema.
There are seven stage events that represent different phases of
ALTER TABLE. Each stage event
reports a running total of WORK_COMPLETED and
WORK_ESTIMATED for the overall
ALTER TABLE operation as it
progresses through its different phases.
WORK_ESTIMATED is calculated using a formula
that takes into account all of the work that
ALTER TABLE performs, and may be
revised during ALTER TABLE
processing. WORK_COMPLETED and
WORK_ESTIMATED values are an abstract
representation of all of the work performed by
ALTER TABLE.
In order of occurrence, ALTER TABLE
stage events include:
stage/innodb/alter table (read PK and internal sort): This stage is active whenALTER TABLEis in the reading-primary-key phase. It starts withWORK_COMPLETED=0andWORK_ESTIMATEDset to the estimated number of pages in the primary key. When the stage is completed,WORK_ESTIMATEDis updated to the actual number of pages in the primary key.stage/innodb/alter table (merge sort): This stage is repeated for each index added by theALTER TABLEoperation.stage/innodb/alter table (insert): This stage is repeated for each index added by theALTER TABLEoperation.stage/innodb/alter table (log apply index): This stage includes the application of DML log generated whileALTER TABLEwas running.stage/innodb/alter table (flush): Before this stage begins,WORK_ESTIMATEDis updated with a more accurate estimate, based on the length of the flush list.stage/innodb/alter table (log apply table): This stage includes the application of concurrent DML log generated whileALTER TABLEwas running. The duration of this phase depends on the extent of table changes. This phase is instant if no concurrent DML was run on the table.stage/innodb/alter table (end): Includes any remaining work that appeared after the flush phase, such as reapplying DML that was executed on the table whileALTER TABLEwas running.
InnoDB ALTER
TABLE stage events do not currently account for the
addition of spatial indexes.
ALTER TABLE Monitoring Example Using Performance Schema
The following example demonstrates how to enable the
stage/innodb/alter table% stage event
instruments and related consumer tables to monitor
ALTER TABLE progress. For
information about Performance Schema stage event instruments and
related consumers, see
Section 27.12.5, “Performance Schema Stage Event Tables”.
Enable the
stage/innodb/alter%instruments:mysql>
UPDATE performance_schema.setup_instrumentsSET ENABLED = 'YES'WHERE NAME LIKE 'stage/innodb/alter%';Query OK, 7 rows affected (0.00 sec) Rows matched: 7 Changed: 7 Warnings: 0Enable the stage event consumer tables, which include
events_stages_current,events_stages_history, andevents_stages_history_long.mysql>
UPDATE performance_schema.setup_consumersSET ENABLED = 'YES'WHERE NAME LIKE '%stages%';Query OK, 3 rows affected (0.00 sec) Rows matched: 3 Changed: 3 Warnings: 0Run an
ALTER TABLEoperation. In this example, amiddle_namecolumn is added to the employees table of the employees sample database.mysql>
ALTER TABLE employees.employees ADD COLUMN middle_name varchar(14) AFTER first_name;Query OK, 0 rows affected (9.27 sec) Records: 0 Duplicates: 0 Warnings: 0Check the progress of the
ALTER TABLEoperation by querying the Performance Schemaevents_stages_currenttable. The stage event shown differs depending on whichALTER TABLEphase is currently in progress. TheWORK_COMPLETEDcolumn shows the work completed. TheWORK_ESTIMATEDcolumn provides an estimate of the remaining work.mysql>
SELECT EVENT_NAME, WORK_COMPLETED, WORK_ESTIMATEDFROM performance_schema.events_stages_current;+------------------------------------------------------+----------------+----------------+ | EVENT_NAME | WORK_COMPLETED | WORK_ESTIMATED | +------------------------------------------------------+----------------+----------------+ | stage/innodb/alter table (read PK and internal sort) | 280 | 1245 | +------------------------------------------------------+----------------+----------------+ 1 row in set (0.01 sec)The
events_stages_currenttable returns an empty set if theALTER TABLEoperation has completed. In this case, you can check theevents_stages_historytable to view event data for the completed operation. For example:mysql>
SELECT EVENT_NAME, WORK_COMPLETED, WORK_ESTIMATEDFROM performance_schema.events_stages_history;+------------------------------------------------------+----------------+----------------+ | EVENT_NAME | WORK_COMPLETED | WORK_ESTIMATED | +------------------------------------------------------+----------------+----------------+ | stage/innodb/alter table (read PK and internal sort) | 886 | 1213 | | stage/innodb/alter table (flush) | 1213 | 1213 | | stage/innodb/alter table (log apply table) | 1597 | 1597 | | stage/innodb/alter table (end) | 1597 | 1597 | | stage/innodb/alter table (log apply table) | 1981 | 1981 | +------------------------------------------------------+----------------+----------------+ 5 rows in set (0.00 sec)As shown above, the
WORK_ESTIMATEDvalue was revised duringALTER TABLEprocessing. The estimated work after completion of the initial stage is 1213. WhenALTER TABLEprocessing completed,WORK_ESTIMATEDwas set to the actual value, which is 1981.
A mutex is a synchronization mechanism used in the code to enforce that only one thread at a given time can have access to a common resource. When two or more threads executing in the server need to access the same resource, the threads compete against each other. The first thread to obtain a lock on the mutex causes the other threads to wait until the lock is released.
For InnoDB mutexes that are instrumented, mutex
waits can be monitored using
Performance Schema. Wait
event data collected in Performance Schema tables can help
identify mutexes with the most waits or the greatest total wait
time, for example.
The following example demonstrates how to enable
InnoDB mutex wait instruments, how to enable
associated consumers, and how to query wait event data.
To view available
InnoDBmutex wait instruments, query the Performance Schemasetup_instrumentstable. AllInnoDBmutex wait instruments are disabled by default.mysql>
SELECT *FROM performance_schema.setup_instrumentsWHERE NAME LIKE '%wait/synch/mutex/innodb%';+---------------------------------------------------------+---------+-------+ | NAME | ENABLED | TIMED | +---------------------------------------------------------+---------+-------+ | wait/synch/mutex/innodb/commit_cond_mutex | NO | NO | | wait/synch/mutex/innodb/innobase_share_mutex | NO | NO | | wait/synch/mutex/innodb/autoinc_mutex | NO | NO | | wait/synch/mutex/innodb/autoinc_persisted_mutex | NO | NO | | wait/synch/mutex/innodb/buf_pool_flush_state_mutex | NO | NO | | wait/synch/mutex/innodb/buf_pool_LRU_list_mutex | NO | NO | | wait/synch/mutex/innodb/buf_pool_free_list_mutex | NO | NO | | wait/synch/mutex/innodb/buf_pool_zip_free_mutex | NO | NO | | wait/synch/mutex/innodb/buf_pool_zip_hash_mutex | NO | NO | | wait/synch/mutex/innodb/buf_pool_zip_mutex | NO | NO | | wait/synch/mutex/innodb/cache_last_read_mutex | NO | NO | | wait/synch/mutex/innodb/dict_foreign_err_mutex | NO | NO | | wait/synch/mutex/innodb/dict_persist_dirty_tables_mutex | NO | NO | | wait/synch/mutex/innodb/dict_sys_mutex | NO | NO | | wait/synch/mutex/innodb/recalc_pool_mutex | NO | NO | | wait/synch/mutex/innodb/fil_system_mutex | NO | NO | | wait/synch/mutex/innodb/flush_list_mutex | NO | NO | | wait/synch/mutex/innodb/fts_bg_threads_mutex | NO | NO | | wait/synch/mutex/innodb/fts_delete_mutex | NO | NO | | wait/synch/mutex/innodb/fts_optimize_mutex | NO | NO | | wait/synch/mutex/innodb/fts_doc_id_mutex | NO | NO | | wait/synch/mutex/innodb/log_flush_order_mutex | NO | NO | | wait/synch/mutex/innodb/hash_table_mutex | NO | NO | | wait/synch/mutex/innodb/ibuf_bitmap_mutex | NO | NO | | wait/synch/mutex/innodb/ibuf_mutex | NO | NO | | wait/synch/mutex/innodb/ibuf_pessimistic_insert_mutex | NO | NO | | wait/synch/mutex/innodb/log_sys_mutex | NO | NO | | wait/synch/mutex/innodb/log_sys_write_mutex | NO | NO | | wait/synch/mutex/innodb/mutex_list_mutex | NO | NO | | wait/synch/mutex/innodb/page_zip_stat_per_index_mutex | NO | NO | | wait/synch/mutex/innodb/purge_sys_pq_mutex | NO | NO | | wait/synch/mutex/innodb/recv_sys_mutex | NO | NO | | wait/synch/mutex/innodb/recv_writer_mutex | NO | NO | | wait/synch/mutex/innodb/redo_rseg_mutex | NO | NO | | wait/synch/mutex/innodb/noredo_rseg_mutex | NO | NO | | wait/synch/mutex/innodb/rw_lock_list_mutex | NO | NO | | wait/synch/mutex/innodb/rw_lock_mutex | NO | NO | | wait/synch/mutex/innodb/srv_dict_tmpfile_mutex | NO | NO | | wait/synch/mutex/innodb/srv_innodb_monitor_mutex | NO | NO | | wait/synch/mutex/innodb/srv_misc_tmpfile_mutex | NO | NO | | wait/synch/mutex/innodb/srv_monitor_file_mutex | NO | NO | | wait/synch/mutex/innodb/buf_dblwr_mutex | NO | NO | | wait/synch/mutex/innodb/trx_undo_mutex | NO | NO | | wait/synch/mutex/innodb/trx_pool_mutex | NO | NO | | wait/synch/mutex/innodb/trx_pool_manager_mutex | NO | NO | | wait/synch/mutex/innodb/srv_sys_mutex | NO | NO | | wait/synch/mutex/innodb/lock_mutex | NO | NO | | wait/synch/mutex/innodb/lock_wait_mutex | NO | NO | | wait/synch/mutex/innodb/trx_mutex | NO | NO | | wait/synch/mutex/innodb/srv_threads_mutex | NO | NO | | wait/synch/mutex/innodb/rtr_active_mutex | NO | NO | | wait/synch/mutex/innodb/rtr_match_mutex | NO | NO | | wait/synch/mutex/innodb/rtr_path_mutex | NO | NO | | wait/synch/mutex/innodb/rtr_ssn_mutex | NO | NO | | wait/synch/mutex/innodb/trx_sys_mutex | NO | NO | | wait/synch/mutex/innodb/zip_pad_mutex | NO | NO | | wait/synch/mutex/innodb/master_key_id_mutex | NO | NO | +---------------------------------------------------------+---------+-------+Some
InnoDBmutex instances are created at server startup and are only instrumented if the associated instrument is also enabled at server startup. To ensure that allInnoDBmutex instances are instrumented and enabled, add the followingperformance-schema-instrumentrule to your MySQL configuration file:performance-schema-instrument='wait/synch/mutex/innodb/%=ON'
If you do not require wait event data for all
InnoDBmutexes, you can disable specific instruments by adding additionalperformance-schema-instrumentrules to your MySQL configuration file. For example, to disableInnoDBmutex wait event instruments related to full-text search, add the following rule:performance-schema-instrument='wait/synch/mutex/innodb/fts%=OFF'
NoteRules with a longer prefix such as
wait/synch/mutex/innodb/fts%take precedence over rules with shorter prefixes such aswait/synch/mutex/innodb/%.After adding the
performance-schema-instrumentrules to your configuration file, restart the server. All theInnoDBmutexes except for those related to full text search are enabled. To verify, query thesetup_instrumentstable. TheENABLEDandTIMEDcolumns should be set toYESfor the instruments that you enabled.mysql>
SELECT *FROM performance_schema.setup_instrumentsWHERE NAME LIKE '%wait/synch/mutex/innodb%';+-------------------------------------------------------+---------+-------+ | NAME | ENABLED | TIMED | +-------------------------------------------------------+---------+-------+ | wait/synch/mutex/innodb/commit_cond_mutex | YES | YES | | wait/synch/mutex/innodb/innobase_share_mutex | YES | YES | | wait/synch/mutex/innodb/autoinc_mutex | YES | YES | ... | wait/synch/mutex/innodb/master_key_id_mutex | YES | YES | +-------------------------------------------------------+---------+-------+ 49 rows in set (0.00 sec)Enable wait event consumers by updating the
setup_consumerstable. Wait event consumers are disabled by default.mysql>
UPDATE performance_schema.setup_consumersSET enabled = 'YES'WHERE name like 'events_waits%';Query OK, 3 rows affected (0.00 sec) Rows matched: 3 Changed: 3 Warnings: 0You can verify that wait event consumers are enabled by querying the
setup_consumerstable. Theevents_waits_current,events_waits_history, andevents_waits_history_longconsumers should be enabled.mysql>
SELECT * FROM performance_schema.setup_consumers;+----------------------------------+---------+ | NAME | ENABLED | +----------------------------------+---------+ | events_stages_current | NO | | events_stages_history | NO | | events_stages_history_long | NO | | events_statements_current | YES | | events_statements_history | YES | | events_statements_history_long | NO | | events_transactions_current | YES | | events_transactions_history | YES | | events_transactions_history_long | NO | | events_waits_current | YES | | events_waits_history | YES | | events_waits_history_long | YES | | global_instrumentation | YES | | thread_instrumentation | YES | | statements_digest | YES | +----------------------------------+---------+ 15 rows in set (0.00 sec)Once instruments and consumers are enabled, run the workload that you want to monitor. In this example, the mysqlslap load emulation client is used to simulate a workload.
shell>
./mysqlslap --auto-generate-sql --concurrency=100 --iterations=10--number-of-queries=1000 --number-char-cols=6 --number-int-cols=6;Query the wait event data. In this example, wait event data is queried from the
events_waits_summary_global_by_event_nametable which aggregates data found in theevents_waits_current,events_waits_history, andevents_waits_history_longtables. Data is summarized by event name (EVENT_NAME), which is the name of the instrument that produced the event. Summarized data includes:COUNT_STARThe number of summarized wait events.
SUM_TIMER_WAITThe total wait time of the summarized timed wait events.
MIN_TIMER_WAITThe minimum wait time of the summarized timed wait events.
AVG_TIMER_WAITThe average wait time of the summarized timed wait events.
MAX_TIMER_WAITThe maximum wait time of the summarized timed wait events.
The following query returns the instrument name (
EVENT_NAME), the number of wait events (COUNT_STAR), and the total wait time for the events for that instrument (SUM_TIMER_WAIT). Because waits are timed in picoseconds (trillionths of a second) by default, wait times are divided by 1000000000 to show wait times in milliseconds. Data is presented in descending order, by the number of summarized wait events (COUNT_STAR). You can adjust theORDER BYclause to order the data by total wait time.mysql>
SELECT EVENT_NAME, COUNT_STAR, SUM_TIMER_WAIT/1000000000 SUM_TIMER_WAIT_MSFROM performance_schema.events_waits_summary_global_by_event_nameWHERE SUM_TIMER_WAIT > 0 AND EVENT_NAME LIKE 'wait/synch/mutex/innodb/%'ORDER BY COUNT_STAR DESC;+---------------------------------------------------------+------------+-------------------+ | EVENT_NAME | COUNT_STAR | SUM_TIMER_WAIT_MS | +---------------------------------------------------------+------------+-------------------+ | wait/synch/mutex/innodb/trx_mutex | 201111 | 23.4719 | | wait/synch/mutex/innodb/fil_system_mutex | 62244 | 9.6426 | | wait/synch/mutex/innodb/redo_rseg_mutex | 48238 | 3.1135 | | wait/synch/mutex/innodb/log_sys_mutex | 46113 | 2.0434 | | wait/synch/mutex/innodb/trx_sys_mutex | 35134 | 1068.1588 | | wait/synch/mutex/innodb/lock_mutex | 34872 | 1039.2589 | | wait/synch/mutex/innodb/log_sys_write_mutex | 17805 | 1526.0490 | | wait/synch/mutex/innodb/dict_sys_mutex | 14912 | 1606.7348 | | wait/synch/mutex/innodb/trx_undo_mutex | 10634 | 1.1424 | | wait/synch/mutex/innodb/rw_lock_list_mutex | 8538 | 0.1960 | | wait/synch/mutex/innodb/buf_pool_free_list_mutex | 5961 | 0.6473 | | wait/synch/mutex/innodb/trx_pool_mutex | 4885 | 8821.7496 | | wait/synch/mutex/innodb/buf_pool_LRU_list_mutex | 4364 | 0.2077 | | wait/synch/mutex/innodb/innobase_share_mutex | 3212 | 0.2650 | | wait/synch/mutex/innodb/flush_list_mutex | 3178 | 0.2349 | | wait/synch/mutex/innodb/trx_pool_manager_mutex | 2495 | 0.1310 | | wait/synch/mutex/innodb/buf_pool_flush_state_mutex | 1318 | 0.2161 | | wait/synch/mutex/innodb/log_flush_order_mutex | 1250 | 0.0893 | | wait/synch/mutex/innodb/buf_dblwr_mutex | 951 | 0.0918 | | wait/synch/mutex/innodb/recalc_pool_mutex | 670 | 0.0942 | | wait/synch/mutex/innodb/dict_persist_dirty_tables_mutex | 345 | 0.0414 | | wait/synch/mutex/innodb/lock_wait_mutex | 303 | 0.1565 | | wait/synch/mutex/innodb/autoinc_mutex | 196 | 0.0213 | | wait/synch/mutex/innodb/autoinc_persisted_mutex | 196 | 0.0175 | | wait/synch/mutex/innodb/purge_sys_pq_mutex | 117 | 0.0308 | | wait/synch/mutex/innodb/srv_sys_mutex | 94 | 0.0077 | | wait/synch/mutex/innodb/ibuf_mutex | 22 | 0.0086 | | wait/synch/mutex/innodb/recv_sys_mutex | 12 | 0.0008 | | wait/synch/mutex/innodb/srv_innodb_monitor_mutex | 4 | 0.0009 | | wait/synch/mutex/innodb/recv_writer_mutex | 1 | 0.0005 | +---------------------------------------------------------+------------+-------------------+NoteThe preceding result set includes wait event data produced during the startup process. To exclude this data, you can truncate the
events_waits_summary_global_by_event_nametable immediately after startup and before running your workload. However, the truncate operation itself may produce a negligible amount wait event data.mysql>
TRUNCATE performance_schema.events_waits_summary_global_by_event_name;
InnoDB monitors provide information about the
InnoDB internal state. This information is useful
for performance tuning.
There are two types of InnoDB monitor:
The standard
InnoDBMonitor displays the following types of information:Work done by the main background thread
Semaphore waits
Data about the most recent foreign key and deadlock errors
Lock waits for transactions
Table and record locks held by active transactions
Pending I/O operations and related statistics
Insert buffer and adaptive hash index statistics
Redo log data
Buffer pool statistics
Row operation data
The
InnoDBLock Monitor prints additional lock information as part of the standardInnoDBMonitor output.
When InnoDB monitors are enabled for periodic
output, InnoDB writes the output to
mysqld server standard error output
(stderr) every 15 seconds, approximately.
InnoDB sends the monitor output to
stderr rather than to stdout
or fixed-size memory buffers to avoid potential buffer overflows.
On Windows, stderr is directed to the default
log file unless configured otherwise. If you want to direct the
output to the console window rather than to the error log, start
the server from a command prompt in a console window with the
--console option. For more
information, see
Default Error Log Destination on Windows.
On Unix and Unix-like systems, stderr is
typically directed to the terminal unless configured otherwise.
For more information, see
Default Error Log Destination on Unix and Unix-Like Systems.
InnoDB monitors should only be enabled when you
actually want to see monitor information because output generation
causes some performance decrement. Also, if monitor output is
directed to the error log, the log may become quite large if you
forget to disable the monitor later.
To assist with troubleshooting, InnoDB
temporarily enables standard InnoDB Monitor
output under certain conditions. For more information, see
Section 15.21, “InnoDB Troubleshooting”.
InnoDB monitor output begins with a header
containing a timestamp and the monitor name. For example:
===================================== 2014-10-16 18:37:29 0x7fc2a95c1700 INNODB MONITOR OUTPUT =====================================
The header for the standard InnoDB Monitor
(INNODB MONITOR OUTPUT) is also used for the
Lock Monitor because the latter produces the same output with the
addition of extra lock information.
The innodb_status_output and
innodb_status_output_locks system
variables are used to enable the standard
InnoDB Monitor and InnoDB
Lock Monitor.
The PROCESS privilege is required
to enable or disable InnoDB Monitors.
Enabling the Standard InnoDB Monitor
Enable the standard InnoDB Monitor by setting
the innodb_status_output system
variable to ON.
SET GLOBAL innodb_status_output=ON;
To disable the standard InnoDB Monitor, set
innodb_status_output to
OFF.
When you shut down the server, the
innodb_status_output variable is
set to the default OFF value.
Enabling the InnoDB Lock Monitor
InnoDB Lock Monitor data is printed with the
InnoDB Standard Monitor output. Both the
InnoDB Standard Monitor and
InnoDB Lock Monitor must be enabled to have
InnoDB Lock Monitor data printed periodically.
To enable the InnoDB Lock Monitor, set the
innodb_status_output_locks system
variable to ON. Both the
InnoDB standard Monitor and
InnoDB Lock Monitor must be enabled to have
InnoDB Lock Monitor data printed periodically:
SET GLOBAL innodb_status_output=ON; SET GLOBAL innodb_status_output_locks=ON;
To disable the InnoDB Lock Monitor, set
innodb_status_output_locks to
OFF. Set
innodb_status_output to
OFF to also disable the
InnoDB Standard Monitor.
When you shut down the server, the
innodb_status_output and
innodb_status_output_locks
variables are set to the default OFF value.
To enable the InnoDB Lock Monitor for
SHOW ENGINE INNODB
STATUS output, you are only required to enable
innodb_status_output_locks.
Obtaining Standard InnoDB Monitor Output On Demand
As an alternative to enabling the standard
InnoDB Monitor for periodic output, you can
obtain standard InnoDB Monitor output on demand
using the SHOW ENGINE
INNODB STATUS SQL statement, which fetches the output to
your client program. If you are using the mysql
interactive client, the output is more readable if you replace the
usual semicolon statement terminator with \G:
mysql> SHOW ENGINE INNODB STATUS\G
SHOW ENGINE INNODB
STATUS output also includes InnoDB
Lock Monitor data if the InnoDB Lock Monitor is
enabled.
Directing Standard InnoDB Monitor Output to a Status File
Standard InnoDB Monitor output can be enabled
and directed to a status file by specifying the
--innodb-status-file option at startup. When this
option is used, InnoDB creates a file named
innodb_status.
in the data directory and writes output to it every 15 seconds,
approximately.
pid
InnoDB removes the status file when the server
is shut down normally. If an abnormal shutdown occurs, the status
file may have to be removed manually.
The --innodb-status-file option is intended for
temporary use, as output generation can affect performance, and
the
innodb_status.
file can become quite large over time.
pid
The Lock Monitor is the same as the Standard Monitor except that it includes additional lock information. Enabling either monitor for periodic output turns on the same output stream, but the stream includes extra information if the Lock Monitor is enabled. For example, if you enable the Standard Monitor and Lock Monitor, that turns on a single output stream. The stream includes extra lock information until you disable the Lock Monitor.
Standard Monitor output is limited to 1MB when produced using the
SHOW ENGINE INNODB
STATUS statement. This limit does not apply to output
written to server standard error output
(stderr).
Example Standard Monitor output:
mysql> SHOW ENGINE INNODB STATUS\G
*************************** 1. row ***************************
Type: InnoDB
Name:
Status:
=====================================
2018-04-12 15:14:08 0x7f971c063700 INNODB MONITOR OUTPUT
=====================================
Per second averages calculated from the last 4 seconds
-----------------
BACKGROUND THREAD
-----------------
srv_master_thread loops: 15 srv_active, 0 srv_shutdown, 1122 srv_idle
srv_master_thread log flush and writes: 0
----------
SEMAPHORES
----------
OS WAIT ARRAY INFO: reservation count 24
OS WAIT ARRAY INFO: signal count 24
RW-shared spins 4, rounds 8, OS waits 4
RW-excl spins 2, rounds 60, OS waits 2
RW-sx spins 0, rounds 0, OS waits 0
Spin rounds per wait: 2.00 RW-shared, 30.00 RW-excl, 0.00 RW-sx
------------------------
LATEST FOREIGN KEY ERROR
------------------------
2018-04-12 14:57:24 0x7f97a9c91700 Transaction:
TRANSACTION 7717, ACTIVE 0 sec inserting
mysql tables in use 1, locked 1
4 lock struct(s), heap size 1136, 3 row lock(s), undo log entries 3
MySQL thread id 8, OS thread handle 140289365317376, query id 14 localhost root update
INSERT INTO child VALUES (NULL, 1), (NULL, 2), (NULL, 3), (NULL, 4), (NULL, 5), (NULL, 6)
Foreign key constraint fails for table `test`.`child`:
,
CONSTRAINT `child_ibfk_1` FOREIGN KEY (`parent_id`) REFERENCES `parent` (`id`) ON DELETE
CASCADE ON UPDATE CASCADE
Trying to add in child table, in index par_ind tuple:
DATA TUPLE: 2 fields;
0: len 4; hex 80000003; asc ;;
1: len 4; hex 80000003; asc ;;
But in parent table `test`.`parent`, in index PRIMARY,
the closest match we can find is record:
PHYSICAL RECORD: n_fields 3; compact format; info bits 0
0: len 4; hex 80000004; asc ;;
1: len 6; hex 000000001e19; asc ;;
2: len 7; hex 81000001110137; asc 7;;
------------
TRANSACTIONS
------------
Trx id counter 7748
Purge done for trx's n:o < 7747 undo n:o < 0 state: running but idle
History list length 19
LIST OF TRANSACTIONS FOR EACH SESSION:
---TRANSACTION 421764459790000, not started
0 lock struct(s), heap size 1136, 0 row lock(s)
---TRANSACTION 7747, ACTIVE 23 sec starting index read
mysql tables in use 1, locked 1
LOCK WAIT 2 lock struct(s), heap size 1136, 1 row lock(s)
MySQL thread id 9, OS thread handle 140286987249408, query id 51 localhost root updating
DELETE FROM t WHERE i = 1
------- TRX HAS BEEN WAITING 23 SEC FOR THIS LOCK TO BE GRANTED:
RECORD LOCKS space id 4 page no 4 n bits 72 index GEN_CLUST_INDEX of table `test`.`t`
trx id 7747 lock_mode X waiting
Record lock, heap no 3 PHYSICAL RECORD: n_fields 4; compact format; info bits 0
0: len 6; hex 000000000202; asc ;;
1: len 6; hex 000000001e41; asc A;;
2: len 7; hex 820000008b0110; asc ;;
3: len 4; hex 80000001; asc ;;
------------------
TABLE LOCK table `test`.`t` trx id 7747 lock mode IX
RECORD LOCKS space id 4 page no 4 n bits 72 index GEN_CLUST_INDEX of table `test`.`t`
trx id 7747 lock_mode X waiting
Record lock, heap no 3 PHYSICAL RECORD: n_fields 4; compact format; info bits 0
0: len 6; hex 000000000202; asc ;;
1: len 6; hex 000000001e41; asc A;;
2: len 7; hex 820000008b0110; asc ;;
3: len 4; hex 80000001; asc ;;
--------
FILE I/O
--------
I/O thread 0 state: waiting for i/o request (insert buffer thread)
I/O thread 1 state: waiting for i/o request (log thread)
I/O thread 2 state: waiting for i/o request (read thread)
I/O thread 3 state: waiting for i/o request (read thread)
I/O thread 4 state: waiting for i/o request (read thread)
I/O thread 5 state: waiting for i/o request (read thread)
I/O thread 6 state: waiting for i/o request (write thread)
I/O thread 7 state: waiting for i/o request (write thread)
I/O thread 8 state: waiting for i/o request (write thread)
I/O thread 9 state: waiting for i/o request (write thread)
Pending normal aio reads: [0, 0, 0, 0] , aio writes: [0, 0, 0, 0] ,
ibuf aio reads:, log i/o's:, sync i/o's:
Pending flushes (fsync) log: 0; buffer pool: 0
833 OS file reads, 605 OS file writes, 208 OS fsyncs
0.00 reads/s, 0 avg bytes/read, 0.00 writes/s, 0.00 fsyncs/s
-------------------------------------
INSERT BUFFER AND ADAPTIVE HASH INDEX
-------------------------------------
Ibuf: size 1, free list len 0, seg size 2, 0 merges
merged operations:
insert 0, delete mark 0, delete 0
discarded operations:
insert 0, delete mark 0, delete 0
Hash table size 553253, node heap has 0 buffer(s)
Hash table size 553253, node heap has 1 buffer(s)
Hash table size 553253, node heap has 3 buffer(s)
Hash table size 553253, node heap has 0 buffer(s)
Hash table size 553253, node heap has 0 buffer(s)
Hash table size 553253, node heap has 0 buffer(s)
Hash table size 553253, node heap has 0 buffer(s)
Hash table size 553253, node heap has 0 buffer(s)
0.00 hash searches/s, 0.00 non-hash searches/s
---
LOG
---
Log sequence number 19643450
Log buffer assigned up to 19643450
Log buffer completed up to 19643450
Log written up to 19643450
Log flushed up to 19643450
Added dirty pages up to 19643450
Pages flushed up to 19643450
Last checkpoint at 19643450
129 log i/o's done, 0.00 log i/o's/second
----------------------
BUFFER POOL AND MEMORY
----------------------
Total large memory allocated 2198863872
Dictionary memory allocated 409606
Buffer pool size 131072
Free buffers 130095
Database pages 973
Old database pages 0
Modified db pages 0
Pending reads 0
Pending writes: LRU 0, flush list 0, single page 0
Pages made young 0, not young 0
0.00 youngs/s, 0.00 non-youngs/s
Pages read 810, created 163, written 404
0.00 reads/s, 0.00 creates/s, 0.00 writes/s
Buffer pool hit rate 1000 / 1000, young-making rate 0 / 1000 not 0 / 1000
Pages read ahead 0.00/s, evicted without access 0.00/s, Random read ahead 0.00/s
LRU len: 973, unzip_LRU len: 0
I/O sum[0]:cur[0], unzip sum[0]:cur[0]
----------------------
INDIVIDUAL BUFFER POOL INFO
----------------------
---BUFFER POOL 0
Buffer pool size 65536
Free buffers 65043
Database pages 491
Old database pages 0
Modified db pages 0
Pending reads 0
Pending writes: LRU 0, flush list 0, single page 0
Pages made young 0, not young 0
0.00 youngs/s, 0.00 non-youngs/s
Pages read 411, created 80, written 210
0.00 reads/s, 0.00 creates/s, 0.00 writes/s
Buffer pool hit rate 1000 / 1000, young-making rate 0 / 1000 not 0 / 1000
Pages read ahead 0.00/s, evicted without access 0.00/s, Random read ahead 0.00/s
LRU len: 491, unzip_LRU len: 0
I/O sum[0]:cur[0], unzip sum[0]:cur[0]
---BUFFER POOL 1
Buffer pool size 65536
Free buffers 65052
Database pages 482
Old database pages 0
Modified db pages 0
Pending reads 0
Pending writes: LRU 0, flush list 0, single page 0
Pages made young 0, not young 0
0.00 youngs/s, 0.00 non-youngs/s
Pages read 399, created 83, written 194
0.00 reads/s, 0.00 creates/s, 0.00 writes/s
No buffer pool page gets since the last printout
Pages read ahead 0.00/s, evicted without access 0.00/s, Random read ahead 0.00/s
LRU len: 482, unzip_LRU len: 0
I/O sum[0]:cur[0], unzip sum[0]:cur[0]
--------------
ROW OPERATIONS
--------------
0 queries inside InnoDB, 0 queries in queue
0 read views open inside InnoDB
Process ID=5772, Main thread ID=140286437054208 , state=sleeping
Number of rows inserted 57, updated 354, deleted 4, read 4421
0.00 inserts/s, 0.00 updates/s, 0.00 deletes/s, 0.00 reads/s
----------------------------
END OF INNODB MONITOR OUTPUT
============================
For a description of each metric reported by the Standard Monitor, refer to the Metrics chapter in the Oracle Enterprise Manager for MySQL Database User's Guide.
StatusThis section shows the timestamp, the monitor name, and the number of seconds that per-second averages are based on. The number of seconds is the elapsed time between the current time and the last time
InnoDBMonitor output was printed.BACKGROUND THREADThe
srv_master_threadlines shows work done by the main background thread.SEMAPHORESThis section reports threads waiting for a semaphore and statistics on how many times threads have needed a spin or a wait on a mutex or a rw-lock semaphore. A large number of threads waiting for semaphores may be a result of disk I/O, or contention problems inside
InnoDB. Contention can be due to heavy parallelism of queries or problems in operating system thread scheduling. Setting theinnodb_thread_concurrencysystem variable smaller than the default value might help in such situations. TheSpin rounds per waitline shows the number of spinlock rounds per OS wait for a mutex.Mutex metrics are reported by
SHOW ENGINE INNODB MUTEX.LATEST FOREIGN KEY ERRORThis section provides information about the most recent foreign key constraint error. It is not present if no such error has occurred. The contents include the statement that failed as well as information about the constraint that failed and the referenced and referencing tables.
LATEST DETECTED DEADLOCKThis section provides information about the most recent deadlock. It is not present if no deadlock has occurred. The contents show which transactions are involved, the statement each was attempting to execute, the locks they have and need, and which transaction
InnoDBdecided to roll back to break the deadlock. The lock modes reported in this section are explained in Section 15.7.1, “InnoDB Locking”.TRANSACTIONSIf this section reports lock waits, your applications might have lock contention. The output can also help to trace the reasons for transaction deadlocks.
FILE I/OThis section provides information about threads that
InnoDBuses to perform various types of I/O. The first few of these are dedicated to generalInnoDBprocessing. The contents also display information for pending I/O operations and statistics for I/O performance.The number of these threads are controlled by the
innodb_read_io_threadsandinnodb_write_io_threadsparameters. See Section 15.14, “InnoDB Startup Options and System Variables”.INSERT BUFFER AND ADAPTIVE HASH INDEXThis section shows the status of the
InnoDBinsert buffer (also referred to as the change buffer) and the adaptive hash index.For related information, see Section 15.5.2, “Change Buffer”, and Section 15.5.3, “Adaptive Hash Index”.
LOGThis section displays information about the
InnoDBlog. The contents include the current log sequence number, how far the log has been flushed to disk, and the position at whichInnoDBlast took a checkpoint. (See Section 15.11.3, “InnoDB Checkpoints”.) The section also displays information about pending writes and write performance statistics.BUFFER POOL AND MEMORYThis section gives you statistics on pages read and written. You can calculate from these numbers how many data file I/O operations your queries currently are doing.
For buffer pool statistics descriptions, see Monitoring the Buffer Pool Using the InnoDB Standard Monitor. For additional information about the operation of the buffer pool, see Section 15.5.1, “Buffer Pool”.
ROW OPERATIONSThis section shows what the main thread is doing, including the number and performance rate for each type of row operation.
This section covers topics related to InnoDB
backup and recovery.
For information about backup techniques applicable to
InnoDB, see Section 15.18.1, “InnoDB Backup”.For information about point-in-time recovery, recovery from disk failure or corruption, and how
InnoDBperforms crash recovery, see Section 15.18.2, “InnoDB Recovery”.
The key to safe database management is making regular backups. Depending on your data volume, number of MySQL servers, and database workload, you can use these backup techniques, alone or in combination: hot backup with MySQL Enterprise Backup; cold backup by copying files while the MySQL server is shut down; logical backup with mysqldump for smaller data volumes or to record the structure of schema objects. Hot and cold backups are physical backups that copy actual data files, which can be used directly by the mysqld server for faster restore.
Using MySQL Enterprise Backup is the
recommended method for backing up InnoDB data.
InnoDB does not support databases that are
restored using third-party backup tools.
Hot Backups
The mysqlbackup command, part of the MySQL
Enterprise Backup component, lets you back up a running MySQL
instance, including InnoDB tables, with minimal
disruption to operations while producing a consistent snapshot of
the database. When mysqlbackup is copying
InnoDB tables, reads and writes to
InnoDB tables can continue. MySQL Enterprise
Backup can also create compressed backup files, and back up
subsets of tables and databases. In conjunction with the MySQL
binary log, users can perform point-in-time recovery. MySQL
Enterprise Backup is part of the MySQL Enterprise subscription.
For more details, see Section 30.2, “MySQL Enterprise Backup Overview”.
Cold Backups
If you can shut down the MySQL server, you can make a physical
backup that consists of all files used by
InnoDB to manage its tables. Use the following
procedure:
Perform a slow shutdown of the MySQL server and make sure that it stops without errors.
Copy all
InnoDBdata files (ibdatafiles and.ibdfiles) into a safe place.Copy all
InnoDBlog files (ib_logfilefiles) to a safe place.Copy your
my.cnfconfiguration file or files to a safe place.
Logical Backups Using mysqldump
In addition to physical backups, it is recommended that you
regularly create logical backups by dumping your tables using
mysqldump. A binary file might be corrupted
without you noticing it. Dumped tables are stored into text files
that are human-readable, so spotting table corruption becomes
easier. Also, because the format is simpler, the chance for
serious data corruption is smaller. mysqldump
also has a --single-transaction
option for making a consistent snapshot without locking out other
clients. See Section 7.3.1, “Establishing a Backup Policy”.
Replication works with InnoDB tables,
so you can use MySQL replication capabilities to keep a copy of
your database at database sites requiring high availability. See
Section 15.19, “InnoDB and MySQL Replication”.
This section describes InnoDB recovery. Topics
include:
To recover an InnoDB database to the present
from the time at which the physical backup was made, you must
run MySQL server with binary logging enabled, even before taking
the backup. To achieve point-in-time recovery after restoring a
backup, you can apply changes from the binary log that occurred
after the backup was made. See
Section 7.5, “Point-in-Time (Incremental) Recovery”.
If your database becomes corrupted or disk failure occurs, you must perform the recovery using a backup. In the case of corruption, first find a backup that is not corrupted. After restoring the base backup, do a point-in-time recovery from the binary log files using mysqlbinlog and mysql to restore the changes that occurred after the backup was made.
In some cases of database corruption, it is enough to dump,
drop, and re-create one or a few corrupt tables. You can use the
CHECK TABLE statement to check
whether a table is corrupt, although CHECK
TABLE naturally cannot detect every possible kind of
corruption.
In some cases, apparent database page corruption is actually due
to the operating system corrupting its own file cache, and the
data on disk may be okay. It is best to try restarting the
computer first. Doing so may eliminate errors that appeared to
be database page corruption. If MySQL still has trouble starting
because of InnoDB consistency problems, see
Section 15.21.2, “Forcing InnoDB Recovery” for steps to start the
instance in recovery mode, which permits you to dump the data.
To recover from an unexpected MySQL server exit, the only
requirement is to restart the MySQL server.
InnoDB automatically checks the logs and
performs a roll-forward of the database to the present.
InnoDB automatically rolls back uncommitted
transactions that were present at the time of the crash. During
recovery, mysqld displays output similar to
this:
InnoDB: The log sequence number 664050266 in the system tablespace does not match the log sequence number 685111586 in the ib_logfiles! InnoDB: Database was not shutdown normally! InnoDB: Starting crash recovery. InnoDB: Using 'tablespaces.open.2' max LSN: 664075228 InnoDB: Doing recovery: scanned up to log sequence number 690354176 InnoDB: Doing recovery: scanned up to log sequence number 695597056 InnoDB: Doing recovery: scanned up to log sequence number 700839936 InnoDB: Doing recovery: scanned up to log sequence number 706082816 InnoDB: Doing recovery: scanned up to log sequence number 711325696 InnoDB: Doing recovery: scanned up to log sequence number 713458156 InnoDB: Applying a batch of 1467 redo log records ... InnoDB: 10% InnoDB: 20% InnoDB: 30% InnoDB: 40% InnoDB: 50% InnoDB: 60% InnoDB: 70% InnoDB: 80% InnoDB: 90% InnoDB: 100% InnoDB: Apply batch completed! InnoDB: 1 transaction(s) which must be rolled back or cleaned up in total 561887 row operations to undo InnoDB: Trx id counter is 4096 ... InnoDB: 8.0.1 started; log sequence number 713458156 InnoDB: Waiting for purge to start InnoDB: Starting in background the rollback of uncommitted transactions InnoDB: Rolling back trx with id 3596, 561887 rows to undo ... ./mysqld: ready for connections....
InnoDB
crash recovery
consists of several steps:
Tablespace discovery
Tablespace discovery is the process that
InnoDBuses to identify tablespaces that require redo log application. See Tablespace Discovery During Crash Recovery.Redo log application
Redo log application is performed during initialization, before accepting any connections. If all changes are flushed from the buffer pool to the tablespaces (
ibdata*and*.ibdfiles) at the time of the shutdown or crash, redo log application is skipped.InnoDBalso skips redo log application if redo log files are missing at startup.The current maximum auto-increment counter value is written to the redo log each time the value changes, which makes it crash-safe. During recovery,
InnoDBscans the redo log to collect counter value changes and applies the changes to the in-memory table object.For more information about how
InnoDBhandles auto-increment values, see Section 15.6.1.6, “AUTO_INCREMENT Handling in InnoDB”, and InnoDB AUTO_INCREMENT Counter Initialization.When encountering index tree corruption,
InnoDBwrites a corruption flag to the redo log, which makes the corruption flag crash-safe.InnoDBalso writes in-memory corruption flag data to an engine-private system table on each checkpoint. During recovery,InnoDBreads corruption flags from both locations and merges results before marking in-memory table and index objects as corrupt.Removing redo logs to speed up recovery is not recommended, even if some data loss is acceptable. Removing redo logs should only be considered after a clean shutdown, with
innodb_fast_shutdownset to0or1.
Roll back of incomplete transactions
Incomplete transactions are any transactions that were active at the time of unexpected exit or fast shutdown. The time it takes to roll back an incomplete transaction can be three or four times the amount of time a transaction is active before it is interrupted, depending on server load.
You cannot cancel transactions that are being rolled back. In extreme cases, when rolling back transactions is expected to take an exceptionally long time, it may be faster to start
InnoDBwith aninnodb_force_recoverysetting of3or greater. See Section 15.21.2, “Forcing InnoDB Recovery”.Change buffer merge
Applying changes from the change buffer (part of the system tablespace) to leaf pages of secondary indexes, as the index pages are read to the buffer pool.
Deleting delete-marked records that are no longer visible to active transactions.
The steps that follow redo log application do not depend on the redo log (other than for logging the writes) and are performed in parallel with normal processing. Of these, only rollback of incomplete transactions is special to crash recovery. The insert buffer merge and the purge are performed during normal processing.
After redo log application, InnoDB attempts
to accept connections as early as possible, to reduce downtime.
As part of crash recovery, InnoDB rolls back
transactions that were not committed or in XA
PREPARE state when the server exited. The rollback is
performed by a background thread, executed in parallel with
transactions from new connections. Until the rollback operation
is completed, new connections may encounter locking conflicts
with recovered transactions.
In most situations, even if the MySQL server was killed
unexpectedly in the middle of heavy activity, the recovery
process happens automatically and no action is required of the
DBA. If a hardware failure or severe system error corrupted
InnoDB data, MySQL might refuse to start. In
this case, see Section 15.21.2, “Forcing InnoDB Recovery”.
For information about the binary log and
InnoDB crash recovery, see
Section 5.4.4, “The Binary Log”.
If, during recovery, InnoDB encounters redo
logs written since the last checkpoint, the redo logs must be
applied to affected tablespaces. The process that identifies
affected tablespaces during recovery is referred to as
tablespace discovery.
Tablespace discovery relies on the
innodb_directories setting,
which defines the directories to scan at startup for tablespace
files. Directories defined by
innodb_data_home_dir,
innodb_undo_directory, and
datadir are automatically
appended to the
innodb_directories argument
value when building a list of directories to scan at startup,
regardless of whether the
innodb_directories option is
configured explicitly. Tablespace files defined with an absolute
path or that reside outside of the directories automatically
appended to the
innodb_directories setting
should be added to the
innodb_directories setting.
Recovery is terminated if any tablespace file referenced in a
redo log has not been discovered previously.
It is possible to use replication in a way where the storage engine
on the replica is not the same as the storage engine on the source.
For example, you can replicate modifications to an
InnoDB table on the source to a
MyISAM table on the replica. For more information
see, Section 17.4.4, “Using Replication with Different Source and Replica Storage Engines”.
For information about setting up a replica, see Section 17.1.2.6, “Setting Up Replicas”, and Section 17.1.2.5, “Choosing a Method for Data Snapshots”. To make a new replica without taking down the source or an existing replica, use the MySQL Enterprise Backup product.
Transactions that fail on the source do not affect replication. MySQL replication is based on the binary log where MySQL writes SQL statements that modify data. A transaction that fails (for example, because of a foreign key violation, or because it is rolled back) is not written to the binary log, so it is not sent to replicas. See Section 13.3.1, “START TRANSACTION, COMMIT, and ROLLBACK Statements”.
Replication and CASCADE.
Cascading actions for InnoDB tables on the
source are replicated on the replica only if
the tables sharing the foreign key relation use
InnoDB on both the source and replica. This is
true whether you are using statement-based or row-based
replication. Suppose that you have started replication, and then
create two tables on the source, where InnoDB
is defined as the default storage engine, using the following
CREATE TABLE statements:
CREATE TABLE fc1 (
i INT PRIMARY KEY,
j INT
);
CREATE TABLE fc2 (
m INT PRIMARY KEY,
n INT,
FOREIGN KEY ni (n) REFERENCES fc1 (i)
ON DELETE CASCADE
);
If the replica has MyISAM defined as the default
storage engine, the same tables are created on the replica, but they
use the MyISAM storage engine, and the
FOREIGN KEY option is ignored. Now we insert some
rows into the tables on the source:
source>INSERT INTO fc1 VALUES (1, 1), (2, 2);Query OK, 2 rows affected (0.09 sec) Records: 2 Duplicates: 0 Warnings: 0 source>INSERT INTO fc2 VALUES (1, 1), (2, 2), (3, 1);Query OK, 3 rows affected (0.19 sec) Records: 3 Duplicates: 0 Warnings: 0
At this point, on both the source and the replica, table
fc1 contains 2 rows, and table
fc2 contains 3 rows, as shown here:
source>SELECT * FROM fc1;+---+------+ | i | j | +---+------+ | 1 | 1 | | 2 | 2 | +---+------+ 2 rows in set (0.00 sec) source>SELECT * FROM fc2;+---+------+ | m | n | +---+------+ | 1 | 1 | | 2 | 2 | | 3 | 1 | +---+------+ 3 rows in set (0.00 sec) replica>SELECT * FROM fc1;+---+------+ | i | j | +---+------+ | 1 | 1 | | 2 | 2 | +---+------+ 2 rows in set (0.00 sec) replica>SELECT * FROM fc2;+---+------+ | m | n | +---+------+ | 1 | 1 | | 2 | 2 | | 3 | 1 | +---+------+ 3 rows in set (0.00 sec)
Now suppose that you perform the following
DELETE statement on the source:
source> DELETE FROM fc1 WHERE i=1;
Query OK, 1 row affected (0.09 sec)
Due to the cascade, table fc2 on the source now
contains only 1 row:
source> SELECT * FROM fc2;
+---+---+
| m | n |
+---+---+
| 2 | 2 |
+---+---+
1 row in set (0.00 sec)
However, the cascade does not propagate on the replica because on
the replica the DELETE for
fc1 deletes no rows from fc2.
The replica's copy of fc2 still contains all of
the rows that were originally inserted:
replica> SELECT * FROM fc2;
+---+---+
| m | n |
+---+---+
| 1 | 1 |
| 3 | 1 |
| 2 | 2 |
+---+---+
3 rows in set (0.00 sec)
This difference is due to the fact that the cascading deletes are
handled internally by the InnoDB storage engine,
which means that none of the changes are logged.
- 15.20.1 Benefits of the InnoDB memcached Plugin
- 15.20.2 InnoDB memcached Architecture
- 15.20.3 Setting Up the InnoDB memcached Plugin
- 15.20.4 InnoDB memcached Multiple get and Range Query Support
- 15.20.5 Security Considerations for the InnoDB memcached Plugin
- 15.20.6 Writing Applications for the InnoDB memcached Plugin
- 15.20.7 The InnoDB memcached Plugin and Replication
- 15.20.8 InnoDB memcached Plugin Internals
- 15.20.9 Troubleshooting the InnoDB memcached Plugin
The InnoDB memcached plugin
is deprecated as of MySQL 8.0.22; expect support for it to be
removed in a future version of MySQL.
The InnoDB memcached plugin
(daemon_memcached) provides an integrated
memcached daemon that automatically stores and
retrieves data from InnoDB tables, turning the
MySQL server into a fast “key-value store”. Instead of
formulating queries in SQL, you can use simple
get, set, and
incr operations that avoid the performance
overhead associated with SQL parsing and constructing a query
optimization plan. You can also access the same
InnoDB tables through SQL for convenience,
complex queries, bulk operations, and other strengths of traditional
database software.
This “NoSQL-style” interface uses the
memcached API to speed up database operations,
letting InnoDB handle memory caching using its
buffer pool mechanism. Data
modified through memcached operations such as
add, set, and
incr are stored to disk, in
InnoDB tables. The combination of
memcached simplicity and
InnoDB reliability and consistency provides users
with the best of both worlds, as explained in
Section 15.20.1, “Benefits of the InnoDB memcached Plugin”. For an architectural
overview, see Section 15.20.2, “InnoDB memcached Architecture”.
This section outlines advantages the
daemon_memcached plugin. The combination of
InnoDB tables and memcached
offers advantages over using either by themselves.
Direct access to the
InnoDBstorage engine avoids the parsing and planning overhead of SQL.Running memcached in the same process space as the MySQL server avoids the network overhead of passing requests back and forth.
Data written using the memcached protocol is transparently written to an
InnoDBtable, without going through the MySQL SQL layer. You can control frequency of writes to achieve higher raw performance when updating non-critical data.Data requested through the memcached protocol is transparently queried from an
InnoDBtable, without going through the MySQL SQL layer.Subsequent requests for the same data is served from the
InnoDBbuffer pool. The buffer pool handles the in-memory caching. You can tune performance of data-intensive operations usingInnoDBconfiguration options.Data can be unstructured or structured, depending on the type of application. You can create a new table for data, or use existing tables.
InnoDBcan handle composing and decomposing multiple column values into a single memcached item value, reducing the amount of string parsing and concatenation required in your application. For example, you can store the string value2|4|6|8in the memcached cache, and haveInnoDBsplit the value based on a separator character, then store the result in four numeric columns.The transfer between memory and disk is handled automatically, simplifying application logic.
Data is stored in a MySQL database to protect against crashes, outages, and corruption.
You can access the underlying
InnoDBtable through SQL for reporting, analysis, ad hoc queries, bulk loading, multi-step transactional computations, set operations such as union and intersection, and other operations suited to the expressiveness and flexibility of SQL.You can ensure high availability by using the
daemon_memcachedplugin on a source server in combination with MySQL replication.
The integration of memcached with MySQL provides a way to make in-memory data persistent, so you can use it for more significant kinds of data. You can use more
add,incr, and similar write operations in your application without concern that data could be lost. You can stop and start the memcached server without losing updates made to cached data. To guard against unexpected outages, you can take advantage ofInnoDBcrash recovery, replication, and backup capabilities.The way
InnoDBdoes fast primary key lookups is a natural fit for memcached single-item queries. The direct, low-level database access path used by thedaemon_memcachedplugin is much more efficient for key-value lookups than equivalent SQL queries.The serialization features of memcached, which can turn complex data structures, binary files, or even code blocks into storeable strings, offer a simple way to get such objects into a database.
Because you can access the underlying data through SQL, you can produce reports, search or update across multiple keys, and call functions such as
AVG()andMAX()on memcached data. All of these operations are expensive or complicated using memcached by itself.You do not need to manually load data into memcached at startup. As particular keys are requested by an application, values are retrieved from the database automatically, and cached in memory using the
InnoDBbuffer pool.Because memcached consumes relatively little CPU, and its memory footprint is easy to control, it can run comfortably alongside a MySQL instance on the same system.
Because data consistency is enforced by mechanisms used for regular
InnoDBtables, you do not have to worry about stale memcached data or fallback logic to query the database in the case of a missing key.
The InnoDB memcached plugin
implements memcached as a MySQL plugin daemon
that accesses the InnoDB storage engine
directly, bypassing the MySQL SQL layer.
The following diagram illustrates how an application accesses data
through the daemon_memcached plugin, compared
with SQL.

Features of the daemon_memcached plugin:
memcached as a daemon plugin of mysqld. Both mysqld and memcached run in the same process space, with very low latency access to data.
Direct access to
InnoDBtables, bypassing the SQL parser, the optimizer, and even the Handler API layer.Standard memcached protocols, including the text-based protocol and the binary protocol. The
daemon_memcachedplugin passes all 55 compatibility tests of the memcapable command.Multi-column support. You can map multiple columns into the “value” part of the key-value store, with column values delimited by a user-specified separator character.
By default, the memcached protocol is used to read and write data directly to
InnoDB, letting MySQL manage in-memory caching using theInnoDBbuffer pool. The default settings represent a combination of high reliability and the fewest surprises for database applications. For example, default settings avoid uncommitted data on the database side, or stale data returned for memcachedgetrequests.Advanced users can configure the system as a traditional memcached server, with all data cached only in the memcached engine (memory caching), or use a combination of the “memcached engine” (memory caching) and the
InnoDBmemcached engine (InnoDBas back-end persistent storage).
Control over how often data is passed back and forth between
InnoDBand memcached operations through theinnodb_api_bk_commit_interval,daemon_memcached_r_batch_size, anddaemon_memcached_w_batch_sizeconfiguration options. Batch size options default to a value of 1 for maximum reliability.The ability to specify memcached options through the
daemon_memcached_optionconfiguration parameter. For example, you can change the port that memcached listens on, reduce the maximum number of simultaneous connections, change the maximum memory size for a key-value pair, or enable debugging messages for the error log.The
innodb_api_trx_levelconfiguration option controls the transaction isolation level on queries processed by memcached. Although memcached has no concept of transactions, you can use this option to control how soon memcached sees changes caused by SQL statements issued on the table used by the daemon_memcached plugin. By default,innodb_api_trx_levelis set toREAD UNCOMMITTED.The
innodb_api_enable_mdloption can be used to lock the table at the MySQL level, so that the mapped table cannot be dropped or altered by DDL through the SQL interface. Without the lock, the table can be dropped from the MySQL layer, but kept inInnoDBstorage until memcached or some other user stops using it. “MDL” stands for “metadata locking”.
You may already be familiar with using
memcached with MySQL, as described in
Using MySQL with memcached. This section describes how
features of the integrated InnoDB
memcached plugin differ from traditional
memcached.
Installation: The memcached library comes with the MySQL server, making installation and setup relatively easy. Installation involves running the
innodb_memcached_config.sqlscript to create ademo_testtable for memcached to use, issuing anINSTALL PLUGINstatement to enable thedaemon_memcachedplugin, and adding desired memcached options to a MySQL configuration file or startup script. You might still install the traditional memcached distribution for additional utilities such as memcp, memcat, and memcapable.For comparison with traditional memcached, see Installing memcached.
Deployment: With traditional memcached, it is typical to run large numbers of low-capacity memcached servers. A typical deployment of the
daemon_memcachedplugin, however, involves a smaller number of moderate or high-powered servers that are already running MySQL. The benefit of this configuration is in improving efficiency of individual database servers rather than exploiting unused memory or distributing lookups across large numbers of servers. In the default configuration, very little memory is used for memcached, and in-memory lookups are served from theInnoDBbuffer pool, which automatically caches the most recently and frequently used data. As with a traditional MySQL server instance, keep the value of theinnodb_buffer_pool_sizeconfiguration option as high as practical (without causing paging at the OS level), so that as much work as possible is performed in memory.For comparison with traditional memcached, see memcached Deployment.
Expiry: By default (that is, using the
innodb_onlycaching policy), the latest data from theInnoDBtable is always returned, so the expiry options have no practical effect. If you change the caching policy tocachingorcache_only, the expiry options work as usual, but requested data might be stale if it is updated in the underlying table before it expires from the memory cache.For comparison with traditional memcached, see Data Expiry.
Namespaces: memcached is like a large directory where you give files elaborate names with prefixes and suffixes to keep the files from conflicting. The
daemon_memcachedplugin lets you use similar naming conventions for keys, with one addition. Key names in the format@@.table_id.keytable_idare decoded to reference a specific a table, using mapping data from theinnodb_memcache.containerstable. Thekeyis looked up in or written to the specified table.The
@@notation only works for individual calls toget,add, andsetfunctions, but not others such asincrordelete. To designate a default table for subsequent memcached operations within a session, perform agetrequest using the@@notation with atable_idget @@
table_idSubsequent
get,set,incr,delete, and other operations use the table designated bytable_idinnodb_memcache.containers.namecolumn.For comparison with traditional memcached, see Using Namespaces.
Hashing and distribution: The default configuration, which uses the
innodb_onlycaching policy, is suitable for a traditional deployment configuration where all data is available on all servers, such as a set of replica servers.If you physically divide data, as in a sharded configuration, you can split data across several machines running the
daemon_memcachedplugin, and use the traditional memcached hashing mechanism to route requests to a particular machine. On the MySQL side, you would typically let all data be inserted byaddrequests to memcached so that appropriate values are stored in the database on the appropriate server.For comparison with traditional memcached, see memcached Hashing/Distribution Types.
Memory usage: By default (with the
innodb_onlycaching policy), the memcached protocol passes information back and forth withInnoDBtables, and theInnoDBbuffer pool handles in-memory lookups instead of memcached memory usage growing and shrinking. Relatively little memory is used on the memcached side.If you switch the caching policy to
cachingorcache_only, the normal rules of memcached memory usage apply. Memory for memcached data values is allocated in terms of “slabs”. You can control slab size and maximum memory used for memcached.Either way, you can monitor and troubleshoot the
daemon_memcachedplugin using the familiar statistics system, accessed through the standard protocol, over a telnet session, for example. Extra utilities are not included with thedaemon_memcachedplugin. You can use thememcached-toolscript to install a full memcached distribution.For comparison with traditional memcached, see Memory Allocation within memcached.
Thread usage: MySQL threads and memcached threads co-exist on the same server. Limits imposed on threads by the operating system apply to the total number of threads.
For comparison with traditional memcached, see memcached Thread Support.
Log usage: Because the memcached daemon is run alongside the MySQL server and writes to
stderr, the-v,-vv, and-vvvoptions for logging write output to the MySQL error log.For comparison with traditional memcached, see memcached Logs.
memcached operations: Familiar memcached operations such as
get,set,add, anddeleteare available. Serialization (that is, the exact string format representing complex data structures) depends on the language interface.For comparison with traditional memcached, see Basic memcached Operations.
Using memcached as a MySQL front end: This is the primary purpose of the
InnoDBmemcached plugin. An integrated memcached daemon improves application performance, and havingInnoDBhandle data transfers between memory and disk simplifies application logic.For comparison with traditional memcached, see Using memcached as a MySQL Caching Layer.
Utilities: The MySQL server includes the
libmemcachedlibrary but not additional command-line utilities. To use commands such as memcp, memcat, and memcapable commands, install a full memcached distribution. When memrm and memflush remove items from the cache, the items are also removed from the underlyingInnoDBtable.For comparison with traditional memcached, see libmemcached Command-Line Utilities.
Programming interfaces: You can access the MySQL server through the
daemon_memcachedplugin using all supported languages: C and C++, Java, Perl, Python, PHP, and Ruby. Specify the server hostname and port as with a traditional memcached server. By default, thedaemon_memcachedplugin listens on port11211. You can use both the text and binary protocols. You can customize the behavior of memcached functions at runtime. Serialization (that is, the exact string format representing complex data structures) depends on the language interface.For comparison with traditional memcached, see Developing a memcached Application.
Frequently asked questions: MySQL has an extensive FAQ for traditional memcached. The FAQ is mostly applicable, except that using
InnoDBtables as a storage medium for memcached data means that you can use memcached for more write-intensive applications than before, rather than as a read-only cache.See memcached FAQ.
This section describes how to set up the
daemon_memcached plugin on a MySQL server.
Because the memcached daemon is tightly
integrated with the MySQL server to avoid network traffic and
minimize latency, you perform this process on each MySQL instance
that uses this feature.
Before setting up the daemon_memcached
plugin, consult Section 15.20.5, “Security Considerations for the InnoDB memcached Plugin” to
understand the security procedures required to prevent
unauthorized access.
The
daemon_memcachedplugin is only supported on Linux, Solaris, and macOS platforms. Other operating systems are not supported.When building MySQL from source, you must build with
-DWITH_INNODB_MEMCACHED=ON. This build option generates two shared libraries in the MySQL plugin directory (plugin_dir) that are required to run thedaemon_memcachedplugin:libmemcached.so: the memcached daemon plugin to MySQL.innodb_engine.so: anInnoDBAPI plugin to memcached.
libeventmust be installed.If you did not build MySQL from source, the
libeventlibrary is not included in your installation. Use the installation method for your operating system to installlibevent1.4.12 or later. For example, depending on the operating system, you might useapt-get,yum, orport install. For example, on Ubuntu Linux, use:sudo apt-get install libevent-dev
If you installed MySQL from a source code release,
libevent1.4.12 is bundled with the package and is located at the top level of the MySQL source code directory. If you use the bundled version oflibevent, no action is required. If you want to use a local system version oflibevent, you must build MySQL with the-DWITH_LIBEVENTbuild option set tosystemoryes.
Configure the
daemon_memcachedplugin so it can interact withInnoDBtables by running theinnodb_memcached_config.sqlconfiguration script, which is located inMYSQL_HOME/shareinnodb_memcachedatabase with three required tables (cache_policies,config_options, andcontainers). It also installs thedemo_testsample table in thetestdatabase.mysql>
sourceMYSQL_HOME/share/innodb_memcached_config.sqlRunning the
innodb_memcached_config.sqlscript is a one-time operation. The tables remain in place if you later uninstall and re-install thedaemon_memcachedplugin.mysql>
USE innodb_memcache;mysql>SHOW TABLES;+---------------------------+ | Tables_in_innodb_memcache | +---------------------------+ | cache_policies | | config_options | | containers | +---------------------------+ mysql>USE test;mysql>SHOW TABLES;+----------------+ | Tables_in_test | +----------------+ | demo_test | +----------------+Of these tables, the
innodb_memcache.containerstable is the most important. Entries in thecontainerstable provide a mapping toInnoDBtable columns. EachInnoDBtable used with thedaemon_memcachedplugin requires an entry in thecontainerstable.The
innodb_memcached_config.sqlscript inserts a single entry in thecontainerstable that provides a mapping for thedemo_testtable. It also inserts a single row of data into thedemo_testtable. This data allows you to immediately verify the installation after the setup is completed.mysql>
SELECT * FROM innodb_memcache.containers\G*************************** 1. row *************************** name: aaa db_schema: test db_table: demo_test key_columns: c1 value_columns: c2 flags: c3 cas_column: c4 expire_time_column: c5 unique_idx_name_on_key: PRIMARY mysql>SELECT * FROM test.demo_test;+----+------------------+------+------+------+ | c1 | c2 | c3 | c4 | c5 | +----+------------------+------+------+------+ | AA | HELLO, HELLO | 8 | 0 | 0 | +----+------------------+------+------+------+For more information about
innodb_memcachetables and thedemo_testsample table, see Section 15.20.8, “InnoDB memcached Plugin Internals”.Activate the
daemon_memcachedplugin by running theINSTALL PLUGINstatement:mysql>
INSTALL PLUGIN daemon_memcached soname "libmemcached.so";Once the plugin is installed, it is automatically activated each time the MySQL server is restarted.
To verify the daemon_memcached plugin setup,
use a telnet session to issue
memcached commands. By default, the
memcached daemon listens on port 11211.
Retrieve data from the
test.demo_testtable. The single row of data in thedemo_testtable has a key value ofAA.telnet localhost 11211Trying 127.0.0.1... Connected to localhost. Escape character is '^]'.get AAVALUE AA 8 12 HELLO, HELLO ENDInsert data using a
setcommand.set BB 10 0 16GOODBYE, GOODBYESTOREDwhere:
setis the command to store a valueBBis the key10is a flag for the operation; ignored by memcached but may be used by the client to indicate any type of information; specify0if unused0is the expiration time (TTL); specify0if unused16is the length of the supplied value block in bytesGOODBYE, GOODBYEis the value that is stored
Verify that the data inserted is stored in MySQL by connecting to the MySQL server and querying the
test.demo_testtable.mysql>
SELECT * FROM test.demo_test;+----+------------------+------+------+------+ | c1 | c2 | c3 | c4 | c5 | +----+------------------+------+------+------+ | AA | HELLO, HELLO | 8 | 0 | 0 | | BB | GOODBYE, GOODBYE | 10 | 1 | 0 | +----+------------------+------+------+------+Return to the telnet session and retrieve the data that you inserted earlier using key
BB.get BBVALUE BB 10 16 GOODBYE, GOODBYE ENDquit
If you shut down the MySQL server, which also shuts off the
integrated memcached server, further attempts
to access the memcached data fail with a
connection error. Normally, the memcached
data also disappears at this point, and you would require
application logic to load the data back into memory when
memcached is restarted. However, the
InnoDB memcached plugin
automates this process for you.
When you restart MySQL, get operations once
again return the key-value pairs you stored in the earlier
memcached session. When a key is requested
and the associated value is not already in the memory cache, the
value is automatically queried from the MySQL
test.demo_test table.
This example shows how to setup your own
InnoDB table with the
daemon_memcached plugin.
Create an
InnoDBtable. The table must have a key column with a unique index. The key column of the city table iscity_id, which is defined as the primary key. The table must also include columns forflags,cas, andexpiryvalues. There may be one or more value columns. Thecitytable has three value columns (name,state,country).NoteThere is no special requirement with respect to column names as along as a valid mapping is added to the
innodb_memcache.containerstable.mysql>
CREATE TABLE city (city_id VARCHAR(32),name VARCHAR(1024),state VARCHAR(1024),country VARCHAR(1024),flags INT,cas BIGINT UNSIGNED,expiry INT,primary key(city_id))ENGINE=InnoDB;Add an entry to the
innodb_memcache.containerstable so that thedaemon_memcachedplugin knows how to access theInnoDBtable. The entry must satisfy theinnodb_memcache.containerstable definition. For a description of each field, see Section 15.20.8, “InnoDB memcached Plugin Internals”.mysql>
DESCRIBE innodb_memcache.containers;+------------------------+--------------+------+-----+---------+-------+ | Field | Type | Null | Key | Default | Extra | +------------------------+--------------+------+-----+---------+-------+ | name | varchar(50) | NO | PRI | NULL | | | db_schema | varchar(250) | NO | | NULL | | | db_table | varchar(250) | NO | | NULL | | | key_columns | varchar(250) | NO | | NULL | | | value_columns | varchar(250) | YES | | NULL | | | flags | varchar(250) | NO | | 0 | | | cas_column | varchar(250) | YES | | NULL | | | expire_time_column | varchar(250) | YES | | NULL | | | unique_idx_name_on_key | varchar(250) | NO | | NULL | | +------------------------+--------------+------+-----+---------+-------+The
innodb_memcache.containerstable entry for the city table is defined as:mysql>
INSERT INTO `innodb_memcache`.`containers` (`name`, `db_schema`, `db_table`, `key_columns`, `value_columns`,`flags`, `cas_column`, `expire_time_column`, `unique_idx_name_on_key`)VALUES ('default', 'test', 'city', 'city_id', 'name|state|country','flags','cas','expiry','PRIMARY');defaultis specified for thecontainers.namecolumn to configure thecitytable as the defaultInnoDBtable to be used with thedaemon_memcachedplugin.Multiple
InnoDBtable columns (name,state,country) are mapped tocontainers.value_columnsusing a “|” delimiter.The
flags,cas_column, andexpire_time_columnfields of theinnodb_memcache.containerstable are typically not significant in applications using thedaemon_memcachedplugin. However, a designatedInnoDBtable column is required for each. When inserting data, specify0for these columns if they are unused.
After updating the
innodb_memcache.containerstable, restart thedaemon_memcacheplugin to apply the changes.mysql>
UNINSTALL PLUGIN daemon_memcached;mysql>INSTALL PLUGIN daemon_memcached soname "libmemcached.so";Using telnet, insert data into the
citytable using a memcachedsetcommand.telnet localhost 11211Trying 127.0.0.1... Connected to localhost. Escape character is '^]'.set B 0 0 22BANGALORE|BANGALORE|INSTOREDUsing MySQL, query the
test.citytable to verify that the data you inserted was stored.mysql>
SELECT * FROM test.city;+---------+-----------+-----------+---------+-------+------+--------+ | city_id | name | state | country | flags | cas | expiry | +---------+-----------+-----------+---------+-------+------+--------+ | B | BANGALORE | BANGALORE | IN | 0 | 3 | 0 | +---------+-----------+-----------+---------+-------+------+--------+Using MySQL, insert additional data into the
test.citytable.mysql>
INSERT INTO city VALUES ('C','CHENNAI','TAMIL NADU','IN', 0, 0 ,0);mysql>INSERT INTO city VALUES ('D','DELHI','DELHI','IN', 0, 0, 0);mysql>INSERT INTO city VALUES ('H','HYDERABAD','TELANGANA','IN', 0, 0, 0);mysql>INSERT INTO city VALUES ('M','MUMBAI','MAHARASHTRA','IN', 0, 0, 0);NoteIt is recommended that you specify a value of
0for theflags,cas_column, andexpire_time_columnfields if they are unused.Using telnet, issue a memcached
getcommand to retrieve data you inserted using MySQL.get HVALUE H 0 22 HYDERABAD|TELANGANA|IN END
Traditional memcached configuration options
may be specified in a MySQL configuration file or a
mysqld startup string, encoded in the
argument of the
daemon_memcached_option
configuration parameter. memcached
configuration options take effect when the plugin is loaded,
which occurs each time the MySQL server is started.
For example, to make memcached listen on port
11222 instead of the default port 11211, specify
-p11222 as an argument of the
daemon_memcached_option
configuration option:
mysqld .... --daemon_memcached_option="-p11222"
Other memcached options can be encoded in the
daemon_memcached_option string.
For example, you can specify options to reduce the maximum
number of simultaneous connections, change the maximum memory
size for a key-value pair, or enable debugging messages for the
error log, and so on.
There are also configuration options specific to the
daemon_memcached plugin. These include:
daemon_memcached_engine_lib_name: Specifies the shared library that implements theInnoDBmemcached plugin. The default setting isinnodb_engine.so.daemon_memcached_engine_lib_path: The path of the directory containing the shared library that implements theInnoDBmemcached plugin. The default is NULL, representing the plugin directory.daemon_memcached_r_batch_size: Defines the batch commit size for read operations (get). It specifies the number of memcached read operations after which a commit occurs.daemon_memcached_r_batch_sizeis set to 1 by default so that everygetrequest accesses the most recently committed data in theInnoDBtable, whether the data was updated through memcached or by SQL. When the value is greater than 1, the counter for read operations is incremented with eachgetcall. Aflush_allcall resets both read and write counters.daemon_memcached_w_batch_size: Defines the batch commit size for write operations (set,replace,append,prepend,incr,decr, and so on).daemon_memcached_w_batch_sizeis set to 1 by default so that no uncommitted data is lost in case of an outage, and so that SQL queries on the underlying table access the most recent data. When the value is greater than 1, the counter for write operations is incremented for eachadd,set,incr,decr, anddeletecall. Aflush_allcall resets both read and write counters.
By default, you do not need to modify
daemon_memcached_engine_lib_name
or
daemon_memcached_engine_lib_path.
You might configure these options if, for example, you want to
use a different storage engine for memcached
(such as the NDB memcached engine).
daemon_memcached plugin configuration
parameters may be specified in the MySQL configuration file or
in a mysqld startup string. They take effect
when you load the daemon_memcached plugin.
When making changes to daemon_memcached
plugin configuration, reload the plugin to apply the changes. To
do so, issue the following statements:
mysql>UNINSTALL PLUGIN daemon_memcached;mysql>INSTALL PLUGIN daemon_memcached soname "libmemcached.so";
Configuration settings, required tables, and data are preserved when the plugin is restarted.
For additional information about enabling and disabling plugins, see Section 5.6.1, “Installing and Uninstalling Plugins”.
The daemon_memcached plugin supports multiple
get operations (fetching multiple key-value pairs in a single
memcached query) and range queries.
Multiple get Operations
The ability to fetch multiple key-value pairs in a single
memcached query improves read performance by
reducing communication traffic between the client and server. For
InnoDB, it means fewer transactions and
open-table operations.
The following example demonstrates multiple-get support. The
example uses the test.city table described in
Creating a New Table and Column Mapping.
mysql>USE test;mysql>SELECT * FROM test.city;+---------+-----------+-------------+---------+-------+------+--------+ | city_id | name | state | country | flags | cas | expiry | +---------+-----------+-------------+---------+-------+------+--------+ | B | BANGALORE | BANGALORE | IN | 0 | 1 | 0 | | C | CHENNAI | TAMIL NADU | IN | 0 | 0 | 0 | | D | DELHI | DELHI | IN | 0 | 0 | 0 | | H | HYDERABAD | TELANGANA | IN | 0 | 0 | 0 | | M | MUMBAI | MAHARASHTRA | IN | 0 | 0 | 0 | +---------+-----------+-------------+---------+-------+------+--------+
Run a get command to retrieve all values from
the city table. The results are returned in a
key-value pair sequence.
telnet 127.0.0.1 11211Trying 127.0.0.1... Connected to 127.0.0.1. Escape character is '^]'.get B C D H MVALUE B 0 22 BANGALORE|BANGALORE|IN VALUE C 0 21 CHENNAI|TAMIL NADU|IN VALUE D 0 14 DELHI|DELHI|IN VALUE H 0 22 HYDERABAD|TELANGANA|IN VALUE M 0 21 MUMBAI|MAHARASHTRA|IN END
When retrieving multiple values in a single get
command, you can switch tables (using
@@
notation) to retrieve the value for the first key, but you cannot
switch tables for subsequent keys. For example, the table switch
in this example is valid:
containers.name
get @@aaa.AA BB
VALUE @@aaa.AA 8 12
HELLO, HELLO
VALUE BB 10 16
GOODBYE, GOODBYE
END
Attempting to switch tables again in the same
get command to retrieve a key value from a
different table is not supported.
There is no limit the number of keys that can be retrieved by a multiple get operation, but there is a 128MB memory limit for storing the result.
Range Queries
For range queries, the daemon_memcached plugin
supports the following comparison operators:
<, >,
<=, >=. An operator
must be preceded by an @ symbol. When a range
query finds multiple matching key-value pairs, results are
returned in a key-value pair sequence.
The following examples demonstrate range query support. The
examples use the test.city table described in
Creating a New Table and Column Mapping.
mysql> SELECT * FROM test.city;
+---------+-----------+-------------+---------+-------+------+--------+
| city_id | name | state | country | flags | cas | expiry |
+---------+-----------+-------------+---------+-------+------+--------+
| B | BANGALORE | BANGALORE | IN | 0 | 1 | 0 |
| C | CHENNAI | TAMIL NADU | IN | 0 | 0 | 0 |
| D | DELHI | DELHI | IN | 0 | 0 | 0 |
| H | HYDERABAD | TELANGANA | IN | 0 | 0 | 0 |
| M | MUMBAI | MAHARASHTRA | IN | 0 | 0 | 0 |
+---------+-----------+-------------+---------+-------+------+--------+
Open a telnet session:
telnet 127.0.0.1 11211
Trying 127.0.0.1...
Connected to 127.0.0.1.
Escape character is '^]'.
To get all values greater than B, enter
get @>B:
get @>B
VALUE C 0 21
CHENNAI|TAMIL NADU|IN
VALUE D 0 14
DELHI|DELHI|IN
VALUE H 0 22
HYDERABAD|TELANGANA|IN
VALUE M 0 21
MUMBAI|MAHARASHTRA|IN
END
To get all values less than M, enter
get @<M:
get @<M
VALUE B 0 22
BANGALORE|BANGALORE|IN
VALUE C 0 21
CHENNAI|TAMIL NADU|IN
VALUE D 0 14
DELHI|DELHI|IN
VALUE H 0 22
HYDERABAD|TELANGANA|IN
END
To get all values less than and including M,
enter get @<=M:
get @<=M
VALUE B 0 22
BANGALORE|BANGALORE|IN
VALUE C 0 21
CHENNAI|TAMIL NADU|IN
VALUE D 0 14
DELHI|DELHI|IN
VALUE H 0 22
HYDERABAD|TELANGANA|IN
VALUE M 0 21
MUMBAI|MAHARASHTRA|IN
To get values greater than B but less than
M, enter get @>B@<M:
get @>B@<M
VALUE C 0 21
CHENNAI|TAMIL NADU|IN
VALUE D 0 14
DELHI|DELHI|IN
VALUE H 0 22
HYDERABAD|TELANGANA|IN
END
A maximum of two comparison operators can be parsed, one being
either a 'less than' (@<) or 'less than or
equal to' (@<=) operator, and the other
being either a 'greater than' (@>) or
'greater than or equal to' (@>=) operator.
Any additional operators are assumed to be part of the key. For
example, if you issue a get command with three
operators, the third operator (@>C) is
treated as part of the key, and the get command
searches for values smaller than M and greater
than B@>C.
get @<M@>B@>C
VALUE C 0 21
CHENNAI|TAMIL NADU|IN
VALUE D 0 14
DELHI|DELHI|IN
VALUE H 0 22
HYDERABAD|TELANGANA|IN
Consult this section before deploying the
daemon_memcached plugin on a production
server, or even on a test server if the MySQL instance contains
sensitive data.
Because memcached does not use an
authentication mechanism by default, and the optional SASL
authentication is not as strong as traditional DBMS security
measures, only keep non-sensitive data in the MySQL instance that
uses the daemon_memcached plugin, and wall off
any servers that use this configuration from potential intruders.
Do not allow memcached access to these servers
from the Internet; only allow access from within a firewalled
intranet, ideally from a subnet whose membership you can restrict.
SASL support provides the capability to protect your MySQL
database from unauthenticated access through
memcached clients. This section explains how
to enable SASL with the daemon_memcached
plugin. The steps are almost identical to those performed to
enabled SASL for a traditional memcached
server.
SASL stands for “Simple Authentication and Security Layer”, a standard for adding authentication support to connection-based protocols. memcached added SASL support in version 1.4.3.
SASL authentication is only supported with the binary protocol.
memcached clients are only able to access
InnoDB tables that are registered in the
innodb_memcache.containers table. Even
though a DBA can place access restrictions on such tables,
access through memcached applications cannot
be controlled. For this reason, SASL support is provided to
control access to InnoDB tables associated
with the daemon_memcached plugin.
The following section shows how to build, enable, and test an
SASL-enabled daemon_memcached plugin.
By default, an SASL-enabled daemon_memcached
plugin is not included in MySQL release packages, since an
SASL-enabled daemon_memcached plugin requires
building memcached with SASL libraries. To
enable SASL support, download the MySQL source and rebuild the
daemon_memcached plugin after downloading the
SASL libraries:
Install the SASL development and utility libraries. For example, on Ubuntu, use apt-get to obtain the libraries:
sudo apt-get -f install libsasl2-2 sasl2-bin libsasl2-2 libsasl2-dev libsasl2-modules
Build the
daemon_memcachedplugin shared libraries with SASL capability by addingENABLE_MEMCACHED_SASL=1to your cmake options. memcached also provides simple cleartext password support, which facilitates testing. To enable simple cleartext password support, specify theENABLE_MEMCACHED_SASL_PWDB=1cmake option.In summary, add following three cmake options:
cmake ... -DWITH_INNODB_MEMCACHED=1 -DENABLE_MEMCACHED_SASL=1 -DENABLE_MEMCACHED_SASL_PWDB=1
Install the
daemon_memcachedplugin, as described in Section 15.20.3, “Setting Up the InnoDB memcached Plugin”.Configure a user name and password file. (This example uses memcached simple cleartext password support.)
In a file, create a user named
testnameand define the password astestpasswd:echo "testname:testpasswd:::::::" >/home/jy/memcached-sasl-db
Configure the
MEMCACHED_SASL_PWDBenvironment variable to informmemcachedof the user name and password file:export MEMCACHED_SASL_PWDB=/home/jy/memcached-sasl-db
Inform
memcachedthat a cleartext password is used:echo "mech_list: plain" > /home/jy/work2/msasl/clients/memcached.conf export SASL_CONF_PATH=/home/jy/work2/msasl/clients
Enable SASL by restarting the MySQL server with the memcached
-Soption encoded in thedaemon_memcached_optionconfiguration parameter:mysqld ... --daemon_memcached_option="-S"
To test the setup, use an SASL-enabled client such as SASL-enabled libmemcached.
memcp --servers=localhost:11211 --binary --username=testname --password=
passwordmyfile.txt memcat --servers=localhost:11211 --binary --username=testname --password=passwordmyfile.txtIf you specify an incorrect user name or password, the operation is rejected with a
memcache error AUTHENTICATION FAILUREmessage. In this case, examine the cleartext password set in thememcached-sasl-dbfile to verify that the credentials you supplied are correct.
There are other methods to test SASL authentication with memcached, but the method described above is the most straightforward.
- 15.20.6.1 Adapting an Existing MySQL Schema for the InnoDB memcached Plugin
- 15.20.6.2 Adapting a memcached Application for the InnoDB memcached Plugin
- 15.20.6.3 Tuning InnoDB memcached Plugin Performance
- 15.20.6.4 Controlling Transactional Behavior of the InnoDB memcached Plugin
- 15.20.6.5 Adapting DML Statements to memcached Operations
- 15.20.6.6 Performing DML and DDL Statements on the Underlying InnoDB Table
Typically, writing an application for the
InnoDB memcached plugin
involves some degree of rewriting or adapting existing code that
uses MySQL or the memcached API.
With the
daemon_memcachedplugin, instead of many traditional memcached servers running on low-powered machines, you have the same number of memcached servers as MySQL servers, running on relatively high-powered machines with substantial disk storage and memory. You might reuse some existing code that works with the memcached API, but adaptation is likely required due to the different server configuration.The data stored through the
daemon_memcachedplugin goes intoVARCHAR,TEXT, orBLOBcolumns, and must be converted to do numeric operations. You can perform the conversion on the application side, or by using theCAST()function in queries.Coming from a database background, you might be used to general-purpose SQL tables with many columns. The tables accessed by memcached code likely have only a few or even a single column holding data values.
You might adapt parts of your application that perform single-row queries, inserts, updates, or deletes, to improve performance in critical sections of code. Both queries (read) and DML (write) operations can be substantially faster when performed through the
InnoDBmemcached interface. The performance improvement for writes is typically greater than the performance improvement for reads, so you might focus on adapting code that performs logging or records interactive choices on a website.
The following sections explore these points in more detail.
Consider these aspects of memcached
applications when adapting an existing MySQL schema or
application to use the daemon_memcached
plugin:
memcached keys cannot contain spaces or newlines, because these characters are used as separators in the ASCII protocol. If you are using lookup values that contain spaces, transform or hash them into values without spaces before using them as keys in calls to
add(),set(),get(), and so on. Although theoretically these characters are allowed in keys in programs that use the binary protocol, you should restrict the characters used in keys to ensure compatibility with a broad range of clients.If there is a short numeric primary key column in an
InnoDBtable, use it as the unique lookup key for memcached by converting the integer to a string value. If the memcached server is used for multiple applications, or with more than oneInnoDBtable, consider modifying the name to ensure that it is unique. For example, prepend the table name, or the database name and the table name, before the numeric value.NoteThe
daemon_memcachedplugin supports inserts and reads on mappedInnoDBtables that have anINTEGERdefined as the primary key.You cannot use a partitioned table for data queried or stored using memcached.
The memcached protocol passes numeric values around as strings. To store numeric values in the underlying
InnoDBtable, to implement counters that can be used in SQL functions such asSUM()orAVG(), for example:Use
VARCHARcolumns with enough characters to hold all the digits of the largest expected number (and additional characters if appropriate for the negative sign, decimal point, or both).In any query that performs arithmetic using column values, use the
CAST()function to convert the values from string to integer, or to some other numeric type. For example:# Alphabetic entries are returned as zero. SELECT CAST(c2 as unsigned integer) FROM demo_test; # Since there could be numeric values of 0, can't disqualify them. # Test the string values to find the ones that are integers, and average only those. SELECT AVG(cast(c2 as unsigned integer)) FROM demo_test WHERE c2 BETWEEN '0' and '9999999999'; # Views let you hide the complexity of queries. The results are already converted; # no need to repeat conversion functions and WHERE clauses each time. CREATE VIEW numbers AS SELECT c1 KEY, CAST(c2 AS UNSIGNED INTEGER) val FROM demo_test WHERE c2 BETWEEN '0' and '9999999999'; SELECT SUM(val) FROM numbers;
NoteAny alphabetic values in the result set are converted into 0 by the call to
CAST(). When using functions such asAVG(), which depend on the number of rows in the result set, includeWHEREclauses to filter out non-numeric values.
If the
InnoDBcolumn used as a key could have values longer than 250 bytes, hash the value to less than 250 bytes.To use an existing table with the
daemon_memcachedplugin, define an entry for it in theinnodb_memcache.containerstable. To make that table the default for all memcached requests, specify a value ofdefaultin thenamecolumn, then restart the MySQL server to make the change take effect. If you use multiple tables for different classes of memcached data, set up multiple entries in theinnodb_memcache.containerstable withnamevalues of your choice, then issue a memcached request in the form ofget @@ornameset @@within the application to specify the table to be used for subsequent memcached requests.nameFor an example of using a table other than the predefined
test.demo_testtable, see Example 15.13, “Using Your Own Table with an InnoDB memcached Application”. For the required table layout, see Section 15.20.8, “InnoDB memcached Plugin Internals”.To use multiple
InnoDBtable column values with memcached key-value pairs, specify column names separated by comma, semicolon, space, or pipe characters in thevalue_columnsfield of theinnodb_memcache.containersentry for theInnoDBtable. For example, specifycol1,col2,col3orcol1|col2|col3in thevalue_columnsfield.Concatenate the column values into a single string using the pipe character as a separator before passing the string to memcached
addorsetcalls. The string is unpacked automatically into the correct column. Eachgetcall returns a single string containing the column values that is also delimited by the pipe character. You can unpack the values using the appropriate application language syntax.
Example 15.13 Using Your Own Table with an InnoDB memcached Application
This example shows how to use your own table with a sample
Python application that uses memcached for
data manipulation.
The example assumes that the
daemon_memcached plugin is installed as
described in Section 15.20.3, “Setting Up the InnoDB memcached Plugin”. It also
assumes that your system is configured to run a Python script
that uses the python-memcache module.
Create the
multicoltable which stores country information including population, area, and driver side data ('R'for right and'L'for left).mysql>
USE test;mysql>CREATE TABLE `multicol` (`country` varchar(128) NOT NULL DEFAULT '',`population` varchar(10) DEFAULT NULL,`area_sq_km` varchar(9) DEFAULT NULL,`drive_side` varchar(1) DEFAULT NULL,`c3` int(11) DEFAULT NULL,`c4` bigint(20) unsigned DEFAULT NULL,`c5` int(11) DEFAULT NULL,PRIMARY KEY (`country`)) ENGINE=InnoDB DEFAULT CHARSET=utf8mb4;Insert a record into the
innodb_memcache.containerstable so that thedaemon_memcachedplugin can access themulticoltable.mysql>
INSERT INTO innodb_memcache.containers(name,db_schema,db_table,key_columns,value_columns,flags,cas_column,expire_time_column,unique_idx_name_on_key)VALUES('bbb','test','multicol','country','population,area_sq_km,drive_side','c3','c4','c5','PRIMARY');mysql>COMMIT;The
innodb_memcache.containersrecord for themulticoltable specifies anamevalue of'bbb', which is the table identifier.NoteIf a single
InnoDBtable is used for all memcached applications, thenamevalue can be set todefaultto avoid using@@notation to switch tables.The
db_schemacolumn is set totest, which is the name of the database where themulticoltable resides.The
db_tablecolumn is set tomulticol, which is the name of theInnoDBtable.key_columnsis set to the uniquecountrycolumn. Thecountrycolumn is defined as the primary key in themulticoltable definition.Rather than a single
InnoDBtable column to hold a composite data value, data is divided among three table columns (population,area_sq_km, anddrive_side). To accommodate multiple value columns, a comma-separated list of columns is specified in thevalue_columnsfield. The columns defined in thevalue_columnsfield are the columns used when storing or retrieving values.Values for the
flags,expire_time, andcas_columnfields are based on values used in thedemo.testsample table. These fields are typically not significant in applications that use thedaemon_memcachedplugin because MySQL keeps data synchronized, and there is no need to worry about data expiring or becoming stale.The
unique_idx_name_on_keyfield is set toPRIMARY, which refers to the primary index defined on the uniquecountrycolumn in themulticoltable.
Copy the sample Python application into a file. In this example, the sample script is copied to a file named
multicol.py.The sample Python application inserts data into the
multicoltable and retrieves data for all keys, demonstrating how to access anInnoDBtable through thedaemon_memcachedplugin.import sys, os import memcache def connect_to_memcached(): memc = memcache.Client(['127.0.0.1:11211'], debug=0); print "Connected to memcached." return memc def banner(message): print print "=" * len(message) print message print "=" * len(message) country_data = [ ("Canada","34820000","9984670","R"), ("USA","314242000","9826675","R"), ("Ireland","6399152","84421","L"), ("UK","62262000","243610","L"), ("Mexico","113910608","1972550","R"), ("Denmark","5543453","43094","R"), ("Norway","5002942","385252","R"), ("UAE","8264070","83600","R"), ("India","1210193422","3287263","L"), ("China","1347350000","9640821","R"), ] def switch_table(memc,table): key = "@@" + table print "Switching default table to '" + table + "' by issuing GET for '" + key + "'." result = memc.get(key) def insert_country_data(memc): banner("Inserting initial data via memcached interface") for item in country_data: country = item[0] population = item[1] area = item[2] drive_side = item[3] key = country value = "|".join([population,area,drive_side]) print "Key = " + key print "Value = " + value if memc.add(key,value): print "Added new key, value pair." else: print "Updating value for existing key." memc.set(key,value) def query_country_data(memc): banner("Retrieving data for all keys (country names)") for item in country_data: key = item[0] result = memc.get(key) print "Here is the result retrieved from the database for key " + key + ":" print result (m_population, m_area, m_drive_side) = result.split("|") print "Unpacked population value: " + m_population print "Unpacked area value : " + m_area print "Unpacked drive side value: " + m_drive_side if __name__ == '__main__': memc = connect_to_memcached() switch_table(memc,"bbb") insert_country_data(memc) query_country_data(memc) sys.exit(0)Sample Python application notes:
No database authorization is required to run the application, since data manipulation is performed through the memcached interface. The only required information is the port number on the local system where the memcached daemon listens.
To make sure the application uses the
multicoltable, theswitch_table()function is called, which performs a dummygetorsetrequest using@@notation. Thenamevalue in the request isbbb, which is themulticoltable identifier defined in theinnodb_memcache.containers.namefield.A more descriptive
namevalue might be used in a real-world application. This example simply illustrates that a table identifier is specified rather than the table name inget @@...requests.The utility functions used to insert and query data demonstrate how to turn a Python data structure into pipe-separated values for sending data to MySQL with
addorsetrequests, and how to unpack the pipe-separated values returned bygetrequests. This extra processing is only required when mapping a single memcached value to multiple MySQL table columns.
Run the sample Python application.
shell>
python multicol.pyIf successful, the sample application returns this output:
Connected to memcached. Switching default table to 'bbb' by issuing GET for '@@bbb'. ============================================== Inserting initial data via memcached interface ============================================== Key = Canada Value = 34820000|9984670|R Added new key, value pair. Key = USA Value = 314242000|9826675|R Added new key, value pair. Key = Ireland Value = 6399152|84421|L Added new key, value pair. Key = UK Value = 62262000|243610|L Added new key, value pair. Key = Mexico Value = 113910608|1972550|R Added new key, value pair. Key = Denmark Value = 5543453|43094|R Added new key, value pair. Key = Norway Value = 5002942|385252|R Added new key, value pair. Key = UAE Value = 8264070|83600|R Added new key, value pair. Key = India Value = 1210193422|3287263|L Added new key, value pair. Key = China Value = 1347350000|9640821|R Added new key, value pair. ============================================ Retrieving data for all keys (country names) ============================================ Here is the result retrieved from the database for key Canada: 34820000|9984670|R Unpacked population value: 34820000 Unpacked area value : 9984670 Unpacked drive side value: R Here is the result retrieved from the database for key USA: 314242000|9826675|R Unpacked population value: 314242000 Unpacked area value : 9826675 Unpacked drive side value: R Here is the result retrieved from the database for key Ireland: 6399152|84421|L Unpacked population value: 6399152 Unpacked area value : 84421 Unpacked drive side value: L Here is the result retrieved from the database for key UK: 62262000|243610|L Unpacked population value: 62262000 Unpacked area value : 243610 Unpacked drive side value: L Here is the result retrieved from the database for key Mexico: 113910608|1972550|R Unpacked population value: 113910608 Unpacked area value : 1972550 Unpacked drive side value: R Here is the result retrieved from the database for key Denmark: 5543453|43094|R Unpacked population value: 5543453 Unpacked area value : 43094 Unpacked drive side value: R Here is the result retrieved from the database for key Norway: 5002942|385252|R Unpacked population value: 5002942 Unpacked area value : 385252 Unpacked drive side value: R Here is the result retrieved from the database for key UAE: 8264070|83600|R Unpacked population value: 8264070 Unpacked area value : 83600 Unpacked drive side value: R Here is the result retrieved from the database for key India: 1210193422|3287263|L Unpacked population value: 1210193422 Unpacked area value : 3287263 Unpacked drive side value: L Here is the result retrieved from the database for key China: 1347350000|9640821|R Unpacked population value: 1347350000 Unpacked area value : 9640821 Unpacked drive side value: R
Query the
innodb_memcache.containerstable to view the record you inserted earlier for themulticoltable. The first record is the sample entry for thedemo_testtable that is created during the initialdaemon_memcachedplugin setup. The second record is the entry you inserted for themulticoltable.mysql>
SELECT * FROM innodb_memcache.containers\G*************************** 1. row *************************** name: aaa db_schema: test db_table: demo_test key_columns: c1 value_columns: c2 flags: c3 cas_column: c4 expire_time_column: c5 unique_idx_name_on_key: PRIMARY *************************** 2. row *************************** name: bbb db_schema: test db_table: multicol key_columns: country value_columns: population,area_sq_km,drive_side flags: c3 cas_column: c4 expire_time_column: c5 unique_idx_name_on_key: PRIMARYQuery the
multicoltable to view data inserted by the sample Python application. The data is available for MySQL queries, which demonstrates how the same data can be accessed using SQL or through applications (using the appropriate MySQL Connector or API).mysql>
SELECT * FROM test.multicol;+---------+------------+------------+------------+------+------+------+ | country | population | area_sq_km | drive_side | c3 | c4 | c5 | +---------+------------+------------+------------+------+------+------+ | Canada | 34820000 | 9984670 | R | 0 | 11 | 0 | | China | 1347350000 | 9640821 | R | 0 | 20 | 0 | | Denmark | 5543453 | 43094 | R | 0 | 16 | 0 | | India | 1210193422 | 3287263 | L | 0 | 19 | 0 | | Ireland | 6399152 | 84421 | L | 0 | 13 | 0 | | Mexico | 113910608 | 1972550 | R | 0 | 15 | 0 | | Norway | 5002942 | 385252 | R | 0 | 17 | 0 | | UAE | 8264070 | 83600 | R | 0 | 18 | 0 | | UK | 62262000 | 243610 | L | 0 | 14 | 0 | | USA | 314242000 | 9826675 | R | 0 | 12 | 0 | +---------+------------+------------+------------+------+------+------+NoteAlways allow sufficient size to hold necessary digits, decimal points, sign characters, leading zeros, and so on when defining the length for columns that are treated as numbers. Too-long values in a string column such as a
VARCHARare truncated by removing some characters, which could produce nonsensical numeric values.Optionally, run report-type queries on the
InnoDBtable that stores the memcached data.You can produce reports through SQL queries, performing calculations and tests across any columns, not just the
countrykey column. (Because the following examples use data from only a few countries, the numbers are for illustration purposes only.) The following queries return the average population of countries where people drive on the right, and the average size of countries whose names start with “U”:mysql>
SELECT AVG(population) FROM multicol WHERE drive_side = 'R';+-------------------+ | avg(population) | +-------------------+ | 261304724.7142857 | +-------------------+ mysql>SELECT SUM(area_sq_km) FROM multicol WHERE country LIKE 'U%';+-----------------+ | sum(area_sq_km) | +-----------------+ | 10153885 | +-----------------+Because the
populationandarea_sq_kmcolumns store character data rather than strongly typed numeric data, functions such asAVG()andSUM()work by converting each value to a number first. This approach does not work for operators such as<or>, for example, when comparing character-based values,9 > 1000, which is not expected from a clause such asORDER BY population DESC. For the most accurate type treatment, perform queries against views that cast numeric columns to the appropriate types. This technique lets you issue simpleSELECT *queries from database applications, while ensuring that casting, filtering, and ordering is correct. The following example shows a view that can be queried to find the top three countries in descending order of population, with the results reflecting the latest data in themulticoltable, and with population and area figures treated as numbers:mysql>
CREATE VIEW populous_countries ASSELECTcountry,cast(population as unsigned integer) population,cast(area_sq_km as unsigned integer) area_sq_km,drive_side FROM multicolORDER BY CAST(population as unsigned integer) DESCLIMIT 3;mysql>SELECT * FROM populous_countries;+---------+------------+------------+------------+ | country | population | area_sq_km | drive_side | +---------+------------+------------+------------+ | China | 1347350000 | 9640821 | R | | India | 1210193422 | 3287263 | L | | USA | 314242000 | 9826675 | R | +---------+------------+------------+------------+ mysql>DESC populous_countries;+------------+---------------------+------+-----+---------+-------+ | Field | Type | Null | Key | Default | Extra | +------------+---------------------+------+-----+---------+-------+ | country | varchar(128) | NO | | | | | population | bigint(10) unsigned | YES | | NULL | | | area_sq_km | int(9) unsigned | YES | | NULL | | | drive_side | varchar(1) | YES | | NULL | | +------------+---------------------+------+-----+---------+-------+
Consider these aspects of MySQL and InnoDB
tables when adapting existing memcached
applications to use the daemon_memcached
plugin:
If there are key values longer than a few bytes, it may be more efficient to use a numeric auto-increment column as the primary key of the
InnoDBtable, and to create a unique secondary index on the column that contains the memcached key values. This is becauseInnoDBperforms best for large-scale insertions if primary key values are added in sorted order (as they are with auto-increment values). Primary key values are included in secondary indexes, which takes up unnecessary space if the primary key is a long string value.If you store several different classes of information using memcached, consider setting up a separate
InnoDBtable for each type of data. Define additional table identifiers in theinnodb_memcache.containerstable, and use the@@notation to store and retrieve items from different tables. Physically dividing different types of information allows you tune the characteristics of each table for optimum space utilization, performance, and reliability. For example, you might enable compression for a table that holds blog posts, but not for a table that holds thumbnail images. You might back up one table more frequently than another because it holds critical data. You might create additional secondary indexes on tables that are frequently used to generate reports using SQL.table_id.keyPreferably, configure a stable set of table definitions for use with the daemon_memcached plugin, and leave the tables in place permanently. Changes to the
innodb_memcache.containerstable take effect the next time theinnodb_memcache.containerstable is queried. Entries in the containers table are processed at startup, and are consulted whenever an unrecognized table identifier (as defined bycontainers.name) is requested using@@notation. Thus, new entries are visible as soon as you use the associated table identifier, but changes to existing entries require a server restart before they take effect.When you use the default
innodb_onlycaching policy, calls toadd(),set(),incr(), and so on can succeed but still trigger debugging messages such aswhile expecting 'STORED', got unexpected response 'NOT_STORED. Debug messages occur because new and updated values are sent directly to theInnoDBtable without being saved in the memory cache, due to theinnodb_onlycaching policy.
Because using InnoDB in combination with
memcached involves writing all data to disk,
whether immediately or sometime later, raw performance is
expected to be somewhat slower than using
memcached by itself. When using the
InnoDB memcached plugin,
focus tuning goals for memcached operations
on achieving better performance than equivalent SQL operations.
Benchmarks suggest that queries and DML operations (inserts, updates, and deletes) that use the memcached interface are faster than traditional SQL. DML operations typically see a larger improvements. Therefore, consider adapting write-intensive applications to use the memcached interface first. Also consider prioritizing adaptation of write-intensive applications that use fast, lightweight mechanisms that lack reliability.
Adapting SQL Queries
The types of queries that are most suited to simple
GET requests are those with a single clause
or a set of AND conditions in the
WHERE clause:
SQL: SELECT col FROM tbl WHERE key = 'key_value'; memcached: get key_value SQL: SELECT col FROM tbl WHERE col1 = val1 and col2 = val2 and col3 = val3; memcached: # Since you must always know these 3 values to look up the key, # combine them into a unique string and use that as the key # for all ADD, SET, and GET operations. key_value = val1 + ":" + val2 + ":" + val3 get key_value SQL: SELECT 'key exists!' FROM tbl WHERE EXISTS (SELECT col1 FROM tbl WHERE KEY = 'key_value') LIMIT 1; memcached: # Test for existence of key by asking for its value and checking if the call succeeds, # ignoring the value itself. For existence checking, you typically only store a very # short value such as "1". get key_value
Using System Memory
For best performance, deploy the
daemon_memcached plugin on machines that are
configured as typical database servers, where the majority of
system RAM is devoted to the InnoDB
buffer pool, through the
innodb_buffer_pool_size
configuration option. For systems with multi-gigabyte buffer
pools, consider raising the value of
innodb_buffer_pool_instances
for maximum throughput when most operations involve data that is
already cached in memory.
Reducing Redundant I/O
InnoDB has a number of settings that let you
choose the balance between high reliability, in case of a crash,
and the amount of I/O overhead during high write workloads. For
example, consider setting the
innodb_doublewrite to
0 and
innodb_flush_log_at_trx_commit
to 2. Measure performance with different
innodb_flush_method settings.
For other ways to reduce or tune I/O for table operations, see Section 8.5.8, “Optimizing InnoDB Disk I/O”.
Reducing Transactional Overhead
A default value of 1 for
daemon_memcached_r_batch_size
and
daemon_memcached_w_batch_size
is intended for maximum reliability of results and safety of
stored or updated data.
Depending on the type of application, you might increase one or
both of these settings to reduce the overhead of frequent
commit operations. On a busy
system, you might increase
daemon_memcached_r_batch_size,
knowing that changes to data made through SQL may not become
visible to memcached immediately (that is,
until N more get
operations are processed). When processing data where every
write operation must be reliably stored, leave
daemon_memcached_w_batch_size
set to 1. Increase the setting when
processing large numbers of updates intended only for
statistical analysis, where losing the last
N updates in an unexpected exit is an
acceptable risk.
For example, imagine a system that monitors traffic crossing a
busy bridge, recording data for approximately 100,000 vehicles
each day. If the application counts different types of vehicles
to analyze traffic patterns, changing
daemon_memcached_w_batch_size
from 1 to 100 reduces I/O
overhead for commit operations by 99%. In case of an outage, a
maximum of 100 records are lost, which may be an acceptable
margin of error. If instead the application performed automated
toll collection for each car, you would set
daemon_memcached_w_batch_size
to 1 to ensure that each toll record is
immediately saved to disk.
Because of the way InnoDB organizes
memcached key values on disk, if you have a
large number of keys to create, it may be faster to sort the
data items by key value in the application and
add them in sorted order, rather than create
keys in arbitrary order.
The memslap command, which is part of the
regular memcached distribution but not
included with the daemon_memcached plugin,
can be useful for benchmarking different configurations. It can
also be used to generate sample key-value pairs to use in your
own benchmarks. See
libmemcached Command-Line Utilities
for details.
Unlike traditional memcached, the
daemon_memcached plugin allows you to control
durability of data values produced through calls to
add, set,
incr, and so on. By default, data written
through the memcached interface is stored to
disk, and calls to get return the most recent
value from disk. Although the default behavior does not offer
the best possible raw performance, it is still fast compared to
the SQL interface for InnoDB tables.
As you gain experience using the
daemon_memcached plugin, you can consider
relaxing durability settings for non-critical classes of data,
at the risk of losing some updated values in the event of an
outage, or returning data that is slightly out-of-date.
Frequency of Commits
One tradeoff between durability and raw performance is how frequently new and changed data is committed. If data is critical, is should be committed immediately so that it is safe in case of an unexpected exit or outage. If data is less critical, such as counters that are reset after an unexpected exit or logging data that you can afford to lose, you might prefer higher raw throughput that is available with less frequent commits.
When a memcached operation inserts, updates,
or deletes data in the underlying InnoDB
table, the change might be committed to the
InnoDB table instantly (if
daemon_memcached_w_batch_size=1)
or some time later (if the
daemon_memcached_w_batch_size
value is greater than 1). In either case, the change cannot be
rolled back. If you increase the value of
daemon_memcached_w_batch_size
to avoid high I/O overhead during busy times, commits could
become infrequent when the workload decreases. As a safety
measure, a background thread automatically commits changes made
through the memcached API at regular
intervals. The interval is controlled by the
innodb_api_bk_commit_interval
configuration option, which has a default setting of
5 seconds.
When a memcached operation inserts or updates
data in the underlying InnoDB table, the
changed data is immediately visible to other
memcached requests because the new value
remains in the memory cache, even if it is not yet committed on
the MySQL side.
Transaction Isolation
When a memcached operation such as
get or incr causes a query
or DML operation on the underlying InnoDB
table, you can control whether the operation sees the very
latest data written to the table, only data that has been
committed, or other variations of transaction
isolation level. Use
the innodb_api_trx_level
configuration option to control this feature. The numeric values
specified for this option correspond to isolation levels such as
REPEATABLE READ. See the
description of the
innodb_api_trx_level option for
information about other settings.
A strict isolation level ensures that data you retrieve is not rolled back or changed suddenly causing subsequent queries to return different values. However, strict isolation levels require greater locking overhead, which can cause waits. For a NoSQL-style application that does not use long-running transactions, you can typically use the default isolation level or switch to a less strict isolation level.
Disabling Row Locks for memcached DML Operations
The innodb_api_disable_rowlock
option can be used to disable row locks when
memcached requests through the
daemon_memcached plugin cause DML operations.
By default, innodb_api_disable_rowlock is set
to OFF which means that
memcached requests row locks for
get and set operations.
When innodb_api_disable_rowlock is set to
ON, memcached requests a
table lock instead of row locks.
The innodb_api_disable_rowlock option is not
dynamic. It must be specified at startup on the
mysqld command line or entered in a MySQL
configuration file.
Allowing or Disallowing DDL
By default, you can perform DDL
operations such as ALTER TABLE on
tables used by the daemon_memcached plugin.
To avoid potential slowdowns when these tables are used for
high-throughput applications, disable DDL operations on these
tables by enabling
innodb_api_enable_mdl at
startup. This option is less appropriate when accessing the same
tables through both memcached and SQL,
because it blocks CREATE INDEX
statements on the tables, which could be important for running
reporting queries.
Storing Data on Disk, in Memory, or Both
The innodb_memcache.cache_policies table
specifies whether to store data written through the
memcached interface to disk
(innodb_only, the default); in memory only,
as with traditional memcached
(cache_only); or both
(caching).
With the caching setting, if
memcached cannot find a key in memory, it
searches for the value in an InnoDB table.
Values returned from get calls under the
caching setting could be out-of-date if the
values were updated on disk in the InnoDB
table but are not yet expired from the memory cache.
The caching policy can be set independently for
get, set (including
incr and decr),
delete, and flush
operations.
For example, you might allow get and
set operations to query or update a table and
the memcached memory cache at the same time
(using the caching setting), while making
delete, flush, or both
operate only on the in-memory copy (using the
cache_only setting). That way, deleting or
flushing an item only expires the item from the cache, and the
latest value is returned from the InnoDB
table the next time the item is requested.
mysql>SELECT * FROM innodb_memcache.cache_policies;+--------------+-------------+-------------+---------------+--------------+ | policy_name | get_policy | set_policy | delete_policy | flush_policy | +--------------+-------------+-------------+---------------+--------------+ | cache_policy | innodb_only | innodb_only | innodb_only | innodb_only | +--------------+-------------+-------------+---------------+--------------+ mysql>UPDATE innodb_memcache.cache_policies SET set_policy = 'caching'WHERE policy_name = 'cache_policy';
innodb_memcache.cache_policies values are
only read at startup. After changing values in this table,
uninstall and reinstall the daemon_memcached
plugin to ensure that changes take effect.
mysql>UNINSTALL PLUGIN daemon_memcached;mysql>INSTALL PLUGIN daemon_memcached soname "libmemcached.so";
Benchmarks suggest that the daemon_memcached
plugin speeds up DML operations
(inserts, updates, and deletes) more than it speeds up queries.
Therefore, consider focussing initial development efforts on
write-intensive applications that are I/O-bound, and look for
opportunities to use MySQL with the
daemon_memcached plugin for new
write-intensive applications.
Single-row DML statements are the easiest types of statements to
turn into memcached operations.
INSERT becomes add,
UPDATE becomes set,
incr or decr, and
DELETE becomes delete.
These operations are guaranteed to only affect one row when
issued through the memcached interface,
because the key is unique within the
table.
In the following SQL examples, t1 refers to
the table used for memcached operations,
based on the configuration in the
innodb_memcache.containers table.
key refers to the column listed under
key_columns, and val
refers to the column listed under
value_columns.
INSERT INTO t1 (key,val) VALUES (some_key,some_value); SELECT val FROM t1 WHERE key =some_key; UPDATE t1 SET val =new_valueWHERE key =some_key; UPDATE t1 SET val = val + x WHERE key =some_key; DELETE FROM t1 WHERE key =some_key;
The following TRUNCATE TABLE and
DELETE statements, which remove
all rows from the table, correspond to the
flush_all operation, where
t1 is configured as the table for
memcached operations, as in the previous
example.
TRUNCATE TABLE t1; DELETE FROM t1;
You can access the underlying InnoDB table
(which is test.demo_test by default) through
standard SQL interfaces. However, there are some restrictions:
When querying a table that is also accessed through the memcached interface, remember that memcached operations can be configured to be committed periodically rather than after every write operation. This behavior is controlled by the
daemon_memcached_w_batch_sizeoption. If this option is set to a value greater than1, useREAD UNCOMMITTEDqueries to find rows that were just inserted.mysql>
SET SESSSION TRANSACTION ISOLATION LEVEL READ UNCOMMITTED;mysql>SELECT * FROM demo_test;+------+------+------+------+-----------+------+------+------+------+------+------+ | cx | cy | c1 | cz | c2 | ca | CB | c3 | cu | c4 | C5 | +------+------+------+------+-----------+------+------+------+------+------+------+ | NULL | NULL | a11 | NULL | 123456789 | NULL | NULL | 10 | NULL | 3 | NULL | +------+------+------+------+-----------+------+------+------+------+------+------+When modifying a table using SQL that is also accessed through the memcached interface, you can configure memcached operations to start a new transaction periodically rather than for every read operation. This behavior is controlled by the
daemon_memcached_r_batch_sizeoption. If this option is set to a value greater than1, changes made to the table using SQL are not immediately visible to memcached operations.The
InnoDBtable is either IS (intention shared) or IX (intention exclusive) locked for all operations in a transaction. If you increasedaemon_memcached_r_batch_sizeanddaemon_memcached_w_batch_sizesubstantially from their default value of1, the table is most likely locked between each operation, preventing DDL statements on the table.
Because the daemon_memcached plugin supports
the MySQL binary log,
source server through the memcached interface
can be replicated for backup, balancing intensive read workloads,
and high availability. All memcached commands
are supported with binary logging.
You do not need to set up the daemon_memcached
plugin on replica servers. The primary advantage of this
configuration is increased write throughput on the source. The
speed of the replication mechanism is not affected.
The following sections show how to use the binary log capability
when using the daemon_memcached plugin with
MySQL replication. It is assumed that you have completed the setup
described in Section 15.20.3, “Setting Up the InnoDB memcached Plugin”.
To use the
daemon_memcachedplugin with the MySQL binary log, enable theinnodb_api_enable_binlogconfiguration option on the source server. This option can only be set at server startup. You must also enable the MySQL binary log on the source server using the--log-binoption. You can add these options to the MySQL configuration file, or on the mysqld command line.mysqld ... --log-bin -–innodb_api_enable_binlog=1
Configure the source and replica server, as described in Section 17.1.2, “Setting Up Binary Log File Position Based Replication”.
Use mysqldump to create a source data snapshot, and sync the snapshot to the replica server.
source shell>
mysqldump --all-databases --lock-all-tables > dbdump.dbreplica shell>mysql < dbdump.dbOn the source server, issue
SHOW MASTER STATUSto obtain the source binary log coordinates.mysql>
SHOW MASTER STATUS;On the replica server, use a
CHANGE MASTER TOstatement to set up a replica server using the source binary log coordinates.mysql>
CHANGE MASTER TOMASTER_HOST='localhost',MASTER_USER='root',MASTER_PASSWORD='',MASTER_PORT = 13000,MASTER_LOG_FILE='0.000001,MASTER_LOG_POS=114;Start the replica.
mysql>
START SLAVE;Or from MySQL 8.0.22: mysql>START REPLICA;If the error log prints output similar to the following, the replica is ready for replication.
2013-09-24T13:04:38.639684Z 49 [Note] Replication I/O thread: connected to source 'root@localhost:13000', replication started in log '0.000001' at position 114
This example demonstrates how to test the
InnoDB memcached
replication configuration using the memcached
and telnet to insert, update, and delete data. A MySQL client is
used to verify results on the source and replica servers.
The example uses the demo_test table, which
was created by the
innodb_memcached_config.sql configuration
script during the initial setup of the
daemon_memcached plugin. The
demo_test table contains a single example
record.
Use the
setcommand to insert a record with a key oftest1, a flag value of10, an expiration value of0, a cas value of 1, and a value oft1.telnet 127.0.0.1 11211Trying 127.0.0.1... Connected to 127.0.0.1. Escape character is '^]'.set test1 10 0 1t1STOREDOn the source server, check that the record was inserted into the
demo_testtable. Assuming thedemo_testtable was not previously modified, there should be two records. The example record with a key ofAA, and the record you just inserted, with a key oftest1. Thec1column maps to the key, thec2column to the value, thec3column to the flag value, thec4column to the cas value, and thec5column to the expiration time. The expiration time was set to 0, since it is unused.mysql>
SELECT * FROM test.demo_test;+-------+--------------+------+------+------+ | c1 | c2 | c3 | c4 | c5 | +-------+--------------+------+------+------+ | AA | HELLO, HELLO | 8 | 0 | 0 | | test1 | t1 | 10 | 1 | 0 | +-------+--------------+------+------+------+Check to verify that the same record was replicated to the replica server.
mysql>
SELECT * FROM test.demo_test;+-------+--------------+------+------+------+ | c1 | c2 | c3 | c4 | c5 | +-------+--------------+------+------+------+ | AA | HELLO, HELLO | 8 | 0 | 0 | | test1 | t1 | 10 | 1 | 0 | +-------+--------------+------+------+------+Use the
setcommand to update the key to a value ofnew.telnet 127.0.0.1 11211Trying 127.0.0.1... Connected to 127.0.0.1. Escape character is '^]'.set test1 10 0 2newSTOREDThe update is replicated to the replica server (notice that the
casvalue is also updated).mysql>
SELECT * FROM test.demo_test;+-------+--------------+------+------+------+ | c1 | c2 | c3 | c4 | c5 | +-------+--------------+------+------+------+ | AA | HELLO, HELLO | 8 | 0 | 0 | | test1 | new | 10 | 2 | 0 | +-------+--------------+------+------+------+Delete the
test1record using adeletecommand.telnet 127.0.0.1 11211Trying 127.0.0.1... Connected to 127.0.0.1. Escape character is '^]'.delete test1DELETEDWhen the
deleteoperation is replicated to the replica, thetest1record on the replica is also deleted.mysql>
SELECT * FROM test.demo_test;+----+--------------+------+------+------+ | c1 | c2 | c3 | c4 | c5 | +----+--------------+------+------+------+ | AA | HELLO, HELLO | 8 | 0 | 0 | +----+--------------+------+------+------+Remove all rows from the table using the
flush_allcommand.telnet 127.0.0.1 11211Trying 127.0.0.1... Connected to 127.0.0.1. Escape character is '^]'.flush_allOKmysql>
SELECT * FROM test.demo_test;Empty set (0.00 sec)Telnet to the source server and enter two new records.
telnet 127.0.0.1 11211Trying 127.0.0.1... Connected to 127.0.0.1. Escape character is '^]'set test2 10 0 4againSTOREDset test3 10 0 5again1STOREDConfirm that the two records were replicated to the replica server.
mysql>
SELECT * FROM test.demo_test;+-------+--------------+------+------+------+ | c1 | c2 | c3 | c4 | c5 | +-------+--------------+------+------+------+ | test2 | again | 10 | 4 | 0 | | test3 | again1 | 10 | 5 | 0 | +-------+--------------+------+------+------+Remove all rows from the table using the
flush_allcommand.telnet 127.0.0.1 11211Trying 127.0.0.1... Connected to 127.0.0.1. Escape character is '^]'.flush_allOKCheck to ensure that the
flush_alloperation was replicated on the replica server.mysql>
SELECT * FROM test.demo_test;Empty set (0.00 sec)
Binary Log Format:
Most memcached operations are mapped to DML statements (analogous to insert, delete, update). Since there is no actual SQL statement being processed by the MySQL server, all memcached commands (except for
flush_all) use Row-Based Replication (RBR) logging, which is independent of any serverbinlog_formatsetting.The memcached
flush_allcommand is mapped to theTRUNCATE TABLEcommand in MySQL 5.7 and earlier. Since DDL commands can only use statement-based logging, theflush_allcommand is replicated by sending aTRUNCATE TABLEstatement. In MySQL 8.0 and later,flush_allis mapped toDELETEbut is still replicated by sending aTRUNCATE TABLEstatement.
Transactions:
The concept of transactions has not typically been part of memcached applications. For performance considerations,
daemon_memcached_r_batch_sizeanddaemon_memcached_w_batch_sizeare used to control the batch size for read and write transactions. These settings do not affect replication. Each SQL operation on the underlyingInnoDBtable is replicated after successful completion.The default value of
daemon_memcached_w_batch_sizeis1, which means that each memcached write operation is committed immediately. This default setting incurs a certain amount of performance overhead to avoid inconsistencies in the data that is visible on the source and replica servers. The replicated records are always available immediately on the replica server. If you setdaemon_memcached_w_batch_sizeto a value greater than1, records inserted or updated through memcached are not immediately visible on the source server; to view the records on the source server before they are committed, issueSET TRANSACTION ISOLATION LEVEL READ UNCOMMITTED.
The InnoDB memcached
engine accesses InnoDB through
InnoDB APIs, most of which are directly
adopted from embedded InnoDB.
InnoDB API functions are passed to the
InnoDB memcached engine as
callback functions. InnoDB API functions
access the InnoDB tables directly, and are
mostly DML operations with the exception of
TRUNCATE TABLE.
memcached commands are implemented through
the InnoDB memcached API.
The following table outlines how memcached
commands are mapped to DML or DDL operations.
Table 15.27 memcached Commands and Associated DML or DDL Operations
| memcached Command | DML or DDL Operations |
|---|---|
get |
a read/fetch command |
set |
a search followed by an INSERT or
UPDATE (depending on whether or not a
key exists) |
add |
a search followed by an INSERT or
UPDATE |
replace |
a search followed by an UPDATE |
append |
a search followed by an UPDATE (appends data to the
result before UPDATE) |
prepend |
a search followed by an UPDATE (prepends data to the
result before UPDATE) |
incr |
a search followed by an UPDATE |
decr |
a search followed by an UPDATE |
delete |
a search followed by a DELETE |
flush_all |
TRUNCATE TABLE (DDL) |
This section describes configuration tables used by the
daemon_memcached plugin. The
cache_policies table,
config_options table, and
containers table are created by the
innodb_memcached_config.sql configuration
script in the innodb_memcache database.
mysql>USE innodb_memcache;Database changed mysql>SHOW TABLES;+---------------------------+ | Tables_in_innodb_memcache | +---------------------------+ | cache_policies | | config_options | | containers | +---------------------------+
The cache_policies table defines a cache
policy for the InnoDB
memcached installation. You can specify
individual policies for get,
set, delete, and
flush operations, within a single cache
policy. The default setting for all operations is
innodb_only.
innodb_only: UseInnoDBas the data store.cache_only: Use the memcached engine as the data store.caching: Use bothInnoDBand the memcached engine as data stores. In this case, if memcached cannot find a key in memory, it searches for the value in anInnoDBtable.disable: Disable caching.
Table 15.28 cache_policies Columns
| Column | Description |
|---|---|
policy_name |
Name of the cache policy. The default cache policy name is
cache_policy. |
get_policy |
The cache policy for get operations. Valid values are
innodb_only,
cache_only, caching,
or disabled. The default setting is
innodb_only. |
set_policy |
The cache policy for set operations. Valid values are
innodb_only,
cache_only, caching,
or disabled. The default setting is
innodb_only. |
delete_policy |
The cache policy for delete operations. Valid values are
innodb_only,
cache_only, caching,
or disabled. The default setting is
innodb_only. |
flush_policy |
The cache policy for flush operations. Valid values are
innodb_only,
cache_only, caching,
or disabled. The default setting is
innodb_only. |
The config_options table stores
memcached-related settings that can be
changed at runtime using SQL. Supported configuration options
are separator and
table_map_delimiter.
Table 15.29 config_options Columns
| Column | Description |
|---|---|
Name |
Name of the memcached-related configuration option.
The following configuration options are supported by the
config_options table:
|
Value |
The value assigned to the memcached-related configuration option. |
The containers table is the most important of
the three configuration tables. Each InnoDB
table that is used to store memcached values
must have an entry in the containers table.
The entry provides a mapping between InnoDB
table columns and container table columns, which is required for
memcached to work with
InnoDB tables.
The containers table contains a default entry
for the test.demo_test table, which is
created by the innodb_memcached_config.sql
configuration script. To use the
daemon_memcached plugin with your own
InnoDB table, you must create an entry in the
containers table.
Table 15.30 containers Columns
| Column | Description |
|---|---|
name |
The name given to the container. If an InnoDB table
is not requested by name using @@
notation, the daemon_memcached plugin
uses the InnoDB table with a
containers.name value of
default. If there is no such entry, the
first entry in the containers table,
ordered alphabetically by name
(ascending), determines the default
InnoDB table. |
db_schema |
The name of the database where the InnoDB table
resides. This is a required value. |
db_table |
The name of the InnoDB table that stores
memcached values. This is a required
value. |
key_columns |
The column in the InnoDB table that contains lookup
key values for memcached operations.
This is a required value. |
value_columns |
The InnoDB table columns (one or more) that store
memcached data. Multiple columns can be
specified using the separator character specified in the
innodb_memcached.config_options table.
By default, the separator is a pipe character
(“|”). To specify multiple columns, separate
them with the defined separator character. For example:
col1|col2|col3. This is a required
value. |
flags |
The InnoDB table columns that are used as flags (a
user-defined numeric value that is stored and retrieved
along with the main value) for
memcached. A flag value can be used as
a column specifier for some operations (such as
incr, prepend) if a
memcached value is mapped to multiple
columns, so that an operation is performed on a specified
column. For example, if you have mapped a
value_columns to three
InnoDB table columns, and only want the
increment operation performed on one columns, use the
flags column to specify the column. If
you do not use the flags column, set a
value of 0 to indicate that it is
unused. |
cas_column |
The InnoDB table column that stores compare-and-swap
(cas) values. The cas_column value is
related to the way memcached hashes
requests to different servers and caches data in memory.
Because the InnoDB
memcached plugin is tightly integrated
with a single memcached daemon, and the
in-memory caching mechanism is handled by MySQL and the
InnoDB buffer
pool, this column is rarely needed. If you do not
use this column, set a value of 0 to
indicate that it is unused. |
expire_time_column |
The InnoDB table column that stores expiration
values. The expire_time_column value is
related to the way memcached hashes
requests to different servers and caches data in memory.
Because the InnoDB
memcached plugin is tightly integrated
with a single memcached daemon, and the
in-memory caching mechanism is handled by MySQL and the
InnoDB buffer
pool, this column is rarely needed. If you do not
use this column, set a value of 0 to
indicate that the column is unused. The maximum expire
time is defined as INT_MAX32 or
2147483647 seconds (approximately 68 years). |
unique_idx_name_on_key |
The name of the index on the key column. It must be a unique index. It
can be the primary
key or a
secondary
index. Preferably, use the primary key of the
InnoDB table. Using the primary key
avoids a lookup that is performed when using a secondary
index. You cannot make a
covering index
for memcached lookups;
InnoDB returns an error if you try to
define a composite secondary index over both the key and
value columns. |
containers Table Column Constraints
You must supply a value for
db_schema,db_name,key_columns,value_columnsandunique_idx_name_on_key. Specify0forflags,cas_column, andexpire_time_columnif they are unused. Failing to do so could cause your setup to fail.key_columns: The maximum limit for a memcached key is 250 characters, which is enforced by memcached. The mapped key must be a non-NullCHARorVARCHARtype.value_columns: Must be mapped to aCHAR,VARCHAR, orBLOBcolumn. There is no length restriction and the value can be NULL.cas_column: Thecasvalue is a 64 bit integer. It must be mapped to aBIGINTof at least 8 bytes. If you do not use this column, set a value of0to indicate that it is unused.expiration_time_column: Must mapped to anINTEGERof at least 4 bytes. Expiration time is defined as a 32-bit integer for Unix time (the number of seconds since January 1, 1970, as a 32-bit value), or the number of seconds starting from the current time. For the latter, the number of seconds may not exceed 60*60*24*30 (the number of seconds in 30 days). If the number sent by a client is larger, the server considers it to be a real Unix time value rather than an offset from the current time. If you do not use this column, set a value of0to indicate that it is unused.flags: Must be mapped to anINTEGERof at least 32-bits and can be NULL. If you do not use this column, set a value of0to indicate that it is unused.
A pre-check is performed at plugin load time to enforce column constraints. If mismatches are found, the plugin is not loaded.
Multiple Value Column Mapping
During plugin initialization, when
InnoDBmemcached is configured with information defined in thecontainerstable, each mapped column defined incontainers.value_columnsis verified against the mappedInnoDBtable. If multipleInnoDBtable columns are mapped, there is a check to ensure that each column exists and is the right type.At run-time, for
memcachedinsert operations, if there are more delimited values than the number of mapped columns, only the number of mapped values are taken. For example, if there are six mapped columns, and seven delimited values are provided, only the first six delimited values are taken. The seventh delimited value is ignored.If there are fewer delimited values than mapped columns, unfilled columns are set to NULL. If an unfilled column cannot be set to NULL, insert operations fail.
If a table has more columns than mapped values, the extra columns do not affect results.
The innodb_memcached_config.sql
configuration script creates a demo_test
table in the test database, which can be used
to verify InnoDB memcached
plugin installation immediately after setup.
The innodb_memcached_config.sql
configuration script also creates an entry for the
demo_test table in the
innodb_memcache.containers table.
mysql>SELECT * FROM innodb_memcache.containers\G*************************** 1. row *************************** name: aaa db_schema: test db_table: demo_test key_columns: c1 value_columns: c2 flags: c3 cas_column: c4 expire_time_column: c5 unique_idx_name_on_key: PRIMARY mysql>SELECT * FROM test.demo_test;+----+------------------+------+------+------+ | c1 | c2 | c3 | c4 | c5 | +----+------------------+------+------+------+ | AA | HELLO, HELLO | 8 | 0 | 0 | +----+------------------+------+------+------+
This section describes issues that you may encounter when using
the InnoDB memcached plugin.
If you encounter the following error in the MySQL error log, the server might fail to start:
failed to set rlimit for open files. Try running as root or requesting smaller maxconns value.
The error message is from the memcached daemon. One solution is to raise the OS limit for the number of open files. The commands for checking and increasing the open file limit varies by operating system. This example shows commands for Linux and macOS:
# Linux shell>
ulimit -n1024 shell>ulimit -n 4096shell>ulimit -n4096 # macOS shell>ulimit -n256 shell>ulimit -n 4096shell>ulimit -n4096The other solution is to reduce the number of concurrent connections permitted for the memcached daemon. To do so, encode the
-cmemcached option in thedaemon_memcached_optionconfiguration parameter in the MySQL configuration file. The-coption has a default value of 1024.[mysqld] ... loose-daemon_memcached_option='-c 64'
To troubleshoot problems where the memcached daemon is unable to store or retrieve
InnoDBtable data, encode the-vvvmemcached option in thedaemon_memcached_optionconfiguration parameter in the MySQL configuration file. Examine the MySQL error log for debug output related to memcached operations.[mysqld] ... loose-daemon_memcached_option='-vvv'
If columns specified to hold memcached values are the wrong data type, such as a numeric type instead of a string type, attempts to store key-value pairs fail with no specific error code or message.
If the
daemon_memcachedplugin causes MySQL server startup issues, you can temporarily disable thedaemon_memcachedplugin while troubleshooting by adding this line under the[mysqld]group in the MySQL configuration file:daemon_memcached=OFF
For example, if you run the
INSTALL PLUGINstatement before running theinnodb_memcached_config.sqlconfiguration script to set up the necessary database and tables, the server might unexpectedly exit and fail to start. The server could also fail to start if you incorrectly configure an entry in theinnodb_memcache.containerstable.To uninstall the memcached plugin for a MySQL instance, issue the following statement:
mysql>
UNINSTALL PLUGIN daemon_memcached;If you run more than one instance of MySQL on the same machine with the
daemon_memcachedplugin enabled in each instance, use thedaemon_memcached_optionconfiguration parameter to specify a unique memcached port for eachdaemon_memcachedplugin.If an SQL statement cannot find the
InnoDBtable or finds no data in the table, but memcached API calls retrieve the expected data, you may be missing an entry for theInnoDBtable in theinnodb_memcache.containerstable, or you may have not switched to the correctInnoDBtable by issuing agetorsetrequest using@@notation. This problem could also occur if you change an existing entry in thetable_idinnodb_memcache.containerstable without restarting the MySQL server afterward. The free-form storage mechanism is flexible enough that your requests to store or retrieve a multi-column value such ascol1|col2|col3may still work, even if the daemon is using thetest.demo_testtable which stores values in a single column.When defining your own
InnoDBtable for use with thedaemon_memcachedplugin, and columns in the table are defined asNOT NULL, ensure that values are supplied for theNOT NULLcolumns when inserting a record for the table into theinnodb_memcache.containerstable. If theINSERTstatement for theinnodb_memcache.containersrecord contains fewer delimited values than there are mapped columns, unfilled columns are set toNULL. Attempting to insert aNULLvalue into aNOT NULLcolumn causes theINSERTto fail, which may only become evident after you reinitialize thedaemon_memcachedplugin to apply changes to theinnodb_memcache.containerstable.If
cas_columnandexpire_time_columnfields of theinnodb_memcached.containerstable are set toNULL, the following error is returned when attempting to load the memcached plugin:InnoDB_Memcached: column 6 in the entry for config table 'containers' in database 'innodb_memcache' has an invalid NULL value.
The memcached plugin rejects usage of
NULLin thecas_columnandexpire_time_columncolumns. Set the value of these columns to0when the columns are unused.As the length of the memcached key and values increase, you might encounter size and length limits.
When the key exceeds 250 bytes, memcached operations return an error. This is currently a fixed limit within memcached.
InnoDBtable limits may be encountered if values exceed 768 bytes in size, 3072 bytes in size, or half of theinnodb_page_sizevalue. These limits primarily apply if you intend to create an index on a value column to run report-generating queries on that column using SQL. See Section 15.22, “InnoDB Limits” for details.The maximum size for the key-value combination is 1 MB.
If you share configuration files across MySQL servers of different versions, using the latest configuration options for the
daemon_memcachedplugin could cause startup errors on older MySQL versions. To avoid compatibility problems, use thelooseprefix with option names. For example, useloose-daemon_memcached_option='-c 64'instead ofdaemon_memcached_option='-c 64'.There is no restriction or check in place to validate character set settings. memcached stores and retrieves keys and values in bytes and is therefore not character set sensitive. However, you must ensure that the memcached client and the MySQL table use the same character set.
memcached connections are blocked from accessing tables that contain an indexed virtual column. Accessing an indexed virtual column requires a callback to the server, but a memcached connection does not have access to the server code.
The following general guidelines apply to troubleshooting
InnoDB problems:
When an operation fails or you suspect a bug, look at the MySQL server error log (see Section 5.4.2, “The Error Log”). Server Error Message Reference provides troubleshooting information for some of the common
InnoDB-specific errors that you may encounter.If the failure is related to a deadlock, run with the
innodb_print_all_deadlocksoption enabled so that details about each deadlock are printed to the MySQL server error log. For information about deadlocks, see Section 15.7.5, “Deadlocks in InnoDB”.If the issue is related to the
InnoDBdata dictionary, see Section 15.21.3, “Troubleshooting InnoDB Data Dictionary Operations”.When troubleshooting, it is usually best to run the MySQL server from the command prompt, rather than through mysqld_safe or as a Windows service. You can then see what mysqld prints to the console, and so have a better grasp of what is going on. On Windows, start mysqld with the
--consoleoption to direct the output to the console window.Enable the
InnoDBMonitors to obtain information about a problem (see Section 15.17, “InnoDB Monitors”). If the problem is performance-related, or your server appears to be hung, you should enable the standard Monitor to print information about the internal state ofInnoDB. If the problem is with locks, enable the Lock Monitor. If the problem is with table creation, tablespaces, or data dictionary operations, refer to the InnoDB Information Schema system tables to examine contents of theInnoDBinternal data dictionary.InnoDBtemporarily enables standardInnoDBMonitor output under the following conditions:A long semaphore wait
InnoDBcannot find free blocks in the buffer poolOver 67% of the buffer pool is occupied by lock heaps or the adaptive hash index
If you suspect that a table is corrupt, run
CHECK TABLEon that table.
The troubleshooting steps for InnoDB I/O
problems depend on when the problem occurs: during startup of the
MySQL server, or during normal operations when a DML or DDL
statement fails due to problems at the file system level.
Initialization Problems
If something goes wrong when InnoDB attempts to
initialize its tablespace or its log files, delete all files
created by InnoDB: all
ibdata files and all
ib_logfile files. If you already created some
InnoDB tables, also delete any
.ibd files from the MySQL database
directories. Then try the InnoDB database
creation again. For easiest troubleshooting, start the MySQL
server from a command prompt so that you see what is happening.
Runtime Problems
If InnoDB prints an operating system error
during a file operation, usually the problem has one of the
following solutions:
Make sure the
InnoDBdata file directory and theInnoDBlog directory exist.Make sure mysqld has access rights to create files in those directories.
Make sure mysqld can read the proper
my.cnformy.inioption file, so that it starts with the options that you specified.Make sure the disk is not full and you are not exceeding any disk quota.
Make sure that the names you specify for subdirectories and data files do not clash.
Doublecheck the syntax of the
innodb_data_home_dirandinnodb_data_file_pathvalues. In particular, anyMAXvalue in theinnodb_data_file_pathoption is a hard limit, and exceeding that limit causes a fatal error.
To investigate database page corruption, you might dump your
tables from the database with
SELECT ... INTO
OUTFILE. Usually, most of the data obtained in this way
is intact. Serious corruption might cause SELECT * FROM
statements or
tbl_nameInnoDB background operations to unexpectedly
exit or assert, or even cause InnoDB
roll-forward recovery to crash. In such cases, you can use the
innodb_force_recovery option to
force the InnoDB storage engine to start up
while preventing background operations from running, so that you
can dump your tables. For example, you can add the following line
to the [mysqld] section of your option file
before restarting the server:
[mysqld] innodb_force_recovery = 1
For information about using option files, see Section 4.2.2.2, “Using Option Files”.
Only set innodb_force_recovery
to a value greater than 0 in an emergency situation, so that you
can start InnoDB and dump your tables. Before
doing so, ensure that you have a backup copy of your database in
case you need to recreate it. Values of 4 or greater can
permanently corrupt data files. Only use an
innodb_force_recovery setting
of 4 or greater on a production server instance after you have
successfully tested the setting on a separate physical copy of
your database. When forcing InnoDB recovery,
you should always start with
innodb_force_recovery=1 and
only increase the value incrementally, as necessary.
innodb_force_recovery is 0 by
default (normal startup without forced recovery). The permissible
nonzero values for
innodb_force_recovery are 1 to 6.
A larger value includes the functionality of lesser values. For
example, a value of 3 includes all of the functionality of values
1 and 2.
If you are able to dump your tables with an
innodb_force_recovery value of 3
or less, then you are relatively safe that only some data on
corrupt individual pages is lost. A value of 4 or greater is
considered dangerous because data files can be permanently
corrupted. A value of 6 is considered drastic because database
pages are left in an obsolete state, which in turn may introduce
more corruption into B-trees
and other database structures.
As a safety measure, InnoDB prevents
INSERT,
UPDATE, or
DELETE operations when
innodb_force_recovery is greater
than 0. An innodb_force_recovery
setting of 4 or greater places InnoDB in
read-only mode.
1(SRV_FORCE_IGNORE_CORRUPT)Lets the server run even if it detects a corrupt page. Tries to make
SELECT * FROMjump over corrupt index records and pages, which helps in dumping tables.tbl_name2(SRV_FORCE_NO_BACKGROUND)Prevents the master thread and any purge threads from running. If an unexpected exit would occur during the purge operation, this recovery value prevents it.
3(SRV_FORCE_NO_TRX_UNDO)Does not run transaction rollbacks after crash recovery.
4(SRV_FORCE_NO_IBUF_MERGE)Prevents insert buffer merge operations. If they would cause a crash, does not do them. Does not calculate table statistics. This value can permanently corrupt data files. After using this value, be prepared to drop and recreate all secondary indexes. Sets
InnoDBto read-only.5(SRV_FORCE_NO_UNDO_LOG_SCAN)Does not look at undo logs when starting the database:
InnoDBtreats even incomplete transactions as committed. This value can permanently corrupt data files. SetsInnoDBto read-only.6(SRV_FORCE_NO_LOG_REDO)Does not do the redo log roll-forward in connection with recovery. This value can permanently corrupt data files. Leaves database pages in an obsolete state, which in turn may introduce more corruption into B-trees and other database structures. Sets
InnoDBto read-only.
You can SELECT from tables to dump
them. With an
innodb_force_recovery value of 3
or less you can DROP or
CREATE tables. DROP
TABLE is also supported with an
innodb_force_recovery value
greater than 3. DROP TABLE is not
permitted with an
innodb_force_recovery value
greater than 4.
If you know that a given table is causing an unexpected exit on
rollback, you can drop it. If you encounter a runaway rollback
caused by a failing mass import or ALTER
TABLE, you can kill the mysqld
process and set
innodb_force_recovery to
3 to bring the database up without the
rollback, and then DROP the table that is
causing the runaway rollback.
If corruption within the table data prevents you from dumping the
entire table contents, a query with an ORDER BY
clause might
be able to dump the portion of the table after the corrupted part.
primary_key DESC
If a high innodb_force_recovery
value is required to start InnoDB, there may be
corrupted data structures that could cause complex queries
(queries containing WHERE, ORDER
BY, or other clauses) to fail. In this case, you may
only be able to run basic SELECT * FROM t
queries.
Information about table definitions is stored in the InnoDB data dictionary. If you move data files around, dictionary data can become inconsistent.
If a data dictionary corruption or consistency issue prevents you
from starting InnoDB, see
Section 15.21.2, “Forcing InnoDB Recovery” for information about
manual recovery.
With innodb_file_per_table
enabled (the default), the following messages may appear at
startup if a
file-per-table
tablespace file (.ibd file) is missing:
[ERROR] InnoDB: Operating system error number 2 in a file operation. [ERROR] InnoDB: The error means the system cannot find the path specified. [ERROR] InnoDB: Cannot open datafile for read-only: './test/t1.ibd' OS error: 71 [Warning] InnoDB: Ignoring tablespace `test/t1` because it could not be opened.
To address the these messages, issue DROP
TABLE statement to remove data about the missing table
from the data dictionary.
This procedure describes how to restore orphan
file-per-table
.ibd files to another MySQL instance. You
might use this procedure if the system tablespace is lost or
unrecoverable and you want to restore .ibd
file backups on a new MySQL instance.
The procedure is not supported for
general
tablespace .ibd files.
The procedure assumes that you only have
.ibd file backups, you are recovering to
the same version of MySQL that initially created the orphan
.ibd files, and that
.ibd file backups are clean. See
Section 15.6.1.4, “Moving or Copying InnoDB Tables” for information about
creating clean backups.
Table import limitations outlined in Section 15.6.1.3, “Importing InnoDB Tables” are applicable to this procedure.
On the new MySQL instance, recreate the table in a database of the same name.
mysql>
CREATE DATABASE sakila;mysql>USE sakila;mysql>CREATE TABLE actor (actor_id SMALLINT UNSIGNED NOT NULL AUTO_INCREMENT,first_name VARCHAR(45) NOT NULL,last_name VARCHAR(45) NOT NULL,last_update TIMESTAMP NOT NULL DEFAULT CURRENT_TIMESTAMP ON UPDATE CURRENT_TIMESTAMP,PRIMARY KEY (actor_id),KEY idx_actor_last_name (last_name))ENGINE=InnoDB DEFAULT CHARSET=utf8;Discard the tablespace of the newly created table.
mysql>
ALTER TABLE sakila.actor DISCARD TABLESPACE;Copy the orphan
.ibdfile from your backup directory to the new database directory.shell>
cp /backup_directory/actor.ibdpath/to/mysql-5.7/data/sakila/Ensure that the
.ibdfile has the necessary file permissions.Import the orphan
.ibdfile. A warning is issued indicating thatInnoDBis attempting to import the file without schema verification.mysql>
ALTER TABLE sakila.actor IMPORT TABLESPACE; SHOW WARNINGS;Query OK, 0 rows affected, 1 warning (0.15 sec) Warning | 1810 | InnoDB: IO Read error: (2, No such file or directory) Error opening './sakila/actor.cfg', will attempt to import without schema verificationQuery the table to verify that the
.ibdfile was successfully restored.mysql>
SELECT COUNT(*) FROM sakila.actor;+----------+ | count(*) | +----------+ | 200 | +----------+
The following items describe how InnoDB
performs error handling. InnoDB sometimes rolls
back only the statement that failed, other times it rolls back the
entire transaction.
If you run out of file space in a tablespace, a MySQL
Table is fullerror occurs andInnoDBrolls back the SQL statement.A transaction deadlock causes
InnoDBto roll back the entire transaction. Retry the entire transaction when this happens.A lock wait timeout causes
InnoDBto roll back the current statement (the statement that was waiting for the lock and encountered the timeout). To have the entire transaction roll back, start the server with--innodb-rollback-on-timeoutenabled. Retry the statement if using the default behavior, or the entire transaction if--innodb-rollback-on-timeoutis enabled.Both deadlocks and lock wait timeouts are normal on busy servers and it is necessary for applications to be aware that they may happen and handle them by retrying. You can make them less likely by doing as little work as possible between the first change to data during a transaction and the commit, so the locks are held for the shortest possible time and for the smallest possible number of rows. Sometimes splitting work between different transactions may be practical and helpful.
A duplicate-key error rolls back the SQL statement, if you have not specified the
IGNOREoption in your statement.A
row too long errorrolls back the SQL statement.Other errors are mostly detected by the MySQL layer of code (above the
InnoDBstorage engine level), and they roll back the corresponding SQL statement. Locks are not released in a rollback of a single SQL statement.
During implicit rollbacks, as well as during the execution of an
explicit
ROLLBACK SQL
statement, SHOW PROCESSLIST
displays Rolling back in the
State column for the relevant connection.
This section describes limits for InnoDB
tables, indexes, tablespaces, and other aspects of the
InnoDB storage engine.
A table can contain a maximum of 1017 columns. Virtual generated columns are included in this limit.
A table can contain a maximum of 64 secondary indexes.
The index key prefix length limit is 3072 bytes for
InnoDBtables that useDYNAMICorCOMPRESSEDrow format.The index key prefix length limit is 767 bytes for
InnoDBtables that use theREDUNDANTorCOMPACTrow format. For example, you might hit this limit with a column prefix index of more than 191 characters on aTEXTorVARCHARcolumn, assuming autf8mb4character set and the maximum of 4 bytes for each character.Attempting to use an index key prefix length that exceeds the limit returns an error.
If you reduce the
InnoDBpage size to 8KB or 4KB by specifying theinnodb_page_sizeoption when creating the MySQL instance, the maximum length of the index key is lowered proportionally, based on the limit of 3072 bytes for a 16KB page size. That is, the maximum index key length is 1536 bytes when the page size is 8KB, and 768 bytes when the page size is 4KB.The limits that apply to index key prefixes also apply to full-column index keys.
A maximum of 16 columns is permitted for multicolumn indexes. Exceeding the limit returns an error.
ERROR 1070 (42000): Too many key parts specified; max 16 parts allowed
The maximum row size, excluding any variable-length columns that are stored off-page, is slightly less than half of a page for 4KB, 8KB, 16KB, and 32KB page sizes. For example, the maximum row size for the default
innodb_page_sizeof 16KB is about 8000 bytes. However, for anInnoDBpage size of 64KB, the maximum row size is approximately 16000 bytes.LONGBLOBandLONGTEXTcolumns must be less than 4GB, and the total row size, includingBLOBandTEXTcolumns, must be less than 4GB.If a row is less than half a page long, all of it is stored locally within the page. If it exceeds half a page, variable-length columns are chosen for external off-page storage until the row fits within half a page, as described in Section 15.11.2, “File Space Management”.
Although
InnoDBsupports row sizes larger than 65,535 bytes internally, MySQL itself imposes a row-size limit of 65,535 for the combined size of all columns. See Section 8.4.7, “Limits on Table Column Count and Row Size”.On some older operating systems, files must be less than 2GB. This is not an
InnoDBlimitation. If you require a large system tablespace, configure it using several smaller data files rather than one large data file, or distribute table data across file-per-table and general tablespace data files.The combined maximum size for
InnoDBlog files is 512GB.The minimum tablespace size is slightly larger than 10MB. The maximum tablespace size depends on the
InnoDBpage size.Table 15.31 InnoDB Maximum Tablespace Size
InnoDB Page Size Maximum Tablespace Size 4KB 16TB 8KB 32TB 16KB 64TB 32KB 128TB 64KB 256TB The maximum tablespace size is also the maximum size for a table.
The path of a tablespace file, including the file name, cannot exceed the
MAX_PATHlimit on Windows. Prior to Windows 10, theMAX_PATHlimit is 260 characters. As of Windows 10, version 1607,MAX_PATHlimitations are removed from common Win32 file and directory functions, but you must enable the new behavior.For limits associated with concurrent read-write transactions, see Section 15.6.6, “Undo Logs”.
This section describes restrictions and limitations of the
InnoDB storage engine.
You cannot create a table with a column name that matches the name of an internal
InnoDBcolumn (includingDB_ROW_ID,DB_TRX_ID, andDB_ROLL_PTR. This restriction applies to use of the names in any lettercase.mysql>
CREATE TABLE t1 (c1 INT, db_row_id INT) ENGINE=INNODB;ERROR 1166 (42000): Incorrect column name 'db_row_id'SHOW TABLE STATUSdoes not provide accurate statistics forInnoDBtables except for the physical size reserved by the table. The row count is only a rough estimate used in SQL optimization.InnoDBdoes not keep an internal count of rows in a table because concurrent transactions might “see” different numbers of rows at the same time. Consequently,SELECT COUNT(*)statements only count rows visible to the current transaction.For information about how
InnoDBprocessesSELECT COUNT(*)statements, refer to theCOUNT()description in Section 12.20.1, “Aggregate Function Descriptions”.ROW_FORMAT=COMPRESSEDis unsupported for page sizes greater than 16KB.A MySQL instance using a particular
InnoDBpage size (innodb_page_size) cannot use data files or log files from an instance that uses a different page size.For limitations associated with importing tables using the Transportable Tablespaces feature, see Table Import Limitations.
For limitations associated with online DDL, see Section 15.12.6, “Online DDL Limitations”.
For limitations associated with general tablespaces, see General Tablespace Limitations.
For limitations associated with data-at-rest encryption, see Encryption Limitations.